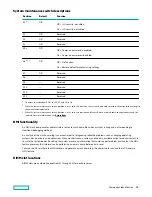
System maintenance switch descriptions
Position
Default
Function
S1
Off
Off = iLO security is enabled.
On = iLO security is disabled.
S2
Off
Reserved
S3
Off
Reserved
S4
Off
Reserved
S5
Off
Off = Power-on password is enabled.
On = Power-on password is disabled.
S6
Off
Off = No function
On = Restore default manufacturing settings
S7
Off
Reserved
S8
—
Reserved
S9
—
Reserved
S10
—
Reserved
S11
—
Reserved
S12
—
Reserved
To access the redundant ROM, set S1, S5, and S6 to On.
When the system maintenance switch position 6 is set to the On position, the system is prepared to restore all configuration settings to
their manufacturing defaults.
When the system maintenance switch position 6 is set to the On position and Secure Boot is enabled, some configurations cannot be
restored. For more information, see
NMI functionality
An NMI crash dump enables administrators to create crash dump files when a system is hung and not responding to
traditional debugging methods.
An analysis of the crash dump log is an essential part of diagnosing reliability problems, such as hanging operating
systems, device drivers, and applications. Many crashes freeze a system, and the only available action for administrators is
to cycle the system power. Resetting the system erases any information that could support problem analysis, but the NMI
feature preserves that information by performing a memory dump before a hard reset.
To force the OS to initiate the NMI handler and generate a crash dump log, the administrator can use the iLO Generate
NMI feature.
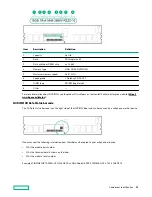
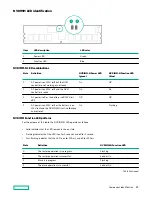
DIMM slot locations
DIMM slots are numbered sequentially (1 through 12) for each processor.
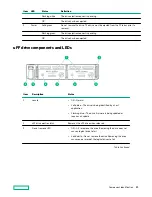
Component identification
19
Содержание HPE ProLiant DX360 Gen10
Страница 7: ...Regulatory information 183 Documentation feedback 184 Acronyms and abbreviations 185 7 ...
Страница 44: ...Operations 44 ...
Страница 74: ...8 Route and connect the data cable 9 Route and connect the power cable Hardware options installation 74 ...
Страница 101: ... Full length Hardware options installation 101 ...
Страница 107: ... 10 SFF SAS SATA NVMe Combo 4 LFF Hardware options installation 107 ...
Страница 125: ...8 Using a Torx T 10 screwdriver remove the Power UID USB assembly 8 SFF 4 LFF Hardware options installation 125 ...
Страница 129: ...6 Install the 4 LFF display port USB module 7 Route and connect the cable Hardware options installation 129 ...
Страница 150: ...2 SFF backplane to P816i a controller 10 SFF NVMe backplane to NVMe riser Cabling 150 ...
Страница 151: ...2 SFF NVMe backplane to primary riser 1 SFF rear backplane to system board SATA Cabling 151 ...


