background image


  74 

3.  Supervision 

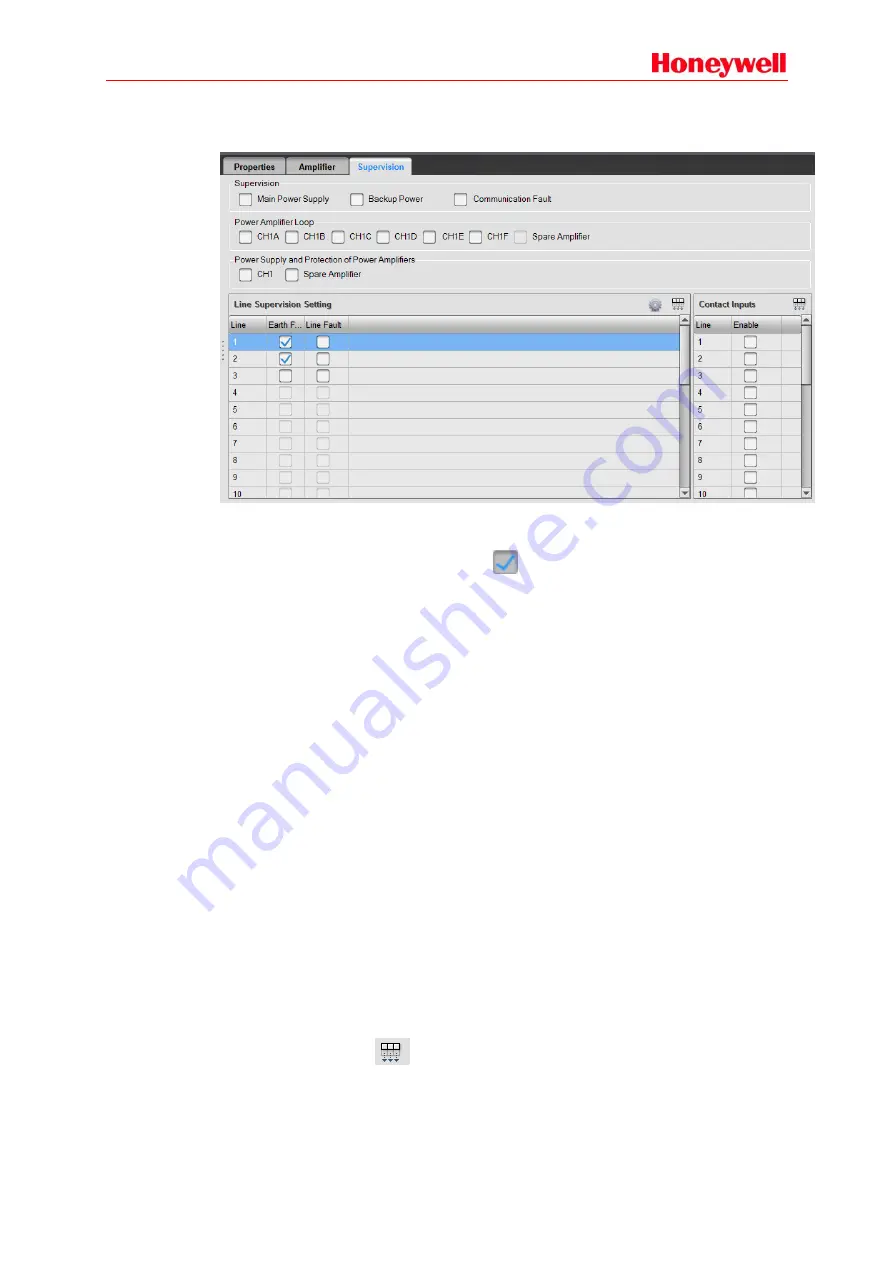
Supervision is used to set related parameter of supervision function, which is shown as below:  


Supervision Options  

Through the software, users can set enable or disable main power supply, backup power supply 

and communication fault. Click the checkbox, 

 means enabled.  


Power Amplifier Loop 

The options of power amplifier loop are used to enable or disable the supervision of the loops 
between controllers and power amplifiers. The options include CH1A, CH1B, CH1C, CH1D, 
CH1E, CH1F and spare amplifier. 


Power Supply and Protection of Power Amplifiers 

The power supply and protection status of power amplifiers may be supervised if the 
corresponding options are enabled. The power supply failure of the power amplifier on the 
same audio channel can’t be identified separately, MCU only show the power supply failure of 
the audio channel, and users may check the indicators from the front panels of power 
amplifiers. 


Line Supervision Setting 

Users can respectively enable or disable the supervision function of speaker lines and earth 
fault. In the 

Earth

 column, the supervision of earth fault of every speaker line can be enabled or 

disabled.  

When users get the authority by inputting the password, it is possible to change the parameters 
of line supervision, including the impedance threshold between speaker line and earth and the 
phase threshold for the short & open circuit supervision. 

This device supervises speaker lines by measuring the phase difference between original 
testing signal and the pilot signal from speaker lines. 

When the phase difference is higher than the threshold of short circuit, and lower than 
threshold of open circuit, a fault of short circuit will be found in the speaker line. When the 
phase difference is higher than threshold of open circuit, a fault of open circuit will be found in 
the speaker line. Usually the phase difference is lower than the threshold of short circuit. 

Select a line, and click the 

 icon to set the rest of parameters the same as the selected 

one. 


Содержание INTEVIO

Страница 1: ...M_XXXXXX_CN_1 0 INTEVIO PA VA System User Manual M_ 2000061157_EN54_1 5 ...

Страница 2: ...The contents of this document are subject to revision without notice due to continued progress in methodology design and manufacturing Honeywell shall have no liability for any error or damage of any kind resulting from the use of this document Trademark List All trademarks mentioned herein are the property of their respective owners These are shown in the document Trademark Information ...

Страница 3: ...served for product installation and operation The Company shall not be liable for fire or electric shock accidents caused by incorrect installation or mistakes Transportation Safety The product shall be protected against impact violent vibration or liquid erosion during transportation storage and installation Environmental Requirements Do not install the product within the environments of extreme ...

Страница 4: ...t power supply grounding lines are interconnected and connected to ground to prevent unstable use or permanent damage There are HV lines within it When powered up do not open the equipment cover without permission to prevent electric shock Prior to the first equipment power up please check its external wiring for correctness to avoid damage During power up please do not touch wiring terminals iden...

Страница 5: ...r change parts of the device It is forbidden to communicate between this INTEVIO system and third party systems unless updating the software of this device The network port of the device is enabled only in deployment mode Password Precaution Please change the password during the system deployment Users need to change the password regularly A password with four numbers is preferred The screen will ...

Страница 6: ...tem Specification 4 System Structure 5 Applications 5 RK MCU Master Control Unit 6 Product Features 6 Product Appearance 6 Technical Specification 9 RK ZONE8 Zone Expander 11 Product Features 11 Product Appearance 11 Technical Specifications 13 RK AMP500 500W Class D Power Amplifier 14 Product Features 14 Product Appearance 14 Technical Specifications 16 RK MIC Remote Call Station 16 Product Featu...

Страница 7: ...52 End of Line Resistor 52 Work Mode Setting 52 System Hardware Checking 54 System Basic Information 54 3 System Configurations 56 Operating Environment 56 Installation and Uninstallation 56 Installation 56 Uninstallation 57 Configuration Operation 58 General Introduction 58 Configuration Guide 59 Project 60 Device 63 Task 76 Operation 80 Upload Configuration File 85 Other Operations 87 Browse Rec...

Страница 8: ...o Files 100 Broadcast External Audio 100 Auto record 100 Temporary Record 101 Enter Exit Manual Emergency Mode 101 Emergency Voice Alarm 102 Emergency Live Announcement 102 Lock Unlock 102 Menu Operation 103 6 Maintenance 116 Regular Maintenance 116 Troubleshooting 116 Checking Problems 116 Troubleshooting 116 Maintenance 119 Changing Fuse 119 Upgrading Device Firmware 119 Appendix 120 Access Leve...

Страница 9: ...mation of INTEVIO system Intended Reader This manual is mainly for the people who need to install operate and maintain the INTEVIO system Relevant Documents The following documents can be used as a reference when reading this manual RK MCU Master Control Unit Product Instructions RK ZONE8 Zone Expander Product Instructions RK AMP500 500W Class D Power Amplifier Product Instructions RK MIC Remote C...

Страница 10: ... power audio signal to drive loudspeakers MCU Master Control Unit The management of the system which can drive 8 zones the system capacity can be increased to extend three number of zones or speaker circuits MAINS Main Power Supply Primary power source BACKUP Backup Power Supply Secondary power source DCT Dry Contact A kind of the interface which can be linked to relays or switches PS Power Supply...

Страница 11: ...ss D power amplifier in RK MCU Full system supervision including main backup power supply CPU microphone power amplifier loop communication speaker lines and contact inputs etc A short circuit or an interruption in loudspeaker lines can be found within 100s and isolated automatically which won t affect other loudspeaker lines Fault status indicating by lights and LCD PTT microphone of RK MIC can b...

Страница 12: ... NPMS R Rack Mounted Panel for Remote Call Station X NPMS W Lockable wall mounted box for Remote Call Station Note Emergency microphones include RK MIC Remote Call Station HMC K4 Extension Keypad optional and or HMC K8 Extension Keypad optional which may be placed on the desktop installed in the rack with X NPMS R Rack Mounted Panel for Remote Call Station or installed on a wall with X NPMS W Lock...

Страница 13: ... audio bus to manage all the devices in the system Up to 15 RK ZONE8 can be connected enabling up to 128 zones Remote call stations RK MIC are connected to the Master Control Unit RK MCU in a daisy chain configuration as shown below Applications System can apply to Educational institutions e g school etc Factories Office buildings Lobbies Apartment hotels Churches ...

Страница 14: ...upports external power amplifiers Flexible power amplifier backup One spare amplifier can back up all amplifiers in the system Built in 1GB Flash memory and 8GB SD card which are used to store audio files recording files configuration data and log files etc Two auxiliary inputs and one MIC LINE input Optional PTT microphone for live broadcast Digital volume control easy to set input and output vol...

Страница 15: ... It turns yellow when an earth fault is found and the fault point can be checked in the menu DISABLED indicates the disabled status It turns yellow when a loudspeaker line is automatically disabled due to a short circuit and details can be checked in menu 5 VU meter To indicate the signal level of internal power amplifier 6 LCD display screen To display the system work status and set the parameter...

Страница 16: ...amplifier interface To connect to the external power amplifiers of two audio channels the MCU will transmit the audio signal and self test signal to the power amplifier s and receive the fault status from power amplifier s 8 Spare power amplifier interface To connect to a spare power amplifier the MCU will transmit the audio signal and self test signal to power amplifier and receive the fault stat...

Страница 17: ... to the CH1A 19 70V 100V interface of external power amplifier Including the CH1B IN CH2A IN CH2B IN and the IN OUT of spare amplifier 20 MODE It is the DIP switch to set the work mode of current device and system 21 Calibration key It is reserved and unavailable 22 DC power output 24V DC power output 23 System extension interface To connect to optional zone expanders 24 Fan Temperature controlled...

Страница 18: ...fier Output signal 1 4 V THD 0 1 Control signal Self testing amplifier fault and power saving control signal Loudspeaker Interface Zone Number 8 each has A and B output Max load power 500W Contact Input Output Contact input 10 contact input interfaces with supervision Contact output 8 contact output interfaces NO NC and COM Fault output and Alarm output Maximum voltage of the outputs AC 250 V DC 3...

Страница 19: ...to 16 loudspeaker lines each zone has two speaker lines 8 contact inputs with supervision 8 dry contact outputs 4 external power amplifiers and 1 spare power amplifier can be connected Flexible amplifier backup function Full supervision including main power supply backup power supply CPU fault power amplifier speaker lines contact inputs and network fault etc The signal volume to amplifiers can be...

Страница 20: ...terfaces which can be used to control the external devices 5 Contact inputs 8 contact input interfaces which can be connected to third party devices and used for business or voice alarm purpose Debug interface is used to upgrade the firmware 6 Power amplifier interface To connect to the external power amplifiers of two audio channels transmit the audio signal self test signal to power amplifier an...

Страница 21: ...50 60Hz Backup power supply 21 5V DC 28 5V DC Fuse T2AL 250V Power consumption 35W Line Input Input signal 1V 0dBV Input impedance 10 KΩ Frequency response 80Hz 18kHz 3dB SNR 80dB A weighted Audio Output Output channels CH1 CH2 Output signal 1 V 0 dBV THD 0 1 Power Amplifier Interface Number 3 CH1 CH2 and spare amplifier Output signal 1 4 V THD 0 1 Control signal Self testing amplifier fault and e...

Страница 22: ...imension W H D 580 mm 235 mm 552 mm Net weight 7 5 Kg Gross weight 10 3 Kg RK AMP500 500W Class D Power Amplifier RK AMP500 is used to amplify the audio signal to drive loudspeakers It is referred to as DA within the manual Product Features Class D technology with high efficiency Maximum 500 W power output 70 V and 100 V audio output Supports balanced or unbalanced audio input Forced fan cooling A...

Страница 23: ...ttons Indicators Description 1 Cooling fan 2 Audio input fault interface FAULT indicates when the DA experiences a fault it is disabled and sends a fault output via dry contact LINE IN indicates the balanced input interface for the input of an external audio source BOOSTER INPUT indicates the 100 V audio input capable to connect to other DA output 3 PA interface To connect to the RK MCU or zone ex...

Страница 24: ...W H D 580 mm 235 mm 552mm Net weight 10 6 Kg Gross weight 13 2 Kg RK MIC Remote Call Station RK MIC is used to perform the various broadcasts and live broadcasts to any or all selected zones This unit has programmable buttons users can easily conduct the operations such as paging BGM broadcast business broadcast voice alarm volume control recording monitoring etc If necessary extension key modules...

Страница 25: ...ult of system network fault and busy status of audio bus etc 3 Manually emergency button The button is protected by a cover to prevent pressing by mistake To switch to the manually mode first lift the cover and press down the button The indicator will light in red 4 Function buttons There are some function buttons such as ALL CLOSE MONITOR CH1 MONITOR CH2 RECORD PLAYBACK LINE IN and MICROPHONE etc...

Страница 26: ...us the 4th switch is to set the end resistor Only the end device on the bus can be set to connect to the end resistor 7 Up link To connect to the RK MCU or previous remote call station 8 Down link To connect to the next remote call station 9 Power adapter interface It is used to supply the power by connecting to an external power adapter in case the device can t be powered by RK MCU Technical Spec...

Страница 27: ...dity 95 without condensing Operating temperature 10 C 55 C 14 F to 131 F Storage temperature 40 C 70 C 40 F to 158 F Specification Dimension W H D 200 46 5 200 mm Packing dimension W H D 403 133 268mm Net weight 1 4Kg Gross weight 2 5Kg ...

Страница 28: ...an be input The Input type can be set as a microphone or line in via the DIP switch beside the interface The MIC LINE interface can output 24V DC phantom power and can be set on or off by the DIP switch XLR Terminal Definition PIN Signal Legend 1 Ground 2 Positive 3 Negative Power Amplifier Interface Power amplifier interfaces are used to connect a power amplifier to the external Master Control Un...

Страница 29: ...cted to a third party system or an external power amplifier via RCA terminal When a live announcement is active via the PTT microphone the REC interface will output the audio signal of microphone This is only available when the PTT microphone is active Amplifier Interface The Amplifier Interface is used to input or output the 100 V audio signal from power amplifier CH1A outputs the 100 V audio sig...

Страница 30: ...he speaker line with the short circuit will be isolated and the affected lines will recover Connection terminals are provided with the product A cable with a cross section of 0 5mm2 to 1 5mm2 is recommended Contact Input There are 10 contact inputs which can be supervised as needed The interfaces can be directly connected with the dry contact output of third party device s Other power sources must...

Страница 31: ...ut to be used to transmit the general fault status of the system to a third party device The port has NO NC and COM terminals While the system is in fault the interface will be activated and send a fault signal to the third party system FIRE This port is used to connect to the fire alarm system via RS 485 bus and transmit the fire alarm signal and work status through MODBUS protocol CTRL This is a...

Страница 32: ...s and 2 branches can be connected A twisted pair CAT 5 cable is recommended A twisted pair 2m cable is provided in the call station package Note Up to 6 call stations can be connected with the Master Control Unit and the distance between the call station and MCU should be less than 600m Wiring of the call station interface PIN Type Legend 1 Mic Line audio positive to MCU 2 Mic Line audio negative ...

Страница 33: ...aight connections are available since the switch has Auto MDIX function For 100m transmission distance cross cable is recommended A twisted pair 2m is provided in the package for connection Wiring of the Ethernet interface PIN Type Legend 1 TX 2 TX 3 RX 4 No pin 5 No pin 6 RX 7 No pin 8 No pin 568A 568B cable order definition PIN T568A Color T568B Color Legend 1 Green white Orange white 2 Green Or...

Страница 34: ... a resettable fuse is used to connect to AC power source T10 AH 250 V fuse is recommended Backup power interface is used to connect to a 24 V DC power source The connector is provided in the package a 2 pin cable with a cross section of 4mm2 is recommended RK ZONE8 Zone Expander Audio Input The RK ZONE8 zone expander has a line input to connect to external audio devices It should be used only if t...

Страница 35: ...iers via the RCA terminal Amplifier Interface The amplifier interface is used to input or output 100 V audio signals from the power amplifier CH1A can be connected with the 100 V audio signal from an external power amplifier which corresponds to audio channel 1 and loudspeaker lines 1 4 CH1B can be connected with the 100 V audio signal from an external power amplifier which corresponds to audio ch...

Страница 36: ... contact outputs of the third party devices can be directly connected to contact inputs When supervision function is enabled two 10k ohm resistors should be installed on the dry contact outputs of the third party device as shown below Debug interface is a RS 232 port which can be used to upgrade the firmware The connection terminals are provided in the package a cable with a cross section of 0 5 m...

Страница 37: ...xtension of the RK MCU A twisted pair CAT 5 cable is recommended A twisted pair 2m cable is provided in the zone expander package Note Do not connect extension inputs or extension outputs of the same device together or to each other DC Power Output The RK ZONE8 has a 24 V DC power output which can be used for external devices The output current should be less than 1 A A resettable fuse is built in...

Страница 38: ...lt Output If any fault occurs the amplifier will be protected During the self testing ports A and B will be shorted This interface can be connected with third party devices to transfer the fault signal of a power amplifier Power Amplifier Control Interface The power amplifier control interface is used to connect with controllers such as the RK MCU or zone expanders to transfer audio and control si...

Страница 39: ...e Call Station Interface There are two RJ 45 ports named UP LINK and DOWN LINK The UP LINK interface is used to connect to the Master Control Unit or the DOWN LINK of a call station The DOWN LINK interface is used to connect to the UP LINK of a call station The interface includes 24 V DC power audio and the CAN control bus A twisted pair CAT 5 is recommended A twisted pair cable 2m is provided in ...

Страница 40: ...ic ties Preparing Cables and Auxiliary Equipment Prepare the following cables before installing the system devices Power cable The power cable used for mains power is provided in the package The connector of the backup power interface is included in the package instead of a power cable The Installer should connect it via the 3 pin cable which with a recommended cross section from 0 5mm2 to 1 5mm2 ...

Страница 41: ...Installing the Devices in the Appliance Cabinet Each device is attached with the cabinet brackets which can be installed into a 19 inch cabinet directly Here we take RK MCU as an example for illustration and this installation also works with other devices Installation steps 1 Install the cabinet brackets to both sides of the front panel for each device which is shown as below Then use attached scr...

Страница 42: ...ich are provided in the packages 4 After installing all the plates softly push devices into cabinet till both sides of rack touch the inside frame of cabinet 5 Use the screws provided to fasten both brackets to the cabinet 6 Install the 1 U panel to the free space Installing the Remote Call Station on Desktop Installing the Key Module If there are key modules please follow the procedures below to ...

Страница 43: ...he bracket between them as shown below and fasten using the screws provided Turn the module over 4 Repeat these steps to install the remaining modules Installing the Goose neck Microphone Insert the microphone plug to the top right socket on the RK MIC and clockwise rotate to fasten the bottom screw ...

Страница 44: ...he hardware provided to fasten it 4 Install the PTT microphone to the RK MIC socket and hang the microphone in the space provided on the left side of the rack Flush Installation of a Remote Call Station To flush mount the installation of the RK MIC use the dimensions below to create the opening to install the call station The 192 mm x 192 mm section of the above stated dimensions is for the flush ...

Страница 45: ...eps 1 Use a flat blade tool such as a screwdriver to lift the plastic cover of the label slot 2 Remove the protective cover 3 Place the label in the slot 4 Replace the plastic cover Installing RK MIC Labels There are 8 configurable buttons on the panel of the RK MIC users can write the button name on the label and then install it on the RK MIC The steps are as follow 1 Use a flat blade tool such a...

Страница 46: ...on is provided in the package Pay attention to the polarity when wiring Connecting the RK MIC Power Supply The remote call station can be powered by the Master Control Unit through the twisted pair cable If the RK MIC can t be powered due to long distance or exceeding the power consumption limitations of devices an AC power adaptor can be connected to the 24 V DC port of the remote call station No...

Страница 47: ...an 4 zones no connection of power amplifier is needed 2 In the single channel mode if there are more than 4 zones and the total power rate is less than 500W connect the device as follows Connecting the and of CH1A OUT to the corresponding ports of CH1B IN 3 Under the single channel mode if there are more than 4 zones and the total power rate is more than 500W the external power amplifier needs to ...

Страница 48: ...s to CH2A IN input 5 Under the dual channel mode if there are more than 4 zones and the total power rate is less than 500W the external power amplifiers need to be connected as the following steps Connect the and of CH1A OUT to the corresponding ports of CH1B IN Use the twisted pair cable to connect PA interface CH2 of RK MCU to PA interface IN of power amplifier Connect the 100V and COM output of...

Страница 49: ...utput port 100V and COM of the first power amplifier to RK MCU input port CH1B Use twisted pair cable to connect PA interface CH2 of RK MCU to the PA interface IN of the second power amplifier Connect the output port 100V and COM of the second power amplifier to RK MCU input port CH2A Use twisted pair cable to connect PA interface OUT of the second power amplifier to PA interface IN of the third p...

Страница 50: ...he RK MCU 3 Install the protective cover to avoid electric shock Sometime the loudspeakers of zones need be connected to the system in two branches the speaker lines may be connected as the below figure Note Pay attention to match the polarity when connecting the loudspeaker cable to the terminal Connecting EOL Module If the speaker lines need to be supervised please connect end of line module EOL...

Страница 51: ... the contact inputs 1 If the line of the contact inputs doesn t need to be supervised connect the relay or the switch output of the external devices or the third party device to the contact inputs of the RK MCU When contact inputs are activated the corresponding function can be started The interfaces are powered by the RK MCU please do not connect any external power sources ...

Страница 52: ...hen the dry contact output is used as a switch to control an external device or transmit a device status connect the NO NC and COM terminals to the external device as shown below 2 Connecting 3 wire volume controller Loudspeaker interface A and B are in parallel When connecting a 3 wire volume controller connect the loudspeaker interface from Group A to the dry contact output NO and NC pins The CO...

Страница 53: ...d and unbalanced signals can be input through the MIC LINE XLR interface A shielded cable is required and the plugs in both sides need to match the device interface Note The gain and phantom power of the MIC LINE port can be set using the DIP switch Please set the DIP switch according to the audio source The port set to be the LINE input has no phantom power output by default When the phantom powe...

Страница 54: ...o be connected as follows Use a twisted pair cable to connect the PA interface CH1 of the RK ZONE8 to the PA interface IN of the power amplifier Connect the amplifier output port 100V and COM to RK MCU input port CH1A IN port COM output connects to the CH1A IN input Connect the and of CH1A IN to the corresponding ports of CH1B IN 3 In single channel mode if there are more than 4 zones and the tota...

Страница 55: ... IN COM output connects to the CH2A IN input 5 In dual channel mode if there are more than 4 zones and the total power rate is less than 500W 2 external power amplifiers need to be connected as follows Use a twisted pair cable to connect the PA interface CH1 of the RK ZONE8 to the PA interface IN of the first power amplifier Connect the 100V and COM output of the first power amplifier output port ...

Страница 56: ... twisted pair cable to connect the PA interface OUT of the first power amplifier to the PA interface IN of the second power amplifier Connect the 100V and COM output of the second power amplifier output port to CH1B IN of the RK ZONE8 Use a twisted pair cable to connect the PA interface CH2 of the RK ZONE8 to the PA interface IN of the third power amplifier Connect the 100V and COM output of the t...

Страница 57: ...onnecting RK MCU section Connecting Dry Contact Output The method for connecting the RK ZONE8 to the dry contact output is the same as the RK MCU please refer to Connecting Dry Contact Output in the Connecting RK MCU section Connecting Audio Device RK ZONE8 has 1 audio input interface to connect to an external audio source which can only be played via the connected loudspeaker line under special c...

Страница 58: ...insert the terminal with a cross section of 3 5mm into the line in port Connecting Spare Power Amplifier If a backup power amplifier is required the installer should be clear which devices will share a spare power amplifier and which device will be connected to the PA interface of the spare amplifier Connect the PA interface of the spare power amplifier to the spare interface of a controller which...

Страница 59: ...grounding terminal The ground of the doors should be connected with the ground of the cabinet In the figure 1 and 2 are grounding screws which need to be connected 2 Connecting Device Grounding Wire All devices have a special grounding screw which is shown as After installing the device in the cabinet it is necessary to use a cable with a cross section of 1 5mm2 to connect the cabinet grounding to...

Страница 60: ...e resistor to the bus via DIP switch System Extension Bus The inside of the system extension interface of the RK MCU is connected to a 120 resistor After the Master Control Unit is connected to the zone expanders users need to turn on the 4th pin of the DIP switch MODE to connect the end of line resistor of the last zone expander Remote Call Station Bus The RK MCU has 2 interfaces without a 120 re...

Страница 61: ...ng the MODE switch When the device works in STANDALONE mode it only broadcasts line input audio in audio channel 1 The loudspeaker line can be enabled and disabled by setting the contact input When the device is in networking mode the RK MCU performs broadcast control and status supervision on zone expanders Switch No Function Description 1 Work mode ON Standalone Mode OFF Networking Mode 2 Line S...

Страница 62: ... the EOL resistor 3 Check the wiring connection from the RK MCU and the zone expander to the power amplifier 4 Check the wiring connection between the backup power amplifier and related devices 5 Check the wiring connection from the RK MIC to the RK MCU and the connection between the RK MICs Note that the end device should be connected to the end resistor 6 To avoid short circuit ensure there is n...

Страница 63: ...55 Note After the installation of a new system the nameplate which is provided in the packaging of the MCU must be filled in and pasted onto the cabinet ...

Страница 64: ...st 512MB RAM At least 1GB free space of hard disk 10M 100M Ethernet port 1024X768 or higher resolution Enabled access to network by firewall Installation and Uninstallation Installation Please follow the instructions below to install the software 1 Double click the installation program INTEVIO Configuration Tool Setup exe and the window below is displayed 2 Click Next the License Agreement page is...

Страница 65: ...ge is displayed If users need to start the software immediately select the option Launch INTEVIO Configuration Tool Otherwise click Finish to complete the software installation Uninstallation Please follow the steps below to uninstall the software 1 Click Start in the lower left corner of the computer desktop and select Program INTEVIO Configuration Tool Uninstall INTEVIO Configuration Tool A prom...

Страница 66: ...dow Main Window Introduction The configuration software is shown with the title bar menu bar project explorer view navigation buttons and main page Menu Bar Project Users can perform the operations below via the Project menu New To create new project files Open To open existing files Save As Save the current project which can be renamed Recent Projects Display the recent projects Project Informati...

Страница 67: ...a new project file or open an existing project file 2 Project Configuration Set the project properties and devices 3 Device Configuration Set the basic parameters of each device 4 Task Configuration Set the broadcast tasks including audio files playlists and task parameters 5 Operation Configuration Set the function for broadcast operation such as button contact input and timing broadcast 6 Upload...

Страница 68: ...ult path is My Documents Click the icon beside the path field to select a different directory 3 Click the OK button to create the project The window will be displayed as below Clicking Cancel will close the new project window 4 Right click the project name in Project Explorer and select Add in the menu to display the Add Device window Select RK MCU EN54 16 in device type then click the OK button t...

Страница 69: ...elow 1 Enter the project name and select the storage directory for the project file 2 Click the OK button The project is then saved as another file but the current one is still the original file Recent Projects Select the menu Project Recent Projects Click the file that needs to be viewed from the project list Project Information Please follow the steps below to configure project properties 1 Sele...

Страница 70: ...he following menu Add Add menu is used to add new devices to the system click it and the following window will be displayed Click the dropdown box beside Device Type to view the device list Select a device type and enter the device name then click OK to save it Copy Paste Users can add the same type of device with similar parameters by copying it First select a device and then click the menu Copy ...

Страница 71: ... follows Basic Setting Basic setting includes System ID Device Name Emergency Button Power saving Mode Wake up Amplifier Regularly and Manual Emergency Exit Timeout System ID is the device identification in the system which is in the range of 10000 11000 The option Emergency Button is used to enable or disable the emergency button on the front panel of the MCU The checkbox displayed as means enabl...

Страница 72: ...configuration file won t change any network parameters the network configuration can only be changed by updating When setting the network please keep the device and computer connected and ensure that the network configuration is correct Storage Storage shows the storage type used by the RK MCU It can be an SD card or Flash and this can be changed Speaker Lines Speaker Lines is used to enable speak...

Страница 73: ...cal time zone the time and date will be wrong during time synchronization Date Time Setting Date Time is used to view and manually update the device s date and time Click the Get button to read the device s time and clicking the Update button can synchronize the device s date and time with the computer 3 Amplifier Set the model of the power amplifier corresponding to each audio channel then set th...

Страница 74: ...front panels of the power amplifiers Line Supervision Setting Users can either enable or disable the supervision function of speaker lines and earth fault In the Earth column the supervision of Earth fault for every speaker line can be enabled or disabled If users are authorized by entering the password it is possible to change the parameters of line supervision including the impedance threshold b...

Страница 75: ...ed as below Device List Speaker Line List Device List displays all controllers that are connected to loudspeaker lines Select one device and the speaker line list will display the connected lines Group List Users need to create a group first Click the icon in the group list and the window below is displayed Enter the group name and click OK to create a new group Select a group in the group list an...

Страница 76: ... signals Users can select other pages by clicking the dropdown list Each row is matched with one speaker line Users can view more content by dragging the scroll bar Set each column s broadcast zones separately Some tools are explained below Evacuation This is used to set linked evacuation lines which are related to fire alarm inputs Alert This is used to set linked alert lines which are related to...

Страница 77: ... system receives a fire alarm signal from contact inputs it will start to broadcast the voice alarm automatically When the fire alarm signals are cleared the voice alarm broadcast won t be reset automatically and the operators need to press the reset button on the devices The voice alarm broadcast will then be reset after a certain number of seconds which can be set in Duration Minimum Duration If...

Страница 78: ...created twice within one project Speaker Lines Speaker Lines is used to enable speaker lines Click the checkbox as required means enabled and means disabled Users can change the name and power of speaker lines The load power is only used as reference Selecting a speaker line and clicking the button sets all the powers to be the same as the current one Trigger Mode of Contact Inputs This table is u...

Страница 79: ...output of the spare power amplifier In the Backup Amplifier column select the spare amplifier corresponding to the main amplifiers to enable the backup function 3 Supervision Supervision is used to set the related parameters of the supervision function which is displayed as below Supervision Options Users can use the software to enable or disable the main power supply backup power supply and commu...

Страница 80: ...n of short circuit and open circuit This device supervises speaker lines by measuring the phase difference between the original testing signal and the pilot signal from speaker lines When the phase difference is higher than the threshold of short circuit and lower than the threshold of open circuit a short circuit fault will be detected in the speaker line When the phase difference is higher than ...

Страница 81: ...lly Closed If Normally Open is selected when the switch of third party device is opened the dry contact input will be deactivated and when the switch is closed the dry contact will be activated If Normally Closed is selected when the switch of third party device is closed the dry contact input will be deactivated and when the switch is opened the dry contact will be activated 2 Amplifier Set the m...

Страница 82: ... of power amplifiers Line Supervision Setting Users can respectively enable or disable the supervision function of speaker lines and earth fault In the Earth column the supervision of earth fault of every speaker line can be enabled or disabled When users get the authority by inputting the password it is possible to change the parameters of line supervision including the impedance threshold betwee...

Страница 83: ...hich ranges from 1 6 Please refer to the chapter Address Setting for the related device setting The chime option is used to enable or disable a pre signal and end signal for live announcement The checkbox means enabled The bar is used to set the chime volume by dragging The keylock option is used to enable or disable the keylock function The checkbox means enabled and the programmable keys 6 7 8 c...

Страница 84: ...ary first Library displays all the audio file names sizes and lengths RK MCU and RK MIC share the same library Software will download the audio files to devices The total storage space of all audio files will be shown at the top of the library which is not the same as the space used in the RK MCU Users can select audio files from the computer and add it to the library by clicking the icon in the t...

Страница 85: ... window and click the icon to delete it Users can add edit and delete the playlist by right clicking in the playlist Contents Select a playlist and Contents will show all the audio files Users can add files into the playlist by dragging them into the list window Select an audio file in Contents and click the icons and to adjust the order of broadcasting Select an audio file in Contents and click t...

Страница 86: ...fferent priorities The lower the value the higher priority it has Normal is used for public address such as normal background music operation broadcast voice broadcast etc The priority range is 56 255 Emergency is used for fire emergency broadcast The priority range is 1 55 Audio Source There are many audio sources such as playlist input call station PTT microphone and temporary recorded files Pla...

Страница 87: ... 3600s This parameter is not available for the external audio input and it is only used to meet the requirement of fire alarm loop playback in an emergency In interval time the ALARM relay is activated Groups This is used to select the groups of the speaker line Click to select all and click to clear all Contact Output This is used to set dry contact outputs which can be activated by a task Click ...

Страница 88: ... used to set the broadcast function on the RK MCU Key1 to Key8 separately correspond to the 8 audio buttons on the front panel The PTT Mic Normal Mode and PTT Mic Emergency Mode correspond to operation under normal broadcast and emergency broadcast Click the task table which corresponds to the key or Mic to select tasks from the dropdown list 2 Zone Key Setting This is used to set the 8 groups whi...

Страница 89: ...s can be supervised via a contact input by selecting Custom Fault from the drop down list Connect the fault output dry contact of the third party device to the contact input then connect a 10kΩ resistor network to the same dry contact output in parallel If the device has a fault a short circuit fault of the contact input will be detected by the MCU The fault description displayed in the MCU can be...

Страница 90: ... are set and no task is specified the item will be invalid and the start time and end time won t be saved Each day timing can be set with up to a maximum of 65535 timing items Note Make sure the day timing is set within the span of one 24 hour day and the end time must be at least 5 seconds after the start time The tasks used for the timing function should be configured while the filter is set to ...

Страница 91: ...ers can set all related broadcast functions in the window below Programmable Keys There are 8 programmable keys on the panel of the RK MIC and their function can be set via the configuration software Double click an item in the table select it and click the icon to set its function The function of the keys can be set as group volume control or task broadcast The default function is none If the fun...

Страница 92: ...r once to start the broadcast and press again to stop Press means press and hold the trigger during the broadcast and release to stop Select the task name from the drop down list Volume Control If the function is volume control users need to set the volume type and step The volume step range step is from 31 to 31 If it is negative the volume will be decreased If it is positive the volume will be i...

Страница 93: ...ploading configuration data all devices and the computer need to be connected to the Master Control Unit via the Ethernet and the IP address of the computer and MCU should be in the same segment Click the Upload button and the software will verify the configuration data automatically If there are any errors they will appear in the message window as shown below Correct the configuration according t...

Страница 94: ...tatus Click the Close button to exit the window If the data upload fails check the following Check the network connection between the computer and device Check the IP address setting of the computer and device Check the firewall setting Note Please use a cross cable to connect the computer to the RK MCU If the Ethernet switch is occupied please use a parallel cable or cross cable to connect the co...

Страница 95: ...he window shows the file s name storage space and recording time Click the icon beside a file to play it via the sound card of the computer If a file needs to be exported select a file and click the Export button to save the audio file to the computer Download System Configuration It is possible to download the project file from the MCU to a computer so users can check and edit the configuration C...

Страница 96: ... Export button to export and save the log data Upgrade RK MCU Firmware Users can click the menu Tools Upgrade MCU Firmware to query and upgrade the MCU firmware version Enter the IP address of the MCU and click the Firmware Query button the software will read and display all the firmware versions including the device type file system version kernel version MCU version MAC address and system ID etc...

Страница 97: ...ne Users can click the menu Tools Update RK MIC Chime Tone to change the chime of remote call stations Before operation an RS 232 port of the computer must be connected to the DEBUG port of the target device Select the connected serial port from the drop down list and select the pre chime file and end chime file by clicking the Select button then click the Update button to send the file to the con...

Страница 98: ...d MCU s user interface display Configuration Software There is a file named language_cfg xls in the software s installation directory which can be opened in Excel and contains the following content Users can add a new language in the New Language column The new language in the MAIN_TITLE row will be displayed in the drop down list of the Setting Language window Users can also translate the English...

Страница 99: ...d a new language in the New Language column and can also translate the English content Please pay attention to character length otherwise the software won t display all characters When uploading the configuration the language file will be transferred to the MCU and users can select the new language from the menu Please refer to the chapter System Setting for details ...

Страница 100: ...lowing items need to be checked 1 While in standby mode check that each device works normally If the fault detection function is enabled users can simulate a fault to check whether it can be detected by the device 2 If the amplifier backup function is available check whether the spare power amplifier can replace the main power amplifier and continue to operate as expected 3 Check that all broadcas...

Страница 101: ...ophone Yellow ON Failure of the PTT microphone is detected Level Meter OFF Built in power amplifier has no signal input Green Built in power amplifier is working Red Clip audio signal level is higher than the maximum level EMERGENCY Red OFF System is working in normal mode Flashing The system is activated by a fire alarm signal and working in automatic emergency mode ON The system is working in ma...

Страница 102: ...olume setting Wheel Knob of Menu Counterclockwise Rotation Decrease the current value Clockwise Rotation Increase the current value Press Perform actions enter or exit value setting ALL Press Select all speaker lines Close Press Forcibly close the selected speaker lines Monitor Press Start to monitor and switch monitor channel CH1 CH2 and OFF Record Press Enter temporary recording Reset Press Clea...

Страница 103: ... ON Short circuit fault is detected on the wiring of contact inputs For more details please check the menu of the MCU DCT OPEN Yellow OFF No open circuit fault is detected on contact inputs ON Open circuit fault is detected on the wiring of contact inputs For more details please check the menu of the MCU POWER AMPLIFIER STATUS Yellow OFF The connection between power amplifier and zone expander is ...

Страница 104: ...Buttons Switches Button Switch Action Description Power switch Press Connect or disconnect main power supply RK MIC Remote Call Station Indicators Indicator Color Status Description POWER Green ON Power on Flashing The system is in power saving mode GENERAL FAULT Yellow OFF The system is normal Flashing New fault is found ON Fault exists in the system and has been confirmed NETWORK FAULT Yellow OF...

Страница 105: ...crophone paging isn t activated Green Flashing Playing pre signal or end signal ON Paging by the microphone Yellow ON Microphone failure is detected Indicators of Programmable Keys OFF The group is idle The task isn t activated No operation Green Flashing The group is selected Activating the task Flashing once Change volume ON Normal mode zones are broadcasting Emergency mode zones are warning Sel...

Страница 106: ...ill exists the device will show a notification again If the fire alarm reset mode is configured as Manual Reset or Manual Duration Reset users need to press the RESET button to clear the alarm status after a fire alarm Please refer to RK MCU reset for setting the button to System Reset ACK When system detects any new fault the buzzer of the RK MCU will beep Meanwhile the general fault indicator wi...

Страница 107: ...via the built in loudspeaker 4 Press the MONITOR CH2 button again to stop the monitor function The indicator turns off and the built in loudspeaker will be muted 5 Users can change the monitored audio channel during monitoring 6 Because there is only one audio channel from RK MCU to RK MIC new operation will replace the older operation Note During monitoring if the loudspeaker is used for other pu...

Страница 108: ... The broadcast of configured audio files can be activated by contact inputs timing and a fire alarm signal If users need to broadcast the audio files manually please follow the operation steps below 1 In normal mode press the zone buttons to select target zones 2 Press the button corresponding to the audio files to broadcast If the broadcast does not start please make sure the priority of the task...

Страница 109: ...pter for further information It is also possible to listen to recordings on the RK MIC The following are the steps to do so 1 Press the Playback button on the front panel The indicator turns green and flickers Recording will be broadcast via the RK MIC built in loudspeaker 2 Press the Playback button again to stop listening Recording Broadcast Steps for broadcasting a recording via the RK MIC 1 Pr...

Страница 110: ...lect target zones 3 Pick up the PTT microphone and press the side button to enable live announcement 4 Release the button to stop If users want to start emergency paging via the microphone of the RK MIC please follow the steps below 1 Press the emergency button to enter manual emergency mode 2 Press zone buttons to select target zones 3 Press the Microphone button on the RK MIC to enable live anno...

Страница 111: ...that direction will not affect the volume During adjustment the screen shows the current volume When no operation has been performed for 3 seconds the device will automatically return to its previous condition Manually pressing the knob can also exit the interface Menu Operation The menu knob can execute the following operations Clockwise rotating Move the cursor to the right Move the cursor down ...

Страница 112: ...ws the homepage on which users can view the time work mode general fault status monitor status and master volume Below are the descriptions for the icons and buttons Emergency Status If the system is working in normal mode the icon will be grey and the description is NORMAL ...

Страница 113: ... menu knob USB When a USB storage is inserted into the device this icon will be displayed Timing When the timing function is enabled the screen will show the task s name and time If there isn t a timing task the icon will be hidden Main Menu From the homepage press the menu knob and the device will display the main menu Users can view the submenus Select Zones System Status Check Recorded Files Sy...

Страница 114: ...ob to return to the main menu If users select RK MCU the interface appears as below The fault list of the RK MCU is as follows No Component Status Description 1 Main PS Normal Fault Display the main PS fault status 2 Backup PS Normal Fault Display the backup PS fault status 3 PTT Microphone Normal Fault Display the PTT microphone status 4 Configuration File Normal Fault Display the configuration f...

Страница 115: ...isplay the status of speaker line 5A B 19 Speaker Line 6A B Normal Open Short Display the status of speaker line 6A B 20 Speaker Line 7A B Normal Open Short Display the status of speaker line 7A B 21 Speaker Line 8A B Normal Open Short Display the status of speaker line 8A B 22 Speaker Line 1A B Earth Normal Fault Display the earth fault of speaker line 1A B 23 Speaker Line 2A B Earth Normal Fault...

Страница 116: ...o Positions Status Description 1 Network Normal Fault Display the communication status between the device and RK MCU 2 Main PS Normal Fault Display the status of main power supply 3 Backup PS Normal Fault Display the status of backup power supply 4 CH1 Amp PS Normal Fault Display the status of power supply of the power amplifiers which are connected to CH1 5 CH2 Amp PS Normal Fault Display the sta...

Страница 117: ...A B Earth Normal Fault Display the earth fault of speaker line 4A B 24 Speaker Line 5A B Earth Normal Fault Display the earth fault of speaker line 5A B 25 Speaker Line 6A B Earth Normal Fault Display the earth fault of speaker line 6A B 26 Speaker Line 7A B Earth Normal Fault Display the earth fault of speaker line 7A B 27 Speaker Line 8A B Earth Normal Fault Display the earth fault of speaker li...

Страница 118: ...orded Files In this menu users can view and play the auto recorded and temporary recorded files via the built in loudspeaker Rotate the menu knob and press it to view the file list In the file list rotate the knob to select a recorded file and press the knob to play it The device can play the recorded files via the built in loudspeaker System Setting Select System Setting in the main menu and pres...

Страница 119: ...n to the main menu System Setting includes Volume Setting Schedule Item Date Time Network Setting Change Password Language Setting and Advanced Setting Rotate the knob to select and press to enter the setting interface Volume Setting Users can adjust the input and output volume in the volume setting interface The following items can be set No Item Range Description 1 MCU Input PTT Mic 0 31 Set the...

Страница 120: ...ress x 13 Z8 x Amp CH2 0 31 Set the volume of power amplifiers which are connected to CH2 of RK ZONE8 with the address x In the volume setting interface rotate the knob to move the cursor and press it to enter the setting interface as shown below Rotating the knob can adjust the value Select Return and press the knob to exit the volume setting interface and return to the previous menu Schedule Ite...

Страница 121: ... have been made the device will automatically exit the interface Time Select Time and press the knob to enter the setting interface Set the time in the same manner as the date After all options have been set the device will automatically exit the interface After setting the time zone date and time rotate the knob to select OK and press it If users select Return the device will return to the previo...

Страница 122: ...rotate the knob to select OK and press it to save If users select Return the device will return to the previous menu without saving Language Setting The MCU supports multi language display Users can set the language in the menu shown above If the language list does not meet the user s requirements they can also add new languages via the configuration software Rotate the knob and move the cursor to...

Страница 123: ...ble or disable the function Select OK and press the knob to save the setting If users select Return the device will return to the previous menu without saving Device Information Users can view Device ID IP Address Subnet Mask Gateway MAC and firmware versions This data cannot be changed Rotate the knob to move the cursor and press it to return to the main menu ...

Страница 124: ...lowed to check the system 1 Record the condition and status in detail Fault status What operations are being commenced when the fault occurs Other existing abnormal phenomena Export fault log file 2 Please make sure the operations being carried out comply with the manual If not please record the actual operations 3 If the fault is not caused by incorrect operation please test it again and make sur...

Страница 125: ...and fuse of the power supply of CH1 power amplifiers 7 CH2 Amp PS The possible reasons are The main power supply of a power amplifier corresponding to CH2 is disconnected The backup power supply of a power amplifier corresponding to CH2 is disconnected Any fuse of CH2 power amplifiers is burned Please check the connection and fuse of the power supply of CH2 power amplifiers 8 Spare Amp PS The poss...

Страница 126: ...ort The wiring of the contact input is shorted Please check the wiring of contact input 16 Fire Alarm Interface RS 485 The possible reasons are The connection between MCU and LPI ModBus module is short open or reversed The connection between LPI ModBus module and fire alarm control panel is faulty No power supply to LPI ModBus module Mistakes in configuration Please check the connection from fire ...

Страница 127: ...hange the fuse then push the cover back The following are the steps to change the fuse of the backup power supply 1 Pull out the fuse plug underneath the AC power socket 2 Exchange the fuse 3 Replace the fuse plug Upgrading Device Firmware If device firmware needs to be upgraded the task must only be performed by appropriately trained people Before upgrading please ensure compatibility between the...

Страница 128: ... the VACIE in accordance with the manufacturer s published instructions and data Access Level 4 By persons who are trained and authorized by the manufacturer to either repair the system or upgrade the firmware thereby changing its basic mode of operation The users of access level 1 can supervise the system status directly via the indicators without special operation If users of access level 2 need...

Страница 129: ...121 RK MCU Label If users need to make RK MCU button labels print the labels below and write the names on the labels Refer to the chapter Installing RK MCU Labels for information on installation ...

Страница 130: ...122 RK MIC Label If the user needs to make RK MIC button labels print the labels below and write the numbers on the labels Refer to the chapter Installing RK MIC Labels for information on installation ...

Страница 131: ...IP switches are used to set the device address The figure below shows the DIP switch settings that correspond to the address code in binary Address DIP Switch Address DIP Switch Address DIP Switch 1 6 11 2 7 12 3 8 13 4 9 14 5 10 15 ...

Страница 132: ......

Страница 133: ...many Phone 49 0 2131 40615 600 Customer Service Center Fax 49 0 2131 40615 606 Manufacturer Life Safety A V Guangzhou Co LTD No 257 Junye Road Guangzhou GETDD East 510530 China Phone 86 0 20 2839 9600 Fax 86 0 20 2820 8706 2019 Honeywell International Inc All rights reserved ...

Отзывы: