G3 – Owner‘s Manual | 133
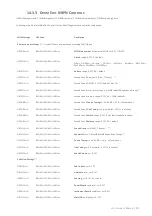
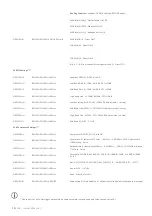
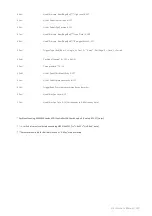
Individual Hi-Hat Volumes can be sent with: rr=42 (Bow), rr=26 (Edge), rr=19 (Bell), rr=44 (Pedal Chick), rr=21 (Pedal Splash)
** “Sound Select” is managed by sending “Sound Group” NRPN and “Sound Instr.” NRPN. Available Sound Groups are: 0=Kick,
1=Snare, 2=Tom, 3=Crash, 4=Ride, 5=Hi-Hat, 6=Cymbal SFX, 7=Percussion1, 8=Percussion2, 9=Sound-FX, 10…109=Imported
Sounds, 110…=Waves
*** Pad Mixer, EQ and Compressor settings are done per pad trigger group (e.g. head + rim, or bow + edge + bell). NRPN needs
only to sent once using the “head” resp. “bow” trigger note.
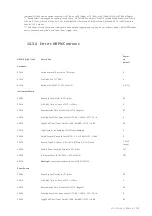
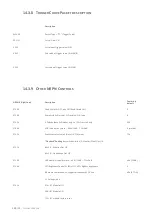
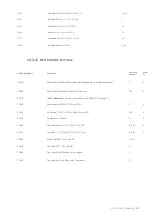
14.3.4
E
FFECTS
NRPN
C
ONTROLS
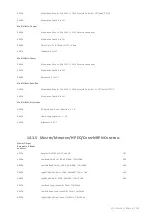
NRPN # (High|Low)
Description
Power-
up
default
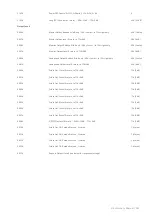
Ambience
0100h
Ambience Level 0 (mute) to 7Fh (max)
0
0101h
Pre-Delay 0 to 127 (TBD)
0
0102h
Ambience ON/OFF 0 = OFF, else ON
0 (OFF)
Instrument Reverb
0200h
Reverb Level 0 (mute) to 127 (max)
64
0201h
Pre-Delay Time 0 = 0ms, till 127 = 250ms
0
0202h
Reverberation Time 0 (shortest) till 7Fh (longest)
64
0203h
Pre-High-Pass Filter Frequency 0=OFF…64=~500Hz...127=~1KHz
0
0204h
High-Shelf Filter (Tone) Gain 0=-12dB, 64=0dB, till 7Fh = +6dB
64
0205h
High Damp 0= no damping, till 127=max damping
0
0206h
Gated Reverb Threshold Level 0=OFF, 1 = -114dB till 127 = -24dB
0
0207h
Reverb Type 0..2=Room, 3..5=Hall, 6..8=Plate1, 9..11=Plate2
5 (Hall
Large)
0208h
Send to Room Reverb 0 (mute) to 127 (max)
127
0209h
Instrument Reverb ON/OFF 0 = OFF, else ON
ON
020Fh
Routing
bus switches (see description of NRPN 370FH)
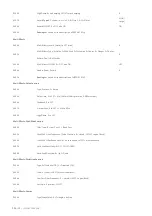
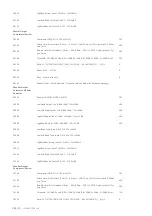
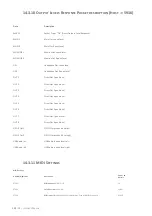
Room Reverb
0300h
Reverb Level 0 (mute) to 127 (max)
64
0301h
Pre-Delay Time 0 = 0ms, till 127 = 250ms
0
0302h
Reverberation Time 0 (shortest) till 7Fh (longest)
64
0303h
Pre-High-Pass Filter Frequency 0=OFF…64=~500Hz...127=~1KHz
0
0304h
High-Shelf Filter (Tone) Gain 0=-12dB, 64=0dB, till 127 = +6dB
64
Содержание G3
Страница 14: ......
Страница 16: ...16 G3 Owner s Manual 3 MOUNTING INSTRUCTIONS 3 1 MOUNTING THE MODULE BRACKET ...
Страница 17: ...G3 Owner s Manual 17 3 1 CONNECTING EXTERNAL EQUIPMENT TO THE G3 MODULE 3 1 1 FRONT ...
Страница 18: ...18 G3 Owner s Manual 3 1 1 REAR PANEL Make sure that the unit is switched off before connecting the equipment ...

