background image

EP OS MOTOR MANAGEMENT SY STEM – INSTRUCTION MANUAL


CHAPTER 5: WinESG


5.

21


Soft starter time:   

use on soft starter typical.  Transition to by-pass will occur after 
this time expires. 

Soft stop time:   

use on soft starter typical.  Transition from by-pass to soft starter 
stop control will occur after this time expires. 

Under current delay time:   

fault or warning is indicated if a current is below under current 
threshold for the set amount of time. 

Start attempts time:   

indicates the allowable time to make the number of start 
attempts set in start attempt counter (Counter 3). 


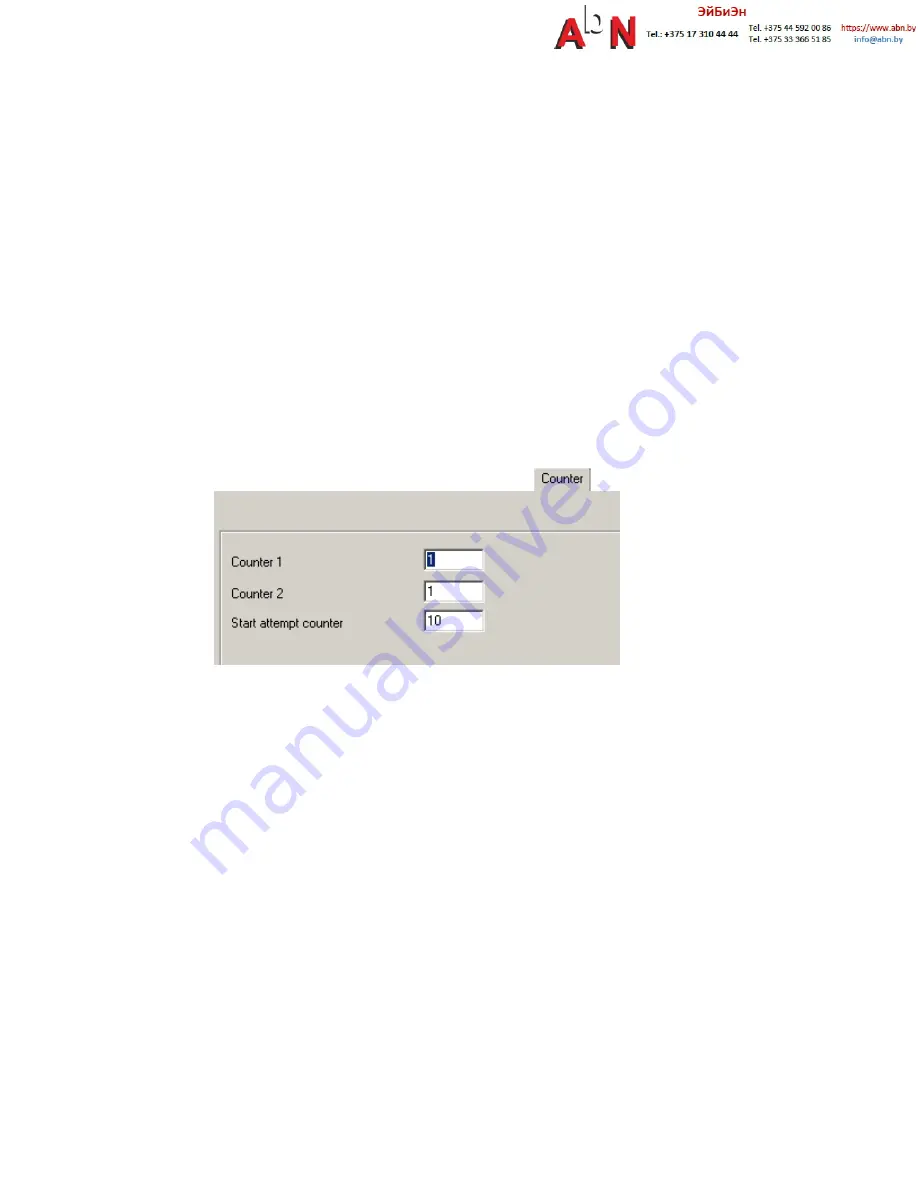
5.3.2.6  Parameterization Counter panel


The counter panel provides a means for setting two parameterizable counters: Counter 1 and Counter 2. They are 
selectable from 0 to 65535 in steps of 1.  Details are available in logic documentation.  Counter 3 is used for Start 
attempt counter, and it is settable from 1 to 40.  This is the number of start attempts allowed within a specified timer 
(Start attempts time). Refer to Figure 5-12 for the WinESG parameterization counter panel. 


Figure 5-12-:  WinESG parameterization counter panel


5.3.2.7  Parameterization Control panel


The control panel provides a means for setting the controls of the local/remote switch, the remote and local devices 
and the device behavior In case of fault.  Refer to figure 5-13 for the WinESG parameterization control panel. 


Содержание EntelliPro ES Series

Страница 1: ...GE Industrial Solutions EntelliPro ES Motor Controller Installation and Instruction Manual EntelliPro ES Revision 3 0 Manual Part Number GEH 6000 Copyright 2011 GE Industrial Solutions ...

Страница 2: ...This page was intentionally left blank ...

Страница 3: ...0 1 2 4 Output specifications 1 12 1 2 5 Power supply specifications 1 13 1 2 6 Communication specifications 1 13 1 2 7 Testing and certification 1 14 1 2 8 Approvals 1 15 1 2 9 Physical specifications 1 15 1 2 10 Environmental specifications 1 14 1 3 EntelliPro CP3 CP5 HMI 1 16 1 4 WinESG Configuration Tool 1 17 Chapter 2 Installation Configuration 2 1 Installation and initial operating 2 1 2 1 1...

Страница 4: ...ntrol Pre Programmed Configuration 2 13 Control Variant 1 Configuration 2 14 Control Variant 2 Configuration 2 15 Control Variant 3 Configuration 2 16 Control Variant 4 Configuration 2 17 Control Variant 5 Configuration 2 18 Control Variant 6 Configuration 2 19 2 3 Motor Starter Configuration 2 20 2 3 1 Motor Starter Type Full voltage non reversing starter 2 21 2 3 2 Motor Starter Type Full voltag...

Страница 5: ...MA 3 25 Chapter 4 Communication 4 1 Modbus RTU 4 1 4 1 1 Modbus address setting 4 1 4 1 2 Modbus baud rate and port configuration 4 3 4 1 3 Modbus function codes 4 4 4 1 4 Modbus topology 4 5 4 1 5 RS 485 connections 4 6 4 1 6 RS 485 termination considerations 4 6 4 1 7 Grounding shielding considerations 4 6 4 1 8 Implementation basics 4 7 4 1 9 Modbus RTU message format 4 7 4 1 10 EntelliPro ES F...

Страница 6: ...p 4 50 4 2 11 Profibus DP Class1 Parameterizing 4 53 Chapter 5 WinESG 5 1 File menu 5 4 5 1 1 WinESG Configuration 5 5 5 1 2 Slave Device Configuration 5 6 5 2 Options Menu 5 7 5 2 1 Alarm protocol panel 5 7 5 2 2 Access protection panel 5 8 5 2 3 Alarm panel 5 9 5 2 4 Time synchronization panel 5 9 5 2 5 Read all Parameters 5 9 5 2 3 Send all Parameters 5 9 5 3 Windows menu 5 10 5 3 1 Control Pan...

Страница 7: ...ication tree structure 6 19 6 16 6 8 EntelliPro CP5 device screen 6 15 6 7 EntelliPro CP5 device addresses 6 14 6 11 EntelliPro CP5 installation 6 18 6 6 EntelliPro CP5 application setting 6 13 6 5 EntelliPro CP5 main panel 6 11 5 37 5 4 2 Analog data panel 5 38 5 4 3 Flexible logic download 5 39 Chapter 6 EntelliPro CP3 and CP5 6 1 EntelliPro CP3 main panel 6 1 6 2 EntelliPro CP3 application sett...

Страница 8: ...This page was intentionally left blank ...

Страница 9: ... interface One HMI is provided as part of the MCC package and is programmed to display metering and other parameters Refer to chapter 6 for additional information The EntelliPro ES can be programmed as an EntelliPro ES retrofit where the Profibus telegrams match the ESS DP device Alternatively the EntelliPro ES can be programmed as a non retrofit unit where additional Profibus telegrams are made a...

Страница 10: ...stallation operation and maintenance Features may be described herein that are not present in all hardware and software systems GE Industrial Solutions assumes no obligation of notice to holders of this document with respect to changes subsequently made GE Industrial Solutions makes no representation or warranty expressed implied or statutory with respect to and explosive environment ATEX sign is ...

Страница 11: ... Union FC Modbus function code GF ground fault GND ground Hz Hertz GSD device description data HMI Human Machine Interface lb pound Ict primary current in EntelliPro CT Ir normal motor operating current I O input and outputs Kohms ku kilo ohms LED light emitting diode MAX maximum MCC motor control center MIN minimum mSec ms milliseconds NVM nonvolatile memory Ops operations PL phase loss PLC progr...

Страница 12: ...lowing additional functions are available Overload protection Thermistor protection 4 20 mA output sensing EntelliPro ES alarm modules configurable for fault trip or warning alarm Eleven predefined starter types Six predefined controls Start inhibits Restart timer Number of starts Number of contactor closures each relay has its own counter Operating hours Non operating hours Counters for overload ...

Страница 13: ...CHAPTER 1 INTRODUCTION EPOS MOTOR MANAGEMENT SYSTEM INSTRUCTION MANUAL 1 5 Entellipro ES3 DOL standard configuration EntelliPro ES5 DOL standard configuration Figure 1 1 Single line diagram ...

Страница 14: ...S catalog configuration definition is shown below EntelliPro ES3 DP 2 2 EntelliPro ES3 basic functionally EntelliPro ES5 advanced functionally DP Profibus DP Modbus RTU 2 Power supply and 7x Digital Inputs rated 24Vdc 3 Power supply and 7x Digital Inputs rated 110 240Vac 0 No external inputs available 3 ouput available 2 Additional 9x external inputs rated 24Vdc available 8 outputs available 3 Add...

Страница 15: ...40Vac 2 5A 24Vdc qty 3 Output Contact X X X X X 2A 240Vac 2A 24Vdc qty 5 Output Contact X X X LT Thermal Overload X X X X X Ground Fault X X X X X Phase Loss X X X X X Current Unbalance X X X X X Thermistor function X X X X X Stalled Rotor X X X X X Under Current X X X X X 4 20mA Output X X X Metering X X X X X Unit Healthy IndicationLED X X X X X Communication LED X X X X X Time stamped event log...

Страница 16: ...te ranges for the application For example increments EntelliPro CT 64 transformer is chosen the FLA setting can be configured from 64 6 10 7 amps to 64 amps in 0 1 amp Use of the appropriate transformer will allow the FLA setting to be configured in the range of CT 6 to CT For example if the consider are the transformer type the number of primary windings and the EntelliPro ES full load current se...

Страница 17: ...ip and warning alarm warning not valid for ATEX Phase Loss Range fixed at 60 any phase 40 of max phase Accuracy 5 Time delay 0 15 seconds in steps of 1s 0 disable immediately when ATEX is selected Timing accuracy 20 Elements fault trip and warning alarm warning not valid for ATEX Current Unbalance Range fixed at 30 any phase 70 of max phase Accuracy 5 Time delay 0 15 seconds in steps of 1s 0 disab...

Страница 18: ...t Recorder Capacity 250 events Data storage non volatile memory Phase Metering Accuracy 5 with external CT Elements single phase average 1 2 3 Input specification Digital Inputs Fixed pickup 16 8Vdc 24Vdc version 77Vac 110 240Vac version Fixed drop off 10Vdc 24Vdc version 30Vac 110 240Vac version CAUTION The usage of voltage between the drop off and pickup range is not recommended Recognition time...

Страница 19: ...7X that is 224 A EntelliPro CT 32 can be used in ATEX area Example 32A CT 5 30 32A 10 x CT 64A CT 10 6 64A 10 x CT 630A CT 105 630A 10 x CT Frequency 47 5 to 63 0 Hz Accuracy with external CT 5 direct 2 accuracy If motor protection up to 10 Ict is desired the nominal current must be derated per the table below The range can be enlarged by feeding multiple primary loops refer to section 1 1 5 Table...

Страница 20: ... 150Vdc or 250Vac Life expectancy Mechanical 20 million operations Electrical 100 000 operations at 5A 30Vdc or 250Vac Application category for AC 15 and DC 13 5A 240VA AC 15 2 5A 24Vdc DC 13 According to IEC 60947 5 1 Normal and Abnormal Conditions A7DQS or gl 10Amps fuses required Signal Relays Configuration electromechanical SPST Contact material silver alloy Operate time 10ms Minimum contact l...

Страница 21: ...le 1 3 Nominal 24Vdc 24Vdc version 140mA max 110 240Vac 120 240Vac version 60mA max Range 19 28 8Vdc 24Vdc version 77 264Vac 110 240Vac version Ride through 30ms 1 2 6 Communication specifications Profibus Port opto isolated Modes DP V1 slave up to 12Mbps Connector 9 pin D connector Standard IEC 61158 Installation PI installation guidelines Modbus RTU over RS485 Port opto isolated Baud rates up to...

Страница 22: ...EC60255 21 1 Class 1 Voltage dip and interruption IEC61000 4 11 0 40 70 dips 250 300 cycle interrupts Harmonics IEC61000 4 13 Voltage ripple IEC61000 4 17 15 ripple Environmental cold IEC60068 2 1 25 C 96 hrs Environmental dry heat IEC60068 2 2 70 C 96 hrs Relative humidity cyclic IEC60068 2 30 6 day variant 2 Short circuit current IEC60947 5 1 ATEX certificatio Rated impulse withstand voltage 4kV...

Страница 23: ...ed quality program ISO9001 ROSH compliance 1 2 9 Physical specifications The size and weight of the EntelliPro ES module is as follows Size 135mm W x 82 5mm H x104 5mm D Weight 0 45kg 1 2 10 Environmental specifications Ambient temperatures storage shipping 40 to 90 C operating 20 to 60 C Humidity operating up to 95 non condensing at 55 C per IEC60068 2 30 Variant 2 6 days operating up to 95 non c...

Страница 24: ...grammed to communicate with the EntelliPro ES devices in a MCC environment in order to provide a convenient station for viewing metering status and setting information and controlling contactors operations EntelliPro CP5 HMI can be connected to multiple EntelliPro ES devices in the MCC network while the EntelliPro CP3 HMI is mainly connected to a single EntelliPro ES device For additional informat...

Страница 25: ...ntelliPro ES It provides the capability for a full parameterization and configuration of the EntelliPro ES devices In addition it supports metering event log analog data retrieval and downloading of custom logic application Refer to Chapter 5 for detailed operation of the WinESG Figure 1 4 shows the parameterization panel view of the WinESG Set up software Figure 1 4 WinESG Panel ...

Страница 26: ...d to install commission maintain or modify this device in accordance with relevant requirements The following tables show the recommended cable type and spacing Cable type Category power cable 400VAC A control cable B function cable TMA C bus cable D Table 2 1 Recommended EntelliPro ES Cable listing Table 2 2 Recommended cable spacing NOTES Do not use multi stranded cable with combinations from ca...

Страница 27: ...describes the mechanical installation of the EPOS system including dimensions for mounting and information on module withdrawal and insertion 2 1 1 1 Dimensions The EntelliPro ES is packaged in a modular arrangement Figure 2 1 shows the dimensions of the EntelliPro ES NOTE All dimensions are in mm Figure 2 1 EntelliPro ES Dimension ...

Страница 28: ...ition The following description is applicable to the label in figure 2 2 EntelliPro ES5 DP 2 2 defines the catalog number of the device Ref No is a GE defined number for the unit Relays 41 43 and 45 are motor relays rated AC 15 5A 240Vac and DC 13 2 5A 24Vdc Supply Voltage A1 A2 24V DC indicates that the power supply for this unit is 24Vdc Terminal definitions N Modbus connection P Mobdbus connect...

Страница 29: ...e pressure on the unit mounting tabs see Item B To remove lift the unit out while holding the tabs up with a screwdriver or another appropriate tool C To insert the connector simply push the connecter toward the EntelliPro terminal see Item C Ensure you have the appropriate connector To remove separate the connector from the housing using the tip of a small screwdriver see Item C or other appropri...

Страница 30: ...31 Digital Inputs Common for Inputs 11 to 19 32 4 20 mA Output 33 4 20 mA Output 41 Digital Motor Relay Output 41 42 Digital Motor Relay Output 41 RTN 43 Digital Motor Relay Output 43 44 Digital Motor Relay Output 43 RTN 45 Digital Motor Relay Output 45 46 Digital Motor Relay Output 45 RTN 61 PTC Temperature Sensor 62 PTC Temperature Sensor 67 Ground PE 91 Supply Voltage 24Vdc or 110 230Vac 92 Sup...

Страница 31: ... are 24Vdc supply input versions while EntelliPro ES3 DP 3 0 EntelliPro ES5 DP 3 2 and EntelliPro ES5 DP 3 3 are 110 to 240Vac versions The operation range for the 24Vdc units is 19Vdc to 29Vdc The operation range for the 110 to 240Vac units is 77Vac to 266Vac CAUTION Check the voltage rating of the unit before applying control power Control power outside of the operating range of the power supply...

Страница 32: ...wnloads 2 1 2 3 Thermistor connection A positive temperature coefficient PTC thermistor can be directly connected to the EntelliPro ES TMA terminals Refer to Figure 2 4 Item C for thermistor connection Connection must be in accordance to IEC 34 11 2 2 1 2 4 Phase Current Connection The EntelliPro ES has three channels for phase current inputs The phase CTs should be chosen so the FLA is not less t...

Страница 33: ...e Open Breaker tripped2 Breaker Tripped2 External Fault Signal 1 External Supervision External Fault Signal 1 External Supervision External Supervision Feedback External Supervision Feedback Breaker ready for Switch On Breaker Ready for Switch On Torque Close Torque Close Torque Switch 2 Torque Switch 2 Drawer Test Position Signal Drawer Test Position Signal Drawer Operation Position Signal Drawer...

Страница 34: ...ed for 1 5 kV AC for 1 second isolation between relay contacts EntelliPro ES CT inputs and the PE terminal 66 Some precautions are required to prevent damage to the EntelliPro ES during these tests To avoid damage to filter capacitors and transient suppressors by continuous high voltage disconnect the PE terminal during testing of power supply inputs The CT inputs inputs and output relays do not r...

Страница 35: ... parameterization control panel shown in the illustration below or Modbus function code 6 register 115 If a source is not assigned as remote it automatically becomes a local source if enabled by checking the box to the right of the source Only one remote source can be selected NOTE If Profibus Class 1 is enabled the remote source selection can only be set to Class 1 In addition EntelliPro ES provi...

Страница 36: ...Remote Sources Listing Local sources are defined as hardwire CP Modbus RTU or other Modbus RTU modules and WinESG Remote control sources are defined as hardwire Modbus RTU or other Modbus RTU modules and Profibus Class 1 which can be PLC or other Profibus based automation system 2 2 1 2 Input Configuration Input can be configured as 1 bit or 2 bit If set to 1 bit then a single input is used to con...

Страница 37: ...trol the start stop reset operations This command may be issued only once upon power up Once the remote selection is made a start command can be issued using Modbus function code 5 register 1 To start contactor2 Modbus command function code 5 register 11 set to ON selects the remote source Modbus as a means to control the start stop reset operations Once the remote selection is made a start comman...

Страница 38: ...rotection cannot be disabled or set as warning It must be configured as fault only Thermal memory cannot be disabled Auto Reset parameter can be set to manual reset one auto reset two auto reset and three auto reset only Always ATEX redundancy contactor is made available Phase Unbalance time delay is automatically set to 500msec instead of selectable from 1 to 15 seconds automatically set to immed...

Страница 39: ...ass1 master is enabled configured as remote source and has the control of the local remote off switch Profibus Class1 bus failure detection is enabled On Class1 bus failure switch position is forced to local position Modbus failure has not affected the on switch position Refer to Figure 2 5 Figure 2 5 Control variant 1 configuration ...

Страница 40: ...usClass1master is enabled configured as remote source and hardwire has the control of the local remote off switch ProfibusClass1 bus failure detection isenabled Class1 bus failure does not affect switch position Modbus failure has not affected the on switch position Refer to Figure 2 6 Figure 2 6 Control variant 2 configuration ...

Страница 41: ...master is enabled configured as remote source and Modbus has the control of the local remote off switch Profibus Class1 bus failure detection is enabled On Class1 bus failure has no effect on the switch position On Modbus failure the switch position is forced to local position Refer to Figure 2 7 Figure 2 7 Control variant 3 configuration ...

Страница 42: ...figuration Profibus Class1 master is disabled Modbus is configured as remote source and has the control of the local remote off switch Profibus Class1 bus failure detection is disabled On Modbus failure the switch position is forced to local position Refer to figure 2 8 Figure 2 8 Control variant 4 configuration ...

Страница 43: ... Configuration Profibus Class1 master is disabled Modbus is configured as remote source and hardwire has the control of the local remote off switch Profibus Class1 bus failure detection is disabled Modbus failure has no effect on switch position Refer to Figure 2 9 Figure 2 9 Control variant 5 configuration ...

Страница 44: ...NUAL 2 19 Control Variant 6 Configuration Profibus Class1 master is enabled Any local sources Modbus WinESG Hardwire if enabled can control the motor operation ON OFF Profibus Class1 bus failure detection is disabled Refer to Figure 2 10 Figure 2 10 Control variant 6 configuration ...

Страница 45: ...er arrangement by providing GE with desired logic control for inputs outputs and timers NOTE NOTE Customer can change pre defined configurations of any motor starter if the default configuration is not to simulate the application Breaker Control selection is NOT available on EntelliPro ES Revision 1 002 Custom logic can be created to selected To select the motor starter type via Modbus holding reg...

Страница 46: ...lid OFF command must be set on hardwire Make sure an input is mapped to command OFF in WinESG parameterization I O panel or Modbus and it is active Remote or local selection must be made via the appropriate source The first step is to select the source Profibus class 1 Modbus or Hardwire that has the control of the local remote switch This is done in the WinESG parameterization control panel shown...

Страница 47: ... and remote are active the drawer ready switch will be OFF and the motor cannot start NOTE to make any changes on the configuration parameter allowed must be enabled in WinESG parameterization function panel or Modbus function code 6 register 62 Refer to section 2 2 1 for the motor control detailed configuration Full voltage non reversing starter operation when an ON1 command is received contactor...

Страница 48: ...igh Input 95 is mapped to drawer in operation mode active high Input 94 is mapped to main circuit feedback active low Input 93 is mapped to control circuit active low Input 11 is mapped to command OFF active low Input 12 is mapped to command ON active high Input 13 not used Input 14 is mapped to external fault active high Input 15 is mapped to external supervision active low Input 16 is mapped to ...

Страница 49: ...ty to change the mapping and other parameters Refer to Tables 2 6 and 2 7 for the complete default configuration of the full voltage non reversing starter motor starter Figures 2 11 and 2 12 show typical full voltage non reversing starter wiring diagrams for EntelliPro ES3 and EntelliPro ES5 Figure 2 11 EntelliPro ES3 Full voltage non reversing DOL starter wiring diagram ...

Страница 50: ...CHAPTER 2 INSTALLATION CONFIGURATION EPOS MOTOR MANAGEMENT SYSTEM INSTRUCTION MANUAL 2 25 Figure 2 12 EntelliPro ES5 full voltage non reversing starter DOL wiring diagram ...

Страница 51: ...zation I O panel or Modbus and it is active If the drawer supervision is enabled as shown below the drawer supervision hardwire input must Remote or local selection must be made via the appropriate source The first step is to select the source Profibus class 1 Modbus or Hardwire that has the control of the local remote switch This is done in the WinESG parameterization control panel shown in illus...

Страница 52: ...ion Full voltage reversing starter operation when an ON1 command is received contactor K1 controlled by EntelliPro ES output relay 41 will close provided the motor is in the off state and the drawer ready switch is active which will start the motor When an OFF command is received contactor K1 will open and the motor will stop Similarly when a reverse ON2 command is received contactor K2 controlled...

Страница 53: ...it active low Output 41 is mapped to contactor 1 Output 43 is mapped to contactor 2 Output 45 is mapped to failure For EntelliPro ES5 types Input 99 is mapped to contactor 1 feedback active high Input 98 is mapped to contactor 2 feedback active high Input 97 is mapped to reset alarm active high Input 96 is mapped to drawer in test mode active high Input 95 is mapped to drawer in operation mode act...

Страница 54: ...ch high priority and identification relay flashing low priority Output 26 is mapped to failure NOTE if default configuration box is left un checked the user will have the ability to change the mapping and other parameters Refer to Tables 2 6 and 2 7 for the complete input output timer and control configurations of the full voltage reversing starter motor starter Figures 2 13 and 2 14 show a typica...

Страница 55: ...CHAPTER 2 INSTALLATION CONFIGURATION 2 30 EPOS MOTOR MANAGEMENT SYSTEM INSTRUCTION MANUAL Figure 2 14 EntelliPro ES5 Full voltage reversing starter wiring diagram ...

Страница 56: ... via the appropriate source The first step is to select the source Profibus class 1 Modbus or Hardwire that has the control of the local remote switch This is done in the WinESG parameterization control panel shown in illustration below If Profibus Class 1 is selected as a controlling mechanism telegram B10008 bit 9 sets the local control and bit 10 sets the remote control If bit 9 is set all mech...

Страница 57: ...nfiguration When the Y contact feedback mapped to the EntelliPro input is received contactor K1 controlled by EntelliPro ES output relay 41 will close connecting the motor to the supply The motor will start at 58 of the line voltage When the Y contactor maximum ON time timer expires or the current has fallen below a pre defined value set by threshold 4 typical specific in WinESG parameterization d...

Страница 58: ... low Output 41 is mapped to contactor 1 Output 43 is mapped to contactor D Output 45 is mapped to contactor Y For EntelliPro ES5 types Input 99 is mapped to contactor 1 feedback active high Input 98 is mapped to contactor Y feedback active high Input 97 is mapped to contactor D feedback active high Input 96 is mapped to drawer test position active high Input 95 is mapped to drawer operation positi...

Страница 59: ...o drawer ready switch high priority and identification relay flashing low priority Output 26 is mapped to failure NOTE if default configuration box is left un checked the user will have the ability to change the mapping and other parameters Refer to Tables 2 6 and 2 7 for the complete input output timer and control configurations of the Star delta motor starter Figures 2 15 and 2 16 show typical S...

Страница 60: ...CHAPTER 2 INSTALLATION CONFIGURATION EPOS MOTOR MANAGEMENT SYSTEM INSTRUCTION MANUAL 2 35 Figure 2 16 EntelliPro ES5 Star delta open transition starter wiring diagram ...

Страница 61: ...panel or Modbus and it is active If the drawer supervision is enabled as shown below the drawer supervision hardwire input must be active Remote or local selection must be made via the appropriate source The first step is to select the source Profibus class 1 Modbus or Hardwire that has the control of the local remote switch This is done in the WinESG parameterization control panel shown in illust...

Страница 62: ...elliPro ES output relay 23 will close connecting the motor in a Wye configuration When the Y contact feedback mapped to the EntelliPro input is received contactor K1 controlled by EntelliPro ES output relay 41 will close connecting the motor to the supply The motor will start at 58 of the line voltage When the Y contactor maximum ON time timer expires or the current has fallen below a pre defined ...

Страница 63: ...figuration and the Star delta reverse typical are selected in the WinESG parameterization information panel shown in the illustration below or by setting Modbus function code 6 register 62 bit0 to 1 and bits 8 9 10 and 11 to 0x3 the inputs and outputs are mapped as below For EntelliPro ES5 types Input 99 is mapped to contactor 1 feedback active high Input 98 is mapped to contactor 2 feedback activ...

Страница 64: ...tion relay flashing low priority Output 26 is mapped to failure NOTE if default configuration box is left un checked the user will have the ability to change the mapping and other parameters Refer to Tables 2 6 and 2 7 for the complete input output timer and control configurations of the Star delta reverse motor starter NOTE this typical is not available on EntelliPro ES3 Figures 2 17 shows a typi...

Страница 65: ... OFF in WinESG parameterization I O panel or Modbus and it is active If the drawer supervision is enabled as shown below the drawer supervision hardwire input must be active Remote or local selection must be made via the appropriate source The first step is to select the source Profibus class 1 Modbus or Hardwire that has the control of the local remote switch This is done in the WinESG parameteri...

Страница 66: ...otor control detailed configuration Soft starter operation when an ON1 command is received contactor K1 controlled by EntelliPro output relay 41 will close This provides power for the soft starter to start and power to drive the motor When the soft starter signals up to speed by closing relay UTS the starter generates the soft starter bypass signal and the EntelliPro ES relay 43 is then closed If ...

Страница 67: ...low Input 97 is mapped to by pass contactor feedback active high Input 96 is mapped to up to speed feedback active high Input 95 is mapped to emergency circuit active low Input 94 is mapped to external supervision active high Input 93 is mapped to safety circuit active low Output 41 is mapped to contactor 1 Output 43 is mapped by pass contactor Output 45 is mapped to reset alarm For EntelliPro ES5...

Страница 68: ... On1 command start Output 24 is mapped to reset Output 25 is mapped to drawer ready switch high priority and identification relay flashing low priority Output 26 is mapped to failure NOTE If default configuration box is left un checked the user will have the ability to change the mapping and other parameters NOTE Ensure soft starter is located before contactor Refer to Tables 2 6 and 2 7 for the c...

Страница 69: ...CHAPTER 2 INSTALLATION CONFIGURATION 2 44 EPOS MOTOR MANAGEMENT SYSTEM INSTRUCTION MANUAL Figure 2 19 EntelliPro ES5 softstarter starter wiring diagram ...

Страница 70: ...ed to command OFF in WinESG parameterization I O panel or Modbus and it is active If the drawer supervision is enabled as shown below the drawer supervision hardwire input must be active Remote or local selection must be made via the appropriate source The first step is to select the source Profibus class 1 Modbus or Hardwire that has the control of the local remote switch This is done in the WinE...

Страница 71: ...etailed configuration Soft starter reverse operation when an ON1 command is received contactor K1 controlled by EntelliPro output relay 41 will close This provides power for the soft starter to start and power to drive the motor in the forward direction When the soft starter signals up to speed by closing relay UTS the starter generates the soft starter bypass signal and the EntelliPro ES relay 45...

Страница 72: ...el or Modbus function code 6 register 36 expires prior to the bypass input signal When an OFF command is received and the soft stop is activated in WinESG parameterization timer panel or Modbus function code 6 register 111 bit5 contactor relay output 45 opens signaling the soft starter to ramp down The opening time of contactor K3 controlled by EntelliPro ES output relay 43 is dependent on the con...

Страница 73: ...mapped to up to speed feedback active high Input 95 is mapped to starter fault feedback active low Input 94 is mapped to main circuit feedback active low Input 93 is mapped to control circuit feedback active low Input 11 is mapped to command OFF active low Input 12 is mapped to command forward ON1 active high Input 13 is mapped to command reverse ON2 active high Input 14 is mapped to external faul...

Страница 74: ...nge the mapping and other parameters NOTE Ensure soft starter is located before contactor Refer to Tables 2 6 and 2 7 for the complete input output timer and control configurations of the reverse soft starter Figures 2 20 and 2 21 show typical reverse soft starter diagrams for EntelliPro ES3 and EntelliPro ES5 Figure 2 20 EntelliPro ES3 reverse softstarter starter wiring diagram ...

Страница 75: ...CHAPTER 2 INSTALLATION CONFIGURATION 2 50 EPOS MOTOR MANAGEMENT SYSTEM INSTRUCTION MANUAL Figure 2 21 EntelliPro ES5 reverse softstarter starter wiring diagram ...

Страница 76: ...and it is active If the drawer supervision is enabled as shown below the drawer supervision hardwire input must be active Remote or local selection must be made via the appropriate source The first step is to select the source Profibus class 1 Modbus or Hardwire that has the control of the local remote switch This is done in the WinESG parameterization control panel shown in illustration below If ...

Страница 77: ...e enabled in WinESG parameterization function panel or Modbus function code 6 register 62 Refer to section 2 2 1 for the motor control detailed configuration Breaker control operation When a start function ON1 is received contactor K1 controlled by EntelliPro output relay 41 will close for pre defined time defined as breaker open close signal time in WinESG parameterization timer panel or Modbus f...

Страница 78: ...1 active low Input 93 is mapped to safety circuit active low Output 41 is mapped to breaker ON Output 43 is mapped to breaker OFF Output 45 is mapped to reset For EntelliPro ES5 types Input 99 is mapped to breaker ON feedback active high Input 98 is mapped to breaker ready to switch ON feedback active high Input 97 is mapped to breaker charged feedback active high Input 96 is mapped to external fa...

Страница 79: ...7 for the complete input output timer and control configurations of breaker control motor starter Figures 2 22 and 2 23 show typical breaker control motor starter diagrams for EntelliPro ES3 and EntelliPro ES feedback alarm is disabled the Breaker status will be ON irrepective of the breaker feedback hardwired input NOT the Breaker auxiliary switch status Breaker feedback input For example if the ...

Страница 80: ...CHAPTER 2 INSTALLATION CONFIGURATION EPOS MOTOR MANAGEMENT SYSTEM INSTRUCTION MANUAL 2 55 Figure 2 23 EntelliPro ES5 Breaker control starter wiring diagram ...

Страница 81: ... Modbus and it is active If the drawer supervision is enabled as shown below the drawer supervision hardwire input must be active Remote or local selection must be made via the appropriate source The first step is to select the source Profibus class 1 Modbus or Hardwire that has the control of the local remote switch This is done in the WinESG parameterization control panel shown in illustration b...

Страница 82: ...ceived contactor K1 controlled by EntelliPro ES output relay 41 will close which will start the motor in a low speed When an ON2 command high speed is received contactor K1 opens When the low speed feedback input from contactor K1 is inactive removed contactor Y controlled by EntelliPro ES output relay 45 will close When the contactor Y feedback signal is received contactor K2 controlled by Entell...

Страница 83: ...back active low Input 95 is mapped to emergency stop active low Input 94 is mapped to external supervision active high Input 93 is mapped to safety circuit active low Output 41 is mapped to contactor 1 Output 43 is mapped to contactor 2 Output 45 is mapped to contactor Y For EntelliPro ES5 types Input 99 is mapped to contactor 1 feedback active high Input 98 is mapped to contactor 2 feedback activ...

Страница 84: ...Output 24 is mapped to fast ON2 feedback Output 25 is mapped to drawer ready switch high priority and identification relay flashing low priority Output 26 is mapped to failure NOTE If default configuration box is left un checked the user will have the ability to change the mapping and other parameters Figures 2 23 and 2 24 show typical Dahlander starter wiring diagrams for EntelliPro ES3 and Entel...

Страница 85: ...CHAPTER 2 INSTALLATION CONFIGURATION 2 60 EPOS MOTOR MANAGEMENT SYSTEM INSTRUCTION MANUAL Figure 2 25 EntelliPro ES5 Dahlander starter wiring diagram ...

Страница 86: ... or Modbus and it is active If the drawer supervision is enabled as shown below the drawer supervision hardwire input must be active Remote or local selection must be made via the appropriate source The first step is to select the source Profibus class 1 Modbus or Hardwire that has the control of the local remote switch This is done in the WinESG parameterization control panel shown in illustratio...

Страница 87: ...abled in WinESG parameterization function panel or Modbus function code 6 register 62 Refer to section 2 2 1 for the motor control detailed configuration Pole changer starter operation when an ON1 command low speed is received contactor K1 controlled by EntelliPro output relay 41 will close which will start the motor in a low speed When a start function ON2 high speed is received contactor K1 open...

Страница 88: ...o contactor 2 Output 45 is mapped to failure For EntelliPro ES5 types Input 99 is mapped to contactor 1 feedback active high Input 98 is mapped to contactor 2 feedback active high Input 97 is mapped to reset alarm active high Input 96 is mapped to drawer in test mode active high Input 95 is mapped to drawer in operation mode active high Input 94 is mapped to main circuit feedback active low Input ...

Страница 89: ...entification relay flashing low priority Output 26 is mapped to failure NOTE If default configuration box is left un checked the user will have the ability to change the mapping and other parameters Refer to Tables 2 6 and 2 7 for the complete input output timer and configurations of a Pole changer starter Figures 2 26 and 2 27 show typical Pole changer starter diagrams for EntelliPro ES3 and Ente...

Страница 90: ...CHAPTER 2 INSTALLATION CONFIGURATION EPOS MOTOR MANAGEMENT SYSTEM INSTRUCTION MANUAL 2 65 Figure 2 27 EntelliPro ES5 Pole changer starter wiring diagram ...

Страница 91: ... enabled as shown below the drawer supervision hardwire input must be active Remote or local selection must be made via the appropriate source The first step is to select the source Profibus class 1 Modbus or Hardwire that has the control of the local remote switch This is done in the WinESG parameterization control panel shown in illustration below If Profibus Class 1 is selected as a controlling...

Страница 92: ... In order to start the solenoid the limit switch 1 reached and limit switch 2 reached inputs inputs 96 and 97on EntelliPro ES3 and inputs 18 and 19 on EntelliPro ES5 must NOT be active at the same time NOTE If both limit switches inputs are active input 96 and 97 on EntelliPro ES3 and 18 and 19 on EntelliPro ES5 a typical specific error will be generated since this is an invalid condition When an ...

Страница 93: ...are selected in the WinESG parameterization information panel shown in the illustration below or by setting Modbus function code 6 register 62 bit0 to 1 and bits 8 9 10 and 11 to 0x9 the inputs and outputs are mapped as below For EntelliPro ES3 types Input 99 is mapped to contactor 1 feedback active high Input 98 is mapped to main circuit active low Input 97 is mapped to limit switch 1 reached act...

Страница 94: ...put 16 is mapped to emergency stop active low Input 17 is mapped to safety circuit active low Input 18 is mapped to limit switch 1 feedback active low Input 19 is mapped to limit switch 2 feedback active low Output 41 is mapped to contactor 1 Output 43 is mapped to ready to switch On Output 45 is mapped to warning high priority and failure relay flashing low priority Output 22 is mapped to local c...

Страница 95: ...CHAPTER 2 INSTALLATION CONFIGURATION 2 70 EPOS MOTOR MANAGEMENT SYSTEM INSTRUCTION MANUAL Figure 2 28 EntelliPro ES3 Solenoid valve wiring diagram ...

Страница 96: ...CHAPTER 2 INSTALLATION CONFIGURATION EPOS MOTOR MANAGEMENT SYSTEM INSTRUCTION MANUAL 2 71 Figure 2 29 EntelliPro ES5 Solenoid valve wiring diagram ...

Страница 97: ...e made via the appropriate source The first step is to select the source Profibus class 1 Modbus or Hardwire that has the control of the local remote switch This is done in the WinESG parameterization control panel shown in illustration below If Profibus Class 1 is selected as a controlling mechanism telegram B10008 bit 9 sets the local control and bit 10 sets the remote control If bit 9 is set al...

Страница 98: ... remote are active the drawer ready switch will be OFF and the motor cannot start NOTE To make any changes on the configuration parameter allowed must be enabled in WinESG parameterization function panel or Modbus function code 6 register 62 Refer to section 2 2 1 for the motor control detailed configuration This motor starter supports switch off at limit switch switch off at torque switch and swi...

Страница 99: ...ut 97 on EntelliPro ES3 and input 18 on EntelliPro ES5 active the motor will stop and will not rotate in the same direction The motor can only re start on the opposite direction by using command ON2 after the motor ON direction switchover time timer set in WinESG parameterization timer or Modbus function code 6 register 30 expires Similarly when an ON2 left command is received contactor K2 control...

Страница 100: ... ON direction switchover time timer set in WinESG parameterization timer or Modbus function code 6 register 30 expires Similarly when an ON2 left command is received contactor K2 controlled by EntelliPro output relay 43 will close provided the motor is in the off state and the drawer ready switch is active which will start the motor in a left direction When the limit switch 1 is reached input 96 o...

Страница 101: ...en an ON2 left command is received contactor K2 controlled by EntelliPro output relay 43 will close provided the motor is in the off state and the drawer ready switch is active which will start the motor in a left direction When the torque limit 2 input 15 on EntelliPro ES5 is reached a position switch warning or fault will be generated The warning or fault will be dependent of limit torque switch...

Страница 102: ...en an ON2 left command is received contactor K2 controlled by EntelliPro output relay 43 will close provided the motor is in the off state and the drawer ready switch is active which will start the motor in a left direction When the torque limit 2 input 15 on EntelliPro ES5 is reached a position switch warning or fault will be generated The warning or fault will be dependent of limit torque switch...

Страница 103: ...ich will start the motor in a left direction When the current has exceeded the typical specific threshold 4 set in WinESG parameterization device settings panel or Modbus function code 6 register 21 the motor will stop and will not rotate in the same direction The motor can only re start on the opposite direction by using command ON1 after the motor ON direction switchover time timer set in WinESG...

Страница 104: ...a left direction When the limit switch 2 is reached input 15 on EntelliPro ES5 active the motor will stop and will not rotate in the same direction The motor can only re start on the opposite direction by using command ON1 after the motor ON direction switchover time timer set in WinESG parameterization timer or Modbus function code 6 register 30 expires In case the motor is running in one directi...

Страница 105: ...high Input 94 is mapped to main circuit feedback active low Input 93 is mapped to control circuit feedback active low Input 11 is mapped to command OFF active low Input 12 is mapped to command ON1 active high Input 13 is mapped to command ON2 active high Input 14 is mapped to torque switch 1 feedback active low Input 15 is mapped to torque switch 2 feedback active low Input 16 is mapped to emergen...

Страница 106: ...N MANUAL 2 81 Refer to Tables 2 6 and 2 7 for the complete input output timer and control configurations of an actuator starter Figures 2 30 and 2 31 show typical actuator starter diagrams for EntelliPro ES3 and EntelliPro ES5 Figure 2 30 EntelliPro ES3 Actuator wiring diagram ...

Страница 107: ...CHAPTER 2 INSTALLATION CONFIGURATION 2 82 EPOS MOTOR MANAGEMENT SYSTEM INSTRUCTION MANUAL Figure 2 31 EntelliPro ES5 Actuator starter wiring diagram ...

Страница 108: ...ctivated Deactivated Deactivated Deactivated Deactivated Deactivated Drawer Position 1 bit Modus 2 bit Modbus N A N A N A N A N A N A N A N A N A N A N A Modbus Failure Detection Enable Enable Enable N A Enable Enable Enable Enable Enable Enable Enable ATEX Activated Deactivated Deactivated Deactivated N A Deactivated Deactivated Deactivated Deactivated Deactivated Deactivated Deactivated bit 5 Re...

Страница 109: ...ow Active Low Active Low Active High Active High Active Low Active High Input 93 Mapping Safety Circuit Safety Circuit Safety Circuit N A Safety Circuit Safety Circuit Safety Circuit Safety Circuit Safety Circuit Safety Circuit Safety Circuit Input 93 High low Activation Active Low Active Low Active Low N A Active Low Active Low Active Low Active Low Active Low Active Low Active Low Relay Output M...

Страница 110: ...d Drawer Position 1 bit Modus 2 bit Modbus 2 bit 2 bit 2 bit N A 2 bit N A N A 2 bit 2 bit N A 2 bit Modbus Failure Detection Enable Enable Enable Enable Enable Enable Enable Enable Enable Enable Enable ATEX Activated Activated Activated Activated Activated Activated Activated Activated Activated Activated Activated Activated bit 5 Remote OFF always valid Deactivated Deactivated Deactivated Deacti...

Страница 111: ...High Active High Active High Active High Active High Active High Input 14 Mapping External Fault 1 External Fault 1 External Fault 1 External Fault 1 External Fault 1 External Fault 1 External Fault 1 External Fault 1 External Fault 1 fb torque open External Fault 1 Input 14 High low Activation Active High Active High Active High Active High Active High Active High Active High Active High Active H...

Страница 112: ...et Reset Warning ON 2 Feedback ON 2 Feedback Limit Switch Left Feedback Warning Second Function Relay 24 Mapping None None None None None None None None None Run Left Flashing None First Function Relay 25 Mapping Ready to Switch ON Ready to Switch ON Ready to Switch ON Ready to Switch ON Ready to Switch ON Ready to Switch ON Ready to Switch ON Ready to Switch ON Ready to Switch ON Ready to Switch ...

Страница 113: ...ing value is calculated continuously When the motor is in overload state the motor temperature and the accumulated motor heating value will rise A trip occurs when the accumulated motor heating value reaches 100 When the motor is stopped and is cooling to an ambient temperature the accumulated motor heating value decays to zero according to the selected cooling settings The thermal model consists ...

Страница 114: ...s additional heating the EntelliPro ES allows the thermal model to be biased with negative sequence current This biasing is accomplished by multiplying the average current by 1 43 in case of phase unbalance and 1 85 in case of phase loss 3 1 2 Hot cold biasing When the motor is running with a constant load below the overload level the motor will eventuallyreach a steady state temperature that corr...

Страница 115: ...s to a maximum trip time allowed when the applied primary current is 7 2 times the EntelliPro ES IN setting The trip time accuracy is 10 for up to 8 times the motor load and 20 The overload curve can be set in the WinESG parameterization device settings panel shown in the illustration below or Modbus function code 6 register 12 Figures 3 1 and 3 2 and Tables 3 1 and 3 2 show the trip time curves f...

Страница 116: ...Wire 1 000 100 Class 40 Class 35 Class 30 10 Class 25 Class 20 Class 15 Class 10 Class 5 1 0 1 1 2 x Motor Load x In 100 0 Figure 3 1 EntelliPro ES trip time curves under normal condition CAUTION if protection above 10 times the motor current IN is desired rated motor current derating may be necessary Refer to section 1 2 3 for additional information ...

Страница 117: ...000 100 Class 40 10 Class 35 Class 30 Class 25 Class 20 Class 15 Class 10 1 0 1 0 9 1 0 x Motor Load x In Class 5 10 0 100 0 Figure 3 2 EntelliPro ES trip time curves under phase loss conditions CAUTION If protection above 10 times the motor current IN is desired rated motor current derating may be necessary Refer to section 1 2 3 for additional information ...

Страница 118: ...nESG parameterization device settings panel shown in the illustration below or Modbus function code 6 register 12 Example If the EntelliPro ES unit is set to class 5 and cool down factor to 1 it will take approximately 59 seconds after a trip for the motor to cool If the cool down factor is set to 15 it will take approximately 889 seconds for the motor to cool and the reset to be allowed After an ...

Страница 119: ...5 766 5 821 25 60 78 45 1 56 9 235 35 31 3 8 392 25 470 7 549 1 5 627 6 706 05 784 5 862 95 862 95 862 95 1 098 3 1 1 76 75 50 1 06 35 21 2 7 31 9 05 425 4 531 75 638 1 744 45 850 8 957 1 5 1 063 5 1 1 69 85 1 1 69 85 1 1 69 85 1 488 9 1 595 25 40 1 40 7 281 4 422 1 562 8 703 5 844 2 984 9 1 1 25 6 1 266 3 1 407 1 547 7 1 547 7 1 547 7 1 969 8 21 1 0 5 30 1 84 8 369 6 554 4 739 2 924 1 1 08 8 1 29...

Страница 120: ...405 25 1 405 25 1 788 5 1 91 6 25 60 1 83 05 366 1 549 1 5 732 2 91 5 25 1 098 3 1 281 35 1 464 4 1 647 45 1 830 5 201 3 55 201 3 55 201 3 55 2562 7 2745 75 50 248 1 5 496 3 744 45 992 6 1 240 75 1 488 9 1 737 05 1 985 2 2233 35 2481 5 2729 65 2729 65 2729 65 3474 1 3722 25 40 328 3 656 6 984 9 1 31 3 2 1 641 5 1 969 8 2298 1 2626 4 2954 7 3283 361 1 3 361 1 3 361 1 3 4596 2 4924 5 30 431 2 862 4 ...

Страница 121: ... 095 1 277 5 1 460 1 642 5 1 825 2007 5 2007 5 2007 5 2555 2737 5 60 261 5 523 784 5 1 046 1 307 5 1 569 1 830 5 2092 2353 5 261 5 2876 5 2876 5 2876 5 3661 3922 5 50 354 5 709 1 063 5 1 41 8 1 772 5 21 27 2481 5 2836 31 90 5 3545 3899 5 3899 5 3899 5 4963 531 7 5 40 469 938 1 407 1 876 2345 281 4 3283 3752 4221 4690 51 59 51 59 51 59 6566 7035 30 61 6 1 232 1 848 2464 3080 3696 431 2 4928 5544 61...

Страница 122: ...60 350 41 700 82 1 051 23 1 401 64 1 752 05 21 02 46 2452 87 2803 28 31 53 69 3504 1 3854 51 3854 51 3854 51 4905 74 5256 1 5 50 475 03 950 06 1 425 09 1 900 1 2 2375 1 5 2850 1 8 3325 21 3800 24 4275 27 4750 3 5225 33 5225 33 5225 33 6650 42 71 25 45 40 628 46 1 256 92 1 885 38 251 3 84 31 42 3 3770 76 4399 22 5027 68 5656 1 4 6284 6 691 3 06 691 3 06 691 3 06 8798 44 9426 9 30 825 44 1 650 88 24...

Страница 123: ...5 4653 75 60 444 55 889 1 1 333 65 1 778 2 2222 75 2667 3 31 1 1 85 3556 4 4000 95 4445 5 4890 05 4890 05 4890 05 6223 7 6668 25 50 602 65 1 205 3 1 807 95 241 0 6 301 3 25 361 5 9 421 8 55 4821 2 5423 85 6026 5 6629 1 5 6629 1 5 6629 1 5 8437 1 9039 75 40 797 3 1 594 6 2391 9 31 89 2 3986 5 4783 8 5581 1 6378 4 71 75 7 7973 8770 3 8770 3 8770 3 1 1 1 62 2 1 1 959 5 30 1 047 2 2094 4 31 41 6 41 88...

Страница 124: ...0 1 825 21 90 2555 2920 3285 3650 401 5 401 5 401 5 51 1 0 5475 60 523 1 046 1 569 2092 261 5 31 38 3661 41 84 4707 5230 5753 5753 5753 7322 7845 50 709 1 41 8 21 27 2836 3545 4254 4963 5672 6381 7090 7799 7799 7799 9926 1 0635 40 938 1 876 281 4 3752 4690 5628 6566 7504 8442 9380 1 031 8 1 031 8 1 031 8 1 31 32 1 4070 30 1 232 2464 3696 4928 61 60 7392 8624 9856 1 1 088 1 2320 1 3552 1 3552 1 355...

Страница 125: ...6 25 60 601 45 1 202 9 1 804 35 2405 8 3007 25 3608 7 421 0 15 481 1 6 5413 05 601 4 5 661 5 95 661 5 95 661 5 95 8420 3 9021 75 50 81 5 35 1 630 7 2446 05 3261 4 4076 75 4892 1 5707 45 6522 8 7338 1 5 8153 5 8968 85 8968 85 8968 85 1 1 41 4 9 1 2230 25 40 1 078 7 21 57 4 3236 1 431 4 8 5393 5 6472 2 7550 9 8629 6 9708 3 1 0787 1 1 865 7 1 1 865 7 1 1 865 7 1 51 01 8 1 61 80 5 30 1 41 6 8 2833 6 4...

Страница 126: ... 60 706 05 1 41 2 1 21 1 8 1 5 2824 2 3530 25 4236 3 4942 35 5648 4 6354 45 7060 5 7766 55 7766 55 7766 55 9884 7 1 0590 75 50 957 1 5 1 91 4 3 2871 45 3828 6 4785 75 5742 9 6700 05 7657 2 861 4 35 9571 5 1 0528 65 1 0528 65 1 0528 65 1 3400 1 1 4357 25 40 1 266 3 2532 6 3798 9 5065 2 6331 5 7597 8 8864 1 1 01 30 4 1 1 396 7 1 2663 1 3929 3 1 3929 3 1 3929 3 1 7728 2 1 8994 5 30 1 663 2 3326 4 498...

Страница 127: ...11 shows an example of the auto reset count operation In this particular example the auto reset is set to 2 OL Trip Auto Reset 1 OL Trip Auto Reset 2 OL Trip Manual Reset 1 Auto Reset allowed after 1 hour of last reset at T 3 t 0 t 1 t 2 t 3 t n Time minutes Figure 3 11 EntelliPro Auto reset operation For an ATEX configured device the Auto Reset parameter can be set to four different values 0 1 2 ...

Страница 128: ...are allowed after an overload trip occurred NOTE auto reset will NOT be allowed for 1 hour after the second trip When the auto reset parameter is set to 3 3 auto resets are allowed after an overload trip occurred NOTE auto reset will NOT be allowed for 1 hour after the third trip The auto reset can be set to higher values if ATEX is disabled For settings above 4 auto reset is always allowed NOTE I...

Страница 129: ...e when command ON1 is issued the EntelliPro protections are based on CT rated current and motor rated current and when command ON2 is issued the EntelliPro protections are based CT rated current low and motor rated current low All other overload settings apply to both CTs and motor loads values The current transformer and motor load ratings are set in WinESG parameterization device settings panel ...

Страница 130: ...register 5 Thermal overload as other protections can be enabled or disabled set as a warning or failure and requiring an auto or manual reset after a failure in WinESG parameterization alarms panel shown in illustration below or Modbus function code 6 registers 114 enable disable 64 warning failure and 63 auto manual reset NOTE For an ATEX configured device overload protection cannot be disabled o...

Страница 131: ...tion systems the delay time can be set from 1 to 15 seconds For ATEX certified units phase loss and unbalance are enabled with faults occurring immediately Phase loss cannot be modified to generate a warning in case of ATEX Phase unbalance and phase loss time delay are set in WinESG parameterization device settings panel shown in the illustration below or Modbus function code 06 register 56 Phase ...

Страница 132: ... the illustration below or Modbus function code 06 register 56 Trip current is set from 0 2 to 1 0 x Ir in 0 1 increments The time delay is set from 100 to 1000 msec in 100 msec increments Ground fault can be enabled or disabled set as a warning or failure and requiring an auto or manual reset after a failure in WinESG parameterization alarms panel shown in illustration below or Modbus function co...

Страница 133: ...arameterization device settings panel shown in the illustration below or Modbus function code 06 register 18 The over current is settable from 100 to 800 of motor current Ir If a current exceeds this current threshold for a pre defined timer set in WinESG parameterization timer panel shown in the illustration below or Modbus function code 06 register 32 a failure or warning will be generated depen...

Страница 134: ...lled rotor protection can be enabled or disabled set as a warning or failure and requiring an auto or manual reset after a failure in WinESG parameterization alarms panel shown in illustration below or Modbus function code 6 registers 114 enable disable 64 warning failure and 63 auto manual reset ...

Страница 135: ...nel shown in the illustration below or Modbus function code 06 register 20 The under current threshold is settable from 1 to 100 of motor load Ir If a current falls below the under current threshold for a pre defined timer set in WinESG parameterization timer panel shown in the illustration below or Modbus function code 06 register 40 a failure or warning will be generated depending on the alarm s...

Страница 136: ...r current can be enabled or disabled set as a warning or failure and requiring an auto or manual reset after a failure in WinESG parameterization alarms panel shown in illustration below or Modbus function code 6 registers 114 enable disable 64 warning failure and 63 auto manual reset ...

Страница 137: ...stor short and open detection is set in the WinESG parameterization typical settings panel shown in the illustration below or in Modbus function code 6 register 130 bit2 If set a warning or failure will be generated in case of short or open thermistor condition depending on the alarm setting Thermistor can be enabled or disabled set as a warning or failure and requiring an auto or manual reset aft...

Страница 138: ...an be connected on a single communication channel is limited to 32 including the master Please refer to the EIA 485 standard for complete details of the physical interface including cabling termination and shielding 4 1 1 Modbus address setting In a Modbus RTU Network each EntelliPro ES module must have a unique address that can be set from 1 to 126 Address 0 is the broadcast address detected by a...

Страница 139: ... is selected the address value can be set In WinESG parameterization Modbus setting panel shown In Illustration below or Modbus function code 6 register 103 If Modbus address is misplaced or forgotten the front left switch can be set to address D and the Entellipro ES will reset Modbus to address 247 ...

Страница 140: ...llustration below or Modbus function code 6 register 90 The EntelliPro supports the configured baud rate settings listed in Table 4 1 which can be set via communications The first number is the baud rate 300 19 200 the first digit after the dash is the number of data bits fixed at 8 the letter represents the parity setting N none E even O odd and the last digit is the stop bit Modbus connection Ad...

Страница 141: ...8E1 1200 8E1 2400 8E1 4800 8E1 9600 8E1 19200 8E1 300 8N1 600 8N1 1200 8N1 2400 8N1 4800 8N1 9600 8N1 19200 8N1 Table 4 1 EntelliPro baud rate settings 4 1 3 Modbus function codes The EntelliPro ES supports the following function codes 03 Read Holding Registers 04 Read Input Registers 05 Force Single Coil 06 Preset Single Register 16 Preset Multiple Registers 20 Read General Reference 21 Write Gen...

Страница 142: ...equire polarization one pair of resistors must be attached to the RS 485 balanced wire pair as follows Pull up resistor to 5 V on the positive line Pull down resistor to common on the negative line These resistors must be between 450 and 650 Ω The latter may allow a higher number of devices to be connected to the serial bus NOTE Pull up and pull down resistors are recommended in an industrial envi...

Страница 143: ... the EntelliPro ES is the first device place a 120 Ω 1 2 W resistor between the and connectors of the RS 485 port If the EntelliPro ES is the last device place the resistor between the and connectors of the RS 485 port Figure 4 3 illustrates appropriate termination of an RS 485 segment at the EntelliPro ES If the termination resistor power dissipation is an issue then an RC termination should be c...

Страница 144: ...rom the master Only the addressed slave device responds to a transmission beginning with this address A device address of 0 indicates a broadcast command Function code This is the second byte of each transmission and represents the commanded action to the slave device for queries from the master or the action that was taken by the slave device for responses from the slave Codes between 1 and 127 a...

Страница 145: ... the high order byte sent first For example consider a request for slave II to respond with 3 registers starting at address 006B For this example the register data in these addresses is as follows Address Data 0002 0001 0003 0000 0004 0012 The master slave packets have the following format MASTER TRANSMISSION BYTES EXAMPLE DESCRIPTION SLAVE ADDRESS 1 11 message for slave 17 FUNCTION CODE 1 03 read...

Страница 146: ... the data bytes to follow the data itself and the CRC Each data item is sent as a two byte number with the high order byte sent first For example request slave 17 to respond with 1 register starting at address 0008 For this example the value in this register 0008 is 0000 MASTER TRANSMISSION BYTES EXAMPLE DESCRIPTION SLAVE ADDRESS 1 11 message for slave 17 FUNCTION CODE 1 04 read registers DATA STA...

Страница 147: ...et we have the following master slave packet format Master Transmission Bytes Example Description SLAVE ADDRESS 1 11 message for slave 17 FUNCTION CODE 1 05 execute operation OPERATION CODE 2 00 01 operation code 1 CODE VALUE 2 FF 00 perform function CRC 2 DF 6A CRC error code Slave Response Bytes Example Description SLAVE ADDRESS 1 11 message from slave 17 FUNCTION CODE 1 05 execute operation OPE...

Страница 148: ...gency stop Failure 71 Reset Limit Switch Failure 72 Reset Safety Circuit Failure 73 Reset Main Circuit Failure 74 Reset Control Circuit Failure 75 Reset Switch Position Failure 76 Reset Under Load Current Failure 77 Reset Overload Current Failure 78 Reset External Supervision Failure 79 Reset Long Start Failure 80 Reset Typical Specific Failure 81 Reset Overload Warning 82 Reset Phase Loss Warning...

Страница 149: ...og Manual Trigger 142 Stop Analog Value Log 144 Clear Overload Accumulator 1793 Read Real Time Clock Registers 180 Clear Event Log 1814 Write Real Time Clock Registers 184 Set factory default parameters Save parameters in memory 1 If the local remote off switch is set to OFF and an OFF command is received from a remote source it will be ignored unless the lock switch is enabled 2 When this command...

Страница 150: ...e request slave 17 to store the value 2 in setpoint address 04 5C After the transmission in this example is complete setpoints address 04 5C will contain the value 00 02 The master slave packet format is shown below Master Transmission Bytes Example Description SLAVE ADDRESS 1 11 message for slave 17 FUNCTION CODE 1 06 store single setpoint DATA STARTING ADDRESS 2 04 5C setpoint address 04 5C DATA...

Страница 151: ... a request for slave 17 to store the value 00 02 to setpoint address 04 5C and the value 01 F4 to setpoint address 04 5D After the transmission in this example is complete EntelliPro ES slave 17 will have the following setpoints information stored The master slave packets have the following format Master Transmission Bytes Example Description SLAVE ADDRESS 1 11 message for slave 17 FUNCTION CODE 1...

Страница 152: ...2 0x0001 Read all 255 Events 0x0002 Read Current RMS Record Number 2 0x 0000 to 0x03E8 Register Length 2 0x0000 to 0 x 007B Table 4 8 Function Code 14H 4 1 10 7 Function Code 15H Modbus Implementation Write File Record EntelliPro Implementation Write Custom logic This command allows the master to write a file containing the custom logic to the EntelliPro ES This function code is used to perform a ...

Страница 153: ... the master with CRC errors will be ignored by the EntelliPro ES The slave response to an error other than CRC error will be Slave Address 1 byte Function Code 1 byte with MSbit set to 1 Exception Code 1 byte Crc 2 bytes The EntelliPro ES implements the following exception response codes 01 Illegal Function The function code transmitted is not one of the functions supported by the EntelliPro ES 02...

Страница 154: ...ring by 2 minutes after motor start Bit3 Free Bit4 Debug Mode 0 OFF 1 ON Debug mode ON Additional Profibus DP telegram will be available V4 retrofit telegram B2721 V5 telegram B40005 Bit5 Bit6 Phase Selection 00 3 Phase 01 2 Phase Bit5 1 Bit6 0 10 1 Phase Bit5 0 Bit6 1 Number of phase selection Bit7 TwoSpeedMotor Type of motor selection 0 disable 1 enable use for pole changer and Dahlandertypicals...

Страница 155: ...ow 1 65535 1 msec Setting 100 msec Unsigned Integer 1 30 16 bit Timer5 Minimum switch over time 1 65535 1 msec Setting 100 msec Unsigned Integer 1 31 16 bit Timer6 Profibus Class 1 Bus failure OFF ON delay time 1 65535 1 msec Setting 100 msec Unsigned Integer 1 32 16 bit Timer7 Blocked motor time Overload Locked Rotor Stalled Rotator 1 65535 1 msec Setting 100 msec Unsigned Integer 1 33 16 bit Tim...

Страница 156: ...5 Ignore Phase loss during start phase Bit 6 Ignore earth fault during start phase Bit 7 Ignore Unbalance load during start phase Bit 8 to 11 Typical selection Bit 12 to 15 Control mode variant selection If set to 1 typical and control mode default configuration will be used 0 0 parameterization allowed via Profibus DP only when motor is in stop condition 0 1 parameterization allowed via Profibus ...

Страница 157: ...nual Reset required 0 Auto Reset 1 Manual Reset required 0 Auto Reset 0 65535 1 0 Unsigned Integer 255 64 16 bit Protection Input Configuration BIT0 Overload BIT1 Phase Loss BIT2 Ground fault BIT3 UnbalancedLoad BIT4 Thermistor BIT5 Emergency stop BIT6 Limit Switch BIT7 Safety Circuit BIT8 Main Circuit BIT9 Control Circuit BIT10 Contactor Feedback BIT11 Under Load Current BIT12 Overload Current BI...

Страница 158: ...Baud Rate Parity Data Bits Stop Bits Example 3008N2 300 Baud Rate 8 Data Bits N No Parity E Even Parity O Odd Parity 2 Stop Bits 0 27 1 Unsigned Integer 27 91 16 bit Frequency 0 50Hz 1 60Hz 0 1 1 Unsigned 120 1 2A e x100 120 1 2A x100 Integer 92 L 32bit register 92 14 Combine both HEX numbers 143E8 Convert this number to decimal 82920 This corresponds to 829 2A base on the x100 scale factor Curren...

Страница 159: ... output must be mapped appropriately Only applicable to Soft Starter Digital output must be mapped properly Digital input must be mapped and link to holding register 64 bit13 If this digital input is activated a fault or alarm will occur Digital input must be mapped and link to holding register 64 bit15 If this digital input is activated a fault or alarm will occur Digital input must be mapped and...

Страница 160: ... is set to alarm and this bit is set to 0 then the overload alarm is ignored If overload protection on holding register 64 is set to failure and this bit is set to 1 then the overload failure is activated If overload protection on holding register 64 is set to alarm and this bit is set to 1 then the overload alarm is activated This is applicable for the Bit 1 thru Bit 15 0 65535 1 Unsigned Integer...

Страница 161: ...mote Input Signal 13 Local Input Signal 14 Reset Alarms Input Signal 15 Main Circuit Feedback 16 Control Circuit Feedback 17 Emergency Stop Signal 18 Safety Circuitry Signal 19 Limit Switch 1 Limit Switch Open Soft Starter External Fault Breaker Tripped 1 20 External Fault Signal 2 Active Low Configuration 21 Contactor 1 ON Command 22 Contactor 2 ON Command 23 Contactor 1 2 OFF Command 24 Contacto...

Страница 162: ... register 118 definition 1 40 Unsigned integer 10021 121 16 bit DigitalInput 11 93 See holding register 118 definition 1 40 1 Unsigned integer 38 122 16 bit DigitalInput 13 12 See holding register 118 definition 1 40 Unsigned integer 0 123 16 bit DigitalInput 15 14 See holding register 118 definition 1 40 Unsigned integer 0 124 16 bit DigitalInput 17 16 See holding register 118 definition 1 40 Uns...

Страница 163: ...ripped2 Status 29 Charger Status 30 Torque Switching 1 Status 31 Torque Switching 2 Status 32 Start Phase Status 33 Run Phase Status 34 Thermistore Line Broken Status 35 Thermistor Line Shorted Status 36 Main Contactor 1 FeedbackStatus 37 Main Contactor 2 FeedbackStatus Flashing 38 ESS_DP_Parameter_mode 39 Switch_protected_Status Flashing 40 Start_Attempt_Status Flashing 41 Drawer_Ready_Status Fla...

Страница 164: ... Switch Counter 2 Number of operation of motor contactor 43 0 4294967296 1 Unsigned Integer 179 180 32 bit Switch Counter 3 Number of operation oof motor contactor 45 Mainly use on start delta reverse typical 0 4294967296 1 Unsigned Integer 181 16 bit Thermal overloaf trip Counter Thermal Overload Trip Counter 0 65536 1 Unsigned Integer 182 16 bit Thermistor Trip Counter Thermistor Trip Counter 0 ...

Страница 165: ...p Current RMS mAmps Unsigned Integer 67 L 68 H 32 bit Phase B Trip Current RMS mAmps Unsigned Integer 69 L 70 H 32 bit Phase C Trip Current RMS mAmps Unsigned Integer 71 L 72 H 32 bit Average Trip Phase Current RMS mAmps Unsigned Integer 73 L 74 H 32 bit Max Phase A Current HI 16 bits RMS mAmps Unsigned Integer 75 L 76 H 32 bit Max Phase B Current HI 16 bits RMS mAmps Unsigned Integer 77 L 78 H 32...

Страница 166: ...tatus On 37 Drawer Ready Status On 38 General Warning Status On 39 General Fault Status On 40 Safety Circuit Status On 41 ESS DP Local Mode Status On 42 ESS DP Remote Mode Status On 43 Drawer Operation Mode Status On 44 Drawer Test Mode Status On 45 Limit Switch 1 Status On 46 Limit Switch 2 Status On 47 General Device Error Status On 48 FeedbackIdentification Status On 49 Class 1 Failure On 50 Mo...

Страница 167: ... Off 172 Drawer Test Mode Status Off 173 Limit Switch 1 Status Off 174 Limit Switch 2 Status Off 175 General Device Error Status Off 176 FeedbackIdentification Status Off 177 Class 1 Failure Off 178 Modbus Failure Off 179 Bypass Switched On Status Off 180 Switching 1 Progess Status Off 181 Switching 2 Progress Status Off 182 Breaker Tripped Status Off 183 Status Charged Status Off 184 Torque Switc...

Страница 168: ...evice error the local remote off switch position is set drawer mode is selected and no OFF command is issued status will be set to 1 When any warning exist the status will be set to 1 When any fault exist the status will be set to 1 When there is safety circuit digital input this bit would be set to 1 When the local remote off switch is set to local the status will be set to 1 source When the loca...

Страница 169: ...IT1 Phase Loss Warning BIT2 GfWarning BIT3 UnbalancedLoadWarning BIT4 ThermistorWarning BIT5 EmergencyStopWarning BIT6 LimitSwitchWarning BIT7 SafetyCircuitWarning BIT8 MainCircuitWarning BIT9 ControlCircuitWarning BIT10 SwitchPositionWarning BIT11 UnderLoadCurrentWarning BIT12 OverLoadCurrentWarning BIT13 ExternalSupervisionWarning BIT14 LongStartWarning BIT15 TypicalSpecificWarning Unsigned Inte...

Страница 170: ...zation alarm diagnostic analog RTC control and control of the slaves A Profibus DP slave Any peripheral device such as EntelliPro ES DP which processes information and sends its output to the Profibus class 1 and or class 2 master It must comply with EN 50 170 standard Volume 2 Profibus Class 1 master The main controller for the high speed data exchange with its Profibus slave devices that is usua...

Страница 171: ...stem overview consisting of Profibus class 1 master PLC or PC with cyclic data exchange Profibus class 2 master WinESG which provides acyclic data exchange EntelliPro ES which are Profibus DP slaves PLC Profibus Class 1 Master ON OFF WinESG Profibus Class 2 ON OFF Profibus DP EntelliPro ES EntelliPro ES EntelliPro ES Figure 4 4 EntelliPro ES Network System ...

Страница 172: ... Pin 3 line B positive TX RX V Pin 6 Table 4 10 Profibus interface external connections The Communication LED indicates the status of Profibus interface LED Color Description n Table 4 11 Profibus LED indications When used for Profibus the Fieldbus port has the following characteristics Baud rate 9600 19200 93750 187500 500000 1 5M 3M 6M and 12M bps with autodetect Address 1 to 125 settable throug...

Страница 173: ... the length of the branch lines the maximum cable length and the number of bus stations The allowed lengths depends upon transmission speed and are indicated in the profi bus standard DIN 19245 3 and in other publications dealing with this topic The Profibus bus address MAC ID of the EntelliPro ES slave which has a range from 1 to 125 can be set via the front cover switches At power up the Entelli...

Страница 174: ...ave Input B 2 Identification telegram 34 Input B 2720 Device ID telegram 36 Output B 10008 Control telegram 4 Input B 20008 Status telegram 4 Input B 30008 Fault telegram 2 Input B 30264 Warning telegram 2 Input B 30776 Unit failure telegram 2 Input B 2704 Current measurement telegram 24 Input B 2705 Fault current telegram 16 Input B 2706 Maximum current telegram 16 Input B 2707 Switch counter tel...

Страница 175: ...essor Software revision format high byte x low byte xxx 1 002 0x0102 2 16 bit Reserved 0x0000 2 8 bit 6 Logic version Free programming Logic ID 6 16 bit Reserved 0x0000 2 Format 1 2 3 23 24 3 24 f 16 bit Reserved 0x0000 2 8 bit 18 Reserved 0 18 B2720 Device ID Telegram 36 8 bit 24 EntelliPro ES Service ID Telegram EntelliPro Catalog depende 24 1 8 bit 8 bit 8 bit 8 bit 8 bit 8 bit 8 bit 8 bit 8 bi...

Страница 176: ...ceived Note that the input must be mapped 1 indicates that parameterization is allowed This must be enabled to change telegram B2736 46 bit 3 4 1 indicates OFF command is received by the Remote source when switch is in LOCAL position motor cannot be turned ON from the local source again till this bit cleared set to zero Provided block Local switch ON feature is actiavted can be activated on config...

Страница 177: ...ck_IdentificationStatus BIT1 Class1Failure BIT2 ModbusFailure BIT3 ByPassSwitchedON BIT4 Switching1Progress BIT5 Switching2Progress BIT6 Breaker Tripped 2 BIT7 Status Charged 1 indicates the feedback from identification command output must be mapped optional as soon as the ID command is issued this bit is set 1 indicates Profibus Class1 failure 1 indicates Modbus failure 1 indicates by pass switch...

Страница 178: ...ircuit failure Input must be mapped 1 indicates Main circuit failure Input must be mapped 1 indicates control circuit failure Input must be mapped 1 indicates contactor feedbackposition failure Input must be mapped 1 indicates underload current failure Trip 1 indicates overload lockmotor failure 1 indicates supervision circuit failure 1 indicates long start Used on custom logic only 2 8 bit B30264...

Страница 179: ...Average Current measurement 4 32 bit Phase current Ground fault Ground Fault current measurement 4 16 bit Time to trip Time to trip 2 16 bit Time to reset Time to Reset time must expire before reset 2 B2705 Trip Failure Telegram 32 bit RMS Trip current L1 Phase A Current at trip time 4 32 bit RMS Trip current L2 Phase B Current at trip time 4 32 bit RMS Trip current L3 PhaseC Current at trip time ...

Страница 180: ...MA 24 23 22 21 20 19 18 17 MS_0 MS 8 7 6 5 4 3 2 1 MS_1 MS 16 15 14 13 12 11 10 9 MS_2 MS 24 23 22 21 20 19 18 17 MR_0 MR 8 7 6 5 4 3 2 1 MR_1 MR 16 15 14 13 12 11 10 9 MR_2 MR 24 23 22 21 20 19 18 17 MA_3 MA 32 31 30 29 28 27 26 25 MA_4 MA 40 39 38 37 36 35 34 33 MA_5 MA 48 47 46 45 44 43 42 41 MS_3 ME 32 31 30 29 28 27 26 25 MS_4 ME 40 39 38 37 36 35 34 33 MS_5 ME 48 47 46 45 44 43 42 41 SEA_0 S...

Страница 181: ...ntactor 4 Operations Counter 4 16 bit Thermal Overload trips Counter 2 16 bit Thermistor trips Counter 2 16 bit Ground Fault Sum Trip Counter 2 32 bit Hours of non operation Motor stopped hours 4 8 bit Event Log Index Counter 1 16 bit Reserved 4 16 bit Reserved 4 16 bit Reserved 4 16 bit Reserved 4 B40009 Debug telegram 4 8 bit Modbus Control Byte1 BEAM 8 7 6 5 4 3 2 1 8 bit Modbus Control Byte2 B...

Страница 182: ...CHAPTER 4 COMMUNICATION EPOS MOTOR MANAGEMENT SYSTEM INSTRUCTION MANUAL 4 45 This page was intentionally left blank ...

Страница 183: ...s Operation mode set to Remote only the selected remove device can control the contactors 4 B2701 Reset Telegram 8 2 8 bit 1 2 Reset Fault BIT0 Overload Failure BIT1 Phase Loss Failure BIT2 Ground Fault Failure BIT3 UnbalancedLoad Failure BIT4 Thermistor Failure BIT5 Emergency stop Failure BIT6 Limit Switch Failure BIT7 Safety Circuit Failure BIT0 Main Circuit Failure BIT1 Control Circuit Failure ...

Страница 184: ...1 8 bit FIRMWARERESET_1 BIT0 Stop Analog Logging BIT1 Reset Contactors 41 Operations Counter BIT2 Reset Contactors 42 Operations Counter BIT3 Reset Contactors 43 Operations Counter BIT4 Reset Contactors 4 Operations Counter BIT5 Reset Thermistor trips Counter BIT6 Reset Ground Fault Sum Trip Counter BIT7 Reset Hours of non operation Motor stopped hours 1 B2702 Set Value Telegram 6 16 bit Parameter...

Страница 185: ...During the network configuration session modules with varying sizes of input data are provided in the GSD file The following table shows the EntelliPro ES cyclic input and output data provided in the GSD file Refer to section 4 2 10 for an example of master configuration 4 2 9 Diagnostic Data EntelliPro ES supports both slave mandatory 6 bytes system wide standardized and slave specific extended d...

Страница 186: ...tate 10 Free 11 12 D0 D1 parameterization status Parameterization Data Flash Data Status 13 D2 14 D3 15 D4 16 D5 17 D6 18 D7 19 D8 20 D9 21 D10 22 D11 23 D12 24 D13 25 26 D14 15 device text 27 D16 not applicable to EntelliPro ES retrofit 28 D17 free 29 D18 free 30 D19 free 31 D20 free 32 D21 free 33 34 Diagnostic fault configuration buffer size 35 36 Diagnostic fault telegram B30008 37 38 Diagnost...

Страница 187: ...The following steps must be systematically taken for proper installation Installation of the SyCon on a PC A licensed version must be available Installation of a Profibus communication component A Pentium II with 64MB RAM is a prerequisite Right hand mouse key for the configuration or parameterization For a Master slave configuration a master is defined which must fit to the Profibus component to ...

Страница 188: ...CHAPTER 4 COMMUNICATION EPOS MOTOR MANAGEMENT SYSTEM INSTRUCTION MANUAL 4 51 Append the desired module telegram The telegram selection list is in the GSD file ...

Страница 189: ...zation data must be sent to the master component by means of a download The menu item Online and Start Debug Mode is to be used to check whether the EntelliPro ES has accepted the parameters If all lines are green the communication is free from defects if lines to slaves are red the cause can be found by an extended diagnosis ...

Страница 190: ... Configurator SyCon from the company Hilscher www Hilscher com Each PB C1 master device has a similar Configuration Tool to install the cyclic parameterization and configuration values The Profibus DP Class1 parameterization is deactivated in the presetting of the Profibus DP GSD file If you use the EntelliPro ES to protect the motor in potentially explosive atmospheres ATEX it s mandatory to set ...

Страница 191: ...r list can be opened The Parameter list appears in a new window The presetting value of the Profibus DP Class1 parameterization is deactivated To activate the PB C1 parameterization the parameter value Set Parameters is set to Parameterize Press buttons to switch the parameter texts display CHAPTER 4 COMMUNICATION EPOS MOTOR MANAGEMENT SYSTEM INSTRUCTION MANUAL 4 54 ...

Страница 192: ...nal memory Existing parameters in the EntelliPro ES will be overwritten Select the Parameter by double clicking the left mouse button A parameter input window for the selected parameter appears See sample with Modbus Bus Failure Behaviour The user will see an entry list of all valid inputs The user selects a value by selecting that value with mouse and clicking Ok button 4 55 EPOS MOTOR MANAGEMENT...

Страница 193: ...NICATION The menu item Online and Start Debug Mode is to be used to check whether the EntelliPro ES has accepted the parameters If all lines are green the communication is free from defects If lines to slaves are red the cause can be found through an extended diagnosis EPOS MOTOR MANAGEMENT SYSTEM INSTRUCTION MANUAL 4 56 ...

Страница 194: ...bus DP communication Data such as status information assigned PB C1 master and Profibus DP Ident Number are shown per the figure below To see the current status of the EntelliPro ES device click on the device The correspondence diagnostic window opens CHAPTER 4 COMMUNICATION Profibus DP communication is not running and no data change is possible 4 57 EPOS MOTOR MANAGEMENT SYSTEM INSTRUCTION MANUAL...

Страница 195: ... device opens it shows that there is a Parameter Fault When the Profibus DP line is red this indicates an error in parameter values or configuration has occured The Cyclic Profibus DP communication is not running and no data change is possible EPOS MOTOR MANAGEMENT SYSTEM INSTRUCTION MANUAL 4 58 CHAPTER 4 COMMUNICATION ...

Страница 196: ...s are eliminated and the data is downloaded into the PB C1 master device the Profibus DP line in SyCon tool the current device status to correct all errors To get more information click the button Ext Diagnostic The following window appears with more helpful information about CHAPTER 4 COMMUNICATION ...

Страница 197: ... Softing are required The WinESG CD GE part number 720020 and Softing Profibus card and OPC server GE part numbers 720031 thru 720037 The CD contains the WinESG isntallation file GSD files OPC Server and Client Controls which must be installed on the PC can be purchased thru GE Contact Softing directly for additional technical information related to the Profibus hardware interface installation and...

Страница 198: ...FIBUS Configurator to select the appropriate XML WinESG xml has four configurable slave devices Slaves adress from 1 to 4 WinESG_75 has 75 configurable slave devices Slaves adress from 1 to 75 WinESG_125 has 125 configurable slave devices Slaves adress from 1 to 125 Users can create their own XML file from the pre defined list with spefic number of slaves if Use the last edited file is selected th...

Страница 199: ...cation parameter in SCADA system else communication problems can appear NOTE The configuration must not be activated when WinESG starts up The WinESG will start the OPC server automatically NOTE WinESG only communicates with Profibus DP devices which are included in the Softing OPC configuration Step 6 Save the project by selecting File Save Step 7 Right click on Segment0 and select Properties to ...

Страница 200: ...any warnings or failures A maximum of 32 devices can be WinESG main panel shown In the Illustration below displays all field devices connected on the network with their line New creates new database file Database contains EntelliPro settings Settings from the database can be downloaded to the EntelliPro ES EntelliPro Es settings can be read and saved into the new database also Open file opens an e...

Страница 201: ... the field devices with the parameters out of WinESG database when they are different You can select how often WinESG should try when the field device does not accept the new parameters The selectable values are off to 5 trials A green A in the main window shows that automatically parameterization is switched on CAUTION Figure 5 1 WinESG configuration panel Automatic parameterization overwrites se...

Страница 202: ...e device s to be added A blue highlighted address indicates the device is selected for configuration with WinESG To disable a selected device click on its address Click ok when completed To add additional Bus line check edit box then right click on the existing Bus line PROFIBUS1 A pop up menu will appear that allows for the addition Figure 5 2 shows the WinESG slave configuration panel Figure 5 2...

Страница 203: ...dows menu panel options NOTE The lock symbol shown in the illustration below in the main menu opens the Access protection panel 5 2 1 Alarm protocol panel In the Alarm protocol panel shown in the Illustration below the alarms can be activated Alarm protocol if selected all incoming alarms from the selected record groups are stored in the file Alarm protocol file file where the alarms will be store...

Страница 204: ...ser name GEPC and the password EPOS Change current access mode access mode can be changed when the login name and password are entered Time if Enable Protection is selected the WinESG will switch to viewing mode after this time expires Add user user can be entered and the access protection defined shown in the illustration below Two groups name can be defined Administrator full access rights WinES...

Страница 205: ...n panel shown in the configuration below when the time synchronization is selected the PC operating time is sent to the EntelliPro ES based on time interval selected 5 2 5 Read all parameters When Read all parameters is selected all parameters in the configured field device only will be read 5 2 6 Send all parameters When Send all parameters is selected all parameters in the screen will be written...

Страница 206: ...ctor operation The first row indicates the number of the bus line bus address and device identification text In the next line the drive status is shown as symbol and as text Red Symbol motor ON Green Symbol motor OFF Next line is the control buttons ON 2 is used for two speed motors For direct starters this button has no meaning Pressing these buttons commands are sent to the device independently ...

Страница 207: ...trol panel provides the EntelliPro ES status and the capability to reset faults warnings and device errors A red highlight indicates a function is active To view the fault warning or device error details click on details as shown in the Figure 5 6 To reset a particular fault select the fault and click reset Figure 5 6 WinESG view and reset faults ...

Страница 208: ...ovides a method to set and identify the location of the EntelliPro ES in the gear The info panel also provides the hardware identification which includes the power supply voltage number of inputs and outputs In addition this panel provides a means to write and read parameters from EntelliPro ES load parameters from database to the WinESG set WinESG default parameters copy parameters from one Entel...

Страница 209: ...ving and loading parameters are shown Load load database parametrs to the screen Default values fills the screen with default values Copy opens the copy dialog Save writes data from WinESG screen to database In illustration D the user can read and write parameters from and to the field device All parameters are set once In addition WinESG compares parameters from the field device to its database c...

Страница 210: ...grammed parameters These pre programmed parameters can be changed if default configuration is unselected Refer to section 2 2 2 for additional information NOTE If the drive typical is set to Fully free logic the Profibus Class 2 data interface of the free logic must follow the Illustration H shows the Hardware Overview which provides power supply number of inputs and outputs ratings CAUTION Entell...

Страница 211: ...elow shows the CT rated current in Ampere for different CTs and feed thru factors Motor rated current Ir settable in the range of 1 to 1 6 x Ict This value is used for overload ground fault and current thresholds protections Two Speed motor only applicable for two speed motors Dahlander Pole changer typicals When applicable a second CT and motor current can be set for the additional speed All othe...

Страница 212: ...er to section 3 1 3 for the trip time curves Class 5 within 5 seconds Class 10 within 10 seconds Class 15 within 15 seconds Class 20 within 20 seconds Class 25 within 25 seconds Class 30 within 30 seconds Class 35 within 35 seconds Class 40 within 40 seconds Cool down factor extends the time until the motor can be turned ON after an overload trip Selectable from 0 to 15 Zero disables this function...

Страница 213: ...l between RMS analog data capture The data is displayed in the analog data capture window Settable from 1s to 60 seconds Analog trigger mode to trigger the RMS analog data capture Disable disables the RMS analog capture Trip any fault triggers the RMS analog capture Warning any warning triggers the RMS analog capture Switch ON start command triggers the RMS analog capture Switch OFF stop command t...

Страница 214: ... warning will be provided on the control screen Manual reset fault or warning will require a manual reset The reset can be done via Modbus function code 5 registers 65 to 106 Profibus class 1 telegram B2701 or WinESG control panel Overload auto reset number of auto reset allowed after an overload fault This number is reset after 1 hour without overload failure NOTE For proper operation of Contacto...

Страница 215: ...zation Mode 1 Parameterization Mode 2 Operation Disabled Disabled Parameterization allowed only when motor is in stop condition Enabled Disabled Parameterization allowed via Profibus while motor is at any state Disabled Enabled Parameterization allowed via Profibus when draw out position is not in test or operation mode Enabled Enabled Parameterization allowed via Profibus when the operation mode ...

Страница 216: ...ed if a current is above the start phase threshold for the set amount of time Modbus failure OFF ON delay time fault or warning is indicated if a Modbus failure exists after this time expires Modbus timeout time must be set in Modbus register 59 Current feedback time fault or warning is indicated if a current is below 0 2 Ir for the set amount of time after a start Motor ON direction switch over t...

Страница 217: ...rameterization Counter panel The counter panel provides a means for setting two parameterizable counters Counter 1 and Counter 2 They are selectable from 0 to 65535 in steps of 1 Details are available in logic documentation Counter 3 is used for Start attempt counter and it is settable from 1 to 40 This is the number of start attempts allowed within a specified timer Start attempts time Refer to F...

Страница 218: ... bit0 or bit1 will turn the motor ON and OFF 2 Bit ON bit telegram B10008 bit0 or bit1 will turn the motor ON and OFF bit telegram B10008 bit0 or bit14 will turn motor off Inverted OFF active low signal 0 is valid OFF command Non Inverted OFF active high signal 1 is valid OFF command Remote selection selects the remote source Profibus class 1 Modbus or hardwire NOTE if Profibus Class 1 is enabled ...

Страница 219: ...OFF if bus failure appears Delayed OFF contactor switches OFF after a specific time delay set on Modbus failure OFF ON delay timer and or Class 1 failure OFF ON delay time Delayed ON1 ON1 command is issued after a specific time delay set on Modbus failure OFF ON delay time and or Class 1 failure OFF ON delay time Use on two speed motor Delayed ON2 ON2 command is issued after a specific time delay ...

Страница 220: ...pole changer If active the direction can be changed without the OFF command after the switchover timer expires For other settings definition refer to the typical description in section 2 3 Drawer position activate the drawer supervision In order to turn ON the motor the drawer turn ON if the drawer is set to operation or test mode If the activate drawer activation supervision is enabled the motor ...

Страница 221: ...in run phase Thermistor shorted Main contactor 1 switching in progress Main contactor 2 switching in progress Motor is start phase Drawer in test mode General device error Device identification profibus class 1 failure Modbus failure Thermistor broken Output relays can be mapped to following as solid on or flashing local Reset alarm Main circuit feedback Control circuit feedback Emergency stop saf...

Страница 222: ...failure Switching Contactor 1 feedback Contactor 2 feedback Parameter mode Switch protected Star attempt Drawer ready General Limit switch warning Safety circuit warning Main voltage warning Contactor feedback warning Under current warning Unbalalanced load failure Thermistor channel failure Emergency OFF failure Limit switch failure Safety circuit failure Over current warning External supervision...

Страница 223: ...ersion if available 5 3 2 13 Diagnostic panel The diagnostic panelshown below shows the operations counters trip information maximum currents and fault currents The operations counters can be set by pressing set value or reset by pressing the Reset button 5 3 2 14 Measure panel The measure panel shows the phases and average RMS currents ground fault currents time to trip and time to reset NOTE Mot...

Страница 224: ...ice errors e debug panel provides a means to fully test the custom logic It shows the actual state of the EntelliPro ES logic variables The data is only valid when the parameter debug mode is activated in the parameterization function panel window NOTE The debug mode should be activated only for test purposes The value of the variable is displayed in colour with the following meaning Red variable ...

Страница 225: ...11 Input bit Contactor feedbak Manual Reset PMQ12 Input bit under load current Manual Reset PMQ13 Input bit over load current Manual Reset PMQ14 Input bit External supervision Manual Reset PMQ15 Input bit Long Start Time Manual Reset PMQ16 Input bit Torque switches Manual Reset PMQ17 Input bit Device failure Manual Reset PMQ18 Input bit Profibus Class1 failure Manual Reset PMQ19 Input bit Modbus f...

Страница 226: ...erved BE4 Input Bit Reserved BE5 Input Bit Profibus cyclic data Command OFF BE6 Input Bit Profibus cyclic data Identification BE7 Input Bit Reserved BE8 Input Bit Reserved BE9 Input Bit Profibus cyclic data Lock switch command BE10 Input Bit Profibus cyclic data Operation mode set to Local BE11 Input Bit Profibus cyclic data Operation mode set to Remote BE12 Input Bit Reserved BE13 Input Bit Reser...

Страница 227: ...ed BEM14 Input Bit Reserved BEM15 Input Bit Reserved BEM16 Input Bit Reserved BEM17 Input Bit Reserved BEM18 Input Bit Reserved BEM19 Input Bit Reserved BEM20 Input Bit Reserved BEM21 Input Bit Reserved BEM22 Input Bit Reserved BEM23 Input Bit Reserved BEM24 Input Bit Reserved BERS1 Input Bit Overload Failure Reset Command BERS2 Input Bit Phase loss Failure Reset Command BERS3 Input Bit Ground fau...

Страница 228: ...rrent Measurement Ungauged Reset Command BERG7 Input Bit EEPROM Failure Reset Command BERG8 Input Bit Current Measurement Reset Command BERG9 Input Bit tart Attempt Reset Command BERG10 Input Bit Thermistor Hardware Reset Command BERG11 Input Bit Reserved BERG12 Input Bit Reserved BERG13 Input Bit Reserved BERG14 Input Bit Reserved BERG15 Input Bit Reserved BERG16 Input Bit Reserved HBAM1 Output B...

Страница 229: ...Long Start Time Failure Status HBAS16 Output Bit Typical Specific Failure Status HBAW1 Output Bit Overload Warning Status HBAW2 Output Bit Phase loss Warning Status HBAW3 Output Bit Ground fault Warning Status HBAW4 Output Bit Unbalancedload Warning Status HBAW5 Output Bit Thermistor Warning Status HBAW6 Output Bit Emergency stop Warning Status HBAW7 Output Bit Limit switch Warning Status HBAW8 Ou...

Страница 230: ...ved SEA31 SEG31 Input Output Bit Reserved SEA32 SEG32 Input Output Bit Reserved MA1 MR1 MS1 Input RS FLipFlop Bit Set ON 1 MA2 Input RS FLipFlop Bit Set ON 2 MA3 Input RS FLipFlop Bit Reserved Use on motor starter typicals only MA4 Input RS FLipFlop Bit Internal command ON 1 Use on motor starter typicals only MA5 Input RS FLipFlop Bit Internal command ON 2 Use on motor starter typicals only MA6 In...

Страница 231: ...ure Use on motor starter typicals only MA46 Input T FlipFlop Bit Flank marker ON1 at Cyclic communication loss Use on motor starter typicals only MA47 Input T FlipFlop Bit Flank marker ON2 at Cyclic communication loss Use on motor starter typicals only MA48 Input T FlipFlop Bit Flank marker OFF at Cyclic communication loss Use on motor starter typicals only TE1 Output Bit Max switch time contactor...

Страница 232: ...delay Timer Use on motor starter typicals only ZA1 Input Bit Counter 1 Expired Flag ZA2 Input Bit Counter 2 Expired Flag ZA3 Input Bit Counter 3 Expired Flag ZA4 Input Bit Counter 4 Expired Flag ZE1 Output Bit Counter 1 Start Flag ZE2 Output Bit Counter 2 Start Flag ZE3 Output Bit Counter 3 Start Flag ZE4 Output Bit Counter 4 Start Flag ZR1 Output Bit Reset Counter 1 ZR2 Output Bit Reset Counter 2...

Страница 233: ...Pro in the systemwith its associate time stamp Refer to Figure 5 19 for the WinESG event log panel Date date of the event Time time of the event Device name name of the device Bus line device connected Bus line FD Address device Profibus address Alarm text alarm text message Events can be sorted by date by clicking the date Press the Start logging button to start the logging process Previous event...

Страница 234: ...uration set on the parameterization device setting panel If the trigger is set to Manual by pressing the Start recording button the current can be viewed Refer to figure 5 20 for the WinESG RMS analog current Data is automatically saved in a file Previous saved waveforms can be retrieved using the Open button Right left zoom in and zoom out buttons are provided to navigate thru the data Figure 5 2...

Страница 235: ...st be followed to download the fully flexible logic Select Bus line on which EntelliPro ES device is connected Select the device address Browse to select the mot file Click Download free logic the downloading process the EntelliPro ES must be re cycle NOTE After the flexible logic download the EntelliPro ES power must be re cycle Also if the download is stopped during If successful a green line pa...

Страница 236: ...programmed drive typical such as DOL DOL The next two figures show the Entellipro CP3 main panel and parameters descriptions Reverse Star Delta Star Delta reverse Soft starter Soft starter reverse Breaker control Dahlander Pole changing starter Solenoid valve and Actuator 2 Valve 1 local operate EPOS MOTOR MANAGEMENT SYSTEM INSTRUCTION MANUAL 6 1 CHAPTER 6 ENTELLIPRO CP3 and CP5 APPLICATION 6 1 En...

Страница 237: ...nch status Displays the current alarm status by flashing Failures or Warnings Displays the mean current of the branch Device text of the connected motor breaker starter Current status of the branch Ready message of the branch Displays the status drawer position switch COM 1 Power LED Modbus COM LED 6 2 EPOS MOTOR MANAGEMENT SYSTEM INSTRUCTION MANUAL CHAPTER 6 ENTELLIPRO CP3 and CP5 APPLICATION ...

Страница 238: ...nections and appropriate Modbus address settings See section 6 2 for additional settings information 2 Valve 1 local operate Drawer ready COM 1 Communication Error COM1 Connection 1 No Modbus communication to the connected EntelliPro ES Message box appears cyclically EPOS MOTOR MANAGEMENT SYSTEM INSTRUCTION MANUAL 6 3 CHAPTER 6 ENTELLIPRO CP3 and CP5 APPLICATION ...

Страница 239: ...creen Button to switch into the Set operation switch screen Only available in Modbus selection switch mode configuration Button to switch into the alarm handling screens Failures and Warnings Button to switch into the current measuring display Button to switch the device ON and OFF COM 1 6 4 EPOS MOTOR MANAGEMENT SYSTEM INSTRUCTION MANUAL CHAPTER 6 ENTELLIPRO CP3 and CP5 APPLICATION ...

Страница 240: ... back to previous menu Button to switch to next selection menu Button to switch back to previous menu Button to switch to previous screen selection Button to switch into the service screen not available Button to switch into the EntelliPro CP3 setting screen CHAPTER 6 ENTELLIPRO CP3 and CP5 APPLICATION The following two figures show the menu screen selections and descriptions EPOS MOTOR MANAGEMENT...

Страница 241: ...cted To establish a communication between the EntelliPro CP and the EntelliPro ES the Modbus address must set to the same Modbus address as in EntelliPro ES device To change the address click on the Modbus address number COM 1 12 Button to switch into the Modbus RTU setting Modbus timeout setting read from EntelliPro ES device Version number of the EntelliPro CP3 application Menu name 6 6 EPOS MOT...

Страница 242: ...ress is protected with a user level password 22222222 The Modbus RTU address range is 1 thru 247 The address is stored permanently in the CP3 panel COM 1 COM 1 EPOS MOTOR MANAGEMENT SYSTEM INSTRUCTION MANUAL 6 7 CHAPTER 6 ENTELLIPRO CP3 and CP5 APPLICATION ...

Страница 243: ...ter a period of time without a user handling The backlight will also switch off after an extended time of inactivity The application screen resumes when the user touchs the display COM 1 6 8 EPOS MOTOR MANAGEMENT SYSTEM INSTRUCTION MANUAL CHAPTER 6 ENTELLIPRO CP3 and CP5 APPLICATION ...

Страница 244: ...ious menu Root screen selection Measuring screen Single phase displaying Back to previous menu Screen choice selection Back to previous menu Diagnostic screen Next diagnostic screen Back to previous menu Shows device characteristic Next Parameter screens EPOS MOTOR MANAGEMENT SYSTEM INSTRUCTION MANUAL 6 9 CHAPTER 6 ENTELLIPRO CP3 and CP5 APPLICATION ...

Страница 245: ...3 settings Language selection Back to previous menu Modbus settings Display settings Back to previous menu Service screen in work Back to previous menu EPOS MOTOR MANAGEMENT SYSTEM INSTRUCTION MANUAL 6 10 CHAPTER 6 ENTELLIPRO CP3 and CP5 APPLICATION ...

Страница 246: ... The row assignment must be done in ES standard Otherwise the data in the EntelliPro CP application might be incorrect DOL reverse Star delta Star delta reverse Soft starter Soft starter reverse Dahlander Pole changing starter Solenoid valve The next two figures show the Entellipro CP5 main panel and Actuator CHAPTER 6 ENTELLIPRO CP3 and CP5 APPLICATION The EntelliPro CP5 device is a touch control...

Страница 247: ...ectively the device configuration screen The columns show the device index which appears on all menus the device text the device Each row in the root screen below shows information about one EntelliPro ES device The row assignment must be done in CHAPTER 6 ENTELLIPRO CP3 and CP5 APPLICATION ...

Страница 248: ...STEM INSTRUCTION MANUAL 6 13 CHAPTER 6 ENTELLIPRO CP3 and CP5 APPLICATION 6 6 EntelliPro CP5 application setting The application setting menu shown in the figure below can be accessed by pressing function key F4 from root menu ...

Страница 249: ... permanently in the CP5 panel These addresses same address 6 7 EntelliPro CP5 device addresses The Device configuration setting is protected with a user level password 22222222 6 14 For each device in the system a unique a Modbus RTU address must be assigned No two devices can have the The device setting menu shown in the figure below can be accessed by pressing function key F5 from root menu ...

Страница 250: ...nu shown in the figure below can be accessed by touching the device row on the main screen All information related to the particular device is made available 6 15 EPOS MOTOR MANAGEMENT SYSTEM INSTRUCTION MANUAL CHAPTER 6 ENTELLIPRO CP3 and CP5 APPLICATION ...

Страница 251: ...2 CHAPTER 6 ENTELLIPRO CP3 and CP5 APPLICATION INSTRUCTION MANUAL to local control The screen shown in the figure below controls the assigned EntelliPro ES device when the device is configured 6 16 6 8 EntelliPro CP5 control screen ...

Страница 252: ...and CP5 APPLICATION 6 EntelliPro CP5 screen saver display off after an extended time of inactivity The application screen resumes when the user touchs the display This screen appears in the application after a period of time without a user handling The backlight will also switch ...

Страница 253: ...lliPro CP5 panel can be found in the WEB www beijerelectronics com signal and Pin6 is the DataN signal Application downloads are done via the COM1 port for the Modbus communication with the EntelliPro CP5 application Pin3 of the COM3 port is the Modbus DataP The EntelliPro CP5 has three communication COM ports on the back side The communication port COM3 is used ...

Страница 254: ...CHAPTER 6 ENTELLIPRO CP3 and CP5 APPLICATION 6 19 EPOS MOTOR MANAGEMENT SYSTEM INSTRUCTION MANUAL 6 1 EntelliPro CP5 application tree structure teetetetetet ...

Страница 255: ...EPOS MOTOR MANAGEMENT SYSTEM INSTRUCTION MANUAL 6 20 CHAPTER 6 ENTELLIPRO CP3 and CP5 APPLICATION ...

Страница 256: ...SALES TECHNOLOGY MAQ _ _ _ _ _ _ _ _ _ _ _ _ _ _ _ _ _ _ _ _ _ _ _ _ _ _ _ _ _ _ _ _ _ _ _ _ _ _ _ _ _ _ _ _ _ _ _ _ _ _ _ _ _ _ _ _ _ _ _ _ _ _ _ 2 07 12 Update CP chapter N Vicente _ _ _ 2 18 11 01 Inital Release N Vicente _ DAT 03 E REV Description draw check permit Revision Page Revision Page Revision Page Revision Page 5 05 11 02 Add Entellipro CP chapter N Vicente _ _ 02 ...

Страница 257: ...nt supply of services to keep your business up and running You can rely on GE s Field Service teams for all your electrical infrastructure as we are at home in all industries specialized in solutions and services for your electrical infrastructure Extend the life of your Power Equipment GE offers a comprehensive portfolio of power quality services including On Site Emergency Services 24 7 Emergenc...

Страница 258: ...cluding Air Circuit Breaker EntelliGuard G M Pact I ME 06 ME07 MEG MEY ME 06 ME00 05 M series Spectronic SP SPE L S GERAPID S SE Gerapid M23 M80 APU30 50 Power Distribution and MC C SEK SEV32 Power Center MCC SEN Plus SE Digital Power SV18 SV 90 Vynconstruct OK Center System4 CCM For further information and contract details please contact your local sales representative or After Sales Service team...

Отзывы: