20
S t y l i s t i c C T 2 0 0 0 S e r i e s C E T a b l e t U s e r ’ s G u i d e – S e c t i o n T w o
1. See your CF Card manual for instructions on instal-
lation of your card. Some CF Cards may require the
system be suspended during card installation.
2. First remove the protective cover by unscrewing the
Philips screw that secures the cover to the system.
Save the cover and hardware for later reinstallation.
3. Position the CF Card side with the arrow on the card
facing up (i.e., when looking at the tablet’s display
side, the arrow on the card should be visible.) Slide
the card into the CF Card slot, and press it firmly to
ensure proper seating.
(See Figure 1-6 for location)
Removing a CF Card
1. To remove a CF Card, first save any active data and
press the Power button.
2. If the cover is installed over the card, remove it and
save it for reinstallation.
3. Pull the CF Card from the slot.
INSTALLING A HANDSTRAP
The handstrap that came with your system provides a
secure, comfortable method for holding the tablet.
To attach the handstrap, perform the following steps:
1. Locate the handstrap attachment points on the rear
of the system
(See Figure 1-3 on page 9 for location)
.
Note that there are three attachment points so that
the strap can be installed either horizontally or diag-
onally, depending upon your preference.
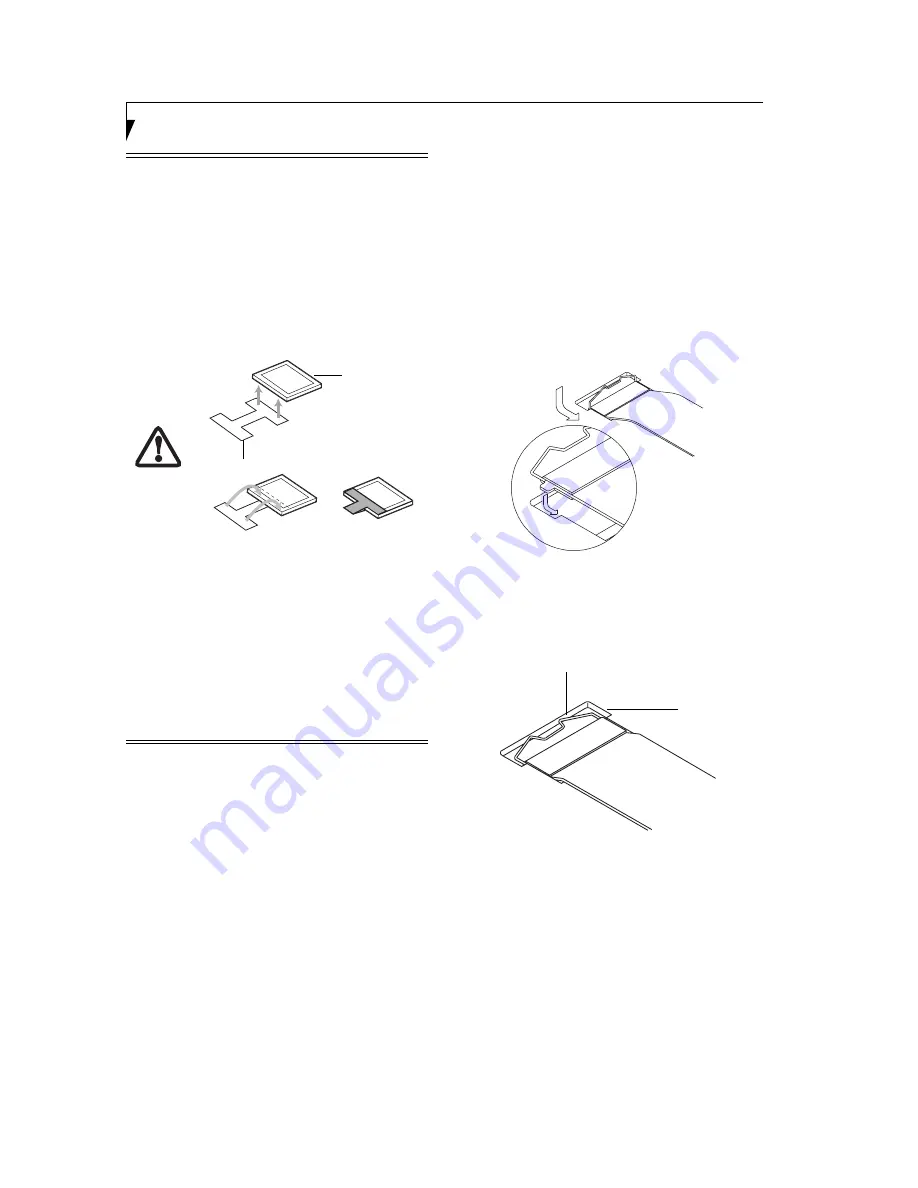
2. Slide the metal strip at one end of the strap into the
slot in one of the attachment points
(Figure 2-2)
.
Figure 2-2 Inserting the Handstrap
3. Press the spring into the slot to secure the metal strip
in the slot
(Figure 2-4)
.
Figure 2-4. Securing the Handstrap
4. Repeat steps 2 and 3 to install the other end of the
strap to a second attachment point.
To remove the handstrap, pull the spring back and up
out of the slot, then slide the metal strip out of the slot.
The CF card slot does not have an eject
button, so try to use cards that are long
enough to extend from the CF card slot.
In the event that is not possible, use one of
the adhesive “H” tabs that were included
with the system. To use an “H” tab,
perform the following steps:
• Make sure you apply the tab to the
end of the card that will be held when
the card is inserted (i.e, the end
without the connector).
• Remove the adhesive cover from one
end of the tab and position it so that it
is flush with the edge of the CF card;
apply it to the card.
• Remove the other two pieces of
adhesive cover and apply the second
end to the other side of the CF card.
• Squeeze the two sides of the tab
together.
When you insert the card from now on,
use the tab to pull the card from the slot.
H Tab
CF Card
(connector end)
Spring
Slot
Содержание Stylistic CE CT2000 Series
Страница 1: ......
Страница 6: ...3 Preface ...
Страница 8: ...5 1 Getting Started with Your Stylistic CT2000 Series CE Tablet ...
Страница 17: ...14 2 Using Your Stylistic CT2000 Series CE Tablet ...
Страница 24: ...21 3 Using Your Stylistic CT2000 Series CE Tablet Software ...
Страница 28: ...25 Wireless LAN User s Guide 4 ...
Страница 35: ...32 5 Care and Maintenance ...
Страница 38: ...35 6 Troubleshooting and FAQs ...
Страница 45: ...42 7 Specifications ...
Страница 48: ...45 8 Glossary ...
Страница 53: ...50 Appendix Installing and Using the Software ...
Страница 64: ......


