Initial Setup and Configuration
Set the Handle Position
2
2-5
Set the Handle Position
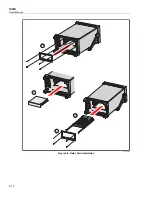
The handle is used to easily transport the Product but can also be used as a stand.
Figure 2-3 shows the various handle positions and also shows how to remove and install
the handle and the protective rubber boots.
Carrying Position
Viewing Position
Alternate Viewing Position
Removal Position (to Remove,
Pull Ends Out)
To Remove, Pull End From Unit
4
5
Boot Removal
6
2
1
3
Hcn003.eps
Figure 2-3. Handle Positions and Boot Removal
Содержание 1586A
Страница 6: ...1586A Users Manual iv Error Messages 7 3 Troubleshooting 7 20...
Страница 8: ...1586A Users Manual vi...
Страница 10: ...1586A Users Manual viii...
Страница 12: ...1586A Users Manual 1 2 General 1 22 1586 2586 High Capacity Input Module Specifications 1 22 General 1 22...
Страница 34: ...1586A Users Manual 2 2...
Страница 42: ...1586A Users Manual 2 10 2 3 4 1 hcn018 eps Figure 2 6 Relay Card Installation...
Страница 44: ...1586A Users Manual 2 12 hcn032 eps Figure 2 7 DAQ STAQ Multiplexer Installation...
Страница 46: ...1586A Users Manual 2 14...
Страница 48: ...1586A Users Manual 3 2...
Страница 82: ...1586A Users Manual 3 36...
Страница 84: ...1586A Users Manual 4 2...
Страница 108: ...1586A Users Manual 5 2...
Страница 114: ...1586A Users Manual 6 2...
Страница 118: ...1586A Users Manual 6 6...
Страница 119: ...7 1 Chapter 7 Error Messages and Troubleshooting Title Page Introduction 7 3 Error Messages 7 3 Troubleshooting 7 20...
Страница 120: ...1586A Users Manual 7 2...
Страница 140: ...1586A Users Manual 7 22 Via Acquanera 29 22100 Como tel 031 526 566 r a fax 031 507 984 info calpower it www calpower it...


