Initial Setup and Configuration
Input Module and Relay Card Installation
2
2-9
To install the Input Module:
1.
Power off the Product with the main power switch.
2.
Slide an Input Module into the slot the relay card was installed.
3.
Power on the Product with the main power switch.
4.
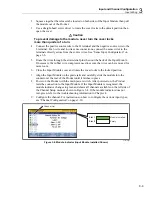
Verify that the module indicator appears green on the main screen (see Figure 2-5).
Note
If the module indicator is not green, the Product did not recognize the Input
Module or relay card. Refer to the troubleshooting section in Chapter 7.
Channel List
Slot 1
Slot 2
Empty
Module Installed
hcn016.eps
Figure 2-5. Module Indicator Example
Содержание 1586A
Страница 6: ...1586A Users Manual iv Error Messages 7 3 Troubleshooting 7 20...
Страница 8: ...1586A Users Manual vi...
Страница 10: ...1586A Users Manual viii...
Страница 12: ...1586A Users Manual 1 2 General 1 22 1586 2586 High Capacity Input Module Specifications 1 22 General 1 22...
Страница 34: ...1586A Users Manual 2 2...
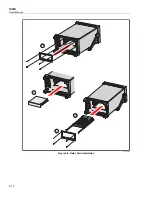
Страница 42: ...1586A Users Manual 2 10 2 3 4 1 hcn018 eps Figure 2 6 Relay Card Installation...
Страница 44: ...1586A Users Manual 2 12 hcn032 eps Figure 2 7 DAQ STAQ Multiplexer Installation...
Страница 46: ...1586A Users Manual 2 14...
Страница 48: ...1586A Users Manual 3 2...
Страница 82: ...1586A Users Manual 3 36...
Страница 84: ...1586A Users Manual 4 2...
Страница 108: ...1586A Users Manual 5 2...
Страница 114: ...1586A Users Manual 6 2...
Страница 118: ...1586A Users Manual 6 6...
Страница 119: ...7 1 Chapter 7 Error Messages and Troubleshooting Title Page Introduction 7 3 Error Messages 7 3 Troubleshooting 7 20...
Страница 120: ...1586A Users Manual 7 2...
Страница 140: ...1586A Users Manual 7 22 Via Acquanera 29 22100 Como tel 031 526 566 r a fax 031 507 984 info calpower it www calpower it...


