background image

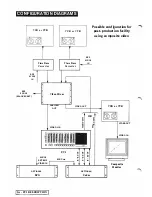
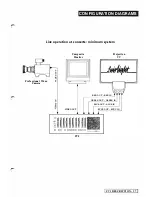
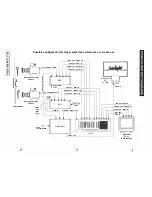
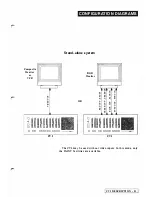
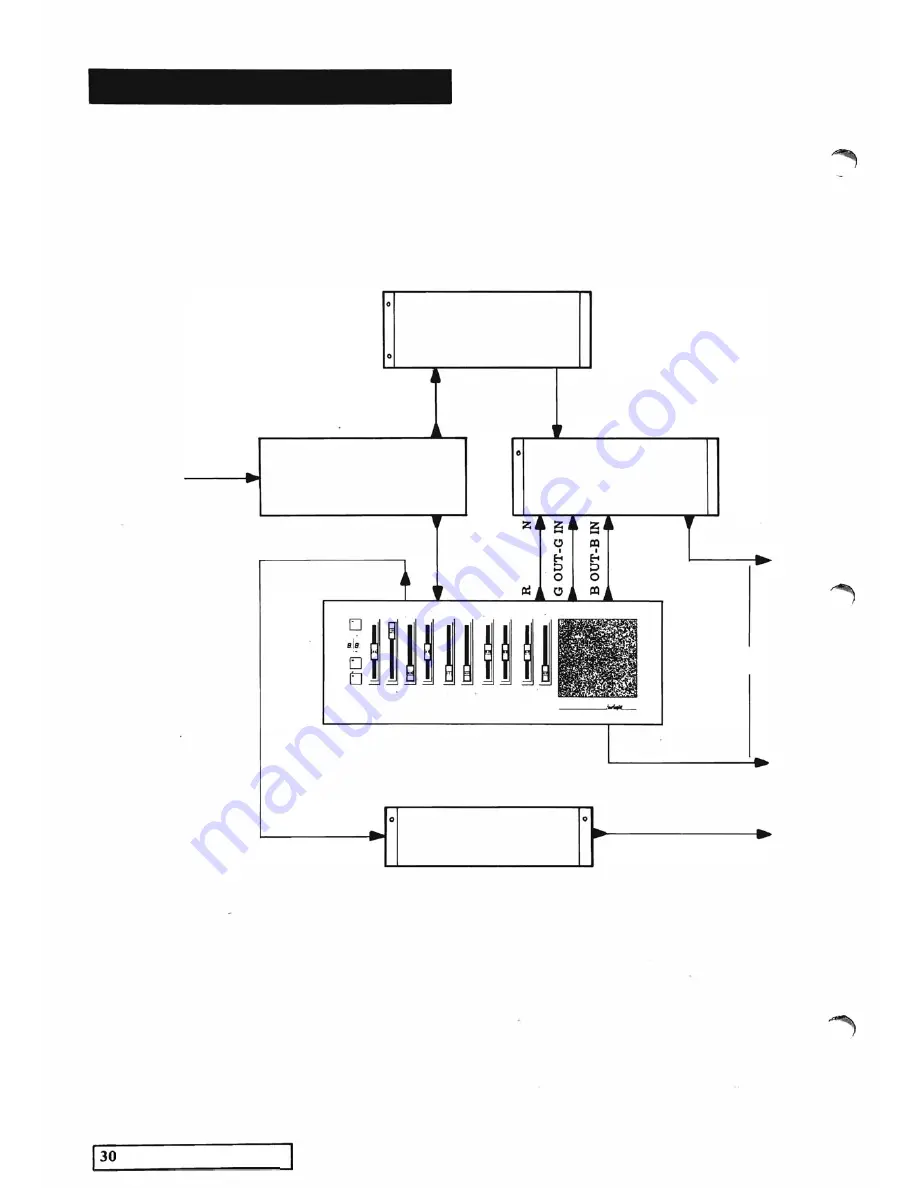
CO N F I G U RATI O N   D I AG RAM S 

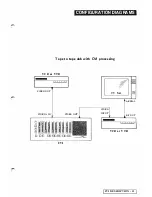
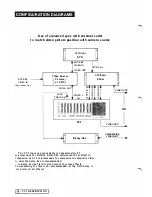
U se  of advanced  sync with  external coder 

to  match vid eo  picture  position with ca mera  source 

V i d eo  Source 

EXT  REF 

camera

V I D E O   IN 

or 

TBC 

(from mixer etc.) 

VIDEO  OUT 

OPTI ONAL 

S P G  

EXT  REF 

VID EO  IN 

VID EO  OUT 

... 

SYNC  etc 

OPTIONAL 

Co

d

e r  

IXl 

VIDEO 

OUT 

Eo< 

LOOP 

VID EO 

::> 

THROUGH 

IN 

o  D O   D DDDD D D DDD 

CVI 

Delay  line 

The  CVI  input  to  output  delay  is  approximately 

0.7 

microseconds 

for  RGB  to  RGB, 

0.95 

m

i

c

ro

sec

o

nd

s  for  RGB  to 

composite, 

and 

1 .3 

microseconds  for  composite  to  composite  video. 

variable  delay  line  is  recommended. 

delay  of  one  field  is  also  present  for some  effects. 

Compensating  for  this  is  not  recommended,  as  the  field  delay  is 

not  preset  in  all  effects. 

-

CVI  DESCRIPTION 

VIDEO  OUT 

UNMODIFIED 

VIDEO  OUT 

OR 

Содержание CVI

Страница 1: ...r e User Manual Computer Video Instrument...

Страница 2: ...ristics are interrelated so that you can combine live video and painted images in a multitude of ways using painted images as backgrounds foregrounds or both capturing live images and combining them f...

Страница 3: ...bes how to include ASCII escape sequences to provide font and attribute changes in titles 2 Use the RS232coinmands Load Library LL and Save Library SL to handle the library en masse Thus If the ra re...

Страница 4: ...Startea 2 Video Melius...

Страница 5: ...required at this stage Presets describes the characteristics of each Factory ROM PRESET including video and paint responses This section also includes photographs of examples of presets and a PRESET Q...

Страница 6: ...re they 7 Stencils Wh at are they 10 Presets What are they 12 Sequencer What is i t 13 The Cursor How to use it 14 Concept ual model 15 Functional overview 16 Connecting the CVI 18 CVI external connec...

Страница 7: ...Ait The console controls consist of 10 Slider controls 1 v o lD v l J v J o o EJ 16 Push buttons 4A Emi4 MikM4M _ Ri A u WA K At Ai CONSOLE CONTROLS 1 Graphics pad o o C O MP U T RlJMENT d 1 At...

Страница 8: ...ld ORANGE ii SATURATION The saturation of a colour is its purity For instance high saturation red is a bright red decreasing saturation goes through various shades of pink until at minimum saturation...

Страница 9: ...ves image horizontally ii VERTICAL PAN Moves image vertically iii STRETCH This control affects the aspect ratio proportion of vertical size to horizontal size of the pixels A pixel is a picture elemen...

Страница 10: ...ntrol Enables Enable Screen Pick Title Wipe Colour Enable Enables COntrol Colourize push on push off Button number O Stencil Key Controls Will re colour the whole digital image in the colourize type s...

Страница 11: ...ection 3 PAINT MENUS under TITLE EDIT menu Use stencil Push on push off Button number 8 Enables you to activate on screen whatever stencil is selected from the STENCIL SOURCE menu See Section 3 VIDEO...

Страница 12: ...s the selection of PRESETS To select a particular PRESET press PRESET button then a two digit number 00 to 99 from the number buttons If the required preset is numbered between 0 and 9 you may either...

Страница 13: ...n the GRAPHICS PAD The form of this cursor varies with different functions For painting the cursor will show the Colour Brush Shape and Colour Type currently selected When the colour and position of c...

Страница 14: ...ries The menus are initially entered by pressing the MENU button This will display the last menu that was used Menus are blue and white pages that appear on the screen For purposes of printing they ap...

Страница 15: ...W LOCK button while in MENU mode Most menus also feature a quick selection bar at the bottom of th e page This quick selection bar enables you to gain instant access to any of the PAINT or VIDEO menus...

Страница 16: ...on the CVI the following PAINT MENU will appear ii To select PAINT TYPE move cursor to Quick select PAINT 2 or press button number 2 DRAW STENCIL B 1 0 PAINT menus 1 0 VIDEO menus iii We now have disp...

Страница 17: ...tion 3 Paint Menu 8 Any change that you make to the stencil will appear on the screen as changes in the areas where the two types of picture are displayed For example assume that you have selected to...

Страница 18: ...ed in the CYI but rather used continuously for live stencil effects The size position and shape of the chromakey stencil are determined entirely from the incoming video signal they are not affected by...

Страница 19: ...nd accurate control of the CVI in demanding situations and even situations which are not so demanding 4 To allow the recording of MENU selections and control positions that create an effect that you m...

Страница 20: ...to be duplicated for identical results The first action in a sequence should be the clearing of the screen in some way usually using a Colour or Stencil Wipe If this is not done replaying the sequenc...

Страница 21: ...using specific PAINT METHODS such as circl rect fill etc The tip of the arrow points to the pixel where painting will take place Position is determined by lifting the stylus off the GRAPHICS PAD at t...

Страница 22: ...use of COLOUR WIPES or by using the GRAPHICS PAD Painted images can also be digitally controlled to give effects The STENCIL can be used as a keying and protection device with both painted and live vi...

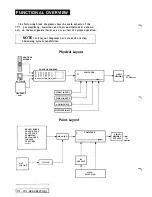
Страница 23: ...nhancing system capabilities Physical Layout r CONTROL SLIDERS CONTROL CONSOLE EIJL1ctllLD 0 0 PUSH BUTTONS f GRAPHICS PAD BRUSH SHAPE COLOUR TYPE PAINT TYPE SYMMETRY RECTANGLES CIRCLES TEXTURES etc e...

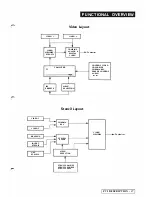
Страница 24: ...RVI EW Video Layout I I VIDEO 2 I COMBINE ANALOG DIGITAL VIDEO COMPUTER 4J11 MENU SELECTION Stencil Layout CHROMA KEY STENCIL PLANE MENU SELECTION STENCIL ON OFF STENCIL SOURCE STENCIL WIPE To Monitor...

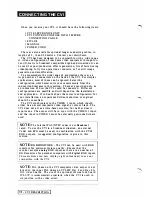
Страница 25: ...nd application If in doubt about the correct configuration for your i nstallation an experienced video technician or engineer should be consulted The CVI synchronizes to the VIDEO I input which should...

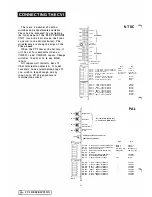
Страница 26: ...tch Power VIDEO I in Red I in Green I in Blue I in VIDEO 2 in Red 2 in Green 2 in Blue 2 in Stencil in Digital cascade in Subcarrier in Audio in Remote switch in Expansion port r Optional expansion mo...

Страница 27: ...a t e SWl 5 G re e n I Inpul t e r m i n a t e SWl 4 Blue 1 I n p u t t e r m i n a t e SlI l J R e d 2 I n p u l l e r m i n a l e S W 2 l G re e n 2 I n fl u l l e r m i n a l e SWl l B l u e 2 I n...

Страница 28: ...and SLIDERS will come on The image on the screen will be the Fairlight logo overlayed on the incoming video signal or black if there is no signal input This is factory PRESET 00 See Section 2 PRESETS...

Страница 29: ...eration VIDEO OUT I I I I VIDEO 1 IN Composite monitor I I GEN LOCK VIDEO OUT VIDEO IN I I I I I I VIDEO OUT VIDEO 2 IN LOOP OUT I Professional Video I Camera I L _ _ _ _ _ _ _ _ _ 122 CVI DESCRIPTION...

Страница 30: ...TION DIAG RAMS Low band live studio use r _ C AM E RA CCU CABLE J D Professional Video Camera o o CCU o o Composite Monitor VIDEO OUT VIDEO IN VIDEO OUT VCR or VTR o 00 0EJOLJEJEJEJLJEJ EJ CVI I CY I...

Страница 31: ...D IN GREEN OUT GREEN IN 0 III 0 r l BLUE OUT BLUE IN 8 o DO DDDDODDDDtJ CVI All screen images in this manual were taken using this configuration Better results may be obtained using a film recorder wh...

Страница 32: ...IIJD I A o c t 3 t I 0 t t I 0 1_ 3 I L O O P OUT 1 0 RED OUT RED IN G REEN OUT G REEN IN BLUE OUT BLUE IN I r 0 00 o c 1 1 l nI 0 n 0 1 1 ft l 8 t I o o c 3 0 0 EXT VID EO IN SUB CARRIER I SYNC B LA...

Страница 33: ...NAL SPG 1 26 CVI DESCRIPTION Video Mixer VCR or VTR Time Base Co rrector 0 0 0 0 REF SYNCS IN PREVIEW VIDEO OUT OUT VIDEO 1 IN CVI 0 I SYNC etc o o o o o o 0 t I 0 OR 0 IZI I IZI OPTIONAL Coder Possib...

Страница 34: ...peration at concerts minimum system Eo o o r l Q Professional Video Camera z Composite Monitor VIDEO OUT o DO D DDOO tJDDD D CVI Projection TV RED OUT RED IN GREEN OUT GREEN IN BLUE OUT BLUE IN SYNC O...

Страница 35: ...rojection CCU TV or VCR 000 I Eo l i GENLOCK IN 0 SYNC RED OUT RED 2 IN VIDEO IN 0 Q GREEN OUT GREEN 2 IN CCU CAMERA CABLE 1 111 BLUE OUT BLUE 2 IN 11 r r u I OUT I I I PERFORMER Professional Video I...

Страница 36: ...IDEO 1 IN SYNCS GENLOCK VIDEO 2 IN o DO 00000 00000 _ _ ___ VIDEO 1 IN SYNCS GENLOCK DIGITAL CASCADE OUT Composite Monitor DIGITAL VIDEO OUT HUHH o 00 OOOOD DOOOEJ _____ C VI VIDEO I N D LOOP THROUGH...

Страница 37: ...T Eo LOOP VIDEO 1 0 THROUGH IN IXl o D O D DDDD DD DDD CVI o Delay line o The CVI input to output delay is approximately 0 7 microseconds for RGB to RGB 0 95 microseconds for RGB to composite and 1 3...

Страница 38: ...RGB Monitor Q fil I E 0 Q fil Z fil fil 0 I Eo 0 Z fil fil 0 Z fil I III I Eo 0 fil I III Z 0 Z I Il I Eo 0 0 Z I Il UUHUU UHHUU LI LI D JDLlLlOOOO JO LI 0 0 ODOOLJOOOOO CVI CVI The CVI may be used wi...

Страница 39: ...U RATION DIAG RAMS Use with domestic video equipment VIDEO OUT VIDEO 1 IN Domestic Video Camera VIDEO OUT VIDEO IN LJ D O DOr JODOEJ O CVI 1 32 CVI DESCRIPTION I TV Set VCR o r VTR e m D O D CCC AERI...

Страница 40: ...CON FIGU RATION DIAG RAMS Tape to tape dub with CVI processing VCR o r VTR VIDEO OUT VIDEO 1 IN VID EO OUT DO DDDotJtJtl Db CVI VID EO INPUT TV Set AERIAL RF OUT VCR o r VTR I CVI DESCRIPTION 33 I...

Страница 41: ...ties see Section 3 PAINT MENUS It is necessary at this point to have a CVI connected and ready to use For connection details see Section I CONNECTING THE CVI Functions may be combined in numerous ways...

Страница 42: ...rawing move the HUE slider All colours from the spectrum should be seen Move the PAN and ZOOM sliders See how it is possible to colour the smallest areas pixels Return the PAN sliders to their central...

Страница 43: ...ory PRESETS stored in the CVI and a list of them appears at the end of this section 9 Drawing now will produce random coloured car shapes Rate of randomness is set by the RATE 1 slider At minimum sett...

Страница 44: ...ill select the COLOUR TYPE menu Select Translucent by moving the cursor to the number 2 and lifting Easy isn t it Push STOP button to return to image Push SATURATION and VALUE sliders up to top positi...

Страница 45: ...lines will be blended into the background giving a much smoother appearance Note that the lines are drawn more slowly when DEJAG is active 12 Another paint method is Rectangle whereby a rectangle of a...

Страница 46: ...nt protect an area of screen for instance to change the background but not the stencilled area Another possibility is to copy one stencilled area to a different part of the screen The CVI will allow l...

Страница 47: ...epeat steps vi to viii to make further copies of the original object 16 Finally we can title our masterpiece i Press MENU button and select Paint Menu 9 TITLE EDIT ii An alphanumeric style keyboard sh...

Страница 48: ...ll on the background This would require at least two floodlights either side of the subject However too much floodlighting can result in hot spots on the chroma key background These areas cannot be ke...

Страница 49: ...ith live video behind it Press the WIPE STENCIL button This should leave just live analog video 2 Select PRESET 30 This effect on live video is called pixelatioll or the mosaic effect Try the ZOOM and...

Страница 50: ...Horizontal or Vertical wipe 8 Select PRESET 39 and draw Still image is unchanged except drawn areas are brighter This is the stencil being shown Notice DRAW COLOUR button is not lit We are just drawin...

Страница 51: ...ee Section 3 DISPLAY CONTROL Menu for more information The ZOOM control can expand the stencil areas without a ffecting the analog areas The RATE 2 slider controls ZOOM speed If RATE 2 is at minimum Z...

Страница 52: ...y freezes at a rate set by RATE 2 slider 16 Select PRESET 61 This carries on from PRESET 60 and uses Slide in Video Menu 2 SCREEN CONTROL Slide allows continuous panning of the continually frozen imag...

Страница 53: ...to VIDEO INPUT 2 PRESET 92 wipes from top to bottom from VIDEO INPUT 2 to VIDEO INPUT 1 PRESET 93 disintegrates dot wise from VIDEO INPUT 1 to VIDEO INPUT 2 These are useful transitions between video...

Страница 54: ...g are on the stencil plane and the field store Press USE STENCIL button to either display or not display the stencilled painted areas Press INVERT STENCIL button to either have the logo and lettering...

Страница 55: ...ally brown but may be altered using the H S V sliders Turn off the DRAW LOCK button and use the DRAW button for greater positioning control The stencil is drawn at the same time therefore defining the...

Страница 56: ...he background stencil Off Live video must be chroma keyed for this PRESET Set up chroma key using PRESET 99 Also a stencil must be drawn PRESET 09 U N DER OVER SLIDE COLOU RIZE Similar to PRESET 08 bu...

Страница 57: ...select a new area to be copied press STOP button and re position cursor Change Brush shape for other effects Build up an image from overlapping cuts and pastes PRESETS 1 3 to 1 7 are part of a graph d...

Страница 58: ...and rectangles are drawn in with a thick brush and Paint crawl Move H S V sliders for changes in Paint crawl colours Move PAN STRETCH and ZOOM sliders for more effect Press FREEZE button to get recta...

Страница 59: ...rom the video image Move the ZOOM and STRETCH sliders for different size rectangles Move HORIZONTAL and VERTICAL PAN sliders to mid position to stop the sliding Actual content of background can now be...

Страница 60: ...PTH is set midway to zero there is no colourizing because there is no depth Press FREEZE to freeze the image Press COLOURIZE to return to normal colours PRESET 27 COLOU RIZE SEPIA TON E Monochrome col...

Страница 61: ...s STOP button to terminate scan PRESET 35 SLOW SCAN DOWN Same as PRESET 34 except down the screen PRESET 36 ZOOM OUT I MAGES Precursor to PRESET 37 Live image is grabbed as it zooms out Move ZOOM slid...

Страница 62: ...ncilled area at a rate set by RATE 2 slider Zooming makes the stencilled area bigger PRESET 41 SLIDE SHATTER TEXTU RE A Texture is on the stencil plane RATE 2 slider controls delay between live digita...

Страница 63: ...colourized area with normal area FREEZE will freeze live video in drawn area Press WIPE STENCIL to clear drawn area PRESET 47 SLAPSTICK Press FREEZE to grab live video image RATE 2 slider controls rat...

Страница 64: ...nalog image RATE 2 slider controls alternation rate Use ZOOM and STRETCH to alter pixelation Press FREEZE to capture pixelated image PRESET 55 I MAGE OVER COLOU R WIPE Colour wipe down the screen behi...

Страница 65: ...clear background ZOOM and STRETCH work well here PRESET 59 TRAIL Current chroma keyed image is continually and rapidly grabbed or frozen as in PRESET 58 This results in a trail of images A rapidly mo...

Страница 66: ...IZONTAL PAN slider positions right mirror Press FREEZE to capture reflections and see left mirror PRESET 65 OVERLAP MIRROR WITH TRAIL AN D STROBE Same a s PRESET 64 except image is continuously frozen...

Страница 67: ...image Digital image is always catching up to the analog image RATE 2 slider sets how fast the catch up is FREEZE will halt the catch up INVERT STENCIL will show digital image through the stencil creat...

Страница 68: ...PAD The stencil cursor will appear Position cursor to blue area and lift from pad A stencil wipe will commence across the screen taking about 6 seconds Everywhere that is blue ish will have the stenc...

Страница 69: ...the live image Thus an i mage can be continually frozen in time with music beats or pulses Adjust the AUDIO SENSITIVITY control in the electronics unit for optimum results PRESET 82 M U SIC TRAIL CRA...

Страница 70: ...gh where VIDEO I is chroma keyed PRESET 86 CHROMA KEY VI DEO 2 OVER 1 Same as PRESET 85 except video paths are reversed and hence the source of chroma key is Video 2 PRESET 87 CHROMA KEY 1 OVER 2 COLO...

Страница 71: ...creen from VIDEO 2 digital to VIDEO 1 analog Press WIPE STENCIL for another wipe Regain VIDEO 2 by pressing INVERT STENCIL Wipe may be stopped at any time by pressing STOP Re position stencil with VER...

Страница 72: ...t of blue a pinky orange colour If keying a face for example set H S V sliders to mid position Adjust HUE red content so that face skin tone is normal colour without chroma key speckles Next adjust VA...

Страница 73: ...R OVER COLOURIZED 18 RECTANGLES WITH PAINT CRAWL 19 CIRCLES MOTTLED 20 CHROMA KEY OVER SLIDING STILL 2 1 ZOOM OUT COLOUR RECTANGLES 22 BOILING BACKGROUND 23 FILLING GRID WITH RANDOM COLOUR 24 CHROMA K...

Страница 74: ...VE COLOURIZE 69 DOPPELGANGER 70 TRAIL CRAWL 7 1 CATCH UP 72 CATCH UP COLOURIZE 73 GHOST SINGLE FREEZE 74 PERSISTENCE OF VISION 75 SOFT PIXELS 76 DIGITAL IMAGE 77 COLOUR DETECT 78 CLEAN UP STENCIL 79 U...

Страница 75: ...s fall on the background This would require at least two floodlights either side of the subject However too much floodl ighting ca n result in hot spots on the chroma key background These areas cannot...

Страница 76: ...behind it Press the WIPE STENCIL button This should leave just live analog video 2 Select PRESET 30 This effect on live video is called pixelatioll or the mosaic effect Try the ZOOM and STRETCH slider...

Страница 77: ...orizontal or Vertical wipe 8 Select PRESET 39 and draw Still image is unchanged except drawn areas are brighter This is the stencil being shown Notice DRAW COLOUR button is not lit We are just drawing...

Страница 78: ...s See Section 3 DISPLAY CONTROL Menu for more information The ZOOM control can expand the stencil areas without affecting the analog areas The RATE 2 slider controls ZOOM speed If RATE 2 is at minimum...

Страница 79: ...y freezes at a rate set by RATE 2 slider 16 Select PRESET 61 This carries on from PRESET 60 and uses Slide in Video Menu 2 SCREEN CONTROL Slide allows continuous panning of the continually frozen imag...

Страница 80: ...to VIDEO INPUT 2 PRESET 92 wipes from top to bottom from VIDEO INPUT 2 to VIDEO INPUT 1 PRESET 93 disintegrates dot wise from VIDEO INPUT 1 to VIDEO INPUT 2 These are useful transitions between video...

Страница 81: ...g are on the stencil plane and the field store Press USE STENCIL button to either display or not display the stencilled painted areas Press INVERT STENCIL button to either have the logo and lettering...

Страница 82: ...ially brown but may be altered using the H S V sliders Turn off the DRAW LOCK button and use the DRAW button for greater positioning control The stencil is drawn at the same time therefore defining th...

Страница 83: ...he background stencil Off Live video must be chroma keyed for this PRESET Set up chroma key using PRESET 99 Also a stencil must be drawn PRESET 09 U N DER OVER SLIDE COLOU RIZE Similar to PRESET 08 bu...

Страница 84: ...lect a new area to be copied press STOP button and re posi ion cursor Change Brush shape for other effects Build up an image from overlapping cuts and pastes PRESETS 1 3 to 1 7 are part of a graph dra...

Страница 85: ...white and rectangles are drawn in with a thick brush and Paint crawl Move H S V sliders for changes in Paint crawl colours Move PAN STRETCH and ZOOM sliders for more effect Press FREEZE button to get...

Страница 86: ...rom the video image Move the ZOOM and STRETCH sliders for different size rectangles Move HORIZONTAL and VERTICAL PAN sliders to mid position to stop the sliding Actual content of background can now be...

Страница 87: ...is set midway to zero there is no colourizing because there is no depth Press FREEZE to freeze the image Press COLOURIZE to return to normal colours PRESET 27 COLOU RIZE SEPIA TON E Monochrome colouri...

Страница 88: ...STOP button to terminate scan PRESET 35 SLOW SCAN DOWN Same as PRESET 34 except down the screen PRESET 36 ZOO M OUT IMAGES Precursor to PRESET 37 Live image is grabbed as it zooms o u t Move ZOOM slid...

Страница 89: ...lled area at a rate set by RATE 2 slider Zooming makes the stencilled area bigger PRESET 41 SLIDE SHATTER TEXTURE A Texture is on the stencil plane RATE 2 slider controls delay between live digital im...

Страница 90: ...olourized area with normal area FREEZE will freeze live video in drawn area Press WIPE STENCIL to clear drawn area PRESET 47 SLAPSTICK Press FREEZE to grab live video image RATE 2 slider controls rate...

Страница 91: ...d analog image RATE 2 slider controls alternation rate Use ZOOM and STRETCH to alter pixelation Press FREEZE to capture pixelated image PRESET 55 I MAGE OVER COLOU R WIPE Colour wipe down the screen b...

Страница 92: ...clear background ZOOM and STRETCH work well here PRESET 59 TRAIL Current chroma keyed image is continually and rapidly grabbed or frozen as in PRESET 58 This results in a trail of images A rapidly mo...

Страница 93: ...ZONTAL PAN slider positions right mirror Press FREEZE to capture reflections and see left mirror PRESET 65 OVERLAP MIRROR WITH TRAI L AN D STROB E Same as PRESET 64 except image is continuously frozen...

Страница 94: ...ge Digital image is always catching up to the analog image RATE 2 slider sets how fast the catch up is FREEZE will halt the catch up INVERT STENCIL will show digital image through the stencil created...

Страница 95: ...S PAD The stencil cursor will appear Position cursor to blue area and lift from pad A stencil wipe will commence across the screen taking about 6 seconds Everywhere that is blue ish will have the sten...

Страница 96: ...the live image Thus an image can be continually frozen in time with music beats or pulses Adjust the AUDIO SENSITIVITY control in the electronics unit for optimum results PRES ET 82 M U SIC TRAI L CR...

Страница 97: ...h where VIDEO I is chroma keyed PRESET 86 CHROMA KEY VI DEO 2 OVER 1 Same as PRESET 85 except video paths are reversed and hence the source of chroma key is Video 2 PRESET 87 CHROMA KEY l OVER 2 COLOU...

Страница 98: ...reen from VIDEO 2 digital to VIDEO 1 analog Press WIPE STENCIL for another wipe Regain VIDEO 2 by pressing INVERT STENCIL Wipe may be stopped at any time by pressing STOP Re position stencil with VERT...

Страница 99: ...of blue a pinky orange colour If keying a face for example set H S V sliders to mid position Adjust HUE red content so that face skin tone is normal colour without chroma key speckles Next adjust VALU...

Страница 100: ...U r r _ r I J _ _ il l i r r r _ _ _ _ _ J Drawing on live video Title on live v ideo 03 Instant wipe to colour r ec n 9 Ie 1 1 Rectangles H u e Sat...

Страница 101: ...1 2 Cut and Paste I F a 1 l I t j j _ f 1 1 i l t 1 7 Under Over colourized J 2 1 Zoom ou t colour rectangles L c 1 8 Rectangles with pain t crawl 22 BOiling backg round 19 Circl es mottled...

Страница 102: ...33 Quad mirror Slow scan across L J _J...

Страница 103: ......

Страница 104: ...56 Under over stencil 57 Under over catch up 58 Push to freeze...

Страница 105: ...60 L J _JI L...

Страница 106: ...80 Under over texture wipe L J _J...

Страница 107: ...L J _Jd r...

Страница 108: ...ER OVER COLOURIZED 18 RECTANGLES WITH PAINT CRAWL 19 CIRCLES MOTTLED 20 CHROMA KEY OVER SLIDING STILL 21 ZOOM OUT COLOUR RECTANGLES 22 BOILING BACKGROUND 23 FILLING GRID WITH RANDOM COLOUR 24 CHROMA K...

Страница 109: ...GATIVE COLOURIZE 69 DOPPELGANGER 70 TRAIL CRAWL 71 CATCH UP 72 CATCH UP COLOURIZE 73 GHOST SINGLE FREEZE 74 PERSISTENCE OF VISION 75 SOFT PIXELS 76 DIGITAL IMAGE 77 COLOUR DETECT 78 CLEAN UP STENCIL 7...

Страница 110: ...ype menu 14 Screen control menu 52 Texture menu 15 Freeze control menu 55 Col o u r control 1 9 Colo u r i z e con trol m e n u 57 Colour type menu 21 Presets control m e n u 61 Symmetry menu 24 Seq u...

Страница 111: ...the stencil and field stores 2 Paint Type Selects the simulation of the type of paint you use For example Flat is equivalent to using opaque acrylic paints Shade simulates an airbrush effect and so o...

Страница 112: ...Symmetry occurs as the image is drawn 7 Colour Wipes Defines changes to the field store which occur over the entire screen 8 Stencil Wipes Defines changes to the stencil plane which occur over the en...

Страница 113: ...by blending the colour of the line edges with the colour already in the field store If DEJAG is selected then the dejag process will be applied to the Draw Rubber band Circle Ellipse and Rays paint me...

Страница 114: ...be repeated for more lines It is not necessary to turn off DRAW LOCK between lines as lifting the stylus from the pad will stop the drawing However if DRAW LOCK is on then drawing will begin as soon a...

Страница 115: ...en going from the last defined point to the current stylus position f Lift the stylus The line will be drawn in your paint selections Steps d to f may be repeated as often as desired If you press STOP...

Страница 116: ...cle will fit just inside or around the desired ellipse Lift the stylus f Put stylus to pad again and an ellipse of dots will appear on screen and will follow the stylus movements on the pad The curren...

Страница 117: ...s will appea r joining the rays centre with the current stylus position Steps c to e may be repea ted to create rays with different centres Changes in H S V and COLOUR DEPTH sliders while d rawing ray...

Страница 118: ...d a cursor saying fill will appear on the screen If you wish to fill the stencil plane only turn off the DRAW COLOUR button at this point d Keeping the stylus down alter the H S V sliders to desired c...

Страница 119: ...If the USE TEXTURE button is on the copied image will be textured 2 As with all Paint Methods if the COLOUR TYPE menu selection is other than Opaque the image copy will not be a solid image For instan...

Страница 120: ...es can be used to paint in a variety of ways either on the field store or the stencil plane Drawing will remain in the Brush shape specified until changed Note that BRUSH SHAPE menu is connected to TE...

Страница 121: ...ft stylus Further Brush shapes are selected in the following way selected Brush shape for drawing t current llser defined Brush shape t currently selected Texture from TEXTURE menu l moves user define...

Страница 122: ...t Brush shape menu will change to this 1 12 PAINT MENU I t move cursor here to jump to TEXTURE menu to change current Texture BRUSH SHAPE EDITOR Position cursor anywhere in this area and lift stylus A...

Страница 123: ...IOUS menu button New Brush shape is displayed in selected Brush shape area and user defined Brush shape area Here another Brush shape has been selected for drawing Note that user defined Brush sh ape...

Страница 124: ...e 3 Shade The left hand side of the brush will have full intensity colour which will decrease across the Brush shape to the right hand side which will have minimum intensity 4 Shade The top of the bru...

Страница 125: ...NCIL WIPES to cover the stencil plane with a pattern Note that the TEXTURE menu is connected to the BRUSH SHAPE menu via the large top right hand box This means that you may use any of the 54 Brush sh...

Страница 126: ...he following way selected Texture for drawing t current user defined Texture t currently selected Brush shape from BRUSH SHAPE menu moves user defined Texture into selected Texture moves Brush shape i...

Страница 127: ...r disappear Build up a new Texture The new Texture will appear here in actual size as you build it 1 move cursor here to edit Texture menu will change to this 1 TEXTU R E M E N U 1 1 move cursor move...

Страница 128: ...ious menu move cursor torJor to here or press DRAW button doubles as PREVIOUS menu button New Texture is displayed in selected Texture area and user defined Texture area Here another Texture has been...

Страница 129: ...ormal fashion 1 Music Colour is controlled by music audio input required This selection overrides the H S V sliders 2 Random Colour is controlled by an internal fluctuating program This would be equiv...

Страница 130: ...to be Off for instance if you are recording an effect which involves the actual process of stencil drawing Alternatively if the Stencil Show selection is made then the areas where the stencil is On be...

Страница 131: ...tion at any one time Colour type selections are closely related to Colourize type selections See Section 3 COLOURIZE TYPE menu Colourize types affect the whole digital image in real time Colour types...

Страница 132: ...der 1 Tint The colour you draw with is added to or subtracted from the colour you are drawing over to the extent specified by the COLOUR DEPTH slider This gives an effect somewhat similar to transpare...

Страница 133: ...l value is then tinted by the selected colour 7 Contour This colour type is basically a form of posterizing The component red green and blue colours of the HUE SATURATION VALUE selection will determin...

Страница 134: ...ntre screen irrespective of pan position This enables you to create an image with multiple centres of rotation and reflection by panning the image so that a new point is at centre screen The SYMMETRY...

Страница 135: ...te that the original line position is not drawn only the reflected line This can make it a little confusing to draw with This selection is more applicable to the Copy Paint Method and the Change Colou...

Страница 136: ...6 Kaleidoscope A combination of cross and diagonal symmetries giving a total of eight copies of each drawn point Note that this symmetry in particular may be very slow especially when used with large...

Страница 137: ...SYM M ETRY M E N U 8 Spin 1 80 degree rotation around the current screen centre giving two images PAINT MENU 27 I...

Страница 138: ...nction The light in the WIPE COLOUR button will go out as soon as the colour wipe is completed You may cancel the wipe before it finishes by pressing the STOP button COLOU R WIPE 0 White Clears the sc...

Страница 139: ...out four seconds to complete depending on which Colo u r type and Tex t u r e functions are used COLOU R WI PES How it is done a Select Colour i n COLOUR WIPES menu b Return to image c Press the WIPE...

Страница 140: ...the screen during the wipe replacing it with new information depending on which Colour type Colour depth Texture Symmetry or Stencil is used You may have an image that you like but wish to change it i...

Страница 141: ...of the screen can be protected from disintegration by using the stencil in the norma l fashion COLOUR WI PES How it is done a Select Col our Tunnel in the COLOUR WIPES menu b Return to image c Press...

Страница 142: ...s complete For the wipe to have an observable effect the STENCIL SOURCE menu must be set to either Internal or Under over and the USE STENCIL button must be on The wipe may be stopped at any stage by...

Страница 143: ...from top to bottom of the screen STENCI L WI PES How it is done a Select Clear in STENCIL WIPES menu b Return to i mage c Press WIPE STENCIL button d The entire stencil plane will be instantly cleared...

Страница 144: ...f colours to be stencilled centered around the colour that you specify with the stylus 34 PAINT MENU How it is done a Select Invert in STENCIL WIPES menu b Return to image c Press WIPE STENCIL button...

Страница 145: ...ing the INVERT STENCIL button can give alternating On and Off window areas in the stencil The Wipe Wipe r and Disintegrate wipes are each automatically preceded by a Window stencil wipe STE NCI L WI P...

Страница 146: ...ow Select characters from the on screen keyboard by moving the cursor over the desired cha racter and lifting the stylus The character will appear in the large box above the keyboard Text will appear...

Страница 147: ...ize character will not a ppear in the titling if there is not enough space left for it even though a smaller character will fit ii a big size character ca n be partially overwritten by the next line o...

Страница 148: ...The title function automatically turns on the DRAW COLOUR function The DRAW STENCIL button controls whether the title is written to the stencil plane A title can be written to both planes simultaneous...

Страница 149: ...to SIZE I SPACE BAR once Select DROP SHADOW 1 d rop RET SPACE BAR 24 times shadow SPACE BAR 1 RET Select UNDERLINE u n derline Select DROP SHADOW 2 SPACE BAR 9 times drop RET SPACE BAR 25 times shado...

Страница 150: ...blue backdrop in the studio as many CVI effects require it See Section I CONNECTING THE CVI The VIDEO MENUS menu is a list of the available menus in the live video control category There are some are...

Страница 151: ...menu except that instead of controlling the colour for painting this menu controls the colour for real time colourizing 5 Colourize Type Defines how the colours of the digitized or drawn areas will ap...

Страница 152: ...which aspects of vidco are displayed where the stencil is On or Off It also determines whether the Field Store is updated by incoming video in the stencil On or Off regions Of course you must have a s...

Страница 153: ...input to the Analog Path of the CVI This is not modified by the CVI at all The live digital video is the digitised video input to the Digital Path This may be colourized by the CVI The field store is...

Страница 154: ...Off this will be the selection normally displayed in the stencil off regions If INVERT STENCIL is On then it will be the selection normally displayed for stencil on regions The display formats and fre...

Страница 155: ...s If FREEZE is on then the frozen Field Store image will be displayed Mix A 50 mix between the Field Store and the live video from the Analog Path is displayed Cascade The cascaded output from another...

Страница 156: ...the stencil Off areas Can be used effectively with the Shatter selection in the SCREEN CONTROL menu to rapidly invert the stencil Can be used to create trail effects where both the trailing object an...

Страница 157: ...an produce the ca tch up effects of PRESET 7 1 Interesting possibilities with two video sources Colour trail The same principle as Trail above is used except that a splash of the current colour is fro...

Страница 158: ...Store above The difference is that paintings made with the Crawl selection will not have constant colour but rather will ha ve colours running continually along the lines This is called Colour Crawl C...

Страница 159: ...field store and be displayed Using Internal stencil you may paint over the cascaded image from the second CVI With Chromakey and Under over stencils a variety of complex multi plane and trail effects...

Страница 160: ...ela tionship between the field store and the stencil plane and if the image is panned or zoomed the stencil will move with it 1 Cascade The stencil coming from a second CVI in Cascade mode Instead of...

Страница 161: ...video signal paths of the CVI The Digital path digitizes video input Therefore this path may be used to colourize store pixelate etc the live image The digital path also includes the Chroma key funct...

Страница 162: ...mirror function will only mirror images in the field store that is frozen or drawn images or continually updating field store images By combining these images with others which are not mirrored effec...

Страница 163: ...he GRAPHICS PAD This enables you to move objects around the screen by drawing on the pad This is a relative position control so the image will not suddenly jump to the position that you touch the pad...

Страница 164: ...ot around the centre of the slider travel to make it easier to stop the image motion If the HORIZONTAL PAN slider is above the central position the image will slide to the right at a speed relative to...

Страница 165: ...e See Section 3 OISPLA Y CONTROL Menu for more information on display formats and freezing 0 Continuous This means that the digital path input will continuously update those field store regions that a...

Страница 166: ...This changes the normal function of the FREEZE button from a push on push off control to a single push control 4 Music This selection enables the freeze function to be controlled strobed from an exte...

Страница 167: ...for this menu 1 H ue Sat Value Fix This is similar to H S V above except that after you have turned the COLOURIZE button On if you then turn it Off again the image will remain olourized and not retur...

Страница 168: ...olour changes for digital video COLOURIZING does not affect Analog video The COLOUR DEPTH slider is important as it governs the degree of colourizing as shown below Note that the middle zero position...

Страница 169: ...will darken the image 1 Translucent This colourize type is similar to overlaying the image with a translucent film of variable density and colour The degree of translucency is determined by the COLOU...

Страница 170: ...ng a black and white photo 6 Contour This colourize type can generate a range of posterizing effects At various settings of the HUE SATURATION and VALUE sliders it will generate a range of colour cont...

Страница 171: ...CONTROL CONSOLE Using the Presets Selecting PRESETS while in this menu is the sa me as at other times press the PRESET button followed by a two digit number or the NEXT DRAW LOCK or PREVIOUS DRAW but...

Страница 172: ...PRESET the physical positions of the sliders does not necessarily reflect the control value tha t the CVI is actually using The CVI will continue to use the slider control value stored in the PRESET u...

Страница 173: ...ections PR ES ETS CO NTROL M E N U How it is done a Selecting Return will result in no change to the PRESET b Selecting Reset preset will reset only the PRESET indicated by the Preset number c Selecti...

Страница 174: ...CK button doubles as NEXT PRESET number may be decremented by pressing PRESET then DRAW button doubles as PREVIOUS c Move cursor to number box opposite to preset Box will be outlined d Choose PRESET n...

Страница 175: ...ss Memory battery backup for copying There are 1 00 PRESET spaces available for your use to change as desired There are also 1 00 factory PRESETS permanently in the program These factory PRESETS are c...

Страница 176: ...ined under Using the Presets above they will not always correspond to the physical positions of the CONTROL CONSOLE sliders Slider values may be changed by moving the cursor to the desired position an...

Страница 177: ...g PRESETS w i t h o u t h a v i n g to expl i c i t l y set or Reset th em The PRESET is actually upda ted a t t h e t i m e w h e n you c h a n ge to a n other P RESET Use t h i s select i o n w i t...

Страница 178: ...PRESETS you can access all of the CVI s menu functions The PRESETS and the SEQUENCER in combination allow an accuracy and versatility of control which is not possible through manual manipulation The r...

Страница 179: ...ures that the CVI will always begin a sequence in a known state If this is not wanted the first step can be removed using the Edit function As an example to record a sequence which changes from Preset...

Страница 180: ...RAW LOCK button is pressed If you stop the Play function during a sequence you can then use the Step function to locate the exact point in the sequence to place an Insert or an Edit see below Append T...

Страница 181: ...n lines and most of them do the up arrow and down arrolV boxes on the menu let you move up or down by ten lines to see more of the sequence For larger movements i Move the cursor to any line number bo...

Страница 182: ...y the methods described under Search ing for li n es above ii Select the line number be ore which you wish to Insert by moving the cursor to light up the appropriate line number box iii Return to the...

Страница 183: ...time entry is reduced by 9 seconds then all following times are reduced by 9 seconds When this is not desired the next time entry can be increased by 9 seconds to restore all subsequent entries Using...

Страница 184: ...RESETS so that each of your required Paint Methods is stored in a different PRESET ii Record the sequence of Paint Methods that you want by changing between the PRESETS of step i The Brush Shapes Pain...

Страница 185: ...Specifically you must fast forward or reverse the video recorder to the point on the tape that you wish to record or retrieve the information and operate the recorder s play and record buttons The Sav...

Страница 186: ...tion title via the TITLE EDIT menu c Return to SAVE RECALL menu d Press RECORD on VCR e Select Save option on the menu and press the STOP button f CVI will now generate an identification display incor...

Страница 187: ...Thus the image sequencer and presets in the CVI be ore the Recall function is initiated will be lost However this information can be separately saved before Recall if you think you may need it later H...

Страница 188: ...Video Menu 6 PRESETS CONTROL 4 Recall Data Recalls the 1 00 user alterable PRESETS and the SEQUENCER information previously Saved to tape This will not affect the current image in the field store The...

Страница 189: ...of an error a message is displayed upon completion to indicate whether the PRESETS data SEQUENCER data or both have been corrupted If the error occurred in the PRESETS data the USER PRESETS of the CVI...

Страница 190: ...d black and white on the digital data coming from tape Select terminated VIDEO 1 composite input 5 Poor tape or recorder a Use new tape quality indicated by b Use a cleaner ragged jumpy or section of...

Страница 191: ...a selection other than Off is made in this menu then when you return to your image press STOP button or position cursor over the white square the selection you have made will override the normal oper...

Страница 192: ...ambient light levels is required c Select Chroma key in the STENCIL SOURCE menu Video Menu 1 Select Stencil Show in Paint Menu 4 d Ensure that the video camera is aimed and focussed on the subject th...

Страница 193: ...t passed will appear on the screen If the CVI fails the test a ppropriate messages will appear Contact your distributor This is what a self test result looks like After the self test you may return to...

Страница 194: ..._ 4 _ i __ __ __ __ __ __ __ __ __ __ _ __ _ __ __ __ __ __ __ __ __ __ __ __ __ __ __ __ __ __ __ __ QUICK SELECTION PAINT MENU I...

Страница 195: ...__ __ __ __ __ __ __ __ __ __ __ __ __ __ __ __ __ __ __ __ __ __ __ __ __ __ _ _ k__ _ _ H _ _ A__ n m h U L _ _ _ Q b_ _ W _ 4 __ __ __ _ MW __ Q 1 QUICK SELECTION VI DEO MENU I OT TlC K F T F C TTO...

Страница 196: ...lilli an _ _ _ _ _ _ _ _ _ _ _ _ _ _ _ _1l _ b h _ _ _ _ _ __ _ _ _ _ _ _ _ _ 9 b_ _ __ QUICK SELECTION VIDEO MENU...

Страница 197: ...RS232C Port ControI 1 Rev 7 Software Update 1...

Страница 198: ...RS232C computer link with the CVI This documentation will be released at a later date in fully typeset format as an update to the User Manual Contents Introduction How RS232C Works Summary of How the...

Страница 199: ...ay all be transmitted to and from the external computer Titles may also be entered with more flexibility than is possible with the TITLE EDIT Menu All these functions can be performed at high speed an...

Страница 200: ...ntage that virtually any two RS232C equipped devices can be made to talk to one another Computer data Computer data consists of simply I s and O s known collectively as bits of information These bits...

Страница 201: ...rpreted as an ASCII character The table of ASCII characters is given at the end of this section Binary data A byte of data will often represent a number which is stored in the computer This is done by...

Страница 202: ...1 5 As there is no single character to represent the binary values from 10 to 1 5 the letters A to F are used This gives the hex notation scheme as listed below Binary Value Decimal Value Hex Value 0...

Страница 203: ...ne or two of them The CYI can be set to expect and transmit ei ther one or two stop bits using the RS232 PORT CONTROL Menu The use of two stop bits is recommended where possi ble RS232C Signals An RS2...

Страница 204: ...e of its handshake outputs RTS or DTR low This output is connected to a handshake input CTS or DSR of the transmitting device and so the transmission should stop When the receiver is ready to receive...

Страница 205: ...S and CTS lines for handshaking When the CTS input is held low by the external computer the CVI will stop transmitting data until the line is taken high again The CTS line must be held high for the CV...

Страница 206: ...y is connected Maximum Load on CVI RS232C Port Power Supplies 1 2 V 5 V 1 2 V Female 25 pin D m i n i connector Pin 1 8 P i n 25 Pin 15 275 rnA 200 rnA 5 rnA 12V 5V RS232C port Pin 7 GND Pin 3 TXD 2 C...

Страница 207: ...the host computer The lines marked and may optionally be omitted with a consequent loss of handshake capability Note that if the line marked is omitted then the CTS pin pin 5 of the CVI must be tied t...

Страница 208: ...re CZ PS45 Press the COLOURIZE button Change to Preset 45 DT 056 189 Draw a dot at screen position x y 56 1 89 Commands fall into two categories those which perform a CONTROL CONSOLE function and thos...

Страница 209: ...nnn hue SAnnn saturation VAmrn value CDnnn colour depth Rlnnn rate one Paint methods R2nnn rate two HPmrn horizontal pan VP1l111l vertical pan SHmm stretch ZMmm zoom Two parameters are required to def...

Страница 210: ...ready to receive The computer may lose some data if this control line is not set See the section on Programming Your Computer for more details Save Sequencer Command SS This instructs the CVI to tran...

Страница 211: ...ommand described above This will activate the selections contained in the loaded Preset data WARNING The CVI Presets are used directly by the Central Processing Unit If out of range values or data err...

Страница 212: ...to 15 and are represented by hexadecimal characters For example the characters S777 represent a pixel with stencil on and a colour of mid grey as blue green and red are all set to value 7 on a scale...

Страница 213: ...will need a program of only a few lines On the other hand a very large program could be written to perform a virtually unlimited variety of functions with the CVI and its data There is a wide range o...

Страница 214: ...en the CVI gives a beep each time that you press the key on your compu ter STA RT l It R e a d a c h a ra c t e r f r o m k e y board 1 Wri t e t h e c h a ra c t e r 1 0 t h e R S 2 3 2 p o r t I Exa...

Страница 215: ...No handshaking is used except to ensure that the RTS line is high If your computer is not able to keep up with the transmission rate of the CVI Le data gets lost try a slower baud rate or use the prog...

Страница 216: ...stop the CVI from transmitting during these t i mes The BASIC language can someti mes be a little slow in switching the handshake outputs of your compu ter a n d it ma y be necessa ry to use a slower...

Страница 217: ...STENCIL WIPE COLOUR USE TEXTURE DRAW STENCIL DRAW COLOUR COLOURIZE Byte 13 Most significant nybble 4 bits Paint Type selection Max value 5 Least significant nybble Colour Type selection Max value 8 B...

Страница 218: ...select Bit 4 Extended Blanking select Bytes 24 25 Unused CVI RS232C SPECI FICATIONS Baud rate menu selectable 300 600 1 200 4800 9600 1 9200 Parity menu selectable none odd even space Stop bits menu s...

Страница 219: ...DC2 I I 2 B R b r 3 ETX DC 3 3 C S c S t I 4 EOT DC4 4 0 T d t T 5 ENQ NAK it 5 E U e u 6 ACK SYN 6 F V f v f v 7 BEU ETB I 7 G W 0 w 8 BS CAN 8 H X h x M IC 9 TAB z E M I 9 I Y I y A L F SUB J Z j Z...

Страница 220: ...External Graphics Pad capability Installation If your CVI has already been equipped with R6 Software and a Memory Module ignore Steps 2 and 3 of the following I Turn off the CVI power 2 Install the R...

Страница 221: ...l Pad and the Control Panel s pad will function as usual Select Preset 1 8 The reet cursor appears on the screen Press the stylus button once to establish the position of the first corner Move the sty...

Страница 222: ...ps unintentional drawing interactions while the Sequencer is playing If you wish to draw while the Sequencer plays simply select Play from the menu and move the stylus off the pad then back on again t...

Страница 223: ...nto the Adap or Ca blc or directl y into the CYI To k board D or compulor To C V I The pins available at the Adaptor Cable depend upon which cable is connected betwcen the Graphics Pad and thc CYI Two...

Страница 224: ...d can be re enabled after the data has been sent This is done simply by transmitting two 3 byte commands to the Graphics Pad These commands are ControlA RM Disable Graphics Pad ControIA RS Enable Grap...

Страница 225: ...RS 232C PORT CONTROL Layout of External Graphics Pad 4 Button Cursor Functions WHITE Preset GREEN Stop RED Last Previous BLUE Next Draw 128 SOFTWARE UPDATE I...

Страница 226: ...Memory Modules and hence the user defined data may be transferred between machines equipped with Revision 7 software Always be certain to turn off the CVI before disconnecting or reconnecting Memory...

Страница 227: ...ct it The whole word will be highlighted _ P _ A _ _ N _T _M _ E _ T _ _ O_ D ____OCI3 E D r a w D o t s R u b b e r b a n d HI im E l l i p s e R e c t a n g l e R a y s C u t P a s t e F i l l C o p...

Страница 228: ...DIT menu Below the Current Title we find the Title Library Up to 99 titles may be stored in the library Five titles from the library are displayed at one time preceded by their library number Several...

Страница 229: ...the TITLES menu Rather than positioning and displaying the Current Title onto the field store a sequence of titles from the Title Library is displayed one by one With ROLL selected hitting TITLE bring...

Страница 230: ...in directly and more easily As the text edit display area near the top of the menu fills up with text the display automatically scrolls down to make more space available If the title increases to an e...

Страница 231: ...g cursor at any point in the edited title allows you to insert more characters at the cursor point by typing them in or to delete characters before the cursor using the DEL key To the left of the curs...

Страница 232: ...h Size 1 selected kerning is done in amounts of one pixel Size 2 results in a two pixel shift and so forth Kern Left FS Kern Right SHIFT FS Several European punctuation symbols are accessible via both...

Страница 233: ...ion Here is how the title shown with the TITLE EDIT menu on Page 5 was created CLR twice to clear Select Font 6 for Roma Font Select Underline Roma font De select Underline RET to start new line Selec...

Страница 234: ...ollows Font RS232 KeyBoard Height Name code code pixels System y 1 1 1 Piccolo F 2 7 Pisa G 3 1 1 Milano H 4 1 2 Olivetti I 5 1 3 Roma J 6 20 Masserati K 7 2 1 User D 8 24 max The small box in the upp...

Страница 235: ...ghlighted it usually is 3 Hit SHIFT on the keyboard SHIFT for UPPERCASE 4 Hit L on the keyboard at which stage L should appear in the esc box SAVE places esc as displayed in its little box into the us...

Страница 236: ...the font Return to the FONT EDIT menu with the LEFT TRIANGLE button to the right of the menu title F _ O _ _ N_ T __ V _ I_ E _ W __ __ __ __ __ _ I 0 1 2 3 4 5 6 7 8 9 A B C D E F G H I J K I P A N T...

Страница 237: ...ield store DOTS selects a dot mode edit position cursor anywhere in the edit area and lift the stylus A pixel dot will either appear or disappear LINES selects line mode edit similar to RUBBER BAND dr...

Страница 238: ...with CLR used during Title Edit it must be hit twice to confirm complete erasure COM inverts complements the contents of the edit box Existing pixels are erased and new pixels created where no pixel e...

Страница 239: ...1 1 1 1 1 1 1 a a a a a a a a 1 1 1 1 1 1 1 a a a a a a a a _ 1 a a a a M t v III l n B 8 m m a AA ouou onon P A I N T 1 11 rrrI51srl8191 V I D E O 0 1 2 3 IlJ 5 6 7 8 9 These two menus have been modi...

Страница 240: ...cted as the current brush for drawing Edit When this box is illuminated you can select any of the displayed brushes for editing You may edit the current brush by hitting the large box at the top left...

Страница 241: ...either appear or disappear LINES selects line mode edit similar to RUBBER BAND drawing from the PAINT METHOD menu Position cursor in the edit area this defines the start of a series of lines Lift the...

Страница 242: ...on d Put stylus to pad The grade cursor will be displayed e Use the HUE SATURATION VALUE and COLOUR DEPTH sliders to vary the cursor colour to the desired setting f Move the tip of the cursor arrow to...

Страница 243: ...y by DRAW LOCK iv The COLOUR DEPTH control will only have an effect if the Colour Type menu is set to something other than Opaque for example Translucent This would allow a film of varying translucenc...

Страница 244: ...lows the current Preset to be set to the current state of the CVI Select Set and the menu will change At this stage you may either CANCEL the Set function or you may go ahead with it by moving the cur...

Страница 245: ...on of the Presets Refer to the Revision 5 User Manual for the meanings of other Preset Control Modes Use the Reset all Presets function if you wish to return to the Factory Presets Controls View This...

Страница 246: ...ber selection Up to ten distinct sequences can be recorded and maintained When a Sequence Number is selected all Pla y Record and Edit functions refer solely to that sequence The other nine sequences...

Страница 247: ...n select Continue The START modes have been re named These apply to both Record and Play functions Normal Previously named Immediate The Sequencer starts immediately Music Previously named Audio The S...

Страница 248: ...rticular slider is recorded resulting in a large saving in memory and greater ease of Sequencer editing Ignore time During Sequencer Play functions it is sometimes desirable to move through a Sequence...

Страница 249: ...followed by a two figure number initially zero The following Title entry specifies the the title position The two figure number may be modified during editing to select any title from the Title Libra...

Страница 250: ...junction with Block to find the end of a long run of one particular instruction type For example if a large number of consecutive Dot instructions have been recorded it is possible to locate the last...

Страница 251: ...Edit functions except Block Search may be carried out in this manner The Sequencer Edit codes for inserting instructions are listed below They are the same as those required for RS232 commands In the...

Страница 252: ...Sequence These commands are only recognised by the CVI when the image is displayed that is when not in the menus The three commands are BSlI Begin playing Sequence II RSn Repeat Loop Sequence n ES En...

Страница 253: ...ng data and image to tape SAVE DATA saves only the data NOT the image RECALL loads data and or image from the tape as selected by the Recall Options in the box in the lower half of the menu TEST DATA...

Страница 254: ...indicates whether each data item was recalled correctly If the message is preceded by a RIGHT TRIANGLE then the indicated data item was corrupted during an unsuccessful recall and thus had to be reset...

Страница 255: ...d blue components of Music Colour and Colourize control The envelope is used for triggering Music freezing and Sequencer Start The peak indicators in the display can be reset by pressing the DRAW butt...

Страница 256: ...to transmit the data contained in the User Defined Font The amount transmitted varies according to the size of the font resident in the font at the time although a typical size would be 6000 character...

Страница 257: ...n The CVI will remain in Load Character mode until an character is received Load Title Command LT The Current Title is loaded with a string of ASCII characters Most ASCII characters from SPACE to z ca...

Страница 258: ...n order as two ASCII characters per byte Load Brushes and Textures Command LB The entire set of User Defined Brushes and User Defined Textures are loaded into the CVI with this command The data format...

Страница 259: ...bgr specifies the lower limits BGR specifies the upper limits So for example the instruction LM 370 A9F tells the CVI to prepare to load the Palette locations that have blue address between 3 and A gr...

Страница 260: ...lue green and red data for the Palette location As an example if you wanted to map all the colours which have only a green component no red or blue to the corresponding shade of grey the following ins...

Страница 261: ...ton is pressed or the ES command is received Repeat Sequence Command RSn This command starts Sequence n playing in Repeat or Loop mode It will loop continuously until the MENU button is pressed or the...

Страница 262: ...8 24 decimal Bytes 5 onwards Pixel bitmap for character in row order If the character width is less than 9 one byte is used per row otherwise two bytes are used The number of rows is equal to the char...

Страница 263: ...l A circumflex I B tilde l C umlaut I D degree 20 n a space 2 1 n a n a 7A n a z 40 copyright 5C inverted 5E SF 7B inverted The LT column indicates how the unusual font characters are specified with...

Страница 264: ...I Font 5 olivetti J Font 6 roma K Font 7 masserati D Font 8 User Defined U Underline ON V Underline OFF S Surround ON T Surround OFF L Drop Shadow LEFT R Drop Shadow RIGHT Z Drop Shadow OFF P Kern LEF...

Страница 265: ...ys which are coloured light grey on the keyboard Across the top of the keyboard are 1 5 function keys labelled F l to F 1 5 With the exception of F15 these keys are used exclusively in the Title Edit...

Страница 266: ...The Title Edit Menu functions are described in detail in the Revision 7 Manual Update Titles may be entered by simply typing onto the menu The Function keys Fl to F1S are used for making font size and...

Страница 267: ...yyy set ellipse centre AXxxxyyy set ellipse axis ELxxxyyy draw ellipse Flxxxyyy fill WS wipe stencil US use stencil IS invert stencil ST stop FZ freeze R2nnn rate two HPnnn horizontal pan VPnnn vertic...

Страница 268: ...Glossary 1 Index 5...

Страница 269: ...bcarrier connect one CVI into another camera control u n i t letter number or symbol video technique of blocking images of a certain colour recolour digital image TV type video signal with a totally b...

Страница 270: ...ng video signal is made to capture a moving live i mage timing of video equipment from an external video source touch sensi tive pad used for d r a w ing selecting etc broadcast standard video hue sat...

Страница 271: ...ots removal of some colour information instant setup of CVI for a particular effect prevent presets from being altered standard layout of alpha numeric typewriter equipment 1 9 inches wide will fit a...

Страница 272: ...z zoom 1 4 REFERENCES downstream of video tape recorders subtle transparent colouring editable lettering transparent colour a video tape format modify a preset brightness of colour video cassette rec...

Страница 273: ...ntrol configuration diagrams connecting the CVI contour control console controls view copy Section Page S3 p 36 S4 p 9 S4 p 26 S l p 20 Sl p 15 S3 p 45 S3 p 5 1 S l p 2 S3 p 20 S3 p 5 1 S3 p l S3 p 10...

Страница 274: ...S3 p S1 digitizing touch pad S I p O Sl p 6 S4 p 23 disintegrate colour S3 p 3 1 stencil S3 p 35 dots S3 p 4 draw S I p 4 S3 p 4 draw over S3 p 20 drawing control S I p O Sl p 3 S I p 1 4 E edge detec...

Страница 275: ...rol colourize control internal stencil invert stencil K kaleidoscope symmetry L live digital logo luminance key I N DEX S l p 1 5 S 3 p 42 S3 p 8 S3 p 8 S3 p 1 4 S 3 p 25 S I p 3 Sl p 4 S3 p 4 l S3 p...

Страница 276: ...our type S3 p 22 options S l p 20 option switches S l p 20 P paint display control S3 p 46 menus S3 p l method S3 p l S3 p 3 type S3 p l S3 p 14 pan controls S l p O SI p 2 pan pen S3 p 53 phase adjus...

Страница 277: ...put Sl p 1 9 reset preset S3 p 63 RGB inputs and outputs S l p 1 9 rotary symmetry S3 p 26 RS232C Port S4 p l rubber band S3 p 5 S save and recall S3 p 4 l S3 p 75 saturation control S l p O Sl p l sc...

Страница 278: ...anslucency control trigger turning on the CVI I 1 10 REFERENCES I Section Page S3 p 23 S3 p 60 S3 p 27 Sl p 10 SI p I S S3 p SO SI p l l S3 p 50 S3 p 4 l S3 p 50 S l p O Sl p 4 S l p I O S l p 3 S 3 p...

Страница 279: ...25 wipe S3 p 53 S3 p 30 S3 p 33 video analog Sl p lS S3 pA5 S3 p Sl board S l p 20 digital Sl p lS S3 pA5 S3 p Sl inputs and outputs S l p l 9 menus S3 pAO source S3 p 5 1 view controls S3 p 66 S4 p 2...

Страница 280: ...__ __ __ __ __ __ __ __ __ __ __ __ __ Occupation __ __ __ __ __ __ __ __ __ __ __ __ __ __ __ __ __ __ __ __ __ __ __ __ Company Name _________________________ Phone __ __ __ __ __ __ _ Address __ _...

Страница 281: ...PTY LTD INCORPORATED IN VICTORIA C 64 CLARENDON STREET SOUTH M ELBOU RNE VICTORIA 3205 AUSTRALIA P o BOX 1076 CITY ROAD SOUTH MELBOURNE 3205 lo r j I t TELEPHONE 03 699 83n FACSI M ILE 03 690 5916 TE...

Страница 282: ......
Страница 283: ...08 brush shapes and textures Edit retouch reduce or enlarge strobe freeze 1110ntage you DeHne it Best of all you don t need an engineering degree to make the most of your CVI Push a button slide a fa...

Отзывы: