background image

Network Menu

72

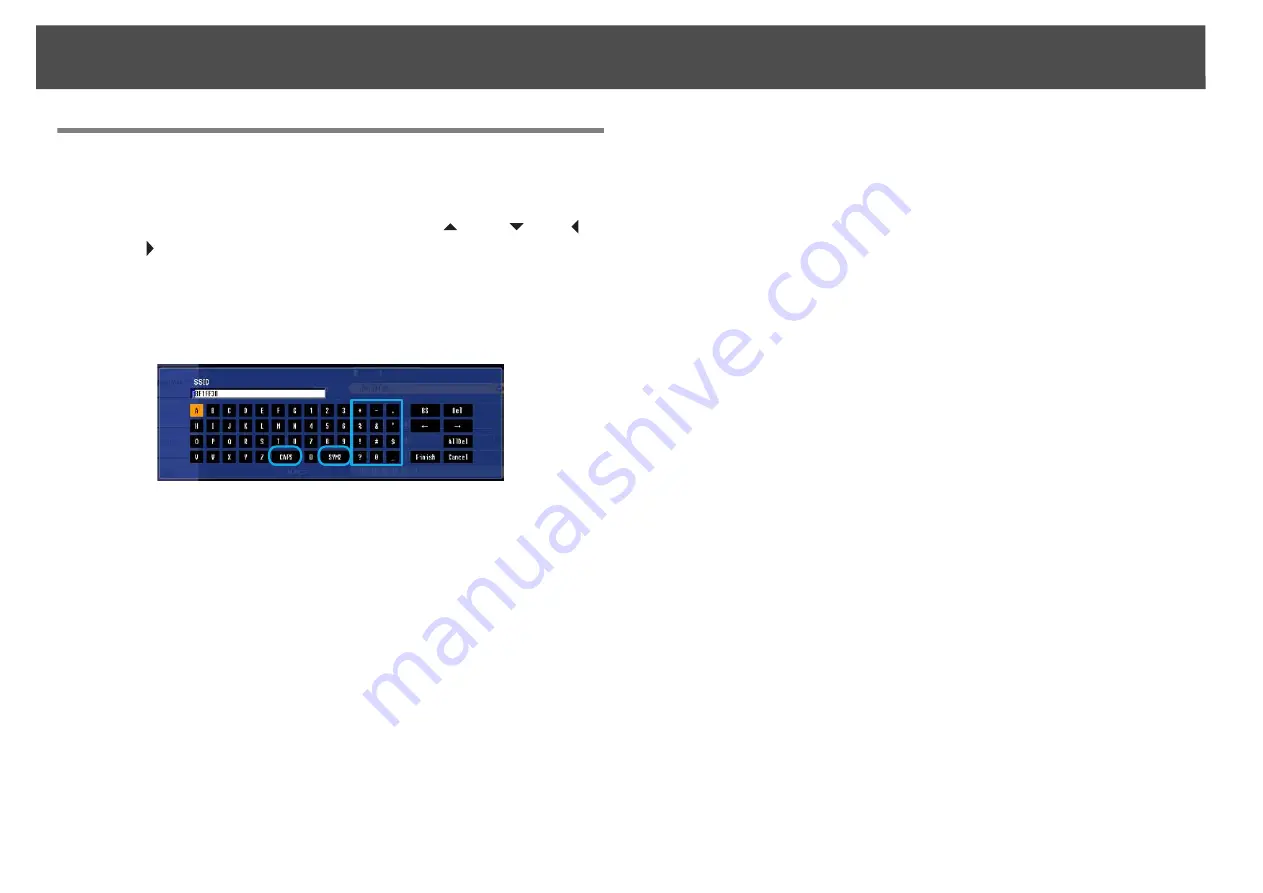
Soft Keyboard Operations

The 

Network

 menu contains items that require input of alphanumerics 

during setup. In this case, the following software keyboard is displayed. 
Use the [

h

] button on the remote control or [

w

/

],  [

v

/

],  [

<

/ ], 

and [

>

/ ] on the projector to move the cursor to the desired key, and 

then press the [Enter] button to enter the alphanumeric. Enter figures by 
holding down the [Num] button on the remote control, and pressing the 
numeric buttons. After inputting, press [Finish] on the keyboard to 
confirm your input. Press [Cancel] on the keyboard to cancel your input.

Each time the [CAPS] key is selected and the [Enter] button is pressed, 
it switches between uppercase and lowercase letters.

Each time the [SYM1/2] key is selected and the [Enter] button is 
pressed, it switches the symbol keys in the section enclosed in the box.

Содержание PowerLite Pro Z8250NL

Страница 1: ...PowerLite Pro Z8150NL Z8250NL Z8255NL Z8350WNL Z8450WUNL Z8455WUNL User s Guide ...

Страница 2: ...ge due to incorrect handling Caution Indicates procedures which may result in damage or injury if sufficient care is not taken q Indicates additional information and points which may be useful to know regarding a topic s Indicates a page where detailed information regarding a topic can be found g Indicates that an explanation of the underlined word or words in front of this symbol appears in the g...

Страница 3: ...HDMI1 2 or SDI input port 28 Projecting images from a computer 29 Changing the Aspect Mode PowerLite Pro Z8350WNL 30 Projecting images from video equipment or from the HDMI1 2 input port 30 Projecting images from a computer 30 Changing the Aspect Mode PowerLite Pro Z8150NL Z8250NL Z8255NL 31 Projecting images from video equipment 31 Projecting images from the HDMI1 2 input port 32 Projecting image...

Страница 4: ...onfiguration Menu 55 Configuration Menu 56 Network Menu 58 Image Menu 60 Signal Menu 62 Settings Menu 65 Extended Menu 67 Network Menu 70 Notes on Operating the Network Menu 71 Soft Keyboard Operations 72 Basic Menu 73 Wireless LAN Menu 74 Search Access Point screen 76 Security Menu Only Available when the Optional Wireless LAN Unit Is Installed 77 When WPA WPA2 PSK is selected 78 When WPA WPA2 EA...

Страница 5: ... on Transportation 124 Moving Nearby 124 When Transporting 124 Preparing packaging 124 Notes when packing and transporting 124 Image Maintenance 125 Panel Alignment 125 Monitoring and Controls EasyMP Monitor 128 Changing Settings Using a Web Browser Web Control 129 Displaying Web Control 129 Displaying Web Remote 129 Displaying Lens Control 130 Setting Certificates 131 Secure HTTP Notes 132 Using ...

Страница 6: ...ne 166 Arc Correction 168 Adjusting the Image Quality 171 Hue Saturation and Brightness Adjustment 171 Gamma Adjustment 171 Select and adjust the correction value 171 Adjust while viewing the image 172 Adjust using the gamma adjustment graph 172 Frame Interpolation PowerLite Pro Z8450WUNL Z8455WUNL only 173 Super resolution 173 Noise Reduction 173 Noise Reduction 173 Mosquito NR 174 Settings for M...

Страница 7: ...nals analog RGB 200 Component Video 200 Composite Video S Video 200 Input signals from HDMI1 2 input port 201 Input signals from SDI input port PowerLite Pro Z8450WUNL Z8455WUNL only 201 Supported Certificates 202 Client Certificate PEAP TLS EAP TLS 202 Server Certificate PEAP PEAP TLS EAP TLS EAP Fast 202 Web Server Certificate Secure HTTP 202 Specifications 203 Projector General Specifications 2...

Страница 8: ...8 Introduction This chapter explains the projector s features and the part names ...

Страница 9: ...gled to project images on the ceiling or floor in addition to normal horizontal projection This makes it an effective communication tool that lets you express your ideas with great impact s p 152 A design that harmonizes with the surrounding environment and makes the installation easy The projector s sophisticated design has a cable cover in which cables are hidden for a clean exterior appearance ...

Страница 10: ...nue projecting with the other lamp and avoid disrupting important presentations Operating temperature of 32 122 F 0 50 C Special coolant and fan in cooling system work against a high temperature environment during operation and improve reliability in normal use Depending on projector settings and environmental conditions you can use this projector in a place up to 122 F 50 C ...

Страница 11: ...pproaches the DICOMg standard The projector is not a medical device and cannot be used for medical diagnosis s p 34 Epson Cinema Filter supports the color gamut for digital cinema Select Theatre or sRGB in Color Mode to use Epson Cinema Filter When color mode is set to Theatre 100 reproduction of the color gamut used for digital cinema is possible As a result this reproduces colors that are full a...

Страница 12: ...an schedule events to turn the projector power on off and switch the input source Registered events are executed automatically at the specified time and date every week s Setting Schedule p 185 Various monitoring and control options A variety of monitoring and control options are supported such as the Epson EasyMP Monitor software This software allows you to use the projector according to your sys...

Страница 13: ...13 Project using Connect to a Network Projector By connecting the projector to a network and using the Network Projector function in Windows Vista or Windows 7 multiple users on the network can share the projector s p 145 ...

Страница 14: ...llects here it can cause the internal temperature to rise and this can lead to problems with operation and shorten the optical engine s service life Be sure to clean the air filter regularly s p 116 p 122 4 Front adjustable foot When set up on a desk turn to extend and retract to adjust the horizontal tilt The front adjustable feet can be removed when the projector is installed on a ceiling s p 19...

Страница 15: ...air used to cool the projector internally Also open this cover to replace the projector s lamps Caution Do not place objects that may become warped or otherwise affected by heat near the air exhaust vent and do not put your face or hands near the vent while projection is in progress 2 Rear foot When set up on a desk turn to extend and retract to adjust the horizontal tilt The rear adjustable feet ...

Страница 16: ... p 193 Connecting to Equipment p 154 4 Remote receiver Receives signals from the remote control s p 23 5 Status indicators The color of the indicators and whether they are flashing or lit indicate the status of the projector s p 96 6 Control panel s Control Panel p 18 Name Function Name Function 1 HDMI1 input port For video signals from HDMI compatible video equipment and computers This projector ...

Страница 17: ...mote control cable is plugged into this port the remote receiver on the projector is disabled 9 RS 232C port When controlling the projector from a computer or controller connect it with an RS 232C cable This port is for control use and should not normally be used s p 135 10 Wireless LAN unit port Connects to the optional wireless LAN unit s p 192 Name Function 11 Monitor Out port Outputs to an ext...

Страница 18: ...a Help screen is displayed these buttons only have the and functions which select menu items and setting values s p 55 When projecting using Connect to a Network Projector these buttons function only as and buttons 6 Shutter button Closes or opens the electric shutter or mutes the image temporarily to dim the screen Any operation that is selected after using the Shutter button is still executed s ...

Страница 19: ...oses the configuration menu s p 55 7 h button When the configuration menu or Help screen is displayed it selects menu items and setting values s p 55 p 93 When using the optional wireless mouse receiver use this button to move the pointer in the desired direction 8 Enter button When the configuration menu or a Help screen is displayed it accepts and enters the current selection and moves to the ne...

Страница 20: ...cus We recommend setting the focus zoom and lens shift at least 30 minutes after you start the projection because images are not stable right after turning on the projector s p 162 Name Function 22 Numeric buttons Use this button to enter passwords remote control ID settings IP Address from the Network and so on s p 177 p 45 23 Color Mode button Each time the button is pressed the Color Mode chang...

Страница 21: ...MI 1 2 button Each time the button is pressed the image displayed changes between the HDMI1 input port and HDMI2 input port s p 26 32 Search button Changes to the next input source that is connected to the projector and is sending an image s p 25 33 Indicators A light is emitted when outputting remote control signals 34 Remote control light emitting area Outputs remote control signals Name Functio...

Страница 22: ... in the correct direction Warning Check the positions of the and marks inside the battery holder to ensure the batteries are inserted the correct way C Replace the battery cover Press until it clicks into place If delays in the responsiveness of the remote control occur or if it does not operate after it has been used for some time it probably means that the batteries are becoming flat When this h...

Страница 23: ...th the projector is shown below q To restrict reception of the operation signals from the remote control set the Remote Receiver on the Settings menu s p 65 When using a remote control provided with other Epson projectors set the Remote Control Type on the Extended menu s p 67 The operating range will depend on the remote control that you use Horizontal operating range Vertical operating range 49 ...

Страница 24: ...24 Useful Functions This chapter explains useful tips for giving presentations and the security functions ...

Страница 25: ...the Search or Source Search button because it will switch only to images from input ports to which image signals are being input Procedure When your video equipment is connected start playback before beginning this operation When two or more pieces of equipment are connected press the Search or Source Search button until the target image is projected When the Search or Source Search button is pres...

Страница 26: ...t port where the equipment you want to use is connected If no operation is performed after about 10 seconds the screen closes Switch to the Target Image using the Remote Control You can change directly to the image from the target input port by pressing the following buttons on the remote control s Remote Control p 19 When switching to LAN images from computers connected through the network are pr...

Страница 27: ...eyond the projection size are not projected Native Projects at the resolution of the input image size to the center of the screen This is ideal for projecting clear images If the image resolution exceeds the panel resolution of this projector PowerLite Pro Z8350WNL 1280x800 PowerLite Pro Z8450WUNL Z8455WUNL 1920x1200 the edges of the image are not projected Aspect mode Explanation Normal Projects ...

Страница 28: ...gnal menu is set to On and Scale Mode is set to Full Display you cannot change the aspect mode Changing the Aspect Mode PowerLite Pro Z8450WUNL Z8455WUNL Projecting images from video equipment or from the HDMI1 2 or SDI input port Each time the Aspect button on the remote control is pressed the aspect mode changes in the order Auto Normal when projecting from the SDI input port 16 9 16 9 Up 16 9 D...

Страница 29: ... examples for each aspect mode are shown below q If parts of the image are missing or it cannot project everything set the Resolution setting to Wide or Normal from the configuration menu depending on the size of the computer panel s p 62 Aspect mode Input Signal XGA 1024X768 4 3 WXGA 1280X800 16 10 WUXGA 1920X1200 16 10 Normal 16 9 16 9 Up 16 9 Down Full Zoom Native Aspect mode Input Signal XGA 1...

Страница 30: ...oom and Native s p 27 Projecting images from a computer Each time the Aspect button on the remote control is pressed the aspect mode changes in the order Normal 16 9 16 9 Up 16 9 Down Full Zoom and Native s p 27 Projection examples for each aspect mode are shown below Example 1080p signal input resolution 1920x1080 aspect ratio 16 9 A Auto B 16 9 C 16 9 Up D 16 9 Down E Full F Zoom G Native Aspect...

Страница 31: ...es from video equipment Each time the Aspect button on the remote control is pressed the aspect mode changes in the order Auto 4 3 16 9 16 9 Up and 16 9 Down s p 27 When inputting a 720p 1080i 1080p signal and the aspect mode is set to 4 3 a 4 3 zoom will be applied the right and left sides of the image will be cut off Full Zoom Native Aspect mode Input Signal XGA 1024X768 4 3 WXGA 1280X800 16 10 ...

Страница 32: ...ing images from a computer Each time the Aspect button on the remote control is pressed the aspect mode changes in the order Normal 4 3 16 9 16 9 Up 16 9 Down and Native s p 27 Projection examples for each aspect mode are shown below Example 1080p signal input resolution 1920x1080 aspect ratio 16 9 A Auto B 4 3 C 16 9 D 16 9 Up E 16 9 Down F Native Aspect mode Input Signal XGA 1024X768 4 3 WXGA 12...

Страница 33: ...image are missing or it cannot project everything set the Resolution setting to Wide or Normal from the configuration menu depending on the size of the computer panel s p 62 16 9 Down Native Aspect mode Input Signal XGA 1024X768 4 3 WXGA 1280X800 16 10 SXGA 1280X1024 5 4 ...

Страница 34: ...Color Mode in the Image menu from the configuration menu s p 60 Mode Application Dynamic Ideal for use in a bright room This is the brightest mode Presentation Ideal for making presentations using color materials in a bright room Theatre Ideal for watching films in a dark room Gives images a natural tone almost like an original source Photo 1 Ideal for projecting still pictures such as photos in a...

Страница 35: ... screen U and a right screen V and simultaneously project two images Input Sources for Split Screen Projection The combinations of input sources that can be projected on a split screen are listed below PowerLite Pro Z8450WUNL Z8455WUNL only Left Screen Right Screen Comp uter BNC S Vide o Video HDMI1 HDMI2 LAN SDI Comp uter BNC S Vide o Video HDMI1 HDMI2 LAN SDI ...

Страница 36: ...he configuration menu s p 65 B Press the Menu button on the remote control or the control panel The Split Screen Setup will be displayed q The Split Screen Setup will also be displayed when the Source Search button is pressed on the control panel or when a Source or the Search button is pressed on the remote control C Select Source and press the Enter button D Select each input source for Left and...

Страница 37: ...rocedure A Press the Menu button on the remote control or the control panel during split screen projection B Select Swap Screens and press the Enter button The images on the left and right screens will be swapped Switching the left and right image sizes Procedure A Press the Menu button on the remote control or the control panel during split screen projection B Select Screen Size and press the Ent...

Страница 38: ...ojection Setting the configuration menu E zoom Switching the aspect mode The aspect mode will be set to Normal s p 27 Operations using the User button on the remote control Auto Iris Help can be displayed only when image signals are not input or when an error or warning notification is displayed Restrictions relating to images The default values for the Image menu are applied to the image on the r...

Страница 39: ...tivate change the Shutter Timer setting to Off from Operation in the Extended menu s p 67 If you press the t button while the shutter is closed the shutter automatically opens and a message requesting confirmation to turn off the power is displayed on the screen The Lamp1 and Lamp2 indicators flash green while the shutter is activated When an event that is set in Schedule is executed the shutter i...

Страница 40: ...used If the Freeze button is pressed while the configuration menu or a Help screen is displayed the menu or Help screen being displayed is cleared Freeze still works while E Zoom is being used Pointer Function Pointer This allows you to move a Pointer icon on the projected image and helps you draw attention to the area you are talking about Procedure A Display the Pointer Each time you press the b...

Страница 41: ...n Settings Pointer Shape from the configuration menu s p 65 Enlarging Part of the Image E Zoom This is useful when you want to expand images to see them in greater detail such as graphs and tables Procedure A Start E Zoom B Move the to the area of the image that you want to enlarge Remote Control Remote Control Remote Control ...

Страница 42: ...image by pressing the x button Press the Esc button to cancel q The enlargement ratio appears on the screen The selected area can be enlarged between 1 to 4 times in 25 incremental steps Use the h button to scroll through the enlarged image E Zoom is canceled when performing some functions such as keystone or Auto Setup When Scale is set to On E Zoom cannot be used Remote Control ...

Страница 43: ...ation menu s Using the Configuration Menu p 55 q If User s Logo Protect from Password Protect is set to On a message is displayed and the user s logo cannot be changed You can make changes after setting User s Logo Protect to Off s p 45 If User s Logo is selected when keystone E Zoom or Aspect are being performed the function currently being performed is cancelled C When Choose this image as the U...

Страница 44: ...o Z8450WUNL Z8455WUNL G When the message Save this image as the User s Logo is displayed select Yes The image is saved After the image has been saved the message Completed is displayed q To use the saved user s logo as the screen image set it in the Display settings under the Extended menu s p 67 Saving the user s logo may take approximately 15 seconds Do not use the projector or any connected equ...

Страница 45: ... Password Protect The following three kinds of Password Protect settings can be made according to how the projector is being used Setting Password Protect Use the following procedure to set Password Protect Procedure A During projection hold down the Freeze button for about five seconds The Password Protect setting menu is displayed 1 Power On Protect When Power On Protect is On you need to enter ...

Страница 46: ...Select On and then press the Enter button 3 Press the Esc button 1 Select User s Logo Protect and then press the Enter button 2 Select On and then press the Enter button 3 Press the Esc button 1 Select Network Protect and then press the Enter button 2 Select On and then press the Enter button 3 Press the Esc button 1 Select Password and then press the Enter button 2 The message Change the password...

Страница 47: ...ilable with the projector Control Panel Lock This is useful at events or shows when you want to deactivate all buttons during projection or at schools when you want to limit button operation Lens Operation Lock This function deactivates all buttons on the remote control related to the lens operation to prevent improper lens adjustment after it is properly adjusted Remote control button lock This f...

Страница 48: ...elect Off in Settings Control Panel Lock from the configuration menu s p 65 Press and hold down the Enter button on the control panel for about seven seconds a message is displayed and the lock is released Lens Operation Lock This function locks the following buttons on the remote control related to the lens operation Procedure A Press the Menu button and select Settings Lens Operation Lock from t...

Страница 49: ... locked according to the setting you chose Remote control button lock This function locks the following buttons on the remote control Procedure Each time the Help button is pressed for at least 5 seconds the remote control button lock turns on or off Remote Control Remote Control ...

Страница 50: ... the projector includes the following security devices to prevent someone from taking the projector Security slot The Security slot is compatible with the Microsaver Security System manufactured by Kensington Handle A commercially available theft deterrent wire lock can be passed through the security cable installation point to secure the projector to a desk or pillar Installing the wire lock Pass...

Страница 51: ...Pro Z8150NL Saving Loading Erasing the Memory Saving to memory Use the following procedure to save your image settings to memory Procedure A During projection press the Menu button on the remote controlorcontrolpanel andselectSettings Memory from theconfigurationmenu s UsingtheConfigurationMenu p 55 Top Menu Sub Menu Image All setting items Signal Progressive Frame Interpolation 1 Super resolution...

Страница 52: ...ion menu B Select Load Memory and then press the Enter button C Select the desired memory and then press the Enter button The settings saved to the memory are applied to the projected im age Erasing a saved memory Procedure A Press the Menu button on the remote control or control panel and select Settings Memory from the configuration menu B Select Erase Memory and then press the Enter button C Se...

Страница 53: ...Memory Function 53 C Select the desired memory and then press the Enter button D Enter the memory name using the soft keyboard s Soft Keyboard Operations p 72 Press Finish to complete renaming ...

Страница 54: ...54 Configuration Menu This chapter explains how to use the configuration menu and its functions The screen shots may be different from those shown in this chapter depending on your projector model ...

Страница 55: ...Using the Configuration Menu 55 Using the Configuration Menu Selecting from the top menu Selecting from the sub menu Setting each item Exit ...

Страница 56: ...o 5 Abs Color Temp 5000K to 10000K Advanced Gamma RGB RGBCMY Auto Iris On Off Signal Menu s p 62 Auto Setup On Off Resolution Auto Wide Normal Manual Tracking Sync Position Progressive Off Video Film Auto Frame Interpolation 1 Off Low Normal High Super resolution 0 to 3 Noise Reduction Off NR1 NR2 Mosquito NR On Off HDMI Video Range Auto Normal Expanded SDI Video Range 1 Normal Expanded Input Sign...

Страница 57: ... Lock Partial Lock Off Lens Operation Lock On Off Pointer Shape Pointer 1 2 3 Power Consumption 2 Normal 1 ECO Normal 2 Remote Receiver Front Rear Front Rear Off User Button PowerConsumption 2 Info Progressive Closed Caption Test Pattern Multi screen Resolution Memory Test Pattern Memory Load Memory Save Memory Erase Memory Rename Memory Top Menu Sub Menu Items Values ...

Страница 58: ...imer Shutter Button Shutter Timer High Altitude Mode BNC Sync Termination Remote Control Type Beep Standby Mode Communication On Communication Off Air Filter Notice On Off Multi Projection Brightness Level 2 Edge Blending Multi screen Projector ID Time Schedule Settings Language 27 languages Top Menu Sub Menu Items Values Info Menu s p 89 Lamp Hours Lamp Status Source Input Signal Resolution Video...

Страница 59: ... Code Security Menu s p 77 Security Open WPA WPA2 PSK WPA WPA2 EAP Wired LAN Menu s p 81 DHCP On Off IP Address Subnet Mask Gateway Address IP Address Display On Off Top Menu Sub Menu Items Values Administrator Settings Menu s p 82 Administrator Password Network Host Name PJLink Password Web Control Password Monitor Password Secure HTTP On Off Mail Notification Manage Certificates SNMP Priority Ga...

Страница 60: ...adjust the color saturation for the images Tint You can adjust the image tint Sharpness Standard You can adjust the image sharpness To make more detailed settings select Advanced Advanced The following four items can be set Thin Line Enhancement If this parameter is set to a positive value details such as hair or fabric patterns will be enhanced Thick Line Enhancement If this parameter is set to a...

Страница 61: ... your image or a displayed graph RGB You can adjust the offset and gain for each signal color red green and blue RGBCMY You can adjust the hue saturation and brightness of each color R red G green B blue C cyan M magenta Y yellow individually Auto Iris This item can be selected when Dynamic or Theatre is selected as the Color Mode setting from the Image menu Set whether or not On Off to adjust to ...

Страница 62: ...l Menu 62 Signal Menu Items that can be set vary depending on the image signal or input source currently being projected as shown in the following screen shots Setting details are saved for each image signal ...

Страница 63: ...d Normal for 4 3 or 5 4 screens Manual You can specify the resolution This is ideal when connected computer is fixed Trackingg You can adjust computer images when vertical stripes appear in the images Sync g You can adjust computer images when flickering fuzziness or interference appear in the images Position You can adjust the display Position up down left and right when a part of the image is mi...

Страница 64: ...Computer input port or BNC input port If Auto is set the input signal is identified automatically according to the connected equipment If colors do not appear correctly when this is set to Auto select the appropriate signal according to the connected equipment Video Signal You can select the signal type for input sources connected to the Video input port or S Video input port If set to Auto video ...

Страница 65: ... Fine adjustment of the curved distortion caused by slack or shrinkage of the screen s p 168 Point Correction The projected image is divided by the grid and you can correct the distortion by moving the point of intersection from side to side and up and down s p 178 Split Screen You can split the screen into two screens s p 35 Control Panel Lock You can use this to restrict operation of the project...

Страница 66: ...If the Menu button on the remote control is pressed for 15 seconds this parameter will return to the default setting User Button You can assign selected items from the configuration menu to the remote control s User button By pressing the User button the assigned menu item selection adjustment screen is displayed allowing you to make one touch settings adjustments You can assign one of the followi...

Страница 67: ...spect Display Background 1 You can set the screen status for when there is no video input to Black Blue or Logo Startup Screen 1 Set this parameter to On to display the user s logo when projection is started Panel Alignment Correct color misalignments red and blue in the screen Closed Caption You can select CC1 CC2 or Off User s Logo 1 You can change the User s Logo that is displayed as a backgrou...

Страница 68: ...n when analog 75Ω termination such as for switchers is necessary Remote Control Type You can select Normal or Simple depending on the type of remote control Set this item to Normal to use the remote control provided with the projector When Simple is selected you can use the remote control provided with other Epson projectors to operate this projector This is useful if you want to use a remote cont...

Страница 69: ...een 1 and 5 This item can be adjusted when Normal 1 is selected in the Power Consumption setting from the Settings menu Edge Blending Corrects a border between multiple images to create a seamless screen s p 180 Multi screen You can adjust the hue and brightness of each projected image s p 182 Projector ID Set the ID within a range of 1 to 9 Off indicates that no ID is set s p 175 Time Schedule Se...

Страница 70: ...rowser of a computer connected to the projector on a network you can set the projector s functions and control the projector This function is called Web Control You can easily enter text using a keyboard to make settings for Web Control such as security settings s p 129 Sub Menu Function Net Info Wireless LAN Net Info Wired LAN Displays the network settings Network Configuration Displays the scree...

Страница 71: ...ne make sure you go to the Setup complete and select Yes No or Cancel When you select Yes or No you return to the configuration menu q If the settings contain an invalid value the settings may not take effect even after you select Yes Yes Saves the settings and exits the Network menu No Exits to the Network menu without saving the settings Cancel Continues displaying the Network menu ...

Страница 72: ...Enter button to enter the alphanumeric Enter figures by holding down the Num button on the remote control and pressing the numeric buttons After inputting press Finish on the keyboard to confirm your input Press Cancel on the keyboard to cancel your input Each time the CAPS key is selected and the Enter button is pressed it switches between uppercase and lowercase letters Each time the SYM1 2 key ...

Страница 73: ...gle byte alphanumeric characters Web Remote is a computer function that allows you to operate the projector by using the Web browser on a computer connected on a network s p 129 Projector Keyword When set to On you have to enter the keyword when you try to connect the projector to a computer using EasyMP Multi PC Projection and EasyMP Network Projection As a result you can prevent presentations fr...

Страница 74: ...ically according to the access point settings In an area that does not support 802 11n only 802 11b g is displayed Connection Mode Set the connection mode to use when connecting the projector and a computer via a wireless LAN If you select Quick a small network is created automatically by the projector and computer It is used with EasyMP Network Projection If SSID Auto Setting is On the projector ...

Страница 75: ...to On you cannot set any more addresses IP Address You can input the IP addressg assigned to the projector You can input a number from 0 to 255 in each field of the address However the following IP addresses cannot be used 0 0 0 0 127 x x x 224 0 0 0 to 255 255 255 255 where x is a number from 0 to 255 Subnet Mask You can input the Subnet Maskg for the projector You can input a number from 0 to 25...

Страница 76: ...encryption method Sub Menu Icon Function Refresh Starts detecting access points again Indicates an already set access point Indicates the access points where security is enabled If you select an access point without security enabled the Wireless LAN menu appears If you select an access point which has security enabled the Security menu appears Set security according to the access point settings ...

Страница 77: ... Communication takes place using security by WPA2 Uses AES method for encryption When establishing connection from computer to projector enter the value set in the passphrase When Advanced is selected Open Connects to access points without security enabled WPA WPA2 PSK Connects in WPA personal mode Encryption method is selected automatically according to the access point settings Set a passphrase ...

Страница 78: ...using it with EasyMP Network Projection you do not need to input the passphrase in the computer if it is the initial default passphrase It is recommended to change the passphrase periodically for security reasons If the network settings are initialized it returns to the initial passphrase s p 88 You cannot enter more than 32 characters on the configuration menu When setting from Web Control you ca...

Страница 79: ...tion protocols are used User name You can enter a user name to be used for authentication in single byte alphanumeric characters no spaces You can enter up to 64 characters If you select PEAP TLS or EAP TLS the user name obtained automatically from the client certificate is displayed You can change the user name if the authentication server requires another user name You cannot enter more than 32 ...

Страница 80: ...t On you must set a CA certificate that can verify the authentication server certificate s p 131 CA certificate Issued to Issued by Validity period Displays the information set in the stored CA certificate It is blank if the certificate is not set Setting RADIUS Server Name Set whether or not to verify the authentication server name during server certificate verification If you set this to On and ...

Страница 81: ...ber from 0 to 255 Subnet Mask You can input the Subnet Maskg for the projector You can input a number from 0 to 255 in each field of the address However the following subnet masks cannot be used 0 0 0 0 255 255 255 255 Gateway Address You can input the IP address for the gateway for the projector You can input a number from 0 to 255 in each field of the address However the following Gateway addres...

Страница 82: ...assword Set a password to use when making settings and controlling the projector using Web Control You can enter up to 8 single byte alphanumeric characters Web Control is a computer function that allows you to set up and control the projector by using the Web browser on a computer connected on a network s p 129 Monitor Password You can enter up to 16 single byte alphanumeric characters Secure HTT...

Страница 83: ...t Crestron RoomView p 138 Changes in projector settings take effect upon restarting The following functions cannot be used when it is set to On Web Control Message Broadcasting EasyMP Monitor plugin Bonjour To connect to the network by Bonjour set it to On For an explanation of the Bonjour service see the Apple Web site http www apple com EPSON Message Broadcasting You can switch the EPSON Message...

Страница 84: ...rver The default value is 25 You can input numbers between 1 to 65535 Email Address 1 Email Address 2 Email Address 3 You can input the e mail address of the destination to send the notification e mail to You can register up to three destinations You can enter up to 64 single byte alphanumeric characters for the e mail addresses You cannot enter more than 32 characters on the configuration menu Wh...

Страница 85: ... the certificate if you use EAP to authenticate the authentication server certificate Select Clear to delete the stored certificate Self signed Certificate Issued to Issued by Validity period When Secure HTTP is set to On information on the certificate maintained by the server function in the projector is displayed It is not displayed if Web Server Certificate is set Select Refresh to update the s...

Страница 86: ...Network Menu 86 q Web Control is used to set certificates s Setting Certificates p 131 ...

Страница 87: ...nitor the projector Trap IP Address 1 Trap IP Address 2 When SNMP is set to On you can set up to two IP addresses as SNMP trap notification destinations You can input a number from 0 to 255 in each field of the address However the following IP addresses cannot be used 127 x x x 224 0 0 0 to 255 255 255 255 where x is a number from 0 to 255 Community Name Set the community name of SNMP You can ente...

Страница 88: ... settings To reset all of the network settings select Yes When you reset the network settings the Passphrase Administrator Password and Manage Certificates menu settings change back to their default values and the certificates are deleted After you reset all the settings the Basic menu appears ...

Страница 89: ...lamp warning time the characters are displayed in yellow Lamp Status The following icons show the status of the lamps Lighted Disable When is displayed the lamp is not operating normally See Reading the Indicators s p 96 Source You can display the Source name for the connected equipment currently being projected Input Signal You can display the Input Signal selected in the Signal menu Resolution Y...

Страница 90: ...ode and normal mode are displayed Status This is information about errors that have occurred on the projector This information may be needed if service is required Serial Number Displays the projector s serial number Event ID When problems occur when the projector and computer are connected through the network information on the problem is displayed using an Event ID Refer to the following page fo...

Страница 91: ...tems in the configuration menu to their default settings The following items are not reset to their defaults passwords Input Signal Memory User s Logo Multi screen all items for Network menus Lamp Hours and Language Reset Memory Resets items for Memory in the Settings menu ...

Страница 92: ...92 Troubleshooting This chapter explains how to identify problems and what to do if a problem is found ...

Страница 93: ...Help If a problem occurs with the projector press the Help button You can solve problems by answering the questions Procedure A Press the Help button The Help screen is displayed B Select a menu item Remote Control Remote Control ...

Страница 94: ...m the selection Questions and solutions are displayed as shown on the screen be low Press the Help button to exit Help q If the Help screen does not provide a solution to the problem refer to Problem Solving p 95 Remote Control ...

Страница 95: ...ou are having a problem with the projector first check the projector s indicators and refer to Reading the Indicators s p 96 If the indicators do not show clearly what the problem might be refer to When the Indicators Provide No Help s p 101 ...

Страница 96: ...monitoring maximum approx 20 seconds or cool down in progress Buttons are disabled while the indicator is flashing Warming up Warm up time is about 30 seconds After warm up is complete the indicator stops flashing t button does not function during warm up Projecting B Indicates the operating status of wireless LAN when the optional wireless LAN unit is connected C Indicates the air filter status D...

Страница 97: ...stem Error Stop using the projector disconnect the power cable from the electrical outlet and contact Epson s p 114 High Temp Error overheating The lamps turn off automatically and projection stops Wait for about five minutes After about five minutes the projector switches to standby mode so check the following two points Check that the air filter and air exhaust vent are clear and that the projec...

Страница 98: ...ced s p 114 When using at an altitude of 4921 ft 1500 m or more set High Altitude Mode to On s p 67 Set Direction to Pointing Down Pointing Up Angled Up or Angled Down when the projector is installed in a direction which is not horizontal s p 67 Filter Airflow Error Check the following two points Check that the air filter and air exhaust vent are clear and that the projector is not positioned agai...

Страница 99: ...r to maintain consistent hue and brightness of projected images Lamp Warning Supply System Warning Ballast Check the following two points Remove the lamp indicated by the flashing indicator lamp 1 or 2 and check if it is cracked s p 119 Clean the air filter s p 116 If it is not cracked Re fit the lamp and turn on the power If the error continues Replace the lamp with a new lamp and turn on the pow...

Страница 100: ...airflow falls any further The message The air filter is clogged Clean or replace the air filter is displayed Check the following two points Check that the air filter and air exhaust vent are clear and that the projector is not positioned against a wall If the air filter is clogged clean or replace it s p 116 p 122 If the Low Air Flow status continues after cleaning the air filter replace the air f...

Страница 101: ... p 103 The message Not supported is displayed s p 104 No Signal is displayed s p 104 Images are fuzzy or out of focus s p 105 Interference or distortion appears in images s p 105 The image is truncated large or small or the aspect is not suitable s p 106 Only part of the image is displayed or the height and width ratios of the image are not correct and so on Image colors are not right s p 106 The ...

Страница 102: ... does not work s p 109 Nothing appears on the external monitor s p 110 I want to change the language for messages and menus s p 110 Mail is not received even if a problem occurs in the projector s p 110 The battery that saves your clock settings is running low is displayed s p 111 Interpreting Event IDs s p 112 ...

Страница 103: ... All of the settings s Reset Menu Reset All p 91 Is the projected image completely black Only when projecting computer images Some input images such as screen savers may be completely black Is the image signal format setting correct Only when projecting images from a video source Change the setting according to the signal for the connected equipment s Signal Menu Video Signal p 62 Check Remedy Is ...

Страница 104: ...are securely connected s p 154 p 156 Is the correct input port selected Change the image by pressing the Search button on the remote control or the Source Search button on the control panel s p 25 Is the power for the computer or video source turned on Turn the power on for the source Are the image signals being output to the projector Only when projecting images from a laptop computer or a comput...

Страница 105: ...r the connected equipment s Signal Menu Video Signal p 62 Are the cables connected correctly Check that all the cables required for projection are securely connected s p 154 p 156 Is an extension cable being used If an extension cable is used electrical interference may affect the signals Use the cables supplied with the projector to check if the cables you are using may be causing the problem Is ...

Страница 106: ...the configuration menu s Signal Menu Position p 62 Is the computer set for dual display Only when projecting computer images If dual display is activated in the Display Properties of the computer s Control panel only about half of the image on the computer screen is projected To display the entire image on the computer screen turn off the dual display setting s Computer video driver documentation ...

Страница 107: ...guration menu s Image Menu Contrast p 60 Is the lamp due for replacement When the lamp is nearly ready for replacement the images become darker and the color quality becomes poorer When this happens replace the lamp with a new lamp s p 119 Is Multi Projection set to On Brightness Level or Brightness Correct on Multi Projection could be set If not projecting from multiple projectors set Multi Proje...

Страница 108: ...t setting for the remote receiver selected Check the Remote Receiver from the configuration menu s Settings Menu Remote Receiver p 65 Was the power cable plugged back in or was the breaker turned on immediately after Direct Power Off Even when Direct Power On is set to On the power may not turn back on Press the t button to turn the power back on in these instances Is the ID switch on the side of ...

Страница 109: ...are inserted correctly or replace the batteries with new ones if necessary s p 22 Are the remote control ID and the projector ID matched Make sure the ID for the projector you want to operate and the ID for the remote control match To operate all projectors by remote control regardless of the ID setting set the ID switch on the side of the remote control to Off s p 175 Does Remote Control Type mat...

Страница 110: ...ng Adjust the Language setting from the configuration menu s Extended Menu Language p 67 Check Remedy Is the time set correctly If the wireless LAN is set correctly but the authentication setting fails the time may not be set correctly Check if it is set correctly s Extended Menu Time Schedule Settings p 67 Check Remedy Is Standby Mode set to Communication On To use the Mail Notification function ...

Страница 111: ...iguration menu Mail notification of problems is sent according to the settings on the Mail Notification menu in the configuration menu Check if it is set correctly s Network Menu Mail Notification Menu p 84 Cause Remedy The internal power supply that saves your clock settings is running low Contact your local dealer or Epson s p 114 Check Remedy ...

Страница 112: ...he projector Restart the projector 0891 The same SSID access point cannot be found Set the computer the access point and the projector to the same SSID 0892 The WPA and WPA2 authentication methods are not the same Check the wireless LAN security setting to see if it is correct s Network Menu Security Menu p 77 0893 The WEP TKIP and AES encoding methods are not the same 0894 Communications was cut ...

Страница 113: ...heck the wireless LAN security setting to see if it is correct Also check if the certificate is imported correctly s Network Menu Security Menu p 77 089B EAP server authentication failed 089C EAP client authentication failed 089D Key exchange failed Event ID Cause Remedy ...

Страница 114: ... 4394 U S or 905 709 3839 Canada Support hours are 6 AM to 8 PM Pacific Time Monday through Friday and 7 AM to 4 PM Pacific Time Saturday Days and hours of support are subject to change without notice Toll or long distance charges may apply Before you call for support please have the following information ready Product name Product serial number located on the bottom or rear of the projector or in...

Страница 115: ...115 Maintenance This chapter explains the maintenance methods that are required to ensure a long projector service life ...

Страница 116: ...ub the lens with harsh materials or subject the lens to shocks as it can easily become damaged Cleaning the Air Filter Clean the air filter and the air intake vent when the following message is displayed or the Filter indicator is flashing green Time to clean the air filter Clean or replace the air filter Caution If dust collects on the air filter it can cause the internal temperature of the proje...

Страница 117: ...over while pressing the tab C Remove the air filter D With the front the side with tabs of the air filter facing down tap the air filter four or five times to shake off the dust Turn it over and tap the other side in the same way Caution If the air filter is hit too hard it may become unusable due to deformities and cracks ...

Страница 118: ...ng a vacuum cleaner from on front side F Reinsert the air filter G Reinsert the air filter cover Press until it clicks into place q If a message is frequently displayed even after cleaning it is time to replace the air filter Replace it with a new air filter s p 122 ...

Страница 119: ...n the life of the lamps If you continue to use the lamp after the replacement period has passed the possibility that the lamp may explode increases When the lamp replacement message appears replace the lamp with a new one as soon as possible even if it is still working Depending on the characteristics of the lamp and the way it has been used the lamp may become darker or stop working before the la...

Страница 120: ...cool enough Procedure A Press the t power button on the remote control or the back of the projector to turn off the projector s power After the confirmation buzzer beeps twice disconnect the power cable B Wait until the lamps have cooled down sufficiently before removing the lamp cover on the back of the projector Pinch the tabs on the front of the lamp cover together to release the lock When the ...

Страница 121: ...lamp cover is removed the lamps turn off automatically as a safety precaution If the lamp or the lamp cover is not installed correctly the lamp will not turn on The lamp s in this product contain mercury Please consult your state and local regulations regarding disposal or recycling Do not put in the trash Resetting the Lamp Hours The projector records lamp life and a message and indicator notify ...

Страница 122: ... the projector is suspended from a ceiling Procedure A Press the t power button on the remote control or the back of the projector to turn off the projector s power After the confirmation buzzer beeps twice disconnect the power cable B Remove the air filter cover Grip the air filter cover tab between your fingers and pull up and remove the cover while pressing the tab A Indicates that lamp 1 has b...

Страница 123: ... 123 C Remove the air filter D Install the new air filter E Replace the air filter cover Press until it clicks into place Caution Air filters contain polypropylene Dispose of used air filters according to local regulations ...

Страница 124: ...he projector When Transporting Preparing packaging Use the lens shift function to horizontally and vertically center the lens Then follow the instructions in Moving Nearby and the additional instructions below Remove the lens unit Attach the cover that was on the lens mount when you purchased the projector The vertical and horizontal lens shifts are positioned in the center Fit the protective lens...

Страница 125: ...Set the Pattern Color setting to the pattern or colors you want to adjust with E Select Start Adjustments and press the Enter button Press Enter again at the next confirmation screen An adjustment screen appears and all four corners of the screen can be adjusted starting with the top left corner F Use the arrow buttons to correct any visible misalignment in the highlighted corner G When you ve fin...

Страница 126: ...n If your projector requires additional adjustments choose Select intersection and adjust to perform a detailed correction at any of the grid intersection points Use the arrow buttons to highlight any of the intersection points and press the Enter button to select and begin adjusting that point ...

Страница 127: ...127 Monitoring and Controls This chapter explains the functions that can be used to monitor and control the projector ...

Страница 128: ...equiring attention can be checked visually by means of icons You can select groups of projectors or a single projector that you are interested in and then check the cumulative lamp operating time or the details of information such as input sources problems and warnings for these projectors Controlling registered projectors Projectors can be selected in groups or as single projectors and you can th...

Страница 129: ...off s p 67 Displaying Web Control Use the following procedure to display Web Control q If your Web browser is set up to connect via a proxy server Web Control cannot be displayed To use Web Control you need to make network connection settings with a device other than a proxy server When setting the security using Web Control we recommend setting Secure HTTP to On s p 82 Procedure A Start the Web b...

Страница 130: ... HDMI button Each time the button is pressed the image displayed changes between the HDMI1 input port and HDMI2 input port E SDI button The input source will change to SDI PowerLite Pro Z8450WUNL Z8455WUNL only F Shutter button Turns the video on or off s p 39 G Freeze button Images are paused or unpaused s p 39 H Search button Changes to the next input source that is connected to the projector an...

Страница 131: ...es screen appears Name Function A Scale down button Adjusts the focus B Tele button Reduces the image without changing the projection size C Down button Shifts the lens downward D Left button Shifts the lens leftward E Repeat button Continues adjusting until the Stop button is pressed F Step button Adjusts by one step each time the button is pressed G Right button Shifts the lens rightward H Defau...

Страница 132: ...ility of the server The projector automatically creates and communicates its self signed certificate This self signed certificate cannot verify reliability from a computer s web browser so it shows a warning on reliability of the server when you access from a web browser Ignore this warning You can separately create a server certificate which can be verified from a computer s web browser and insta...

Страница 133: ...s set to On and a problem warning occurs in the projector the following e mail is sent Sender Email Address 1 Subject EPSON Projector Line 1 The name of the projector where the problem has occurred Line 2 The IP address set for the projector where the problem has occurred Line 3 and on Details of the problem The details of the problem are listed line by line The following table shows the details t...

Страница 134: ...is useful when controlling projectors centrally at a point distant from them s p 87 q SNMP should be managed by a network administrator or someone who is familiar with the network To use the SNMP function to monitor the projector you need to install the SNMP manager program on your computer The managing function using SNMP cannot be used via wireless LAN in Quick mode Up to two destination IP addr...

Страница 135: ... Command List When the power ON command is transmitted to the projector the power turns on and it enters warm up mode When the projector s power has turned on a colon 3Ah is returned When a command is input the projector executes the command and returns a and then accepts the next command At the projector At the computer At the projector PC serial cable At the computer Signal Name Function GND Sig...

Страница 136: ...and transmit Item Command Power ON OFF On PWR ON Off PWR OFF Signal selection Computer Auto SOURCE 1F RGB SOURCE 11 Component SOURCE 14 BNC Auto SOURCE BF RGB SOURCE B1 Component SOURCE B4 HDMI1 SOURCE 30 HDMI2 SOURCE A0 SDI PowerLite Pro Z8450WUNL Z8455WUNL only SOURCE 60 Video SOURCE 45 S Video SOURCE 42 LAN SOURCE 53 Shutter Button Electric Shutter Blank On MUTE ON Off MUTE OFF ...

Страница 137: ...PJLink Class1 and agreement was confirmed by the PJLink standard adaptability verification URL http pjlink jbmia or jp english Non compatible commands Input names defined by PJLink and corresponding projector sources Manufacturer name displayed for Manufacture name information query Model name displayed for Product name information query Function PJLink Command Image muting set AVMT 11 Source PJLi...

Страница 138: ...com getroomview This manual describes operating procedures in the computer window using a Web browser q Only single byte alphanumeric characters and symbols can be entered The following functions cannot be used while using Crestron RoomView Web Control s p 129 Message Broadcasting EasyMP Monitor plugin Controlling is possible if Standby Mode is set to Communication On from the Extended menu of the...

Страница 139: ...tons are clicked To display buttons that are not shown in the window click c or d to scroll left or right Button Function Freeze Images are paused or unpaused s p 39 Contrast Adjusts the difference between light and dark areas in the image Brightness Adjusts the image brightness Color Adjusts the color saturation for the images Sharpness Adjusts the image sharpness Zoom Click the z button to enlar...

Страница 140: ... Performs the same operation as the Esc button on the remote control s p 19 E The following operations will be performed when the tabs are clicked Tab Function Contact IT Help Displays the Help Desk window Used to send and receive messages to the administrator using Crestron RoomView Express Info Displays information on the projector that is currently connected Tools Changes the settings in the pr...

Страница 141: ...s Location Enter an installation location name for the projector that is currently connected on the network The name can contain up to 32 single byte alphanumeric characters and symbols Assigned To Enter a user name for the projector The name can contain up to 32 single byte alphanumeric characters and symbols DHCP Select the Enabled check box to use DHCP You cannot set static IP addresses if DHCP...

Страница 142: ...t the same an error will be displayed Send Click this button to commit changes made to the Admin Password D User Password Select the Enabled check box to require a password to open the operation window on the computer The following items can be set Item Function New Password Enter the new password required to open the operation window The password can contain up to 26 single byte alphanumeric char...

Страница 143: ...sage Broadcasting can be used to send a message JPEG file to project on all Epson projectors or specified projectors connected on the network The data can be sent manually or sent automatically using Timer Settings of EasyMP Monitor Download the Message Broadcasting software from the following website http www epson com ...

Страница 144: ...144 Network Functions This chapter explains the additional functions for networks ...

Страница 145: ...hen click Start All programs Accessories Connect to a Network Projector The connection setting screen is displayed The projector is identified by inputting its IP address or by allow ing the OS to automatically identify all of the connected projectors C Once the OS has identified all of the connected projectors select the one that you want to use and click Connect When the projector password scree...

Страница 146: ...atically by inputting an 8 digit code that was assigned to the projector from the computer to the access point in advance Make connection settings between the computer and the access point in advance For details on how to make this connection refer to the manual provided with the access point This method is recommended when the projector is mounted on the ceiling q Refer to the documentation for t...

Страница 147: ...llowing screen is displayed When connecting using the Push Button Method follow the steps given below Go to Making a connection using the PIN Code Method when connecting using the PIN Code Method s p 148 Making a connection using the push button method Procedure A Select Push Button Method The Push Button Method screen is displayed ...

Страница 148: ...reen This completes the setup D Press the Enter button or the Esc button It returns to the Wireless LAN menu screen E Select Setup complete Yes This completes the setup of the connection between the projector and the access point Press the Menu button to close the configu ration menu Making a connection using the PIN Code Method q Before you can make a connection using the PIN Code Method a connec...

Страница 149: ... Method screen is displayed B Enter the PIN code displayed on the PIN Code Method screen from the computer to the access point and then select Start Setup The progress is displayed C The message Setup by Wi Fi Protected Setup complete is displayed Press the Enter button or the Esc button It returns to the Wireless LAN menu screen ...

Страница 150: ...ted Setup Connection with a Wireless LAN Access Point 150 D Select Setup complete Yes This completes the setup of the connection between the projector and the access point Press the Menu button to close the configu ration menu ...

Страница 151: ...151 Installation and Connections This chapter explains the projection installation methods and methods to connect to other equipment ...

Страница 152: ...he screws from loosening and do not use oils or lubricants When mounting the projector on the ceiling be sure to take measures to prevent it from falling such as passing a wire through the handles Caution Do not use the projector upside down Set the Direction properly in the configuration menu according to the angle of installation s p 67 Using the projector at an improper angle or setting the con...

Страница 153: ...Installation Methods 153 When installing the projector keep enough distance from the wall to the projector s air exhaust and intake vent ...

Страница 154: ...r before connecting external equipment s Attaching and Removing the Interface Cover p 193 Connecting to a Computer This section provides examples of connecting the projector to a computer The computer port and cable names may also be different from those given q Refer to the following when projecting images from a computer that is connected through a network Projecting with the EasyMP Network Proj...

Страница 155: ...ter Refer to the documentation for your computer for the method to change the video output Example of changing the output Windows computers Hold down the Fn key on your computer and press the function key labeled CRT LCD etc If the image is not displayed on your computer monitor press the same keys again Connection 2 Monitor Out port Computer cable supplied Computer input port Connection 3 HDMI ou...

Страница 156: ...es may also be different from those given Port on the video equipment Connecting cable Projector port Connection 1 Component outputs RCA component video cable commercially available BNC RCA adapter commercially available BNC input port R Cr Pr G Y B Cb Pb Connection 2 Component outputs Component to VGA cable D sub component conversion optional accessory Computer input port ...

Страница 157: ...able commercially available S Video input port Connection 4 Video output BNC video cable commercially available Video input port Connection 5 HDMI output HDMI cable commercially available HDMI1 2 input port Port on the video equipment Connecting cable Projector port ...

Страница 158: ...ideo Signal on the Signal menu according to the signal from the connected equipment s p 62 Use a cable that complies with the HDMI standard for the HDMI cable Connection 6 SDI output BNC video cable commercially available SDI input port Port on the video equipment Connecting cable Projector port ...

Страница 159: ...equipment This is useful when installing a projector q If the User button on the remote control is set to Test Pattern the test pattern will be displayed when the User button is pressed The default setting is Test Pattern Procedure A During projection press the Menu button Select Settings Test Pattern then press the Enter button Using the Remote Control Using the Control Panel ...

Страница 160: ... Not available on PowerLite Pro Z8150NL q To set menu items that cannot be set while the test pattern is being displayed or to fine tune the projected image project an image from the connected device C Press the Esc button to end the test pattern Using the Remote Control Using the Control Panel Top Menu Sub Menu Items Image menu Color Mode s p 34 Abs Color Temp Advanced Gamma 1 s p 171 RGB RGBCMY ...

Страница 161: ...osition of the projected image use the h button on the remote control or the w v and buttons on the control panel Keep pressing the button to move the image continuously When the position of the lens shift comes to the center of the verti cal or horizontal direction it stops moving Release your finger and press the button again to adjust more q The image will be clearest when both the vertical and...

Страница 162: ... Focusing the Image Procedure A Press the Focus button on the remote control or press the Lens button on the back of the projector until Adjust Focus is displayed on the screen B Toadjustthefocus usethe h buttonontheremotecontrol or the arrow buttons on the back of the projector as shown below C When you re done press the Esc button on the remote control or on the back of the projector Zooming the...

Страница 163: ...e four methods of correcting distortion in projected images as below Quick Corner This allows you to manually correct each of the four corners of the projected image separately s Quick Corner p 164 We recommend using Quick Corner to accurately adjust keystone distortion H V Keystone This allows you to manually correct distortion in the horizontal and vertical directions independently You can perfo...

Страница 164: ...nfiguration menu The default setting for Geometric Correction is set to H V Keystone so when w v and buttons are pressed H V Keystone correction is carried out Because Quick Corner H V Keystone Arc Correction and Point Correction can be carried out while projecting a test pattern you do not need to make preparations by connecting a computer or other equipment Quick Corner Procedure A During projec...

Страница 165: ...ter button Press the Enter button again to display the selection screen from which you can select one of the four corners C Use the h button on the remote control or the w v and buttons on the control panel to select the corner you want to adjust and then press the Enter button ...

Страница 166: ...figuration menu when w v and buttons are pressed later the screen for selecting the corner in step 2 is displayed Change Geometric Correction from the configuration menu to H V Keystone if you want to correct H V Keystone when pressing the w v and buttons on the control panel s p 65 q If the Esc button is held down for about two seconds while correcting with Quick Corner the confirm default reset ...

Страница 167: ... keystone Horizontal keystone can be corrected to a horizontal projector tilt of up to 20 against the screen If the and buttons are pressed simultaneously for at least 1 second the results of any horizontal keystone correction will be reset q Before performing horizontal or vertical keystone adjustment shift the lens to the positions mentioned below Otherwise your image may not be adjusted correct...

Страница 168: ... using Quick Corner to precisely align the projected image with the screen or to fine tune the image s Quick Corner p 164 Arc Correction Procedure A During projection press the Menu button Select Settings menu Geometric Correction and then press the Enter button s Using the Configuration Menu p 55 B Select Arc Correction and press the Enter button Press the Enter button again and the screen below ...

Страница 169: ...can adjust the two sides next to the corner D To adjust the shape use the h button on the remote control or the w v and buttons on the control panel If the triangle in the direction you are adjusting the shape turns gray as shown in the screenshot below you cannot adjust the shape any further in that direction q If you press the Default button while adjusting the value that you are adjusting is re...

Страница 170: ...3 to 5 as needed to adjust any remaining parts G When you are done press the Esc button to exit the correction menu q If the Esc button is held down for about two seconds while correcting with Arc Correction the following screen is displayed Select Yes to reset the results of any Arc Correction adjustments ...

Страница 171: ...usted Select and adjust the correction value When a smaller value is selected the dark areas of images become brighter but the lighter areas may become oversaturated When a larger value is selected you can reduce the overall brightness of the image to make the image sharper Hue Adjusts the overall hue of the image bluish greenish reddish Saturation Adjusts the overall vividness of the image Bright...

Страница 172: ...er than 150 inches select a small value q Medical images may not be reproduced correctly according to your settings and screen specifications Adjust while viewing the image Move the cursor on the projected image to the part where you want to change the brightness and adjust the value q If you press the Default button while adjusting the value that you are adjusting is reset to the default Adjust u...

Страница 173: ... Normal or High Set to Off if noise occurs after setting them Super resolution You can sharpen the image of a low resolution or blurry picture The menu is displayed in the following order Signal Menu Super resolution Depending on the image distortion at the edge of the image may be enhanced If you notice any distortion set it to 0 q If you press the Default button while adjusting the value that yo...

Страница 174: ...duction It is recommended that this is set to Off when viewing image sources in which noise is very low such as for DVDs Mosquito NR You can reduce the wavy noise that occurs in lines between areas with dramatic changes in colors The menu is displayed in the following order Signal Menu Mosquito NR ...

Страница 175: ...ding A dedicated computer with a GPU that has two or more outputs VGA DVI HDMI etc and supports Edge Blending Cables to connect the computer to the projectors Projector ID Remote Control ID When an ID is set for the projector and the remote control you can use the remote control to operate only the projector with a matching ID This is very useful when managing multiple projectors When operating al...

Страница 176: ... when the projector ID is set to Off or the remote control ID is set to 0 Setting the projector ID Procedure A During projection press the Menu button and select Extended Multi Projection from the configuration menu s Using the Configuration Menu p 55 B Select Projector ID and then press the Enter button C Select of one of the numbers from 1 to 9 to use as the ID and then press the Enter button D ...

Страница 177: ...the projection screen It disappears in about three seconds Setting the remote control ID Procedure A Set the remote control ID switch to On B While holding the ID button press a number button to select a number to match the ID of the projector you want to operate s Checking the Projector ID p 176 Once this setting has been made the projector that can be operated by the remote control is limited Re...

Страница 178: ... be displayed to adjust the projection status without connecting video equipment s p 159 When projecting from multiple projectors correction is easier if images are displayed as is aspect ratio and image resolution are maintained and without being enlarged or reduced in size We recommend projecting from the center of the lens when possible As you get to the edges the lens gets thinner which can ca...

Страница 179: ...then press the Enter button According to the value selected in Grid Size the point selection screen is displayed on the projected image q You can change the color of the guide using the Pattern Color setting G Move the h button to the point you want to correct then press the Enter button q If the Esc button is held down for about two seconds while selecting the point the confirm default reset scre...

Страница 180: ...ng function Set to Off when not projecting from multiple projectors Top Edge Bottom Edge Right Edge Left Edge Blending Enable this setting on the sides of the projected image you want to blend A gradient appears indicating the area where blending occurs Blend Range Adjusts the width of the blending area You can adjust the width down to increments of one pixel at a time and you can blend up to 45 o...

Страница 181: ... E Set a side for edge blending Guide Colors You can select from three guide colors Remote Control Sub Menu Function 1 Select Edge Blending and then press the Enter button 2 Select On and then press the Enter button 3 Press the Esc button 1 Select the Guide Display and then press the Enter button 2 Select On and then press the Enter button 3 Press the Esc button 1 Select an edge Top Edge Bottom Ed...

Страница 182: ...er correction 5 In Blend Range adjust the width of the blended area The width should be set so that the guide appears on the border of where the images overlap q If you press the Default button while adjusting Blend Range the value that you are adjusting is reset to the default 6 Press the Esc button 1 Select Blend Curve and then press the Enter button 2 Select from 3 gradient choices and then pre...

Страница 183: ... button Select Signal menu Scale and then press the Enter button s Using the Configuration Menu p 55 B Select Scale and then select On Sub Menu Function Brightness Level Adjust when the brightness of each projector is different Multi screen Adjustment Level Change the adjustment level of the projected image Brightness Correct Adjust the brightness Color Correct G R Adjust the color tone to look mo...

Страница 184: ...g Scale Vertically or Scale Horizontally E Set Image Display Range Adjust this setting while watching the screen The clipping values displayed on screen and the size of the clipped area may vary de pending on the screens to be matched such as when matching top and bottom screens or left and right screens Full Display When the image is not resized it is projected the same as projected by Normal asp...

Страница 185: ...function s p 129 Procedure A Press the Menu button and select Extended Time Schedule Settings from the configuration menu s Using the Configuration Menu p 55 B Set the time and schedule Selecting from the top menu and sub menus and changing of se lected items are the same as operations in the configuration menu To delete all registered schedules select Schedule Reset then select Yes C Select the S...

Страница 186: ...screen to set the daylight saving time Use Internet Time Set to On to update the time automatically through an Internet time server Internet Time Server Input the IP address for an Internet time server Sub Menu Function Daylight Saving Time Set whether or not On Off to activate the daylight saving time DST Start Set the date and time to start the daylight saving time DST End Set the date and time ...

Страница 187: ... using the cable supplied with the external monitor q Only analog RGB signals from a computer connected to the Computer input port or the BNC input port can be displayed on an external monitor Images from equipment connected to other ports and component video signals cannot be displayed The image cannot be displayed on an external monitor when the projector is on standby Setting gauges such as Key...

Страница 188: ... and it could cause a malfunction Try not to touch the lens with your hand or fingers If fingerprints or oils are left on the surface of the lens projection quality deteriorates Before replacing the lens unit use the lens shift function to horizontally and vertically center the lens s p 161 Procedure A Remove the interface cover A Loosen the screw Thumb screw available on PowerLite Pro Z8255NL Z84...

Страница 189: ...lockwise D Once it is released pull the lens unit straight out Attaching Caution Do not remove or attach the lens unit when the projector s lens area is facing up Dust or dirt could enter the projector A Loosen the two screws B Loosen the screw Thumb screw available on PowerLite Pro Z8255NL Z8455WUNL only C Pull the cover straight out ...

Страница 190: ...s 190 Procedure A Insert the lens unit straight into the lens insertion section with the white circle on the lens on top B While holding the lens unit firmly turn the lock lever clockwise until it is locked Check that the lens cannot be detached ...

Страница 191: ...r with the lens unit installed If the projector is stored without the lens unit dust and dirt may get inside the projector and cause malfunctions or lower the quality of projection A Install the cover along the guide B Tighten the screw Thumb screw available on the PowerLite Pro Z8255NL Z8455WUNL only C Tighten the two screws A Install the cover along the guide B Tighten the screw ...

Страница 192: ...to the projector set the Wireless LAN Power setting on the Wireless LAN menu to On The default setting is On s p 74 Reading the wireless LAN indicators There are two wireless LAN indicators one on the projector and one on the Wireless LAN unit A Loosen the screw Thumb screw available on the PowerLite Pro Z8255NL Z8455WUNL only B While pulling up the interface cover open switch pull the interface c...

Страница 193: ...Status Indicator on projector Indicator on Wireless LAN unit The Wireless LAN unit not connected or the Wireless LAN Power setting on the Wireless LAN menu is Off The Wireless LAN unit connected to the projector but not connected to the network The Wireless LAN unit connected to the projector and connected to the network The Wireless LAN unit connected to the projector connected to the network and...

Страница 194: ...the interface cover straight out Attaching Procedure A Remove the top cover when ejecting the connected cables upward Remove the bottom cover when ejecting the connected cables downward B Install the cover along the guide C Tighten the screw Thumb screw available on the PowerLite Pro Z8255NL Z8455WUNL only ...

Страница 195: ...upplied Accessories 195 Removing the Feet When mounting the projector on the ceiling you can remove the feet and attach the supplied foot covers for clean appearance Procedure A Remove the feet B Attach the supplied foot covers ...

Страница 196: ...196 Appendix ...

Страница 197: ...ns 2 ELPLM07 V12H004M07 Rear projection wide lens ELPLR04 V12H004R04 Wide zoom lens ELPLW04 V12H004W04 Flush Ceiling Mount Bracket V12H003B25 Mount Bracket with Extended Pipe V12H003B26 Kensington security lock ELPSL01 Remote control cable set V12H005C28 Replacement remote control 1558838 Wireless IR mouse receiver for remote control V12H007T16 Wireless LAN module V12H418P12 Product Part Number Ai...

Страница 198: ...51 Wide zoom lens ELPLW04 60 to 500 inches 1 23 1 68 1 1 37 27 32 37 04 mm 1 8 2 26 Rear projection wide lens ELPLR04 60 to 500 inches 0 72 16 15 mm 1 85 Middle throw zoom lens ELPLM06 60 to 500 inches 2 51 3 85 1 1 5 55 43 to 83 3 mm 1 81 2 4 Middle throw zoom lens ELPLM07 60 to 500 inches 3 66 5 60 1 1 5 80 59 to 121 1 mm 1 81 2 34 Long throw zoom lens ELPLL07 60 to 500 inches 5 45 7 67 1 1 39 1...

Страница 199: ...PLS04 60 to 500 inches 1 74 2 82 1 1 61 36 00 to 57 35 mm 1 65 2 51 Wide zoom lens ELPLW04 60 to 500 inches 1 31 1 80 1 1 37 27 32 37 04 mm 1 8 2 26 Rear projection wide lens ELPLR04 60 to 500 inches 0 77 16 15 mm 1 85 Middle throw zoom lens ELPLM06 60 to 500 inches 2 68 4 10 1 1 5 55 43 to 83 3 mm 1 81 2 4 Middle throw zoom lens ELPLM07 60 to 500 inches 3 92 5 97 1 1 5 80 59 to 121 1 mm 1 81 2 34...

Страница 200: ...mponent Video PowerLite Pro Z8450WUNL Z8455WUNL only Composite Video S Video Signal Refresh Rate Hz Resolution dots VGA 60 72 75 85 640x480 SVGA 56 60 72 75 85 800x600 XGA 60 70 75 85 1024x768 WXGA 60 1280x768 60 1366x768 60 75 85 1280x800 WXGA 60 75 85 1440x900 WSXGA 1 60 1680x1050 WXGA 60 1600x900 SXGA 70 75 85 1152x864 60 75 85 1280x1024 60 75 85 1280x960 SXGA 60 75 1400x1050 UXGA 60 1600x1200 ...

Страница 201: ...640x480 SVGA 60 800x600 XGA 60 1024x768 WXGA 60 1280x800 SXGA 60 1280x960 60 1280x1024 SXGA 60 1400x1050 WXGA 60 1600x900 WXGA 60 1366x768 WXGA 60 1440x900 UXGA 60 1600x1200 WSXGA 1 60 1680x1050 WUXGA 2 60 1920x1200 SDTV 480i 60 720x480 SDTV 480p 60 720x480 SDTV 576i 50 720x576 SDTV 576p 50 720x576 HDTV 720p 50 60 1280x720 HDTV 1080i 50 60 1920x1080 HDTV 1080p 24 30 50 60 1920x1080 Signal Refresh ...

Страница 202: ...2048 4096 bit Password Required up to 32 alphanumeric characters Item Explanation Supported format X509v3 Extension DER CER PEM Encryption RSA Hashes MD5 SHA 1 SHA 256 SHA 384 SHA 512 Key length 512 1024 2048 4096 bit Encode BASE64 Binary Item Explanation Supported format PKCS 12 Extension PKCS P12 Encryption RSA Hashes MD5 SHA 1 SHA 256 SHA 384 SHA 512 Key length 512 1024 2048 4096 bit Common Nam...

Страница 203: ...t 5300 lumens Normal mode White light output 8500 lumens ISO 21118 standard Color light output 8500 lumens ECO mode Light output 6500 lumens Normal mode White light output 10000 lumens ISO 21118 standard Color light output 10000 lumens ECO mode Light output 7600 lumens White light output 8000 lumens ISO 21118 standard Color light output 8000 lumens Focus adjustment Automatic Zoom adjustment 1 Auto...

Страница 204: ... Standby 5 1 W Communication On 0 5 W Communication Off Operating altitude 0 to 10000 ft 0 to 3048 m Set High Altitude Mode to On when using the projector above 4921 ft 1500 m Operating temperature 3 32 to 122 F 0 to 50 C No condensation Storage temperature 14 to 140 F 10 to 60 C No condensation Weight 1 Approx 48 4 lb 22 kg including lens Safety and Approvals United States FCC 47CFR Part 15B Clas...

Страница 205: ... temperature is 32 to 113 F 0 to 45 C when Power Consumption is set to Normal 2 and 32 to 104 F 0 to 40 C when it is set to Normal 1 at an altitude of 4921 to 10000 ft 1500 to 3048m Product name PowerLite Pro Z8450WUNL Z8455WUNL PowerLite Pro Z8350WNL PowerLite Pro Z8250NL Z8255NL PowerLite Pro Z8150NL Connec tors Computer Input Port 1 Mini D Sub15 pin female blue BNC input port 1 5BNC female Vide...

Страница 206: ...ns 206 USB 2 0 is supported However the operation of all USB compatible devices is not guaranteed Angle of tilt Using the projector at angles not shown in the illustrations above may damage it or cause an accident ...

Страница 207: ...nce 207 Appearance Units inches mm A Center of lens B Distance from center of lens to suspension bracket point 10 5 267 16 0 167 3 4 86 6 4 8 121 4 8 9 225 21 0 534 18 0 456 1 5 39 21 4 544 6 28 9 734 9 3 236 ...

Страница 208: ...ojector may not be able to project images protected with updated or revised versions of HDCP encryption HDTV An abbreviation for High Definition Television that refers to high definition systems which satisfy the following conditions Vertical resolution of 720p or 1080i or greater p Progressiveg i Interlaceg Screen Aspect Ratiog of 16 9 IP Address A number to identify a computer connected to a Net...

Страница 209: ...access points Gateway address Gateway Address This is a server router for communicating across a network subnet divided according to subnet masksg Contrast The relative brightness of the light and dark areas of an image can be increased or decreased to make text and graphics stand out more clearly or to make them appear softer Adjusting this particular property of an image is called Contrast adjus...

Страница 210: ...l Trap IP Address This is the IP Addressg for the destination computer used for error notification in SNMP Progressive A method of image scanning whereby the image data from a single image is scanned sequentially from top to bottom to create a single image Refresh Rate The light emitting element of a display maintains the same luminosity and color for an extremely short time Because of this the im...

Страница 211: ...nd multiple versions of Windows may be referred to as for example Windows 2000 XP Vista with the Windows notation omitted Mac OS X 10 3 x Mac OS X 10 4 x Mac OS X 10 5 x Mac OS X 10 6 x Mac OS X 10 7 x In this guide the operating systems above are referred to as Mac OS X 10 3 9 Mac OS X 10 4 x Mac OS X 10 5 x Mac OS X 10 6 x and Mac OS X 10 7 x Furthermore the collective term Mac OS is used to ref...

Страница 212: ...nts such as alcohol thinner or benzine Do not use any spray containing a flammable gas to remove dirt or dust that is adhering to parts such as the lens or filter of the projector Contact your dealer to clean the interior of the projector If the interior of the projector has not been cleaned for a long time dust may build up which could cause fire or electric shock Never spill liquid of any kind i...

Страница 213: ...d periods Place the projector near an outlet where the plug can be easily unplugged Unplug the projector from the wall outlet and refer servicing to qualified service personnel under the following conditions If it does not operate normally when you follow the operating instructions or exhibits a distinct change in performance If smoke strange odors or strange noises come from the projector If the ...

Страница 214: ...r you could get burned Do not touch the lens with bare hands Always attach the lens cover to the lens when not using the projector to prevent the lens from becoming dirty or damaged Never try to remove the lamp immediately after use because it will be extremely hot Before removing the lamp turn off the power and wait at least an hour to allow the lamp to cool completely Do not place the source of ...

Страница 215: ... energy and if not installed and used in accordance with the instructions may cause harmful interference to radio communications However there is no guarantee that interference will not occur in a particular installation If this equipment does cause harmful interference to radio or television reception which can be determined by turning the equipment off and on the user is encouraged to try to cor...

Страница 216: ...software programs which apply the GNU General Public License Version 2 or later version GPL Programs We provide the source code of the GPL Programs until five 5 years after the discontinuation of same model of this projector product If you desire to receive the source code of the GPL Programs contact Epson as described in the User s Guide These GPL Programs are WITHOUT ANY WARRANTY without even th...

Страница 217: ... are designed to make sure that you have the freedom to distribute copies of free software and charge for this service if you wish that you receive source code or can get it if you want it that you can change the software or use pieces of it in new free programs and that you know you can do these things To protect your rights we need to make restrictions that forbid anyone to deny you these rights...

Страница 218: ...ther recipients of the Program a copy of this License along with the Program You may charge a fee for the physical act of transferring a copy and you may at your option offer warranty protection in exchange for a fee 2 You may modify your copy or copies of the Program or any portion of it thus forming a work based on the Program and copy and distribute such modifications or work under the terms of...

Страница 219: ...the work for making modifications to it For an executable work complete source code means all the source code for all modules it contains plus any associated interface definition files plus the scripts used to control compilation and installation of the executable However as a special exception the source code distributed need not include anything that is normally distributed in either source or b...

Страница 220: ...f software distributed through that system in reliance on consistent application of that system it is up to the author donor to decide if he or she is willing to distribute software through any other system and a licensee cannot impose that choice This section is intended to make thoroughly clear what is believed to be a consequence of the rest of this License 8 If the distribution and or use of t...

Страница 221: ...public the best way to achieve this is to make it free software which everyone can redistribute and change under these terms To do so attach the following notices to the program It is safest to attach them to the start of each source file to most effectively convey the exclusion of warranty and each file should have at least the copyright line and a pointer to where the full notice is found one li...

Страница 222: ...PL This projector product includes the open source software programs which apply the GNU Lesser General Public License Version 2 or later version LGPL Programs We provide the source code of the LGPL Programs until five 5 years after the discontinuation of same model of this projector product If you desire to receive the source code of the LGPL Programs contact Epson as described in the User s Guid...

Страница 223: ...f you link other code with the library you must provide complete object files to the recipients so that they can relink them with the library after making changes to the library and recompiling it And you must show them these terms so they know their rights We protect your rights with a two step method 1 we copyright the library and 2 we offer you this license which gives you legal permission to c...

Страница 224: ...N 0 This License Agreement applies to any software library or other program which contains a notice placed by the copyright holder or other authorized party saying it may be distributed under the terms of this Lesser General Public License also called this License Each licensee is addressed as you A library means a collection of software functions and or data prepared so as to be conveniently link...

Страница 225: ...bute them as separate works But when you distribute the same sections as part of a whole which is a work based on the Library the distribution of the whole must be on the terms of this License whose permissions for other licensees extend to the entire whole and thus to each and every part regardless of who wrote it Thus it is not the intent of this section to claim rights or contest your rights to...

Страница 226: ...for the work may be a derivative work of the Library even though the source code is not Whether this is true is especially significant if the work can be linked without the Library or if the work is itself a library The threshold for this to be true is not precisely defined by law If such an object file uses only numerical parameters data structure layouts and accessors and small macros and small ...

Страница 227: ... 6a above for a charge no more than the cost of performing this distribution d If distribution of the work is made by offering access to copy from a designated place offer equivalent access to copy the above specified materials from the same place e Verify that the user has already received a copy of these materials or that you have already sent this user a copy For an executable the required form...

Страница 228: ...ly through you then the only way you could satisfy both it and this License would be to refrain entirely from distribution of the Library If any portion of this section is held invalid or unenforceable under any particular circumstance the balance of the section is intended to apply and the section as a whole is intended to apply in other circumstances It is not the purpose of this section to indu...

Страница 229: ... TO THE QUALITY AND PERFORMANCE OF THE LIBRARY IS WITH YOU SHOULD THE LIBRARY PROVE DEFECTIVE YOU ASSUME THE COST OF ALL NECESSARY SERVICING REPAIR OR CORRECTION 16 IN NO EVENT UNLESS REQUIRED BY APPLICABLE LAW OR AGREED TO IN WRITING WILL ANY COPYRIGHT HOLDER OR ANY OTHER PARTY WHO MAY MODIFY AND OR REDISTRIBUTE THE LIBRARY AS PERMITTED ABOVE BE LIABLE TO YOU FOR DAMAGES INCLUDING ANY GENERAL SPE...

Страница 230: ...tact you by electronic and paper mail You should also get your employer if you work as a programmer or your school if any to sign a copyright disclaimer for the library if necessary Here is a sample alter the names Yoyodyne Inc hereby disclaims all copyright interest in the library Frob a library for tweaking knobs written by James Random Hacker signature of Ty Coon 1 April 1990 Ty Coon President ...

Страница 231: ...THEORY OF LIABILITY WHETHER IN CONTRACT STRICT LIABILITY OR TORT INCLUDING NEGLIGENCE OR OTHERWISE ARISING IN ANY WAY OUT OF THE USE OF THIS SOFTWARE EVEN IF ADVISED OF THE POSSIBILITY OF SUCH DAMAGE libjpeg This projector product includes the open source software program libjpeg which applies the terms and conditions provided by owner of the copyright to the libjpeg The libjpeg are WITHOUT ANY WA...

Страница 232: ...s accept NO LIABILITY for damages of any kind These conditions apply to any software derived from or based on the IJG code not just to the unmodified library If you use our work you ought to acknowledge us Permission is NOT granted for the use of any IJG author s name or company name in advertising or publicity relating to this software or products derived from it This software may be referred to ...

Страница 233: ...orated libpng This projector product includes the open source software program libpng which applies the terms and conditions provided by owner of the copyright to the libpng The libpng are WITHOUT ANY WARRANTY without even the implied warranty of MERCHANTABILITY AND FITNESS FOR A PARTICULAR PURPOSE List of libpng programs libpng 1 2 7 libpng 1 2 44 License terms of conditions of each program which...

Страница 234: ... and the entire risk of satisfactory quality performance accuracy and effort is with the user libpng versions 0 97 January 1998 through 1 0 6 March 20 2000 are Copyright c 1998 1999 Glenn Randers Pehrson and are distributed according to the same disclaimer and license as libpng 0 96 with the following individuals added to the list of Contributing Authors Tom Lane Glenn Randers Pehrson Willem van S...

Страница 235: ...nted 2 Altered versions must be plainly marked as such and must not be misrepresented as being the original source 3 This Copyright notice may not be removed or altered from any source or altered source distribution The Contributing Authors and Group 42 Inc specifically permit without fee and encourage the use of this source code as a component to supporting the PNG file format in commercial produ...

Страница 236: ...s software in a product an acknowledgment in the product documentation would be appreciated but is not required 2 Altered source versions must be plainly marked as such and must not be misrepresented as being the original software 3 This notice may not be removed or altered from any source distribution Jean loup Gailly jloup gzip org Mark Adler madler alumni caltech edu If you use the zlib library...

Страница 237: ...bject form made available under the License as indicated by a copyright notice that is included in or attached to the work an example is provided in the Appendix below Derivative Works shall mean any work whether in Source or Object form that is based on or derived from the Work and for which the editorial revisions annotations elaborations or other modifications represent as a whole an original w...

Страница 238: ...e Source form of any Derivative Works that You distribute all copyright patent trademark and attribution notices from the Source form of the Work excluding those notices that do not pertain to any part of the Derivative Works and d If the Work includes a NOTICE text file as part of its distribution then any Derivative Works that You distribute must include a readable copy of the attribution notice...

Страница 239: ... such damages 9 Accepting Warranty or Additional Liability While redistributing the Work or Derivative Works thereof You may choose to offer and charge a fee for acceptance of support warranty indemnity or other liability obligations and or rights consistent with this License However in accepting such obligations You may act only on Your own behalf and on Your sole responsibility not on behalf of ...

Страница 240: ...distributed in the hope that it will be useful but WITHOUT ANY WARRANTY expressed or implied including the implied warranties of MERCHANTABILITY or FITNESS FOR A PARTICULAR PURPOSE A copy of this license is available at http www opensource org licenses Any Red Hat trademarks that are incorporated in the source code or documentation are not subject to the BSD License and may only be used or replica...

Страница 241: ...ARE IS BEING PROVIDED AS IS WITHOUT ANY EXPRESS OR IMPLIED WARRANTY IN PARTICULAR NEITHER THE AUTHOR NOR AT T MAKES ANY REPRESENTATION OR WARRANTY OF ANY KIND CONCERNING THE MERCHANTABILITY OF THIS SOFTWARE OR ITS FITNESS FOR ANY PARTICULAR PURPOSE The author of this software is David M Gay Copyright C 1998 2001 by Lucent Technologies All Rights Reserved Permission to use copy modify and distribut...

Страница 242: ... C 1993 C W Sandmann This file may be freely distributed as long as the author s name remains 6 Eric Backus C Copyright 1992 Eric Backus This software may be used freely so long as this copyright notice is left intact There is no warrantee on this software 7 Sun Microsystems Copyright C 1993 by Sun Microsystems Inc All rights reserved Developed at SunPro a Sun Microsystems Inc business Permission ...

Страница 243: ... from this software without specific prior written permission THIS SOFTWARE IS PROVIDED BY THE AUTHOR AS IS AND ANY EXPRESS OR IMPLIED WARRANTIES INCLUDING BUT NOT LIMITED TO THE IMPLIED WARRANTIES OF MERCHANTABILITY AND FITNESS FOR A PARTICULAR PURPOSE ARE DISCLAIMED IN NO EVENT SHALL THE AUTHOR BE LIABLE FOR ANY DIRECT INDIRECT INCIDENTAL SPECIAL EXEMPLARY OR CONSEQUENTIAL DAMAGES INCLUDING BUT ...

Страница 244: ... IS PROVIDED BY KTH AND ITS CONTRIBUTORS AS IS AND ANY EXPRESS OR IMPLIED WARRANTIES INCLUDING BUT NOT LIMITED TO THE IMPLIED WARRANTIES OF MERCHANTABILITY AND FITNESS FOR A PARTICULAR PURPOSE ARE DISCLAIMED IN NO EVENT SHALL KTH OR ITS CONTRIBUTORS BE LIABLE FOR ANY DIRECT INDIRECT INCIDENTAL SPECIAL EXEMPLARY OR CONSEQUENTIAL DAMAGES INCLUDING BUT NOT LIMITED TO PROCUREMENT OF SUBSTITUTE GOODS O...

Страница 245: ... this list of conditions and the following disclaimer in the documentation and or other materials provided with the distribution THIS SOFTWARE IS PROVIDED BY THE AUTHOR AS IS AND ANY EXPRESS OR IMPLIED WARRANTIES INCLUDING BUT NOT LIMITED TO THE IMPLIED WARRANTIES OF MERCHANTABILITY AND FITNESS FOR A PARTICULAR PURPOSE ARE DISCLAIMED IN NO EVENT SHALL THE REGENTS OR CONTRIBUTORS BE LIABLE FOR ANY ...

Страница 246: ...HOR MAKES NO REPRESENTATION OR WARRANTY OF ANY KIND CONCERNING THE MERCHANTABILITY OF THIS SOFTWARE OR ITS FITNESS FOR ANY PARTICULAR PURPOSE 18 Citrus Project Copyright c 1999 Citrus Project All rights reserved Redistribution and use in source and binary forms with or without modification are permitted provided that the following conditions are met 1 Redistributions of source code must retain the...

Страница 247: ... PROFITS OR BUSINESS INTERRUPTION HOWEVER CAUSED AND ON ANY THEORY OF LIABILITY WHETHER IN CONTRACT STRICT LIABILITY OR TORT INCLUDING NEGLIGENCE OR OTHERWISE ARISING IN ANY WAY OUT OF THE USE OF THIS SOFTWARE EVEN IF ADVISED OF THE POSSIBILITY OF SUCH DAMAGE 20 DJ Delorie i386 Copyright C 1991 DJ Delorie All rights reserved Redistribution and use in source and binary forms is permitted provided t...

Страница 248: ...the following disclaimer in the documentation and or other materials provided with the distribution THIS SOFTWARE IS PROVIDED BY THE AUTHOR AND CONTRIBUTORS AS IS AND ANY EXPRESS OR IMPLIED WARRANTIES INCLUDING BUT NOT LIMITED TO THE IMPLIED WARRANTIES OF MERCHANTABILITY AND FITNESS FOR A PARTICULAR PURPOSE ARE DISCLAIMED IN NO EVENT SHALL THE AUTHOR OR CONTRIBUTORS BE LIABLE FOR ANY DIRECT INDIRE...

Страница 249: ...is list of conditions and the following disclaimer in the documentationand or other materials provided with the distribution THIS SOFTWARE IS PROVIDED BY THE AUTHOR AND CONTRIBUTORS AS IS AND ANY EXPRESS OR IMPLIED WARRANTIES INCLUDING BUT NOT LIMITED TO THE IMPLIED WARRANTIES OF MERCHANTABILITY AND FITNESS FOR A PARTICULAR PURPOSE ARE DISCLAIMED IN NO EVENT SHALL THE AUTHOR OR CONTRIBUTORS BE LIA...

Страница 250: ...ing disclaimer in the documentation and or other materials provided with the distribution THIS SOFTWARE IS PROVIDED BY THE AUTHOR AND CONTRIBUTORS AS IS AND ANY EXPRESS OR IMPLIED WARRANTIES INCLUDING BUT NOT LIMITED TO THE IMPLIED WARRANTIES OF MERCHANTABILITY AND FITNESS FOR A PARTICULAR PURPOSE ARE DISCLAIMED IN NO EVENT SHALL THE AUTHOR OR CONTRIBUTORS BE LIABLE FOR ANY DIRECT INDIRECT INCIDEN...

Страница 251: ...r materials provided with the distribution THIS SOFTWARE IS PROVIDED BY THE AUTHOR AND CONTRIBUTORS AS IS AND ANY EXPRESS OR IMPLIED WARRANTIES INCLUDING BUT NOT LIMITED TO THE IMPLIED WARRANTIES OF MERCHANTABILITY AND FITNESS FOR A PARTICULAR PURPOSE ARE DISCLAIMED IN NO EVENT SHALL THE REGENTS OR CONTRIBUTORS BE LIABLE FOR ANY DIRECT INDIRECT INCIDENTAL SPECIAL EXEMPLARY OR CONSEQUENTIAL DAMAGES...

Страница 252: ... must reproduce the above copyright notice this list of conditions and the following disclaimer in the documentation and or other materials provided with the distribution Neither the name of CodeSourcery nor the names of its contributors may be used to endorse or promote products derived from this software without specific prior written permission THIS SOFTWARE IS PROVIDED BY CODESOURCERY INC AS I...

Страница 253: ...ICT LIABILITY OR TORT INCLUDING NEGLIGENCE OR OTHERWISE ARISING IN ANY WAY OUT OF THE USE OF THIS SOFTWARE EVEN IF ADVISED OF THE POSSIBILITY OF SUCH DAMAGE WPA Supplicant The copyright owner of the WPA Supplicant open source software provides terms and conditions hereinafter referred to as WPA Supplicant License The projector uses this product in compliance with the BSD License as part of the WPA...

Страница 254: ...ISUAL PATENT PORTFOLIO LICENSE FOR THE PERSONAL AND NONCOMMERCIAL USE OF A CONSUMER FOR i ENCODING VIDEO IN COMPLIANCE WITH THE MPEG 4 VISUAL STANDARD MPEG 4 VIDEO AND OR ii DECODING MPEG 4 VIDEO THAT WAS ENCODED BY A CONSUMER ENGAGED IN A PERSONAL AND NON COMMERCIAL ACTIVITY AND OR WAS OBTAINED FROM A VIDEO PROVIDER LICENSED BY MPEG LA TO PROVIDE MPEG 4 VIDEO NO LICENSE IS GRANTED OR SHALL BE IMP...

Страница 255: ...ines Corp Macintosh and Mac are registered trademarks of Apple Inc Pixelworks and DNX are trademarks of Pixelworks Inc This product includes RSA BSAFE software from RSA Security Inc RSA is a registered trademark of RSA Security Inc BSAFE RSA Security Inc is a registered trade mark in the United States and other countries WPA WPA2 and Wi Fi Protected Setup are registered trademarks of Wi Fi Allianc...

Страница 256: ...om the use of any options or any consumable products other than those designated as Original EPSON Products or EPSON Approved Products by Seiko Epson Corporation This information is subject to change without notice A Note Concerning Responsible Use of Copyrighted Materials Epson encourages each user to be responsible and respectful of the copyright laws when using any EPSON product While some coun...

Отзывы: