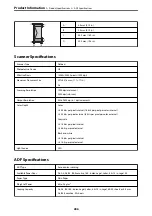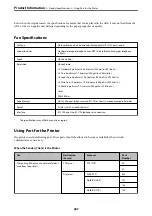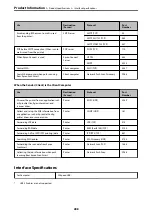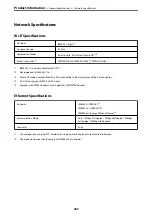
ECM:
Automatically corrects errors in the fax transmission (Error Correction Mode), mostly caused by
telephone line noise. If this is disabled, you cannot send or receive documents in color.
Dial Tone Detection:
Detects a dial tone before starting to dial. If the printer is connected to a PBX (Private Branch
Exchange) or digital phone line, the printer may fail to start dialing. In this situation, change the
Line
Type
setting to
PBX
. If this does not work, disable this feature. However, disabling this feature may
drop the first digit of a fax number and send the fax to the wrong number.
Dial Mode:
Select the type of phone system to which you have connected the printer. When set to
Pulse
, you can
temporarily switch the dialing mode from pulse to tone by pressing ("T" is entered) while entering
numbers on the fax top screen. This setting may not be displayed depending on your region or
country.
Line Type:
Select the line type to which you have connected the printer.
When using the printer in an environment that uses extensions and requires an external access code,
such as 0 and 9, to get an outside line, select
PBX
. For an environment that uses a DSL modem or
terminal adapter, setting to
PBX
is also recommended.
Access Code
Select
Use
, and then register an external access code such as 0 or 9. Then, when sending a fax
to an outside fax number, enter # (hash) instead of the real code. # (hash) must also be used in
Contacts
as an external access code. If an external access code such as 0 or 9 is set in a contact,
you cannot send faxes to the contact. In this case, set
Access Code
to
Do Not Use
, otherwise
you must change the code in
Contacts
to #.
Header:
Enter your sender name and fax number. These appear as a header on outgoing faxes.
❏
Your Phone Number: You can enter up to 20 characters using 0-9 + or space. For Web Config, you
can enter up to 30 characters.
❏
Fax Header: You can register up to 21 sender names as necessary. You can enter up to 40 characters
for each sender name. For Web Config, enter the header in Unicode (UTF-8).
Receive Mode:
Select the receive mode. For details, see the related Information below.
DRD:
If you have subscribed to a distinctive ring service from your telephone company, select the ring
pattern to be used for incoming faxes. The distinctive ring service, offered by many telephone
companies (the service name differs by company), allows you to have several phone numbers on one
phone line. Each number is assigned different ring pattern. You can use one number for voice calls
and another for fax calls. Depending on the region, this option may be
On
or
Off
.
Rings to Answer:
Select the number of rings that must occur before the printer automatically receives a fax.
>
>
276
Содержание C11CH68401
Страница 1: ...User s Guide Printing Copying Scanning Faxing Maintaining the Printer Solving Problems NPD6169 00 EN ...
Страница 17: ...Part Names and Functions Front 18 Inside 20 Rear 21 ...
Страница 29: ...Loading Paper Paper Handling Precautions 30 Paper Size and Type Settings 30 Loading Paper 31 ...
Страница 34: ...Placing Originals Placing Originals 35 Originals that are not Supported by the ADF 36 ...
Страница 76: ...Copying Available Copying Methods 77 Basic Menu Options for Copying 82 Advanced Menu Options for Copying 82 ...
Страница 325: ...3 Click Edit Administrator Information Settings to Use the Printer Setting a Shared Network Folder 325 ...
Страница 369: ...Where to Get Help Technical Support Web Site 370 Contacting Epson Support 370 ...

