background image

3. If the computer still does not start, the problem is probably

caused by the power source; see “Battery Problems” or

“AC Adapter Problems,” below.

Battery Problems

If you have trouble running the computer from a battery,
follow the steps in this section to find the problem. (Be sure to
read Chapter 3 for information on powering your system.)

1.

Check the Battery Status and Suspend icons in the System

Window. If the Battery Status icon indicates there is

sufficient battery power left and you see a Suspend icon,

the computer is in Suspend to Memory mode; press any
key or press the Suspend/ Resume button to continue. If
you are using Suspend to Disk as your Suspend mode,
press the computer’s power button to resume. See

Chapter 3 for more information.

2. If the Battery Status icon is empty and blinking, the battery

power is very low. If you have a second battery that is fully
charged, first turn off your computer, then use the second
battery to replace the one in the computer. If the computer
then works properly, you need to recharge the other
battery. See Chapter 3 for instructions.

3. If you replace the battery and the computer does not work

properly, the new battery may also not be fully charged.
Recharge this battery until it reaches its maximum capacity.

4. If you think the battery is not providing any power, it may

not be installed properly. Try removing and reinstalling it

according to the instructions in Chapter 3.

5. Connect the AC adapter to the computer and plug the

adapter into an electrical outlet. Turn on the computer and
see if it works using the AC adapter.

5-4

Troubleshooting

Содержание ActionNote 650

Страница 1: ...User s Guide Printed on recycled paper with at least 10 post consumer content ...

Страница 2: ...without the prior written permission of Epson America Inc No patent liability is assumed with respect to the use of information contained herein Nor is any liability assumed for damages resulting from the use of the information contained herein Further this publication and features described herein are subject to change without notice TRADEMARKS EPSON is a registered trademark of Seiko Epson Corpo...

Страница 3: ...ically explained in this User s Guide do not attempt to service the computer yourself Unplug the computer and refer servicing to qualified service personnel under the following conditions If the power cord or plug is damaged if liquid has entered the computer if the computer has been dropped or the cabinet damaged if the computer does not operate normally or exhibits a distinct change in performan...

Страница 4: ...les appareils branchés sur ce cordon ne soit pas supérieure à la capacité du cordon S assurer aussi que cette intensité ne dépasse jamais la somme de 15 ampères pour l ensemble des appareils Sauf dans les cas spécifiques expliqués dans ce manuel de l usager ne pas essayer d entretenir ou de réparer l ordinateur soi même Débrancher l ordinateur et contacter un technician qualifié dans les circonsta...

Страница 5: ... circuit different from that to which the receiver is connected Consult an experienced radio TV technician for help WARNING The connection of a non shielded equipment interface cable to this equipment will invalidate the FCC Certification of this device and may cause interference levels that exceed the limits established by the FCC for this equipment It is the responsibility of the user to obtain ...

Страница 6: ...up Copies of Your Files 1 8 Running the System Configuration Utility 1 8 When to Run the System Configuration Utility 1 9 Starting the Utility 1 9 Changing the Settings 1 10 S e t t i n g D e l e t i n g a n d C h a n g i n g a P a s s w o r d 1 1 3 Setting a password 1 14 Deleting or changing a password 1 14 Setting the Power Management Options 1 15 Exiting the System Configuration Utility 1 18 C...

Страница 7: ...cing the Battery 3 7 Recharging the Battery 3 8 Using the Power Management Features 3 10 Automatic Features 3 12 Manual Features 3 13 Resuming Activity From Suspend Mode 3 14 Using the APM Interface 3 15 Using Suspend to Disk Mode 3 16 Creating the Suspend to Disk data file 3 17 Recreating the Suspend to Disk data file 3 19 Chapter 4 Installing Optional Devices Connecting an External Monitor 4 1 C...

Страница 8: ...oblems Diskette Problems Diskette Drive Problems Hard Disk Problems Software Problems Printer Problems Memory Module Problems PC Card Problems Appendix A Specifications 5 1 5 3 5 3 5 4 5 5 5 6 5 7 5 8 5 9 5 9 5 9 5 10 5 11 5 12 5 12 5 13 5 14 5 14 5 15 CPU and Memory A l Controllers A 2 Interfaces A 3 Keyboard A 3 Trackball A 3 Mass Storage A 3 LCD Screen A 4 System Configuration Utility A 4 Power...

Страница 9: ...r productivity and fun Your high capacity hard disk drive will hold the hundreds of program and data files you create as you use your computer And when you re ready to acquire more capability your computer s two PCMCIA card slots allow you to quickly and easily add flash RAM fax modem local area network LAN and other PC card options You can even use your ActionNote like a desktop PC when you re no...

Страница 10: ...soft Windows and in any other programs On line computer user s guide Windows manual and other manuals providing instructions and inform ation while you are on the road Your ActionNote has been configured for you and the hard disk drive already contains most of the software you need Video drivers have already been installed and you can select whether to load your PCMCIA drivers and utilities each t...

Страница 11: ...ou use an Energy Star compliant external monitor with your computer it also enters a low power standby mode because it is not receiving video signals from your computer Screens on non compliant monitors become blank but do not enter a low power mode What This Manual Covers You do not need to read everything in this book to use your computer see the following chapter summaries Chapter 1 provides st...

Страница 12: ...rnational marketing locations Conventions Used in This Manual This manual uses the following type conventions in the text Example Meaning Enter Keys you press on the keyboard Fn F12 Keys you press at the same time hold down the key marked Fn and press the F12 key C DOS Text as it appears on the screen DISKCOPY A B Text that you type exactly as shown 4 Introduction ...

Страница 13: ...re Center Assistance with Extra Care Road Service Customer relations EPSON technical information library fax service Product literature on current and new products You can purchase accessories manuals or parts for EPSON products from EPSON Accessories at 800 873 7766 U S sales only In Canada call 800 922 8911 When you call for technical assistance be ready to identify your system and its configura...

Страница 14: ...free CompuServe membership This membership entitles you to an introductory 15 usage credit on CompuServe s extended services and forums The brochure that came with your computer describes the CompuServe services and how to access them as well as providing subscription information Note To access CompuServe you must install a modem PC card in your computer The fastest way to access helpful tips spec...

Страница 15: ...ing the system components Connecting the AC adapter Turning the computer on and off Reading the System Window icons Backing up files Running the System Configuration utility SCU Opening the Screen To open the LCD screen slide the latch on the computer s lid to the right and lift the lid upward Setting Up the Computer 1 1 ...

Страница 16: ...ldentifying the System Components Use the illustrations below to help you identify your system components 1 2 Setting Up the Computer ...

Страница 17: ... country other than the one where you purchased your computer make sure you have the correct power cord before you connect the AC adapter to an electrical outlet Caution Use only the adapter designed for the ActionNote 600 Series computer model number TSA3 or you could damage the computer To connect the AC adapter first connect the adapter s power cord to the connector as shown below Setting Up th...

Страница 18: ... into an electrical outlet The green power light on the adapter comes on and the AC Power icon the plug appears in the computer s System Window See page 1 7 for a description of the System Window icons For more information about powering the computer with the AC adapter see Chapter 3 For instructions on connecting optional equipment to your computer see Chapter 4 1 4 Setting Up the Computer ...

Страница 19: ...t Press SPACEBAR to skip memory test Press the spacebar or let the power on diagnostic tests continue Then you see this prompt on the bottom of the screen for 1 second CTRL ALT S to enter System Configuration Utility Ignore this prompt for now You then see a prompt asking if you want to load PC card drivers If you do not respond to the prompt within 5 seconds the computer loads the drivers and con...

Страница 20: ... the program you are currently using Make sure the computer is not accessing data from the diskette drive hard disk drive or a PC card by checking the icons in the System Window see page 1 7 for more information Press the power button for two seconds to turn off the computer This two second delay is a safety feature to prevent you from accidentally turning off the computer Caution Always make sure...

Страница 21: ...g the hard disk drive Activity Diskette Computer is accessing a diskette Drive Activity PC Card Computer is accessing a PC card Activity Suspend System is in suspend mode see Chapter 3 Battery Gauges charging status and power left in Status the battery see Chapter 3 Battery AC adapter is charging the battery see Charging Chapter 3 AC Power AC adapter is connected to the computer see Chapter 3 For ...

Страница 22: ... the System Configuration Utility The System Configuration utility SCU defines your system s configuration so the computer recognizes all of its devices The SCU is stored in the computer s ROM read only memory where you can access it whenever you turn on or reset the computer or when you press Ctrl Alt S at the MS DOS prompt Caution The SCU reboots your computer when you exit the utility and any d...

Страница 23: ...e set a password or customize the power management features You can also access the power management features by pressing Ctrl Alt P or Fn Esc In addition any time you change the computer s configuration by installing or removing memory for example you need to run the SCU to update the configuration Starting the Utility You can start the SCU by pressing Ctrl Alt S at the MS DOS prompt or during po...

Страница 24: ...option PowerMgmt Use the and keys to highlight the menu bar option you want to select then press Enter If you prefer you can also press the key for the highlighted letter in the menu option to select it The Defaults and Exit options do not have pull down menus see the table below for more information Once you see a pull down menu use the or keys to highlight the option you want to change and press...

Страница 25: ...l assigned No Disabled as COM1 COM Port Assigns the built in serial COM2 2F8h port address the COM4 2E8h PCMCIA slots are COM3 Disable Parallel Mode 1 Assigns the operation Normal mode of the parallel port Bidirectional Disable Diskette Drive Specifies a diskette drive 1 44MB type for drive A drive B 1 2 MB option is inoperable None Hard Disk 2 Automatically detects the Custom drive type or allows...

Страница 26: ...Changing a No Disabled Password below SCU Password See Setting Deleting Enabled and Changing a No Disabled Password below Boot Drive Selects the drive the Drive A computer should check Drive C first as it boots the system VGA menu Display Mode Selects the display mode LCD the computer uses when CRT you boot the system BOTH active matrix and monochrome only LCD Sets the mode used to Normal appears ...

Страница 27: ...d disk drive Setting Deleting and Changing a Password You can set two types of passwords on your system a Boot password and an SCU password The Boot password prevents an unauthorized user from accessing any programs or data on your computer including the System Configuration utility The SCU password prevents access only to the SCU and your system configuration information If you set a Boot passwor...

Страница 28: ...error message start over again at step 1 You see a message verifying that a password is set Press any key to continue The selected password option setting is changed to Enabled Deleting or changing a password If you want to delete or change a password follow these steps 1 Highlight the Boot Password or SCU Password option 2 Press Enter the disappears and the password is disabled 3 If you want to c...

Страница 29: ... select the PowerMgmt option from the SCU menu bar the screen changes to the Power Management screen Use the menu bar and pull down menu options the same way you use them on the SCU screen Note You can also access this screen outside of the SCU by pressing Ctrl Alt P or Fn ESC at the MS DOS prompt or by pressing Fn ESC from Windows Then when you exit the Power Management screen you return to the M...

Страница 30: ...er management features are enabled set Battery enable when using battery power only Selects whether to warn you of a low battery and enter suspend mode or to warn you and not enter suspend mode Sets a time in which the system automatically resumes activity after entering suspend mode if enabled select a time Sets an inactivity time period after which the system slows down the CPU in seconds Sets a...

Страница 31: ...ed or Suspend to Disk Enabled see Using Suspend to Disk Mode in Chapter 3 before you enable this option Video Monitoring Determines whether video Enabled 2 3 activity prevents the system No Disabled from entering a standby or suspend mode Device menu Video Sets an inactivity time period 1 Min after which the computer turns 2 Min off the LCD screen or you can 4 Min specify that the LCD screen is 6 ...

Страница 32: ... you should not use any Windows screen saver programs because the screen saver may prevent your computer from entering suspend mode 3 If you enable Video Monitoring and your system s video is active the system does not enter any standby or suspend modes If you disable Video Monitoring the system ignores video activity such as a blinking cursor and enters these modes as necessary Existing the Syste...

Страница 33: ...ging the CPU speed Using password security Using diskettes Using video drivers and utilities Configuring PC cards Caring for the Computer Follow these guidelines to keep your computer working well Keep the computer and AC adapter dry and do not subject them to extreme heat or cold To prevent damage to the LCD do not place anything on top of the computer even if it is closed Using Your Computer 2 1...

Страница 34: ... Activity icon appears in the System Window This icon indicates that the computer is copying data to or from the hard disk Never remove the hard disk drive when the computer is on After turning the power off wait 20 seconds before moving the computer This allows the disks in the drive to stop spinning and the hard disk read write heads to lock in place so you do not damage the drive Although the h...

Страница 35: ...e to under an hour The ActionNote computer allows you to hot swap PC cards so that you can insert and remove a card as you need it without having to restart or reconfigure your system If you have an electronic m ail system available to you send E mail rather than memos Not only is this faster but you 11 save paper and storage space too Use recycled paper and recycle your used paper whenever you ca...

Страница 36: ...rnative Ctrl Alt key sequence as described below Fn key functions Key command Fn F1 or Ctrl Alt F1 Fn F2 or Ctrl Alt F2 Fn F3 or Ctrl Alt F3 Fn F4 or Ctrl Alt F4 Fn F9 or Ctrl Alt F9 Fn F10 or Ctrl Alt F10 Function Decreases LCD brightness Increases LCD brightness Decreases contrast active matrix LCD does not require this feature correct contrast adjusts automatically Increases contrast active mat...

Страница 37: ... back to the LCD For the dual scan LCD toggles the display between the LCD and the external monitor Fn Esc Displays the Power Management screen when you are using MS DOS or Windows Fn Locks the embedded keypad as described in the next Num Lock section Using the Embedded Keypad The embedded keypad shown below allows you to enter numbers symbols and cursor control commands from a keypad arrangement ...

Страница 38: ...ed keypad key Alphanumeric Cursor control characters function Num Lock key you see the Numeric Alphanumeric Num Lock icon characters characters Using the Trackball The trackball on your ActionNote is a built in pointing device very similar to a mouse you can use it to move the cursor select text or objects cut and paste or choose menu items The trackball is compatible with most software applicatio...

Страница 39: ...ns or block text Press the left button and hold it down while you move the trackball to drag objects around the screen Note The right button is sometimes used with programs written for a two button mouse but you can use it as your primary button If you want to reassign the buttons and or adjust the trackball sensitivity use the Windows Mouse utility in the Control Panel or the MS DOS PANEL utility...

Страница 40: ... if necessary to lift out the dial and the trackball 3 Blow any dust out of the trackball base If the metal rollers inside the base seem dirty clean them gently with a cotton swab 4 Wash the trackball with warm water and a mild soap then dry it thoroughly with a lint free cloth 5 Place the trackball back in the base 6 Place the dial over the trackball in the position it was in when you removed it ...

Страница 41: ...ction unless it is necessary Also some programs classify and store new data only when you exit them properly so do not reset the computer before you exit a program if possible If resetting the computer does not work you probably need to turn it off wait five seconds and turn it back on again Changing the CPU Speed Your computer s processor can operate at two speeds high speed and 12 MHz At high sp...

Страница 42: ...assword every time you turn on or reset your computer If you set an SCU password the computer prompts you to enter the password only when you press Ctrl Alt S to run the System Configuration utility If you want to enter change or delete a password run the System Configuration utility as described in Chapter 1 When you see a prompt to enter a password see the next sections Caution Once you set a Bo...

Страница 43: ...d displays another prompt You have three more tries Entering an SCU Password When you set an SCU password the computer prompts you for it only after you have pressed Ctrl Alt S to enter the System Configuration utility Before you see the SCU screen you see the following prompt on the password entry screen Enter your SCU PASSWORD Type your password and press Enter To protect your password the scree...

Страница 44: ... sided high density usually labeled 2HD To insert a diskette hold it with the label facing up and the shutter leading into the drive Slide it into the drive until it clicks into place To remove the diskette make sure the Diskette Drive Activity icon does not appear in the System Window then press the release button When the diskette pops out remove it 2 12 Using Your Computer ...

Страница 45: ...n external monitor When you use the Chip sCPL utility to switch your computer s display mode Windows saves it as the permanent display mode You can use the SCU utility or the Fn keys to change your computer s display mode too Using an Fn key only changes the display mode for the current session while using the SCU utility changes the display mode permanently Note Your ActionNote is configured to d...

Страница 46: ...at could be free for other uses See the EPSON Card and Socket Services User s Guide for more information Once you have loaded the drivers and inserted a PC card your computer configures most cards automatically using card and socket services software Refer to the EPSON Card and Socket Services User s Guide for more information on configuring your PC card Caution If you run the MS DOS MEMMAKER util...

Страница 47: ...install a socket services enabler either as a device driver or command that is executed when you load the network operating system See the documentation that came with your PC card to see if you need to install any additional drivers You can obtain the latest information on available PC card drivers by checking the Epson America Forum on CompuServe See Where to Get Help in the Introduction to this...

Страница 48: ...2 16 Using Your Computer ...

Страница 49: ...o an automobile cigarette lighter and an external battery charger Contact your Authorized EPSON dealer or EPSON Accessories for Imore information about these options Using the AC Adapter The AC adapter allows you to connect the ActionNote to a standard electrical outlet to power the computer and charge the battery You should use it whenever you have access to an electrical outlet especially when y...

Страница 50: ...tery powers the computer when the AC adapter is not connected The battery provides from 4 to 6 hours of power for monochrome LCD models and from 2 5 to 4 hours for color LCD models when you use the computer s power management features Caution Use only the NiMH battery designed for use with this computer model number 10HR 4 3AU The length of time the battery provides power depends on how you use th...

Страница 51: ...mory are protected for several hours If you selected Suspend to Disk the default setting the memory contents are saved in a data file on your hard disk drive so they are always available See Chapter 1 for instructions on selecting your suspend mode and see Using the Power Management Features on page 3 10 for more information about these modes Note Do not remove the computer s battery and leave it ...

Страница 52: ...t the Power icon in the Control Panel window to see a status screen that gives information about your battery Note For a description of the power management modes available from the Power dialog box see Using the APM Interface on page 3 15 The computer s Battery Charging and Battery Status icons work together to let you know how the battery is charging if the AC adapter is attached and how much po...

Страница 53: ...y is currently charging you see the Battery Charging icon and the Battery Status icon changes as follows to inform you of the charging status When the battery is fully charged the Battery Charging icon disappears and the AC Power and Battery Status icons appear as follows Powering the Computer 3 5 ...

Страница 54: ...tery is charged at approximately 26 to 50 of capacity Your battery is charged between low battery status and 25 of capacity Your battery power is low you have approximately 20 minutes of power left Note Times and percentages are approximates only and may differ depending on how you are using your computer When the Battery Status icon blinks you have about 10 minutes of power left insert a spare ba...

Страница 55: ...ry release grip on the battery cover toward the front of the computer until the cover disengages from the computer case Then pull the battery straight out of its compartment Note Avoid touching the battery contacts with any metal objects such as keys or coins because they may short out the battery s circuits Powering the Computer 3 7 ...

Страница 56: ...System Window when you open the LCD screen Recharging the Battery The battery that comes with your system is rechargeable You may need to charge the battery before using it for the first time and you must recharge it when it runs out of power If you have additional batteries it s a good idea to keep them fully charged so you can replace the battery in your computer when it runs low This is especia...

Страница 57: ...e system while the battery is recharging it can take up to 3 hours Your computer has a safety timer that prevents it from charging the battery too long The timer stops charging after 2 hours if the computer is turned off and after 4 hours if it is turned on If you find that over time the battery is losing its charge sooner the life of the battery may be reaching its end As an NiMH battery loses it...

Страница 58: ... modes Each of the four modes provides progressively increased power conservation and affects the functioning of progressively more components in your computer The standby modes CPU Standby and Global Standby reduce the speed and performance of the CPU components related to CPU operations and peripheral components such as the hard disk and LCD screen The suspend modes Suspend to Memory and Suspend...

Страница 59: ...ideo memory contents are saved to a file in one contiguous space on the hard disk for later restoration As Dower saving increases response time decreases Power saving increases with each mode listed CPU Standby saves the least amount of power while Suspend to Disk mode saves the most You can enable any or all of these power saving modes by using a combination of automatic and manual power manageme...

Страница 60: ...ment screen allows you to select progressively longer timeout periods in which the system must be inactive before the computer enters CPU Standby mode Global Standby mode or either type of Suspend mode You can also do the following Disable any or all of the power savings modes Select Suspend to Memory or Suspend to Disk as your suspend mode Enable or disable the computer s ability to enter suspend...

Страница 61: ...n goes dark If the computer is in Suspend to Disk mode no icon appears before the screen goes dark The method you use to resume activity depends on the type of suspend mode you selected at the Power Management screen See Resuming Activity From Suspend Mode below for instructions on resuming from suspend mode Manual Features You can also enter the suspend mode you selected at the Power Management s...

Страница 62: ...s When you release the button or open the cover the LCD backlight comes back on Resuming Activity From Suspend Mode If you selected Suspend to Memory as your suspend mode you can press the Suspend Resume button above the Num Lock key to resume activity Then the Suspend icon disappears the hard disk spins up and the video screen comes back on If you selected Suspend to Disk as your suspend mode the...

Страница 63: ...es exit any application programs you are using and exit Windows Then press Ctrl Alt Del to reboot your computer Then select the option to load your PCMCIA card drivers at the prompt Using the APM Interface In addition to your computer s power management features your system supports the Intel Microsoft Advanced Power Management APM interface version 1 0 or higher This interface enhances your syste...

Страница 64: ...anagement features Allows MS DOS the computer s BIOS and your application programs to share power management features in the most efficient manner Note If you disable your computer s power management features APM is also disabled even if you have configured your software to use it Using Suspend to Disk Mode If you select Suspend to Disk as your suspend mode you must create a Suspend to Disk data f...

Страница 65: ...se any doubling software such as the MS DOS DRVSPACE utility or if you increase or decrease the size of your system memory See Recreating the Suspend to Disk data file on page 3 19 for instructions Creating the Suspend to Disk data file To create a Suspend to Disk data file follow these steps 1 If necessary exit Windows to the MS DOS prompt 2 Log onto the C PM directory 3 Type the following at the...

Страница 66: ...spend To Disk File Allocated Failed to open taporary file Disk too fragmented targets contiguous area nnn sectors If you see the last message check the hard disk drive for any files you don t need then delete them Then run the MS DOS DEFRAG EXE utility to defragment your hard disk drive See your on line MS DOS help utility for instructions 6 When your system reboots you see the following message S...

Страница 67: ...pecified a large enough Suspend to Disk data file and have enough room on the hard disk drive for the file Note If you see the following error message when your system attempts to enter Suspend to Disk mode you must run the MS DOS DEFRAG EXE utility to defragment your hard disk drive Suspend to Disk Disabled Suspend to disk file not contiguous Then run 0VMAKFIL EXE as described above to recreate t...

Страница 68: ...ibed below Follow these steps 1 If necessary exit Windows to the MS DOS prompt 2 Log onto the C PM directory 3 Type the following at the MS DOS prompt and press Enter to remove the existing Suspend to Disk data file OVMAKFIL R You see the following message D e l e t e d E x i s t i n g S u s p e n d T o D i s k D a t a F i l e 4 Type the following utility DEFRAG C and press Enter to run the DEFRAG...

Страница 69: ...d Expansion memory module Hard disk drive Connecting an External Monitor The VGA port on the back of your computer allows you to connect an external color or monochrome VGA monitor Follow these steps 1 Make sure both the computer and monitor are turned off 2 If necessary connect the monitor cable to the monitor 3 If necessary open the port cover on the back of the computer Installing Optional Devi...

Страница 70: ...If you selected L C D you must press Fn F12 to change the display to the external monitor If you selected BOTH available with active matrix or monochrome LCDS you see a display on the external monitor and LCD simultaneously and may want to press Fn F12 to change the display to the external monitor only If you are using an external keyboard press Ctrl Alt F12 to change the display mode Be sure to r...

Страница 71: ...or scanner Before you connect the device check its manual to see if you need to change any of its settings You may also need to change the Parallel Mode option in the SCU to match the mode for your device See Chapter 1 for more information Then follow these steps 1 Make sure the computer and the parallel device are turned off then place the device near your computer 2 If necessary open the port co...

Страница 72: ...electrical outlet Connecting a Serial Device You can use the RS 232C serial port to connect a serial device such as a serial printer plotter or mouse Follow these steps 1 Make sure both the computer and the serial device are turned off 2 If necessary connect the serial cable to your serial device 3 If necessary open the port cover on the back of the computer 4 Connect the serial cable to the compu...

Страница 73: ...hat provides the best error detection Also check the documentation that came with your serial device to see if you need to adjust any of the device settings Your computer s default setting for the serial port is COM2 the trackball is COM1 and the PC card slots are COM3 If you want to change the serial port setting to COM4 run the System Configuration utility as described in Chapter 1 Make sure you...

Страница 74: ...mediately after connecting it If you connected an external pointing device you must disable the computer s built in trackball using the SCU before you can use the device See Chapter 1 for instructions Before you can use a pointing device with your applications you may need to install the special software driver that came with it See the documentation supplied with the device for instructions 4 6 I...

Страница 75: ...the Intel ExCaT M standard for hot insertion which means the system recognizes a PC card inserted into a card slot with the computer turned on The upper PC card slot is slot O and the lower slot is slot 1 If you install a Type III PC card you must install it in slot 1 Follow these steps to install a PC card 1 Open the door covering the PC card slots on the left side of your computer 2 Hold the PC ...

Страница 76: ...ution Do not change the setting of a memory PC card s write protect switch while the card is installed in the computer or you may damage the card First eject the card then change the switch setting and reinsert it See Chapter 2 for instructions on configuring your PC card s Installing a Memory Module Your computer comes with at least 4MB of memory soldered on the system board If your computer s st...

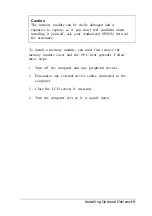
Страница 77: ...icer for assistance To install a memory module you must first remove the memory module cover and the CPU heat spreader Follow these steps 1 2 3 4 Turn off the computer and any peripheral devices Disconnect any external device cables connected to the computer Close the LCD screen if necessary Turn the computer over so it is upside down Installing Optional Devices 4 9 ...

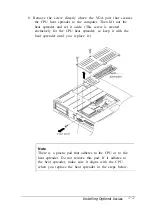
Страница 78: ...with the cover until you replace it 6 Lift off the cover and set it aside 7 Beneath the cover is a black metal CPU heat spreader with holes in it To remove it first open the door covering the ports on the back of your computer Caution The CPU heat spreader may be hot if the computer has been running recently You may want to use a cloth to protect your hands as you follow the next step 4 10 Install...

Страница 79: ... is created exclusively for the CPU heat spreader so keep it with the heat spreader until you replace it Note There is a plastic pad that adheres to the CPU or to the heat spreader Do not remove this pad If it adheres to the heat spreader make sure it aligns with the CPU when you replace the heat spreader in the steps below Installing Optional Devices 4 11 ...

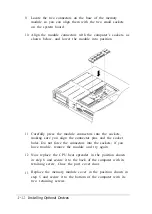
Страница 80: ...sockets making sure you align the connector pins and the socket holes Do not force the connectors into the sockets if you have trouble remove the module and try again Now replace the CPU heat spreader in the position shown in step 8 and secure it to the back of the computer with its retaining screw Close the port cover door Replace the memory module cover in the position shown in step 5 and secure...

Страница 81: ...ould recreate the Suspend to Disk data file on your computer s hard disk drive so its size corresponds to your new memory size See Using Suspend To Disk Mode in Chapter 3 for instructions Removing and Replacing the Hard Disk Drive If you need to remove the hard disk drive follow these steps 1 Turn off the computer and any peripheral devices 2 Disconnect any external device cables connected to the ...

Страница 82: ...e hard disk drive cover to the bottom of the computer These screws are created exclusively for the hard disk drive cover so keep them with the cover until you replace it 7 Lift off the cover and set it aside 4 14 Installing Optional Devices ...

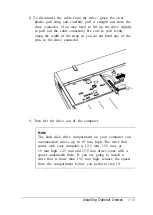
Страница 83: ...end any of the pins in the drive connector 9 Then lift the drive out of the computer Note The hard disk drive compartment on your computer can accommodate drives up to 19 mm high The drive that comes with your computer is 12 5 mm 15 5 mm or 19 mm high 12 5 mm and 15 5 mm drives come with a spacer underneath them If you are going to install a drive that is more than 15 5 mm high remove the spacer f...

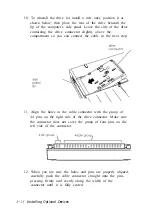
Страница 84: ... cable in the next step 11 Align the holes in the cable connector with the group of 44 pins on the right side of the drive connector Make sure the connector does not cover the group of four pins on the left side of the connector 12 When you are sure the holes and pins are properly aligned carefully push the cable connector straight onto the pins pressing firmly and evenly along the width of the co...

Страница 85: ...ong its edge into the three slots in the computer case Then secure it with its two retaining screws 15 Replace the CPU heat spreader and memory module cover by reversing steps 5 through 8 on pages 4 10 and 4 11 16 Run the System Configuration utility as described in Chapter 1 to automatically configure or reconfigure your drive Installing Optional Devices 4 17 ...

Страница 86: ...4 18 Installing Optional Devices ...

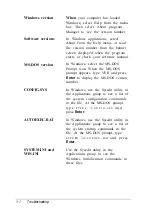
Страница 87: ...equest technical assistance be ready to provide the serial number of your computer its system BIOS version number its configuration including the types of disk drives and options and the names and version numbers of any software programs you are using Use these guidelines to gather information about your system Serial number Look on the underside of the computer to find the serial number System BI...

Страница 88: ... type VER and press Enter to display the MS DOS version number CONFIG SYS In Windows use the Sysedit utility in the Applications group to see a list of the system configuration commands in the file At the MS DOS prompt type T Y P E c C O N F I G S Y S a n d press Enter AUTOEXEC BAT In Windows use the Sysedit utility in the Applications group to see a list of the system startup commands in the file...

Страница 89: ...e problem If the error is serious the computer cancels further checking and halts system initialization The error message remains on the screen and the computer locks up If this happens contact your Authorized EPSON Servicer or the EPSON Connection to report the problem The Computer Won t Start If your computer does not start when you press the power button try the following 1 Check the AC Power B...

Страница 90: ...utton to resume See Chapter 3 for more information 2 If the Battery Status icon is empty and blinking the battery power is very low If you have a second battery that is fully charged first turn off your computer then use the second battery to replace the one in the computer If the computer then works properly you need to recharge the other battery See Chapter 3 for instructions 3 If you replace th...

Страница 91: ...new battery Note When you need to discard your battery contact your local government agency for recycling information AC Adapter Problems If the computer does not work with the AC adapter check the adapter s power light and AC Power icon in the computer s System Window If they are not on try the following 1 Disconnect the AC adapter and then reconnect it 2 Make sure the AC adapter is securely conn...

Страница 92: ... a specified period of time has clap sed with no system activity Press any key to restore the display See Chapters 1 and 3 for information about the power management options and Chapter 2 for information on the ChipsCPL utility 3 Use the brightness and contrast key commands to adjust the screen display The contrast adjustment has no effect on active matrix screen s See Chapter 2 for instructions 4...

Страница 93: ... computer again 4 Check the monitor setting to make sure the correct one is selected Some computers can accept input from two computers 5 You may have switched your display to LCD mode Press Fn F12 until you see the display on your external monitor Make sure the default display selected in the SCU Display Mode option and the setting in the Windows ChipsCPL utility are correct for your system See C...

Страница 94: ...your computer is in Suspend to Disk mode it may not have enough power to boot your system when you press the power button to resume Connect the AC adapter or install a spare charged battery then press the power button You may be able to resume activity by canceling the current operation If you are executing an MS DOS command try pressing Ctrl C or Ctrl Break In Windows press Ctrl Alt Del to reset ...

Страница 95: ...ord call the EPSON Connection for assistance Embedded Keypad Problems If you have trouble using the embedded keypad or any of the keys involved with the keypad review the information in Chapter 2 If you have accidentally locked the keypad the Embedded Keypad Locked icon appears in the System Window Press Fn Num Lock to unlock it Trackball Problems If your trackball is not working properly check th...

Страница 96: ... when necessary PS 2 compatible drivers for Windows and MS DOS applications are already installed on your system 2 Did you disable the computer s built in trackball in the System Configuration utility If not you must disable it in order to use an external pointing device with your computer See Chapter 1 for instructions 3 Is the external device connected properly Make sure you connected it to the ...

Страница 97: ...diskette does not contain files you do not want to change or lose Then move the switch to remove the write protection Ordinarily it s a good idea to leave program diskettes write protected but some programs don t work properly using write protected diskettes 4 Is the diskette formatted A new diskette must be formatted before you can store data on it See your MS DOS on line help utility or your on ...

Страница 98: ...nusual noises stop the current operation immediately and contact your Authorized EPSON Servicer or the EPSON Connection Hard Disk Problems If you have problems with your hard disk drive check the following 1 If you have set an inactivity time period in the Hard Disk option on the Power Management screen and the drive powered down the hard disk may still be coming back up to speed Your drive needs ...

Страница 99: ... can run at either high speed or low speed While almost all programs work properly at high speed some must run at the slower speed Check your software manual to see if this is the case and change the CPU speed if necessary See Chapter 2 for instructions 4 If you have entered an MS DOS command that you want to stop press Ctrl C or Ctrl Break If you are using Windows press Ctrl Alt Del to reset the ...

Страница 100: ...ms feeding paper check the printer manual for the correct DIP switch settings and for serial operation settings Memory Module Problems If you have trouble with memory you have added to your system check the following 1 Make sure the power on diagnostics memory count and the SCU are displaying the correct amount of memory See Chapter 1 for more information 2 Did you insert the memory module correct...

Страница 101: ... any PCMCIA card and socket services that you loaded and initialized before you suspended to disk are not reloaded or reinitialized after you resume Your computer may recognize SRAM PC cards but it will not recognize most other PC cards To reload and reinitialize these services exit any application programs you are using and exit Windows Then press Ctrl Alt Del to reboot your computer Select the o...

Страница 102: ...ct the AC adapter when you use a LAN PC card because these cards consume a lot of power 7 Is your PC card compatible with the ActionNote The PC card slots in your computer support PCMCIA version 2 1 or earlier and accept up to two Type I or II cards or one Type III card If you aren t sure your card is compatible call the EPSON Connection to ask about tested cards 8 Did you run the MS DOS MEMMAKER ...

Страница 103: ... through keyboard commands 4MB or 8MB RAM standard on the system board expandable to 8MB 12MB or 20MB using a 4MB 8MB or 16MBmemory module 128KB Flash ROM device containing the system and VGA BIOS and System Configuration utility code 512KB DRAM supports resolutions up to 640 x 480 in 256 colors on the color LCD and up to 1024 x 768 in 16 or 800 x 600 in 256 colors on an external monitor Supports ...

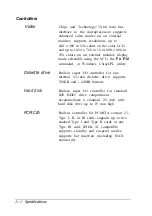
Страница 104: ...ChipsCPL utility Diskette drive Built in super I O controller for one internal 3 5 inch diskette drive supports 720KB and 1 44MB formats Hard disk PCMCIA Built in super I O controller for standard IDE HDD drive compartment accommodates a standard 2 5 inch wide hard disk drive up to 19 mm high Built in controller for PCMCIA version 2 1 Type I II or III cards supports up to two stacked Type I and Ty...

Страница 105: ...in mini DIN connector keyboard for a PSI 2 type external keyboard mouse keypad mouse or other pointing device Keyboard 85 86 keys 101 102 key keyboard compatible embedded keypad support for hot key commands Trackball Built in 16 mm serial trackball with two buttons Mass Storage Hard disk drive One internal 2 5 inch long 12 5 mm to 19 mm high IDE hard disk drive SCU automatically detects standard I...

Страница 106: ...Alt S at system startup or at MS DOS prompt includes power management features Size 5 3 inches L x 2 8 inches W x 1 5 inches H 136 mm L x 72mm W x 37 mm H Weight 13 5 ounces 380 grams AC cable length 6 ft 1 8 meters DC cable length 39 in 1 meter Input voltage 100 VAC to 250 VAC autosensing Input frequency 40 to 63 HZ Output voltage 17 VDC with 2 Amp maximum and 20 VDC with 1 05 Amp maximum Battery...

Страница 107: ...0 ft 67 to 4 000 m Non operating 4 to 140 F 20 to 60 C 5 to 95 200 to 30 000 ft 47 to 10 000 m Caution When traveling by airplane take the computer into the passenger compartment as carry on luggage to prevent it from being stored in an unpressurized storage compartment Physical Dimensions Model Depth Width Height Weight inches mm inches mm inches mm lb kg Monochrome 8 6 219 11 279 1 75 44 5 5 8 2...

Страница 108: ...odules External keyboard External numeric keypad Additional NiMH batteries External battery charger Automobile cigarette lighter adapter Additional AC adapter PCMCIA cards including Flash RAM SRAM Hard disk modem fax modem LAN cards etc A 6 Specifications ...

Страница 109: ...ecifications A 4 using 3 2 9 Battery Low option 1 16 3 3 Beeps configuring BIOS 5 1 Bidirectional parallel port see Parallel port Boot drive 1 12 Brightness 2 4 5 7 C Cache 1 13 A 1 Calendar A 1 Caps Lock icon 1 7 ChipsCPL utility 2 13 5 6 7 Clock real time A 1 CMOS RAM 1 8 A 1 CompuServe Intro 6 2 15 Computer caring for 2 l 2 dimensions A 5 features Intro 1 power button 1 5 6 5 3 powering 3 1 20 ...

Страница 110: ...rnal keyboard configuring 4 6 connecting 4 5 6 port specifications A 3 problems 5 10 11 External monitor connecting 4 1 3 problems 5 7 resolutions A 2 specifications A 3 switching display 2 5 2 13 4 2 3 F Fn key functions 1 6 2 3 5 G Global Standby option 1 16 H Hard disk drive activity icon 1 7 2 2 backup 1 8 configuring 1 11 4 17 controller A 2 power management option 1 17 problems 5 12 13 prote...

Страница 111: ... 2 4 5 6 connecting serial 4 4 5 driver 2 6 5 10 port specifications A 3 problems 5 10 11 utilities 2 7 N NiMH see Battery Num Lock configuring default mode 1 11 icon 1 7 key functions 2 3 2 5 6 O On line documentation Intro 2 Options available A 6 installing 4 1 18 0S 2 1 6 P Parallel port configuring 1 11 4 3 device connection 4 34 specifications A 3 Passwords changing 1 13 15 deleting 1 13 15 e...

Страница 112: ... 5 14 Processor speed 2 9 5 13 A 1 R RAM 5 3 A 1 Real time clock A 1 Resetting the computer 2 9 ROM 1 8 5 3 A 1 S Safety instructions see iii iv at front of manual Scanner 4 34 Scroll Lock icon 1 7 Serial number 5 1 Serial port address 4 5 configuring 1 11 3 3 4 5 device connection 4 4 5 specifications A 3 Shadow RAM A 1 Software pre installed Intro 2 problems 5 13 support Intro 2 version numbers ...

Страница 113: ...pematic rate 1 12 when to run 1 9 System Window 1 4 1 7 3 2 3 8 3 13 4 8 System identifying 1 2 5 l 2 SYSTEM INI file 5 2 T Temperature A 5 Text conventions Intro 4 Text mode enhancement 2 4 Time 1 11 Trackball cleaning 2 8 compatibility 2 6 configuring 1 11 2 7 4 6 drivers 2 6 problems 2 2 2 8 5 9 11 specifications A 3 using 2 6 8 Travel precautions 2 2 Troubleshooting 5 1 17 Turning computer on ...

Страница 114: ...ica Miami FL USA Tel 305 265 0092 Fax 305 265 0097 Epson Argentina S A Buenos Aires Argentina Tel 541 322 6898 Fax 541 322 9725 Epson Chile S A Santiago Chile Tel 562 232 8966 Fax 562 233 3197 Epson Costa Rica S A San Jose Costa Rica Tel 506 234 6666 Fax 506 225 5709 Epson Mexico S A De C V Mexico D F Mexico Tel 525 395 9944 Hotline 91800 50326 Fax 525 395 9499 Epson Do Brasil Silo Paulo SP Brazil...

Отзывы: