background image


32


Connecting to a PC


Here’s how to copy F-1 materials to a PC connected to the network.


Cautions Regarding File Sharing


The F-1 cannot have a password set for “File Sharing.” For this reason, please do not use the 
PC file sharing feature on a network environment where unexpected access to the internet 
may occur.


Network Settings


1


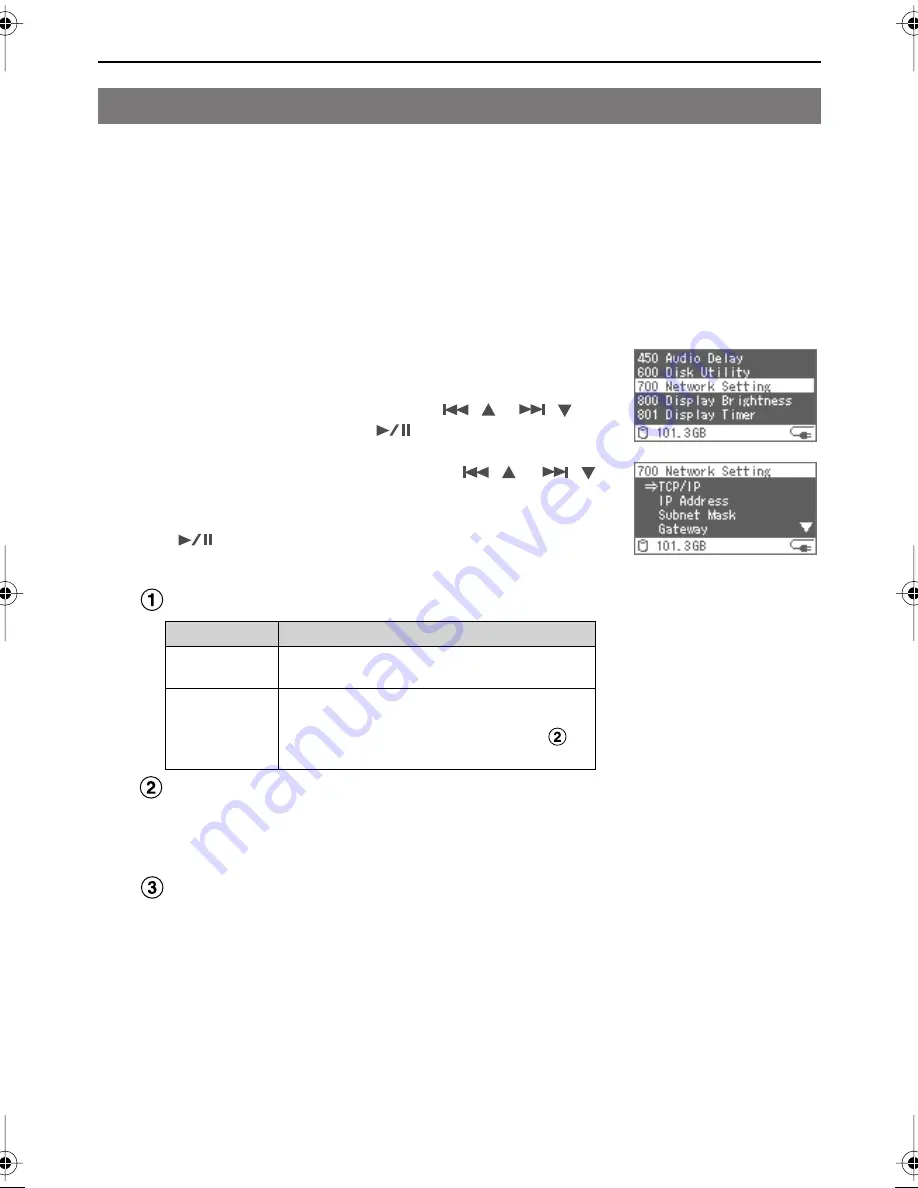
Press the [MENU] button to access the Menu screen, 
and select the “Network Setting.”


Select the “Network Setting” with the [

(

)] [

(

)] 

buttons, and then press the [

(ENTER)] button.


2


Select the following items with the [

(

)] [

(

)] 

buttons and then configure them.


After configuration, confirm each setting with the 
[

(ENTER)] button.

* “Host Name” cannot be changed.


Select the “TCP/IP” configuration method.

Input the “IP Address,” “Subnet mask,” and “Gateway” 

addresses.


Please check with the network administrator about each of 
these addresses.


Set the “Port Number.”


Set this when remotely controlling the F-1 from a PC.

Set the same number as the number set on the “F-1 Net 
Control” remote control software (p. 33).

The port number is selected from “50000” to “50003.”

Please check with the network administrator for the port that is 
used.


Copying F-1 Materials over a Network


Value

Description


Manual

When the IP address used for the network is 
specified by the network administrator.

DHCP

When the IP address is assigned automatically 
by the router.
When set to “DHCP,” the setting in step 2-

 is 

unnecessary.

F-1_v2_e.book 32 ページ 2009年4月17日 金曜日 午前10時47分

Содержание F-1

Страница 1: ...NIT SAFELY p 6 8 IMPORTANT NOTES p 9 10 and An Important Notice Regarding the Software p 64 67 These sections provide important information concerning the proper operation of the unit Additionally in order to feel assured that you have gained a good grasp of every feature provided by your new unit Owner s Manual should be read in its entirety The manual should be saved and kept on hand as a conven...

Страница 2: ...LAN cable Battery case Removable storage F1 HD120 120 GB Hard Disk Drive Owner s manual IMPORTANT THE WIRES IN THIS MAINS LEAD ARE COLOURED IN ACCORDANCE WITH THE FOLLOWING CODE BLUE BROWN As the colours of the wires in the mains lead of this apparatus may not correspond with the coloured markings identifying the terminals in your plug proceed as follows The wire which is coloured BLUE must be con...

Страница 3: ... can be inserted or removed Drives that has been removed can be connected to a PC with the included USB cable If you keep a number of storage units on hand and switch them as needed you can resume recording right away Two power systems DC 12V power supply AA battery operation The unit can be operated on a DC 12V power supply or by AA batteries Use them together for a redundant failover power suppl...

Страница 4: ...ng the Batteries 25 Setting Battery Type 26 Operating the Menu 27 F 1 Folder Structure 28 Copying F 1 Materials to a PC 29 Connecting the F 1 to a PC 29 Connecting the Removable Storage to a PC 30 The F 1 Utility 30 Disconnecting the PC 31 Copying F 1 Materials over a Network 32 Remotely Controlling the F 1 from the PC F 1 Net Control 33 Please read before using USING THE UNIT SAFELY 6 IMPORTANT N...

Страница 5: ... Setting the Record Mode for Capturing 46 Capturing using the F 1 s Internally Generated Timecode 48 Setting Peak Hold for the Audio Level Meter 49 Setting Stereo Monaural for WAV Files 49 Delaying Audio Output Audio Delay 50 Setting the Date and Time 51 Setting Material File Playback Mode 52 Setting the Time until the Display Turns Off Display Timer 53 Setting the Brightness of the Display 53 Set...

Страница 6: ...lectric shock 008e Use only the attached power supply cord Also the supplied power cord must not be used with any other device 009 Do not excessively twist or bend the power cord nor place heavy objects on it Doing so can damage the cord producing severed elements and short circuits Damaged cords are fire and shock hazards Used for instructions intended to alert the user to the risk of injury or m...

Страница 7: ...been exposed to rain or otherwise has become wet or The unit does not appear to operate normally or exhibits a marked change in performance 013 In households with small children an adult should provide supervision until the child is capable of following all the rules essential for the safe operation of the unit 014 Protect the unit from strong impact Do not drop it 015 Do not force the unit s powe...

Страница 8: ...or catch fire Before use carefully read the cautions printed on the battery as well as the owner s manual that accompanies the battery 103b At regular intervals you should unplug the AC adaptor and clean it by using a dry cloth to wipe all dust and other accumulations away from its prongs Also disconnect the power plug from the power outlet whenever the unit is to remain unused for an extended per...

Страница 9: ... or otherwise subject it to temperature extremes Excessive heat can deform or discolor the unit 355b When moved from one location to another where the temperature and or humidity is very different water droplets condensation may form inside the unit Damage or malfunction may result if you attempt to use the unit in this condition Therefore before using the unit you must allow it to stand for sever...

Страница 10: ...ation Do not set up the unit in any location where it may be affected by vibration from external sources or on any surface that is not stable Please do not block the cooling fan vent on the side panel Do not leave the unit in any environment subject to temperature extremes for example in a closed automobile in summer or outdoors during winter Do not use the unit in locations of high temperature or...

Страница 11: ... AC adaptor is cut off by a power outage the capture process will continue See Using Batteries p 24 for details 3 Attach the included ferrite cores to both ends of the i LINK cable Insert the i LINK cable in the ferrite core and close and press the ferrite core together until you hear a click Capturing by Connecting a HDV DV Camera Preparations Handle Removable storage AC adaptor included Power co...

Страница 12: ... button on the F 1 to turn on power The POWER lamp lights when power is turned on Please wait until the Home screen is displayed The status lamp lights according to the format of the connected camera It may take up to 10 seconds for the camera to be recognized 3 Press the REC button on the F 1 to start capturing video Press the STOP button to stop capture See Checking Captured Video and Audio p 15...

Страница 13: ... or damage to other devices always turn down the volume and turn off the power on all devices before making any connections Use a balanced XLR type connector for the AUDIO IN connector Please connect the device after verifying the wiring configuration The figure at left shows the AUDIO IN connector wiring 3 Set the switch on the side panel of the F 1 Use one of the following settings for the conne...

Страница 14: ... capture can take place continuously varies depending on the WAV Mode setting p 49 as follows When the time limit is reached capture will stop automatically The captured audio is saved into the following audio file format The factory default setting is to create stereo WAV files You can also create monaural WAV files for each channel See Setting Stereo Monaural for WAV Files p 49 for details To ca...

Страница 15: ...ume with the PHONES Level knob Press the STOP button to stop playback The timecode shown on the F 1 s display does not match the timecode shown on the HDV DV camera display This is due to a video delay equal to the time for digital processing by the HDV DV camera When listening to the audio there will be a delay between the video displayed on the HDV DV camera display and the audio output from the...

Страница 16: ...screens STOP Button p 12 14 15 Stops capture REC Button p 12 14 15 Starts the capture of the input HDV DV stream and audio REC Lamp This is illuminated during capture Front Panel HDV Lamp This lights when the device connected to the i LINK connector is in HDV format or MPEG 2 TS format DV Lamp This lights when the device connected to the i LINK connector is in DV format CH3 4 Lamp This lights when...

Страница 17: ...he AUDIO IN connector 3CH 4CH PHONES Level Knob p 15 This adjusts the volume of the output from the PHONES jack PHONES headphones Jack p 15 This connects the headphones This monitors the audio input to the AUDIO IN connector 3CH 4CH Current Screen Operation Home Screen Audio Level Screen Selects the previous file in the same folder Menu Screen Selects the previous menu item Changes the value of th...

Страница 18: ...emovable storage F1 HD120 can be inserted Open close detection switch This switch detects whether the rear cover is open or closed Do not touch the Open close detection switch touching it may cause malfunction LAN Connector p 33 This is used to connect to a PC via a network using a LAN cable F 1 materials can be copied to a PC connected to the network Cooling Fan Vent The internal cooling fan regu...

Страница 19: ...power is turned on GAIN Switch p 13 Sets the gain of the audio input from the AUDIO IN connector 48V Phantom Power Switch p 13 Turns the phantom power supplied to the AUDIO IN connector on off Set to ON when connecting a condenser microphone that requires phantom power Supplying phantom power to a dynamic microphone may result in damage Please thoroughly read the instruction manual for the device ...

Страница 20: ...ws each time the DISPLAY button is pressed When Home screen changes to Home screen the timecode and total time display locations are exchanged Menu Screen p 27 This screen switches between hide show each time the MENU button is pressed Home Screen During capture During capture with Stream Check p 45 enabled During standby During playback During playback pause During Capture Displays the video form...

Страница 21: ...ure Standby External Displays the timecode of the device connected to the i LINK connector Displays when no timecode is included in the input signal from the i LINK connector Internal Rec Run Displays the timecode internally generated by the F 1 Timecode will advance only during capture Internal Free Run Displays the timecode internally generated by the F 1 When the F 1 is powered up timecode will...

Страница 22: ...el knob on the front panel The level meter display is different depending on the menu WAV Mode setting p 49 Audio Level Screen During Capture Displays the elapsed time for capture During Standby Playback Displays the length of the material currently selected WAV Mode setting Audio Level Meter Display Stereo The AUDIO IN connector CH3 is L and CH4 is R Mono X 2 ...

Страница 23: ...ew seconds after power up is required before the unit will operate normally 1 Press the POWER button on the front panel 2 When the Power off message is displayed press the POWER button again To turn off power press the POWER button within five seconds of the message display Turning Power On Off Turning Power On Turning Power Off AC adaptor included Power cord included Lamp Power outlet Power conne...

Страница 24: ...ing on the frequency of use and use environment Remaining Battery Power Indication Shows the remaining battery power When the remaining battery power indication shows the batteries are depleted Please replace the batteries as soon as possible If you continue use when there is little power left in the batteries the power will eventually be cut off Please use the Battery Remaining Power Display as a...

Страница 25: ...e positive and negative terminals correctly 5 Replace the battery case into the F 1 6 Close the rear cover then lock it 7 Set the battery type Select the type of battery used from the Menu screen See Setting Battery Type on the next page for details Inserting the Batteries Battery case Do not allow any foreign metal objects to touch the terminals of the battery case Doing so may cause the batterie...

Страница 26: ...settings 1 Press the MENU button to access the Menu screen and select the Battery Type Select the Battery Type with the buttons and then press the ENTER button 2 Select the battery type with the buttons 3 Verify by pressing the ENTER button Setting Battery Type Value Description Alkaline Alkaline batteries Oxyride batteries Ni MH Nickel Metal Hydride Batteries External External battery ...

Страница 27: ...t a menu item with the buttons 3 Verify a selected menu item by pressing the ENTER button When the menu has many layers repeat steps 2 3 Changing Settings 1 The value of a setting is changed with the buttons 2 Confirm the value you wish to set by pressing the ENTER button Saving Changed Content When the value for a setting is confirmed by pressing the ENTER button the setting is saved in the F 1 s...

Страница 28: ...a PC that does not have QuickTime installed Please download the QuickTime application from the Apple website http www apple com quicktime download F 1 Folder Structure m2t Video file in MPEG 2 TS format that is created when capturing in HDV dv Video file in DV format that is created when capturing in DV wav Audio file in WAV format The following WAV files are created according to the WAV Mode sett...

Страница 29: ...age is displayed select the Yes with the buttons and then press the ENTER button 4 After the F 1 is detected by the PC copy the necessary materials After the F 1 is detected by the PC the screen at right is shown The detection can take several seconds Detection from the PC is as follows After reviewing F 1 Folder Structure on the previous page please copy the necessary files to the PC Mac Because ...

Страница 30: ... removable storage is recognized by the PC copy the necessary materials 3 Disconnect from the PC See Disconnecting the PC p 31 for how to disconnect The F 1 Utility browser editor is an application that lets you use your computer to audition and perform cut editing on material captured by the F 1 Please download it from the Roland Systems Group website http rolandsystemsgroup net F 1 Utility and F...

Страница 31: ...e select USB Mass Storage Device 4 Click on Stop in the dialog box 5 When the Stop a Hardware Device dialog box appears select the item indicating the F 1 and click on OK 6 When the following message is displayed unplug the USB cable connecting the F 1 and PC When the USB cable is unplugged the Home screen is shown on the F 1 s display Mac 1 Drag the F 1 s icon displayed on the desktop to the Dock...

Страница 32: ...irm each setting with the ENTER button Host Name cannot be changed Select the TCP IP configuration method Input the IP Address Subnet mask and Gateway addresses Please check with the network administrator about each of these addresses Set the Port Number Set this when remotely controlling the F 1 from a PC Set the same number as the number set on the F 1 Net Control remote control software p 33 Th...

Страница 33: ...g Check Host Name from the menu See the PC instruction manual for details on how to connect to the network The F 1 s workgroup name is WORKGROUP With Mac OS X you can access with smb F 1 Host Name 4 Copy F 1 materials to the PC After reviewing F 1 Folder Structure p 28 please copy the necessary files to the PC Please do not unplug the LAN cable or turn off the F 1 while files are being copied tran...

Страница 34: ... 2008 Selecting folders 1 Press the MENU button to access the Menu screen and select the Select Folder Select the Select Folder with the buttons and then press the ENTER button 2 Select a folder with the buttons 3 Confirm the choice by pressing the ENTER button The folder changes Deleting folders 1 Press the MENU button to access the Menu screen and select the Delete Folder Select the Delete Folde...

Страница 35: ...ons The name of the currently selected material file is displayed on the Home screen 2 Press the MENU button to access the Menu screen and select the Delete File Select the Delete File with the buttons and then press the ENTER button 3 Select the Delete with the buttons 4 Confirm the choice by pressing the ENTER button The material file is deleted Deleting Material Files Material file name ...

Страница 36: ...ss the POWER button two times to turn off power 2 Unlock the rear cover then open it 3 With the grooved side facing up insert the removable storage With the handle lowered firmly insert the removable storage until it reaches the back 4 Close the rear cover then lock it Removing 1 Press the POWER button two times to turn off power 2 Unlock the rear cover then open it 3 Grasp the handle of the remov...

Страница 37: ... removable storage is erased Please back up important data on a PC or USB mass storage device p 29 32 39 40 Please do not format the F 1 s removable storage with the PC The removable storage may become unusable Deleting All Data When all data on the removable storage is deleted a new folder is automatically created 1 Press the MENU button to access the Menu screen and select the Disk Utility Selec...

Страница 38: ... time to complete so please do not turn off the power When using the included removable storage F1 HD120 initialization takes about 50 minutes to complete Scans for corrupted files on the removable storage and repairs them When the internal drive check is performed files that have problems are repaired and the frequency of errors can be reduced 1 Press the MENU button to access the Menu screen and...

Страница 39: ...er Structure p 28 for details 1 Connect the USB mass storage device to the USB HOST connector 2 Press the MENU button to access the Menu screen and select the Disk Utility Select the Disk Utility with the buttons and then press the ENTER button 3 Select the Backup to USB Select the Backup to USB with the buttons and then press the ENTER button 4 Select the Yes with the buttons 5 Confirm the choice...

Страница 40: ...isk Utility with the buttons and then press the ENTER button 3 Select the Copy File to USB Select the Copy File to USB with the buttons and then press the ENTER button 4 Select the Yes with the buttons 5 Confirm the choice by pressing the ENTER button Copy starts This may take a while depending on the size of the material files The material files are stored in the root directory of the USB mass st...

Страница 41: ... the Format USB Select the Format USB with the buttons and then press the ENTER button 3 Select the Yes with the buttons 4 Confirm the choice by pressing the ENTER button Initialization begins Initialization takes some time to complete so please do not turn off the power Scans for corrupted files on the USB mass storage device and repairs them When the USB check is performed files that have proble...

Страница 42: ...necting 1 Connect the VGA display mouse to the F 1 as shown in the figure below The screen and mouse pointer are shown on the VGA display Please use a VGA display that supports analog RGB input 800 x 600 resolution Operating by Connecting a VGA Display and Mouse DISPLAY OUT connector VGA cable USB HOST connector VGA display Mouse ...

Страница 43: ...irst stop the playback then restart playback from the beginning of the file Using the Mouse Click on the radio button Name list Thumbnail list in the upper right of the VGA Screen to change the display Using the Menu Change the setting for the menu item File List VGA to change the display Folder Folder save location File File name Length Material length Format information etc Value Description Nam...

Страница 44: ...When the F 1 STOP button is pressed during Synchro Recording capture is stopped At the same time the Sync Rec setting is changed to Disable By setting a delay for audio to be captured you can correct the synchronization gap between audio and video at the time of capture Depending on the camera used the synchronization gap may differ for each capture so the desired results of the correction may not...

Страница 45: ...mera begins recording after awaking from a Sleep state or when the tape is exchanged 1 Press the MENU button to access the Menu screen and select the Stream Check Select the Stream Check with the buttons and then press the ENTER button 2 Select the Enable with the buttons 3 Verify by pressing the ENTER button If Stream Check is set to Enable the status indication will show sc during capture Dividi...

Страница 46: ...re you press the REC button Maximum file length Normal Rec From the start of capture to when you press the STOP button or until the maximum length of time over which a capture can take place has been exceeded Loop Rec The time specified by the Loop Length p 47 Pre Rec From the start of capture to when you press the STOP button or until the maximum length of time over which a capture can take place...

Страница 47: ... 3 Verify by pressing the ENTER button Normal Rec Loop Rec Pre Rec No Display Adjusting the Loop Recording Time Value Description 10 min When you capture with the Rec Mode p 46 set to Loop Rec video files of the specified length will be created 30 min 60 min Display screen If Rec Mode p 46 is set to Loop Rec the display will show a screen similar to the following Even if you press the DISPLAY butt...

Страница 48: ...lect the TimeCode Start Value with the buttons and then press the ENTER button 2 specify the timecode starting value with the buttons Set the hour minute second and frame Set the Hour with the buttons After verifying with the ENTER button the cursor moves to the Minute position Set the minute second and frame in the same way When the ENTER button is pressed with the cursor on the Frame position th...

Страница 49: ... p 14 a WAV file is created The number of channels of the created WAV file can be set to stereo or monaural 1 Press the MENU button to access the Menu screen and select the WAV Mode Select the WAV Mode with the buttons and then press the ENTER button 2 Select the number of channels for the WAV file with the buttons 3 Verify by pressing the ENTER button Setting Peak Hold for the Audio Level Meter V...

Страница 50: ...be corrected 1 Press the MENU button to access the Menu screen and select the Audio Delay Select the Audio Delay with the buttons and then press the ENTER button 2 Select the audio delay time with the button Set the third digit with the buttons After verifying with the ENTER button the cursor moves to the second digit Set the second and first digits in the same way When the ENTER button is pressed...

Страница 51: ...er period 1 Press the MENU button to access the Menu screen and select the Set Time Date Select the Set Time Date with the buttons and then press the ENTER button 2 Set the date and time with the buttons Set the year month date hour minute and second Set the Year with the buttons After verifying with the ENTER button the cursor moves to the Month position Set the month date hour minute and second ...

Страница 52: ...n An icon may be displayed at the bottom of the Home screen depending on the Playback Mode Setting Material File Playback Mode Value Description Single Plays the currently selected file only once Single Repeat Repeatedly plays the currently selected file Sequential Plays all files in the currently selected folder only once in order of the file names Playback begins with the selected file and stops...

Страница 53: ... button The display s brightness can be adjusted 1 Press the MENU button to access the Menu screen and select the Display Brightness Select the Display Brightness with the buttons and then press the ENTER button 2 Adjust the brightness with the buttons 3 Verify by pressing the ENTER button Setting the Time until the Display Turns Off Display Timer Value Description OFF The display is always on 2 s...

Страница 54: ... turn off even if no operations are performed within the set period of time 1 Press the MENU button to access the Menu screen and select the Auto Power OFF Select the Auto Power OFF with the buttons and then press the ENTER button 2 Select the time until the power turns off with the buttons 3 Verify by pressing the ENTER button Setting the Lamp Illumination Method Value Description OFF The lamps a...

Страница 55: ...ory default settings See Menu List p 62 for details on the factory default settings 1 Press the MENU button to access the Menu screen and select Factory Reset Select Factory Reset with the buttons and then press the ENTER button 2 Select the Yes with the buttons 3 Confirm the choice by pressing the ENTER button The F 1 s settings are restored to the factory default settings Setting the Language fo...

Страница 56: ...ess the MENU button to access the Menu screen and select the Codec Type Select the Codec Type with the buttons and then press the ENTER button 2 Select the desired type of codec with the buttons When this setting is changed the F 1 may need to be restarted depending on the value of the setting If Codec type is set to MPEG 2 TS the Pre record p 46 time 3 seconds will change depending on the bit rat...

Страница 57: ...ctor 1 Press the MENU button to access the Menu screen and select the SDI Audio Ch Select the SDI Audio Ch with the buttons and then press the ENTER button 2 Select the audio channels with the buttons 3 Verify by pressing the ENTER button MPEG 2 TS 35Mbps 6 5 hours 9Mbps 25 hours MPEG 2 TS 50Mbps 4 5 hours 12Mbps 18 5 hours MPEG 2 TS 8Mbps 28hours 2Mbps 112 5 hours Setting the Channels for SDI Emb...

Страница 58: ...ry settings can cause a problem in operation due to voltage drops Problems during Capture Problem Cause and Action Cannot perform capture Is the HDV DV stream being input If there is no HDV DV stream being input a capture will not start even if the REC button is pressed Is the removable storage inserted properly If the removable storage is not detected properly the Media is not exist error message...

Страница 59: ...1 There are also cameras that have a mode that automatically switches the HDV DV format Even if this mode is set you may not be able to play the stream on the F 1 Timecode is not output correctly Could you be capturing an HDV DV stream that does not include timecode If you capture an HDV DV stream without timecode the timecode won t be saved correctly in the dv or m2t file that is created As a res...

Страница 60: ...r longer than this the internal clock settings are reset If batteries are inserted as a backup power supply the internal settings can be maintained for a longer period p 24 1 To achieve storage of the maximum amount of power it takes 24 hours in the following state Connect the AC adapter or supply power or insert batteries Remaining battery power is not displayed correctly Does the Battery Type se...

Страница 61: ...down the power button for about four seconds to switch off the power Unplug the power cord from the electrical outlet If batteries are installed remove the battery case If the unit does not operate normally when the power is turned on again it may mean that the hard disk has been damaged In such instances consult your dealer or the nearest EDIROL Roland Service Center Note however that it may not ...

Страница 62: ...Rec Pre Rec 061 Loop Length Specifies the length of the files created by loop recording 10 min 30 min 60 min 100 TimeCode Mode Specifies the type of timecode that will be recorded in the video file during capture External Internal Rec Run Internal Free Run 110 TimeCode Reset 1 Resets the current timecode to the value specified by Timecode Starting Value 111 TimeCode Start Value Specifies the start...

Страница 63: ...the display brightness Level 0 5 7 801 Display Timer Sets the time until the display is turned off when there is no activity for a fixed amount of time OFF 2 sec 5 sec 10 sec 20 sec 810 LED Sets whether the POWER REC and Status Lamps are used OFF ON 830 Peak Hold Sets whether peak hold for a fixed time is used for the Audio Level Meter OFF ON 850 File List VGA Sets the display method for the file ...

Страница 64: ...or a refund or credit If you comply with these license terms you have the rights below 1 Use Rights You may use the software on the device with which you acquired the software 2 Additional Licensing Requirements and or Use Rights a Specific Use Roland SG Corporation designed this device for a specific use You may only use the software for that use b Other Software You may use other programs with t...

Страница 65: ... of the Remote Boot process and ii use the Remote Boot Installation Service only for deployment of the software to devices as part of the Remote Boot process and iii download the software to licensed devices and use it on them For more information please refer to the device documentation or contact Roland SG Corporation Internet Based Services Microsoft provides Internet based services with the so...

Страница 66: ...t for which you have a valid license c Misuse of Internet based Services You may not use these services in any way that could harm them or impair anyone else s use of them You may not use the services to try to gain unauthorized access to any service data account or network by any means 4 Windows Update Agent also known as Software Update Services The software on the device includes Windows Update...

Страница 67: ... merchantability fitness for a particular purpose and non infringement 12 Liability Limitations You can recover from Microsoft and its affiliates only direct damages up to two hundred fifty U S Dollars U S 250 00 You cannot recover any other damages including consequential lost profits special indirect or incidental damages This limitation applies to Anything related to the software services conte...

Страница 68: ... Type Connector x 2 Power 4 pin XLR Type Connector Left Side LAN Connector Ethernet 10 100Base Tx RJ45 Type Connector Display 128 x 64 dots Graphic OLED Power Supply DC 9 V AC Adaptor 9 16V 2 0A or HR15 51 x 8 or LR6 AA x 8 Max Operation time about 2 hour Nickel Metal Hydride Battery about 30 minutes Alkaline Dry Battery about 10 hour External IDX Endura10 Li Ion Battery Battery life will be chang...

Страница 69: ...69 Main Specification Dimensions are shown in millimeters Dimensions 111 61 179 4 5 ...

Страница 70: ...ount In addition the Endura Battery V Mount type from IDX Company Ltd can also be used 120 GB Hard Disk F1 HD120 This is a replacement for the removable hard disk 120 GB 64 GB Flash Storage F1 SSD64 This is a replacement for the removable flash storage 64 GB Carrying Bag CB F1 This bag was designed to hold and carry the F 1 unit and the removable storage You can also operate the F 1 while it is in...

Страница 71: ...1 Video and Audio 13 CB F1 70 Check Host Name 33 Check Int Drive 38 Check USB 41 Clear Int Drive 37 Clip lamp 14 Codec Type 56 Computer Connecting 29 Copying 29 Disconnecting 31 F 1 Net Control 33 F 1 Utility 30 Network connection 33 Network settings 32 Remotely controlling 33 Copy File to USB 40 Copying 29 32 40 Create New Folder 34 D Date setting 51 Delay 50 Delete File 35 Delete Folder 34 Delet...

Страница 72: ...gth 47 LoopRec folder 46 Loop Record 46 M m2t file 28 Marker 12 Material files Backing up 39 Copying 29 32 40 Deleting 35 Deleting all data 37 material folder 28 Menu Factory Reset 55 List 62 Operations 27 Screen 27 Monaural WAV file 28 49 Mouse operations 42 N Network Connection 33 Copying 32 F 1 Net Control 33 Remotely Controlling 33 Settings 32 NTFS format 38 41 O Optional accessories 70 P PC C...

Страница 73: ...41 SDI Audio Ch 57 SDI embedded audio 57 Select Folder 34 Set Time Date 51 sph file 28 Stereo WAV file 28 49 Storage See Removable storage See USB mass storage Stream Check 45 Subnet Mask 32 Synchro record feature 44 Sync Rec 44 T TCP IP 32 Time Date 51 Timecode Mode 48 Reset 48 Start Value 48 Time setting 51 U USB mass storage Backing up 39 Copying files 40 Initializing Formatting 41 Scanning 41 ...

Страница 74: ...For China For EU Countries ...

Страница 75: ...ich can be determined by turning the equipment off and on the user is encouraged to try to correct the interference by one or more of the following measures Reorient or relocate the receiving antenna Increase the separation between the equipment and receiver Connect the equipment into an outlet on a circuit different from that to which the receiver is connected Consult the dealer or an experienced...

Страница 76: ...r 28 2 tr S 131 30 Nacka SWEDEN TEL 0 8 702 00 20 BRAZIL Roland Brasil Ltda Rua San Jose 211 Parque Industrial San Jose Cotia Sao Paulo SP BRAZIL TEL 011 4615 5666 Other CENTRAL LATIN AMERICA Roland Systems Group U S 425 Sequoia Drive Suite 114 Bellingham Washington 98226 USA TEL 360 594 4282 AUSTRIA GERMANY ITALY IRELAND UNITED KINGDOM EDIROL Europe Ltd Studio 3 4 114 Power Road London W4 5PY U K...

Отзывы: