


RS4203 Manual
Chapter 10 - Clipper and Looper Operation and Adjustments
Rev 32, 01/11/13
Copyright © 2013, Tipper Tie, Inc., All rights reserved
73
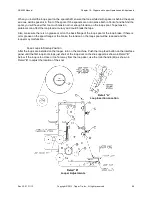
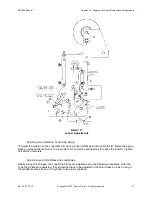
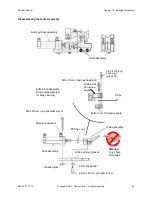
Loop Brake and Lower Loop Strip Plate Feed Position Adjustment
The Loop Brake and the Lower Loop Strip Plate are positioned as shown in Detail “D” on the previous
page. In the Loop Feed Position, the Lower Loop Strip Plate is .200 from the Tape Backup Plate. To
change the position, adjust clevis
N
on the Loop Brake Cylinder as shown in Detail “C”. The loop brake
has a tab on the back that lifts the lower loop strip plate into position when the brake releases and the
loop is being fed into the die support.
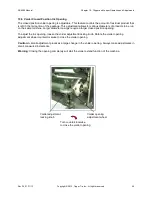
Loop Door Gap Adjustment
The loop door gap adjustment is very important. If the gap is too small, the knot on the loop may pull out
from under the clip or damage the loop. If the gap is too big, the loop may not have enough tension on the
loop. Without enough tension, the loop end may come out from under the clip or the loop knot may end
well away from the clip.
Set the gap on the loop door as shown in Detail “F” below. Loosen the jam nut on set screw
S
.
Screw the
set screw in to increase the gap. Screw the set screw out to decrease the gap. When the adjustments are
complete, tighten the jam nut.
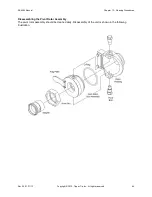
Knot Hold Door Gap Adjustment
The Knot Hold Door gap adjustment is also critical. If the gap is too big, the loop may pull out of the
window when the clipper swings out to the clip position. If the knot door goes too far past the loop window
it could damage the loop.
To set the gap on the Knot Hold Door, adjust clevis
T
on the Loop Knot Door Cylinder as shown in Detail
“G”. The door should be flush with the bottom of the loop window in the die support.
Detail “G”
Knot Hold Door Gap Adjustment
Detail “F”
Loop Door Adjustment


