


RS4203 Manual
Chapter 10 - Clipper and Looper Operation and Adjustments
Rev 32, 01/11/13
Copyright © 2013, Tipper Tie, Inc., All rights reserved
70
Adjusting Loop Insertion Distance
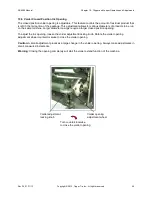
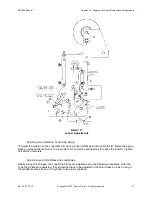
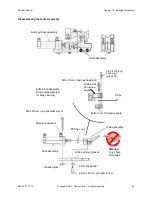
To adjust the loop insertion distance, refer to Detail “B” for the initial setup. Loosen roller handle
H
, and
center it in its slot. Tighten roller handle
H
. Loosen knurled handle
G
. Pull the index sprocket wheel
towards you to loosen it on the tapered shaft. Rotate the index sprocket wheel
clockwise
to move the loop
knot closer to the loop door. Rotate the index sprocket wheel
counterclockwise
to move the loop knot
away from the loop door. When the loop knot is in the correct position, tighten knurled handle
G
.
After this initial adjustment is complete, use roller handle
H
to adjust the loop knot location whenever an
adjustment is required. Loosen roller handle
H
, and raise the roller to move the knot closer to the loop
door. Move the roller down to move the knot away from the loop door. Tighten handle
H
when complete.
Adjusting Loop Index Speed
The speed of the loop feed (loop feed index) should be fairly slow to prevent jerking of the tape. If you
feed the loop too fast, the tape will break. If you feed the loop too slow, the looper may stall. A flow control
is used to adjust the loop index speed.
Note: The speed of the looper does not affect the speed of the RS Machine. The loop is being fed while
the product is being stuffed and the voiders are closing and spreading, which allows plenty of time to feed
the loop.
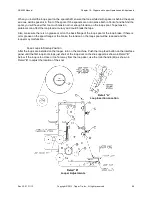
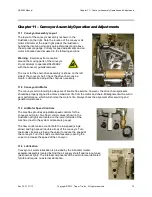
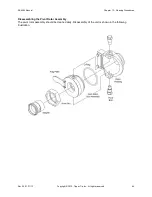
To adjust the loop index flow control, refer to Detail “C” on the next page. Remove the guard or open the
guard door to gain access to flow control
L
. Loosen the locking nut on flow control
L
. Turn the flow control
knob
clockwise
to slow the loop feed. Turn the knob
counterclockwise
to speed up the loop feed. When
the looper is adjusted to the proper speed, tighten the locking nut. If the locking nut is loose, the loop feed
speed could change while the machine is running.
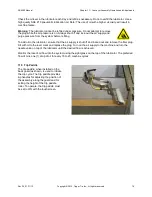
Adjusting the Loop Air Blast
The air blast helps guide the loop to the center of the Clipper Die Support loop window. The air blast
needs to blow fairly hard. Some loops have a tendency to veer off to the front or back of the loop window.
The air blast helps bring the loop back to the center of the loop window. If the air blast is not working or is
not blowing hard enough, a lot of loops will probably be missing. A flow control is used to adjust the air
blast.
To adjust the loop air blast flow control, loosen the locking nut on the inline, as shown in Detail “C” on the
next page. Turn the flow control knob
clockwise
to reduce the air blast. Turn the flow control knob
counterclockwise
to increase the air blast. The inline flow control should be metering out towards the air
blast block. When the air blast is set, tighten the locking nut on flow control
M
.
Adjusting Loop Spool Tensioning
Loop spools sometimes vary in width. Thus, you may have to adjust the spool shaft or the idler arm
tensioning spring to set the correct spool tension.
Adjusting Loop Spool Shaft
To adjust the loop spool shaft tension, loosen nut
K
as shown in Detail “C” on the next page. Rotate the
shaft by turning bar
J
as shown in Detail “B”. Rotate the shaft
clockwise
to increase the tension. Rotate
the shaft
counterclockwise
to decrease the tension. When the tension is properly adjusted, tighten nut
K
.


