


RS4203 Manual
Chapter 16 – Troubleshooting by Product Appearance
Rev 32, 01/11/13
Copyright © 2013, Tipper Tie, Inc., All rights reserved
108
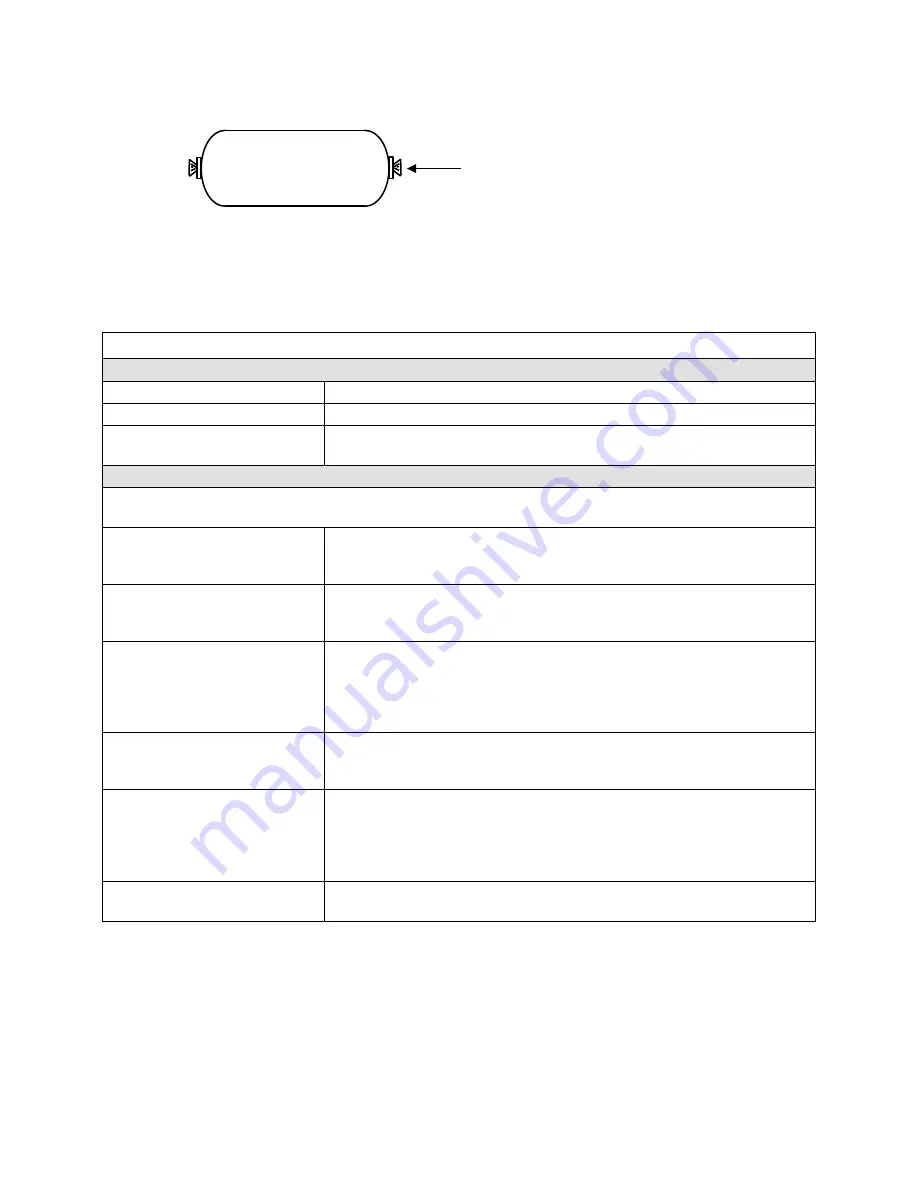
Adjust voider orifice wheel if needed. Turn wheel
clockwise
to loosen or increase the orifice. Turn wheel
counterclockwise
to tighten or reduce the orifice. Note: a small adjustment can make a large difference in
the orifice opening.
Cutting of casing may result from the following
PROBLEMS
SOLUTIONS
Over travel of punch
Adjust crimp stop to limit travel of punch.
Excessive air supply pressure
to clipper unit
Adjust air regulator for clipper to lower setting.
Improper gathering of the casing, which causes the clip to pierce through the casing, may be due
to the following:
Too large a voider orifice
results in too large a casing
rope
Turn voider adjustment wheel counterclockwise to reduce final voider
closing orifice.
Clipper not advancing far
enough onto casing rope
created by voiders.
Loosen and extend clipper drive tie rod to increase travel of clipper.
Casing rope should rest tightly down in, against back of clipper throat.
Too much residual or product
emulsion inside casing rope,
causing casing to rupture at
clips, when clips are applied,
just before knife is fired
If turning voider adjustment wheel clockwise as described above
does
not sufficiently eliminate product from rope, adjust orifice of movable
voider itself, so that its orifice is equal to or slightly larger than the orifice
of the stationary voider pair.
Punch entering die area with
clip before gate has fully
stabilized with casing rope
Increase gate-closed dwell.
Check gate solid state switch for proper adjustment.
Overstuffing to compensate for
excessive voider travel (too
great a distance between
second tie clip and movable
voider)
With clipper swung-in, adjust movable voider so that voider is within 1/8
inch of second tie die guard.
Over- or under- soaking of the
casing
Check casing manufacturer’s recommended soaking procedure and
follow accordingly. Use additional lubrication in the form of water.
CHECK FOR CLEAN CASING
ENDS OR TAILS.
SOME RESIDUAL PRODUCT IS
EXPECTED.


