


RS4203 Manual
Chapter 6 - Machine Operation
Rev 32, 01/11/13
Copyright © 2013, Tipper Tie, Inc., All rights reserved
37
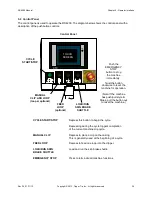
CTC
Parker
POW ER
Operator Interface
P
TOUCH
SCREEN
TOUCH
SCREEN
CYCLE
START/
STOP
MANUAL
CLIP AND
LOOP
(looper
optional)
FEED
LOOP
(optional)
LOAD/RUN
SKIN BRAKE
SHUTTLE
EMERGENCY
STOP
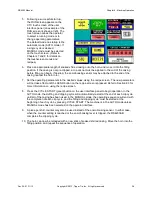
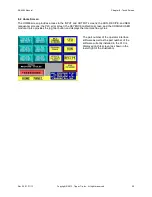
Control Panel
Chapter 6 – Machine Operation
6.1 Preparation
Before operating the machine, check all air connections. If they have become disconnected, reassemble
as shown in the pneumatic schematic. Adjust the incoming air to a pressure of 80 to 90 PSI (5,4-6,2 bar),
and check for any air leakage. If leakage is present, correct the problem before continuing.
When shipped, the main circuit breaker in the control box is in the OFF position. Turn the breaker ON.
Ensure the following steps are complete before starting the machine:
•
Clips and loops (optional) are installed
•
Guards are installed
•
Pivot installed with all seals
•
Horn installed
•
Skin brake assembly installed
•
Horn/rotor aligned with skin brake assembly
•
Fill tube connected to stuffer
•
Filler cable installed
•
End of casing switch reset
•
Main air supply connected
•
Electricity Connected
•
Main electrical disconnect to ON position
6.2 Starting the Machine
Complete the following steps in the order listed to
start the machine.
1. Rotate the main air supply lock-out valve
to the SUPPLY (ON) position.
2. On the control panel, twist the
EMERGENCY STOP button clockwise to
reset the machine.
3. After power has been applied,
move one of the guards from the
open to the closed position.
Note: When the EMERGENCY STOP
button is reset, the programmable logic
controller (PLC) performs a series of
startup functions. Opening and closing a
guard resets the safety circuit which
provides both pneumatic and electrical
supply to the power air valves. The clipper
and voider return to their ‘home’ positions.
4. Press the CYCLE START button once to
cycle the conveyor and put the machine in
the ‘ready for input’ state.


