
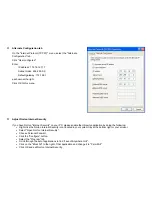


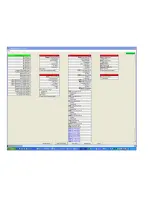


The Schematic View
You will open up the schematic of the AV equipment in the room. The schematic supports graphical entry of interconnects - as we will
see shortly.
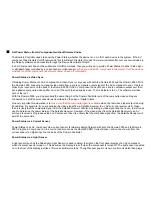
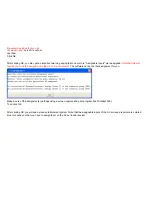
Before any equipment has been added to the room, you will just have the Domain Controller and any additional control ports that have
been added to the project (e.g., Global Cache, Lantronix, etc). In the example below, you see the control ports of the Domain 3000.
At the top of the menu, you see the "File" dropdown menu. Use this to
a copy of the schematic.
There are 4 buttons at the bottom of the menu. Here's what they do.
•
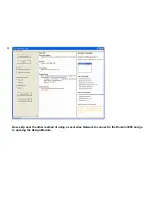
Click the "Whole House" button to see all of the AV components throughout the house. Use this view to connect AV and control
wires to distributed audio and video components. Once you are in the Whole House view,
you will not be able to add AV
components
to the rooms - just wire together existing components. If you only have one room of entertainment equipment in your
house, then there is no need to use this button.
•
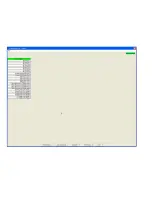
Click the "Add Component" button to add the AV components to
this room
of your project.
•
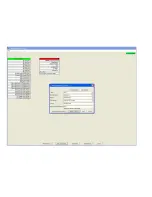
Click the "Preferences" button to modify the default set up created by the software for selecting sources and their paths to
displays and speakers. For more information, please see AV Preferences.
•
Click the "Done" button when you are finished making changes. The changes you make happen immediately. Therefore, the
Done button just closes the Schematic window.
Содержание Domain 3000
Страница 16: ......
Страница 21: ......
Страница 24: ......
Страница 29: ......
Страница 33: ...Red IR Control Yellow Power Sense Silver Serial...
Страница 34: ......
Страница 38: ......
Страница 39: ...Note that errors still exist If you click on the err of both components you will get the following...
Страница 40: ......
Страница 42: ......
Страница 44: ......
Страница 46: ......
Страница 48: ......
Страница 50: ......
Страница 52: ......
Страница 54: ......
Страница 55: ...Subwoofer wire added below...
Страница 56: ......
Страница 58: ......
Страница 60: ......
Страница 62: ......
Страница 64: ......
Страница 66: ......
Страница 68: ......
Страница 70: ......
Страница 72: ......
Страница 74: ......
Страница 76: ...Open the Entertainment Browser GUI Click on the Entertainment icon to open the Browser GUI Entertainment menu...
Страница 80: ......
Страница 87: ......
Страница 89: ......
Страница 91: ...Right click on Adobe PDF and select Set as Default Printer From the File drop down menu select Print...
Страница 93: ...The Adobe application will open if it was not already open and you will see the menu at the right Click OK...
Страница 95: ...Acrobat will now have the schematic Click File Print...
Страница 102: ......


