

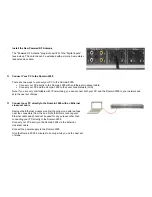


Open Find My Destiny (PC directly to the Domain 3000 with an Ethernet crossover cable)
From the Microsoft Windows "Start" button, select "All Programs", "Destiny Networks", "Ubiquity3.1", "Find My Destiny".
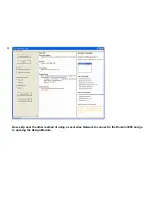
The "Find My Destiny" application will find the Domain 3000 and assist you in troubleshooting any problems you may run into.
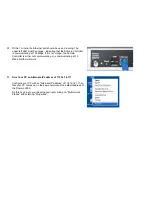
As shown in the screen shot below, the "Find My Destiny" application has three sections.
The middle section will tell you information about your PC and its connectivity to the network. It will analyze your PC to make sure
it is running the Microsoft Windows XP operating system, Microsoft Internet Explorer 6.0 and the Adobe Scalar Vector Graphics
(SVG) viewer (which was installed with our software). These should all have a green "OK" after them. It will also check your
Ethernet network interface card. If you are using the Ethernet crossover cable to connect your PC to the Domain 3000, then you
should see an IP address of 172.16.16.117 and this test should also have a green "OK" after it. Finally, it will test your Internet
connection. Note that Internet connectivity is not necessary for using Destiny Networks' products. If you are using the Ethernet
crossover cable to connect your PC to the Domain 3000, then this test will show a red "Not Available". Later, if you connect the
Domain 3000 to your home network, this information can be useful to see if your network is behaving properly.
The right section of the application will show you information about the Domain Controller and its connection to the network. when
the name of a Domain 3000 appears in the box on the upper right,
click on the name to select it
(for example, the name
"d3k_E11B" was clicked on in the example below). The name of the Domain 3000 consists of the "d3k" abbreviation of the product
plus the last 4 bytes of the MAC address of your particular unit. The MAC address is written on the back of the Domain 3000. You
must click on the name before proceeding to the next step. If the name does not appear, make sure your PC is connected to the
Domain 3000 via the special Ethernet crossover cable supplied in the box and that the Domain 3000 power supply is plugged in.
Soon after clicking on the name of the Domain 3000, information about the Domain 3000 will appear below the box (you may have
to scroll the window to see it). You will see information about the Domain 3000's network connectivity and version of software.
Below those two things, you will see the boot up status of the Domain 3000. In the example below the status is "Browser interface
up and running". This is the final step and it means that the Domain 3000 is now fully up and running. If it says something else,
please wait for the Domain 3000 to finish booting up.
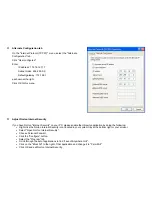
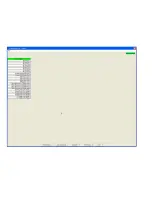
Since you are using the crossover Ethernet cable, then you will get the warning shown below about the missing DHCP server. You
can disregard the warning because you are connected directly to your PC, and, therefore, are not using a DHCP server.
Содержание Domain 3000
Страница 16: ......
Страница 21: ......
Страница 24: ......
Страница 29: ......
Страница 33: ...Red IR Control Yellow Power Sense Silver Serial...
Страница 34: ......
Страница 38: ......
Страница 39: ...Note that errors still exist If you click on the err of both components you will get the following...
Страница 40: ......
Страница 42: ......
Страница 44: ......
Страница 46: ......
Страница 48: ......
Страница 50: ......
Страница 52: ......
Страница 54: ......
Страница 55: ...Subwoofer wire added below...
Страница 56: ......
Страница 58: ......
Страница 60: ......
Страница 62: ......
Страница 64: ......
Страница 66: ......
Страница 68: ......
Страница 70: ......
Страница 72: ......
Страница 74: ......
Страница 76: ...Open the Entertainment Browser GUI Click on the Entertainment icon to open the Browser GUI Entertainment menu...
Страница 80: ......
Страница 87: ......
Страница 89: ......
Страница 91: ...Right click on Adobe PDF and select Set as Default Printer From the File drop down menu select Print...
Страница 93: ...The Adobe application will open if it was not already open and you will see the menu at the right Click OK...
Страница 95: ...Acrobat will now have the schematic Click File Print...
Страница 102: ......


