10
ENGLISH
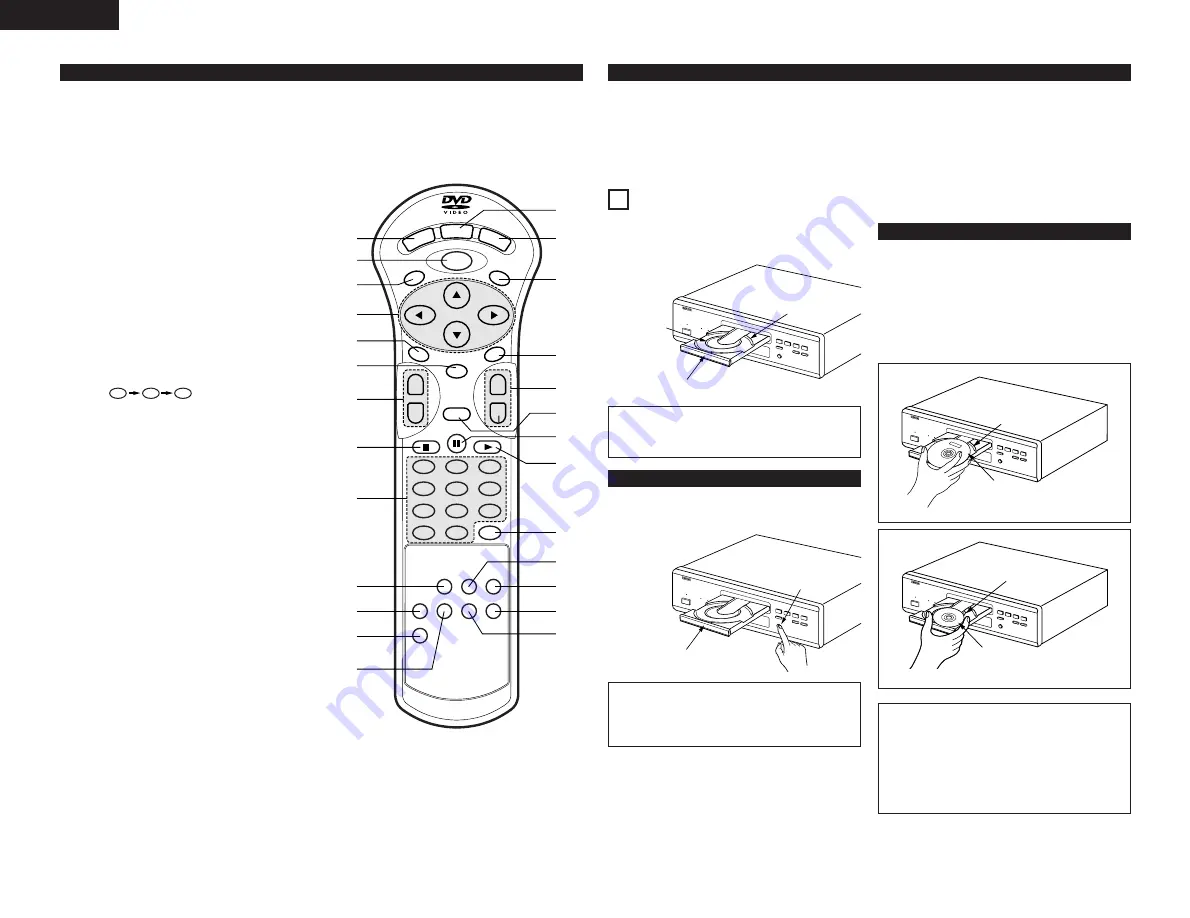
(3) Names and Functions of Remote Control Unit Buttons
q
POWER button (POWER)
Press this to switch the power between on and standby.
w
MENU button (MENU)
e
TOP MENU button (TOP MENU)
r
Cursor buttons (Cursor)
Use the
•
and
ª
buttons to select in the vertical
direction.
Use the
0
and
1
buttons to select in the horizontal
direction.
t
AUDIO button (AUDIO)
For DVDs, press this to switch the audio language. For
video CDs, press this to switch the channel between
“LR”, “L” and “R”.
y
ENTER button (ENTER)
Press the ENTER button to select the item selected with
the cursor buttons.
u
SKIP buttons (SKIP)
i
STOP button (
2
)
o
Number buttons
Use these to input numbers.
Use the +10 button to input numbers of 10 or over.
Example: To input 25
!0
PROGRAM/DIRECT button (PROG/DIRECT)
Press this to switch between the normal play,
programmed play.
!1
SET UP button (SET UP)
!2
V.S.S. button (V.S.S.)
Sets the virtual surround sound. (Functions when playing
DVDs recorded in Dolby Digital with two or more
channels.)
!3
REPEAT button (REPEAT)
Press this to play tracks repeatedly
!4
DISPLAY button (DISPLAY)
Press this to display the ON-SCREEN.
!5
OPEN/CLOSE button (OP/CL)
!6
SUBTITLE button (SUBTITLE)
Press this to switch the DVD’s subtitle language.
!7
ANGLE button (ANGLE)
Press this to switch the angle.
!8
SLOW/SEARCH buttons (SLOW/SEARCH)
!9
RETURN button (RETURN)
Press this to return to the previous menu screen.
@0
STILL/PAUSE button (
3
)
@1
PLAY button (
1
)
@2
CLEAR button (CLEAR)
Press this to clear numbers that you have input.
@3
CALL button (CALL)
Press this to check the program contents.
@4
RANDOM button (RANDOM)
Press this to play the tracks on the video or music in
random order.
@5
NTSC/PAL button (NTSC/PAL)
Use this to switch the set’s video output format
(NTSC/PAL).
@6
A-B REPEAT button (A-B REPEAT)
Use this to repeat sections between two specific points.
5
+10
+10
IMPORTANT SETUP INFORMATION
7
LOADING DISCS
2
Set discs in the disc tray with the labeled (printed) side
facing up.
8 cm disc guide
12 cm disc guide
Disc tray
NOTE:
• Do not move the DVD-2800 while a disc is playing.
Doing so may scratch the disc.
(1) Opening and Closing the Disc Tray
q
Turn on the power.
w
Press the OPEN/CLOSE button.
Disc tray
OPEN/CLOSE button
NOTES:
• Be sure to turn on the power before opening and closing
the disc tray.
• Do not strike on the button with a pencil, etc.
(2) Loading Discs
This set has the following presettings:
“DISC SETUP”, “OSD SETUP”, “VIDEO SETUP”, “AUDIO SETUP”, “RATINGS” and
“OTHER SETUP”.
These presettings have been preset upon shipment from the factory. If you wish to change them to suit your specific purposes,
refer to pages 19 to 25.
Figure 1
Outer disc tray
12 cm disc
Figure 2
Inner disc tray
8 cm disc
NOTES:
• If your foreign object is caught in the disc tray during
closing, simply press the OPEN/CLOSE button again and
the tray will open.
• Do not press the disc tray in by hand when the power is
off. Doing so will damage it.
• Do not place foreign objects in the disc tray. Doing so
will damage it.
• Pick up the disc carefully so as not to touch the signal
surface and hold it with the labeled side facing up.
• With the disc tray fully open, set the disc in the disc tray.
• Set 12 cm discs in the outer tray guide (Figure 1), 8 cm discs
in the inner tray guide (Figure 2).
• Press the OPEN/CLOSE button. The disc is automatically
loaded.
• The disc tray can also be closed automatically to load the
disc by pressing the PLAY button.
B
1
2
3
4
5
6
7
8
9
0
+10
CLEAR
ENTER
CALL
RANDOM
REPEAT
A-B REPEAT
NTSC/PAL
RETURN
ANGLE
AUDIO
MENU
SUBTITLE
TOP MENU
DISPLAY
OP/CL
POWER
SET UP
V.S.S.
REMOTE CONTROL UNIT
RC-546
PROG/DIRECT
SKIP
+
-
SLOW/SEARCH
+
-
q
!5
w
r
t
y
u
i
o
!6
!7
!8
!9
@0
@1
@2
@4
@5
@6
@3
!4
!0
!1
!2
!3
e


