


Parameter
Description
Type
●
Local: Connect through RS-485 port.
●
Remote: Connect through network by adding IP address of PTZ camera
to the Device.
Protocol
Select the protocol for the PTZ camera such as PELCOD.
Address
Enter the address for PTZ camera. The default is 1.
The entered address must be the same with the address configured on the
PTZ camera; otherwise the system cannot control PTZ camera.
Baud rate
Select the baud rate for the PTZ camera. The default is 9600.
Data Bit
The default value is 8.
Stop Bit
The default value is 1.
Parity
The default value is None.
Step 3
Click Apply.
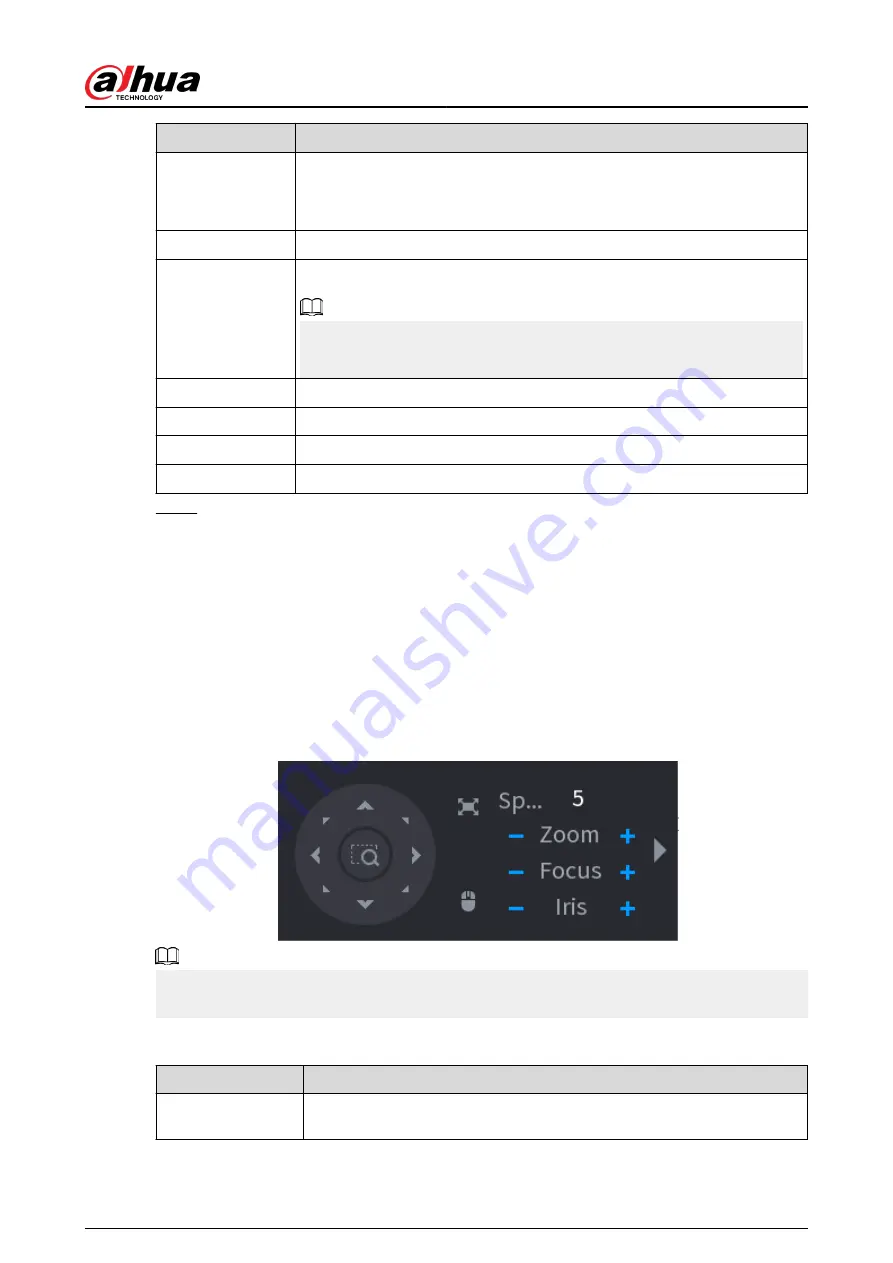
5.6.7.2 PTZ Control
You can use the PTZ control panel to perform the operations such as directing camera in eight
directions, adjusting zoom, focus and iris settings, and quick positioning.
Basic PTZ Control Panel
Right-click the live page, and then select PTZ Control.
Figure 5-37 Basic PTZ control panel
●
The gray button means system does not support current function.
●
For some model, the PTZ function is available only in one-window mode.
Table 5-13 PTZ control parameters
Parameter
Description
Speed
Controls the movement speed. The bigger the value, the faster the
movement.
User's Manual
150
Содержание DHI-NVR5432-EI
Страница 1: ...ZHEJIANG DAHUA VISION TECHNOLOGY CO LTD V2 3 4 Network Video Recorder User s Manual...
Страница 14: ...Appendix 4 Compatible Network Camera List 449 Appendix 5 Cybersecurity Recommendations 455 User s Manual XIII...
Страница 89: ...Figure 2 103 Alarm input port 1 User s Manual 75...
Страница 116: ...NVR21 S3 NVR21 P S3 NVR21 8P S3 NVR41 EI NVR41 P EI NVR41 8P EI Figure 3 47 Typical connection User s Manual 102...
Страница 118: ...S3 NVR21HS 8P S3 NVR41HS EI NVR41HS P EI NVR41HS 8P EI Figure 3 49 Typical connection User s Manual 104...
Страница 127: ...Figure 3 60 Typical connection 3 5 15 NVR616 4KS2 Series Figure 3 61 Typical connection User s Manual 113...
Страница 137: ...Figure 5 8 Unlock pattern login User s Manual 123...
Страница 152: ...Figure 5 23 AcuPick human detection User s Manual 138...
Страница 153: ...Figure 5 24 AcuPick motor vehicle detection Step 5 Configure the search conditions as needed User s Manual 139...
Страница 156: ...Figure 5 27 Shortcut menu 1 User s Manual 142...
Страница 184: ...Figure 5 59 Modify IP Step 7 Click Next Figure 5 60 Device initialization Step 8 Click Finished User s Manual 170...
Страница 217: ...Figure 5 87 AcuPick human detection User s Manual 203...
Страница 218: ...Figure 5 88 AcuPick motor vehicle detection Step 5 Configure the search conditions as needed User s Manual 204...
Страница 222: ...Figure 5 92 Thumbnails Step 7 Point to the target you want and then click to check the details User s Manual 208...
Страница 223: ...Figure 5 93 Custom search 2 Step 8 Configure the search conditions as needed User s Manual 209...
Страница 335: ...Figure 5 203 TCP IP Step 2 Click to configure the NIC card and then click OK User s Manual 321...
Страница 387: ...Figure 5 253 Pattern login User s Manual 373...
Страница 444: ...Figure 5 314 Shutdown 2 User s Manual 430...
Страница 453: ...Figure 6 5 Cluster log Step 2 Enter the start time and end time Step 3 Click Search User s Manual 439...
Страница 471: ......


