Initial Configuration
Stacking Configuration
Page 32
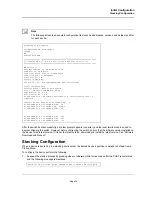
Note
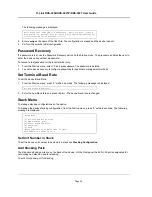
The following screen is an example configuration.Items such as addresses, versions, and dates may differ
for each device.
After the switch boots successfully, a system prompt appears (console>) and the local terminal can be used to
begin configuring the switch. However, before configuring the switch, ensure that the software version installed on
the device is the latest version. If it is not the latest version, download and install the latest version. See "Software
Download and Reboot."
Stacking Configuration
When a device is booted up in a stacking environment, the booted device’s position in a stack is defined from a
Startup Menu.
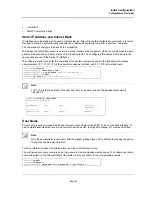
To configure the device perform the following:
1.
Suspend the startup process by pressing
<Esc>
or
<Enter>
within two seconds after the POST is completed
and the following message is displayed:
Preparing to decompress...
Decompressing SW from image-1
638000
OK
Running from RAM...
*********************************************************************
*** Running SW Ver. x.x.x.x Date 11-Jan-200x Time 15:43:13 ***
*********************************************************************
HW version is
Base Mac address is: 00:00:b0:24:11:80
Dram size is: xxM bytes
Dram first block size is: 47104K bytes
Dram first PTR is: 0x1200000
Flash size is: xM
Devices on SMI BUS:
-------------------
smi dev id = 16, dev type=0xd0411ab, dev revision=0x1
Device configuration:
Prestera based - Back-to-back system
Slot 1 - DB-DX240-24G HW Rev. xx.xx
Tapi Version: xx.x.x-x
Core Version: xx.x.x-x
01-Jan-200x 01:01:22 %INIT-I-InitCompleted: Initialization task is
completed
Console> 01-Jan-200x 01:01:23 %LINK-I-Up: e1
01-Jan-200x 01:01:23 %LINK-W-Down: e2
01-Jan-200x 01:01:23 %LINK-I-Up: Vlan 1
01-Jan-200x 01:01:23 %LINK-W-Down: e4
.
.
.
01-Jan-200x 01:01:23 %LINK-W-Down: e46
01-Jan-200x 01:01:23 %LINK-W-Down: e47
01-Jan-200x 01:01:23 %LINK-W-Down: e48
Autoboot in 2 seconds -press RETURN or Esc.to abort and enter prom.
Содержание DXS-3250 - xStack Switch - Stackable
Страница 9: ...Preface Intended Audience Page 8 ...
Страница 274: ......
Страница 275: ......
Страница 285: ...Contacting D Link Technical Support Page 278 ...
Страница 286: ...D Link DXS 3250 DXS 3227P DXS 3227 User Guide Page 279 ...
Страница 287: ...Contacting D Link Technical Support Page 280 ...
Страница 288: ...D Link DXS 3250 DXS 3227P DXS 3227 User Guide Page 281 ...
Страница 289: ...Contacting D Link Technical Support Page 282 ...
Страница 290: ...D Link DXS 3250 DXS 3227P DXS 3227 User Guide Page 283 ...
Страница 291: ...Contacting D Link Technical Support Page 284 ...
Страница 292: ...D Link DXS 3250 DXS 3227P DXS 3227 User Guide Page 285 ...
Страница 293: ...Contacting D Link Technical Support Page 286 ...
Страница 294: ...D Link DXS 3250 DXS 3227P DXS 3227 User Guide Page 287 ...
Страница 295: ...Contacting D Link Technical Support Page 288 ...
Страница 296: ...D Link DXS 3250 DXS 3227P DXS 3227 User Guide Page 289 ...
Страница 297: ...Contacting D Link Technical Support Page 290 ...
Страница 298: ...D Link DXS 3250 DXS 3227P DXS 3227 User Guide Page 291 ...
Страница 299: ...Contacting D Link Technical Support Page 292 ...
Страница 300: ...D Link DXS 3250 DXS 3227P DXS 3227 User Guide Page 293 ...
Страница 301: ...Contacting D Link Technical Support Page 294 ...
Страница 302: ...D Link DXS 3250 DXS 3227P DXS 3227 User Guide Page 295 ...
Страница 303: ...Contacting D Link Technical Support Page 296 ...
Страница 304: ...D Link DXS 3250 DXS 3227P DXS 3227 User Guide Page 297 ...
Страница 305: ...Contacting D Link Technical Support Page 298 ...
Страница 306: ...D Link DXS 3250 DXS 3227P DXS 3227 User Guide Page 299 ...
Страница 307: ...Contacting D Link Technical Support Page 300 ...
Страница 308: ...D Link DXS 3250 DXS 3227P DXS 3227 User Guide Page 301 ...
Страница 309: ...Contacting D Link Technical Support Page 302 ...
Страница 310: ...D Link DXS 3250 DXS 3227P DXS 3227 User Guide Page 303 ...

