


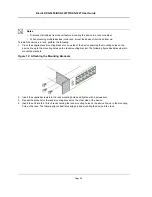


Mounting Device
Preparing for Installation
Page 22
Preparing for Installation
This section provides an explanation for preparing the installation site, and includes the following topics:
•
Installation Precautions
•
Site Requirements
•
Unpacking
Installation Precautions
Warnings
•
The surface on which the switch is placed should be adequately secured to prevent it from becoming
unstable and/or falling over.
•
Ensure the power source circuits are properly grounded.
•
Observe and follow service markings. Do not service any product except as explained in your system
documentation. Opening or removing covers marked with a triangular symbol with a lighting bolt may
cause electrical shock. These components are to be serviced by trained service technicians only.
•
Ensure the power cable, extension cable, and/or plug is not damaged.
•
Ensure the product is not exposed to water.
•
Ensure the device is not exposed to radiators and/or heat sources.
•
Do not push foreign objects into the device, as it may cause a fire or electric shock.
•
Use the device only with approved equipment.
•
Allow the product to cool before removing covers or touching internal equipment.
•
Ensure the switch does not overload the power circuits, wiring, and over-current protection. To deter-
mine the possibility of overloading the supply circuits, add together the ampere ratings of all devices
installed on the same circuit as the device being installed. Compare this total with the rating limit for
the circuit. The maximum ampere ratings are usually printed on the switch, near their AC power con-
nectors.
Cautions
•
Ensure the air flow around the front, sides, and back of the switch is not restricted.
•
Ensure the cooling vents are not blocked.
•
Do not install the switch in an environment where the operating ambient temperature might exceed
40
º
C (104
º
F).
Site Requirements
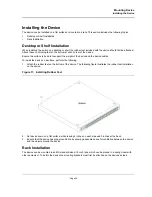
The device is placed on a table-top. Before installing the unit, verify that the location chosen for installation meets
the following site requirements.
•
General
— Ensure that the power supply is correctly installed.
•
Power
— The unit is installed within 1.5 m (5 feet) of a grounded, easily accessible outlet 100-250 VAC, 50-
60 Hz.
•
Clearance
— There is adequate frontal clearance for operator access. Allow clearance for cabling, power
connections and ventilation.
•
Cabling
— The cabling is routed to avoid sources of electrical noise such as radio transmitters, broadcast
amplifiers, power lines and fluorescent lighting fixtures.
Содержание DXS-3250 - xStack Switch - Stackable
Страница 9: ...Preface Intended Audience Page 8 ...
Страница 274: ......
Страница 275: ......
Страница 285: ...Contacting D Link Technical Support Page 278 ...
Страница 286: ...D Link DXS 3250 DXS 3227P DXS 3227 User Guide Page 279 ...
Страница 287: ...Contacting D Link Technical Support Page 280 ...
Страница 288: ...D Link DXS 3250 DXS 3227P DXS 3227 User Guide Page 281 ...
Страница 289: ...Contacting D Link Technical Support Page 282 ...
Страница 290: ...D Link DXS 3250 DXS 3227P DXS 3227 User Guide Page 283 ...
Страница 291: ...Contacting D Link Technical Support Page 284 ...
Страница 292: ...D Link DXS 3250 DXS 3227P DXS 3227 User Guide Page 285 ...
Страница 293: ...Contacting D Link Technical Support Page 286 ...
Страница 294: ...D Link DXS 3250 DXS 3227P DXS 3227 User Guide Page 287 ...
Страница 295: ...Contacting D Link Technical Support Page 288 ...
Страница 296: ...D Link DXS 3250 DXS 3227P DXS 3227 User Guide Page 289 ...
Страница 297: ...Contacting D Link Technical Support Page 290 ...
Страница 298: ...D Link DXS 3250 DXS 3227P DXS 3227 User Guide Page 291 ...
Страница 299: ...Contacting D Link Technical Support Page 292 ...
Страница 300: ...D Link DXS 3250 DXS 3227P DXS 3227 User Guide Page 293 ...
Страница 301: ...Contacting D Link Technical Support Page 294 ...
Страница 302: ...D Link DXS 3250 DXS 3227P DXS 3227 User Guide Page 295 ...
Страница 303: ...Contacting D Link Technical Support Page 296 ...
Страница 304: ...D Link DXS 3250 DXS 3227P DXS 3227 User Guide Page 297 ...
Страница 305: ...Contacting D Link Technical Support Page 298 ...
Страница 306: ...D Link DXS 3250 DXS 3227P DXS 3227 User Guide Page 299 ...
Страница 307: ...Contacting D Link Technical Support Page 300 ...
Страница 308: ...D Link DXS 3250 DXS 3227P DXS 3227 User Guide Page 301 ...
Страница 309: ...Contacting D Link Technical Support Page 302 ...
Страница 310: ...D Link DXS 3250 DXS 3227P DXS 3227 User Guide Page 303 ...