2-4
Axxius 800 - Release 2.2
Physical Installation
Assembly of Axxius 800
Assembly of Axxius 800
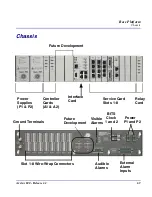
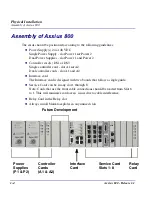
The cards should be positioned according to the following guidelines:
l
Power Supply(s) 24 or 48 VDC
Single Power Supply - slot Power 1 or Power 2
Dual Power Supplies - slot Power 1 and Power 2
l
Controller card(s) DS1 or DS3
Single controller card - slot A1 or A2
Dual controller cards - slot A1 and A2
l
Interface card
The Interface card is designed with two boards that follow a single guide.
l
Service Cards can be in any slot 1 through 8.
Note: Cards that use the front cable connections should be loaded from Slot 8
to 1. This will minimize card access issues due to cable interference.
l
Relay Card in the Relay slot.
l
Always install blank faceplates in any unused slots.
Controller
Interface
Card
Cards
(A1 & A2)
Service Card
Slots 1-8
Power
Supplies
(P1 & P2)
Future Development
Relay
Card
Содержание Network Device Axxius 800
Страница 1: ...Axxius 800 USER MANUAL Part Number 770 0104 AG Product Release 2 2 May 2004 ...
Страница 32: ...xxxii Axxius 800 Release 2 2 Table of Contents ...
Страница 50: ...1 18 Axxius 800 Release 2 2 Base Platform ACO ...
Страница 101: ...CHAPTER CLI Commands In this Chapter n Command Line Interface Help n CLI Commands ...
Страница 392: ...8 8 Axxius 800 Release 2 2 FXO Voice Card Channel Associated Signaling CAS Conversions ...
Страница 430: ...12 8 Axxius 800 Release 2 2 Power Supply Installing Replacing a Power Supply ...
Страница 472: ...15 20 Axxius 800 Release 2 2 Terminal Server Router Card LEDs ...
Страница 500: ...18 12 Axxius 800 Release 2 2 Maintenance Hot Swap Service Card ...
Страница 511: ...APPENDIX Loopback Tests In this Appendix n Overview n DS1 Loopbacks n V 35 Loopbacks n V 35 V 54 Loop ...
Страница 532: ...C 22 Axxius 800 Release 2 2 Loopback Tests V 35 V 54 Loop ...
Страница 552: ...Glossary 20 Axxius 800 Release 2 2 Glossary ...

