


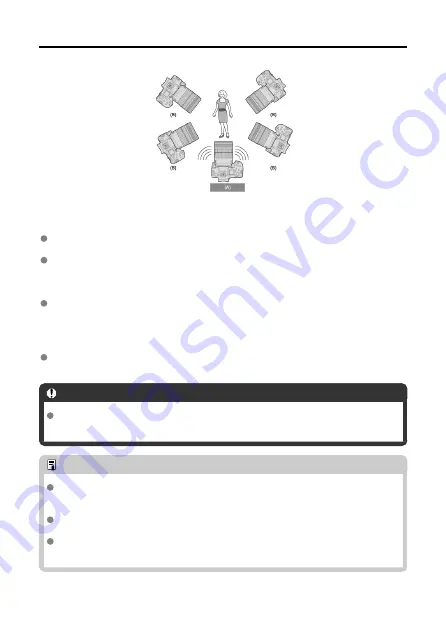
Positioning the Cameras
(A) Sender Camera
(B) Receiver Camera
Position the receiver cameras in clear view of the sender camera, without objects
between them.
Receiver cameras can be positioned up to approx. 50 m / XX ft. from the sender
camera. However, the distance supported for linked shooting may be shorter depending
on the wireless communication conditions, which are affected by how the cameras are
positioned, the usage environment, and weather conditions.
Pressing the shutter button halfway on the sender camera will also put the receiver
cameras in a state corresponding to when their shutter buttons are pressed halfway.
Similarly, fully pressing the shutter button on the sender camera will also put the
receiver cameras in a state corresponding to when their shutter buttons are fully
pressed.
There will be a slight delay in the shutter release timing between the sender and
receiver cameras. (Simultaneous shooting is not possible.)
Caution
Do not use multiple flash units. Although slight, there is a difference in the shutter
release timing, which may cause out-of-sync flash firing and inadequate exposure.
Note
During linked shooting, when you press the AE lock or depth-of-field preview
button, the camera adjusts the focus and meters as if you had pressed the shutter
button halfway.
Once you have established a connection between the sender camera and receiver
cameras, the settings are retained even after you replace the batteries.
If you will no longer use a receiver camera in linked shooting, go to [
Connection
settings
] and set [
LinkedShot
] to [
Disconnect
].
109
Содержание WFT-R10
Страница 1: ...Wireless File Transmitter WFT R10 Advanced User Guide E CT2 D106 A CANON INC 2020 ...
Страница 12: ...Nomenclature 10 20 19 21 22 23 24 25 26 11 12 13 14 1 2 3 4 5 6 7 8 9 17 18 15 16 27 31 32 33 28 29 30 12 ...
Страница 14: ...Example of EOS R5 LCD panel 1 WFT battery level 2 WFT status wireless 3 WFT status wired 4 Charging via USB 14 ...
Страница 54: ...3 Select OK The next screen is displayed Go to Configuring Settings for the Communication Function 54 ...
Страница 57: ...6 Select OK The next screen is displayed Go to Configuring Settings for the Communication Function 57 ...
Страница 76: ...6 Select FTP transfer 7 Select OK The selected images are transferred to the FTP server 76 ...
Страница 95: ...6 Select Direct transfer 7 Select OK The selected images are transferred to the computer 95 ...
Страница 98: ...5 Select OK The selected images are transferred to the computer 98 ...
Страница 102: ...4 Register the captions to the camera Select Apply to camera to register your new captions to the camera 102 ...
Страница 110: ...Terminating the Connection and Reconnecting Terminating the Connection Reconnecting 110 ...
Страница 127: ...Editing Function Settings 1 Select WFT settings 2 Select Manual setting 3 Select Function settings 4 Select MODE 127 ...
Страница 138: ...Use a highly shielded Category 5e or higher STP Shielded Twisted Pair Gigabit Ethernet cable 138 ...
Страница 166: ...4 Select Comm settings for using IPv6 5 Select Change 6 Select TCP IPv6 7 Select the item to be set 166 ...


