Creating and Registering Captions
Transferring Images with a Caption
] and register it to the
camera.
1.
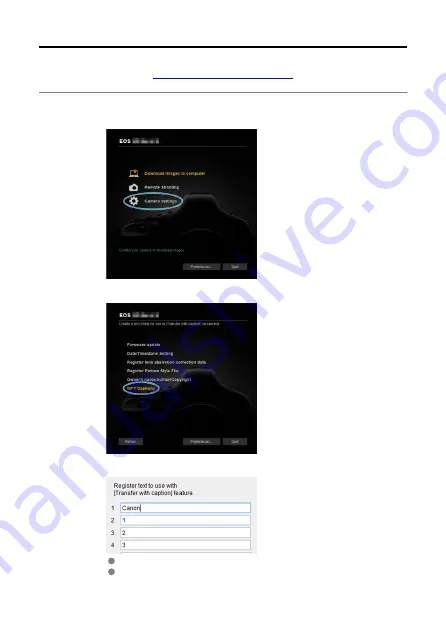
Start EOS Utility and select [Camera settings].
2.
Select [WFT Captions].
3.
Enter the caption or captions.
Enter up to 31 characters (in ASCII format).
To acquire caption data stored in the camera, select [
Load settings
].
99
Содержание WFT-E9
Страница 12: ...Nomenclature 1 4 2 3 1 Attachment pin 2 Tightening screw 3 Terminal 4 Terminal cap 12 ...
Страница 48: ...3 Select OK The next screen is displayed Go to Configuring Settings for the Communication Function 48 ...
Страница 51: ...6 Select OK The next screen is displayed Go to Configuring Settings for the Communication Function 51 ...
Страница 53: ...2 Configure the connection settings for the communication function FTP Transfer EOS Utility Browser Remote 53 ...
Страница 59: ...10 Select OK This is not displayed for offline settings 11 Select OK 59 ...
Страница 71: ...6 Select Transfer 7 Select OK The selected images are transferred to the FTP server 71 ...
Страница 74: ...When OK is selected the selected image is transferred to the FTP server 74 ...
Страница 91: ...7 Select OK The selected images are transferred to the computer 91 ...
Страница 94: ...When OK is selected the selected image is transferred to the PC 94 ...
Страница 100: ...4 Register the captions to the camera Select Apply to camera to register your new captions to the camera 100 ...
Страница 114: ...114 ...
Страница 150: ...Terminating the Connection and Reconnecting Terminating the Connection Reconnecting 150 ...
Страница 200: ...4 Select Comm settings for using IPv6 5 Select Change 6 Select TCP IPv6 7 Select the item to be set 200 ...
Страница 204: ...Operation Environment Working temperature range 0 45 C 32 113 F Working humidity 85 or less 204 ...


