


Attaching to the Camera
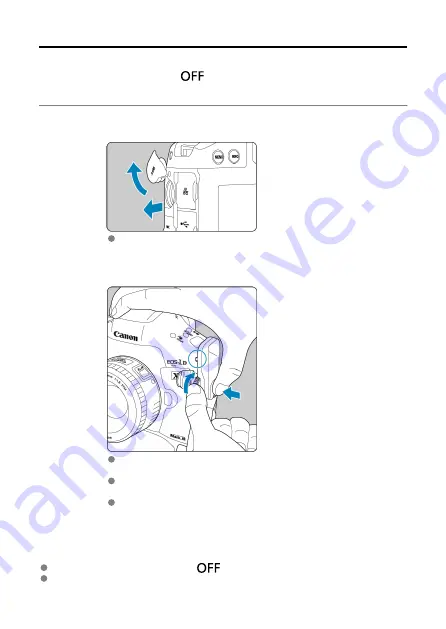
Set the camera's power switch to <
> before attaching the transmitter.
The transmitter is powered by the camera. Ensure the camera battery has sufficient
charge. If the battery level drops to 19% or less, you cannot transfer captured images.
1.
Open the terminal cover on the camera.
Pull out the system extension terminal cover and rotate it toward the
front.
2.
Attach the transmitter.
Insert the transmitter terminal and attachment pin in the corresponding
camera system extension terminal and attachment hole.
Push the underside of the transmitter into the camera and turn the
tightening screw in the direction of the arrow.
Turn the tightening screw until it stops rotating to securely attach the
transmitter.
Removing the transmitter
Set the camera's power switch to <
>.
Loosen the tightening screw until the transmitter comes off.
14
Содержание WFT-E9
Страница 12: ...Nomenclature 1 4 2 3 1 Attachment pin 2 Tightening screw 3 Terminal 4 Terminal cap 12 ...
Страница 48: ...3 Select OK The next screen is displayed Go to Configuring Settings for the Communication Function 48 ...
Страница 51: ...6 Select OK The next screen is displayed Go to Configuring Settings for the Communication Function 51 ...
Страница 53: ...2 Configure the connection settings for the communication function FTP Transfer EOS Utility Browser Remote 53 ...
Страница 59: ...10 Select OK This is not displayed for offline settings 11 Select OK 59 ...
Страница 71: ...6 Select Transfer 7 Select OK The selected images are transferred to the FTP server 71 ...
Страница 74: ...When OK is selected the selected image is transferred to the FTP server 74 ...
Страница 91: ...7 Select OK The selected images are transferred to the computer 91 ...
Страница 94: ...When OK is selected the selected image is transferred to the PC 94 ...
Страница 100: ...4 Register the captions to the camera Select Apply to camera to register your new captions to the camera 100 ...
Страница 114: ...114 ...
Страница 150: ...Terminating the Connection and Reconnecting Terminating the Connection Reconnecting 150 ...
Страница 200: ...4 Select Comm settings for using IPv6 5 Select Change 6 Select TCP IPv6 7 Select the item to be set 200 ...
Страница 204: ...Operation Environment Working temperature range 0 45 C 32 113 F Working humidity 85 or less 204 ...


