171
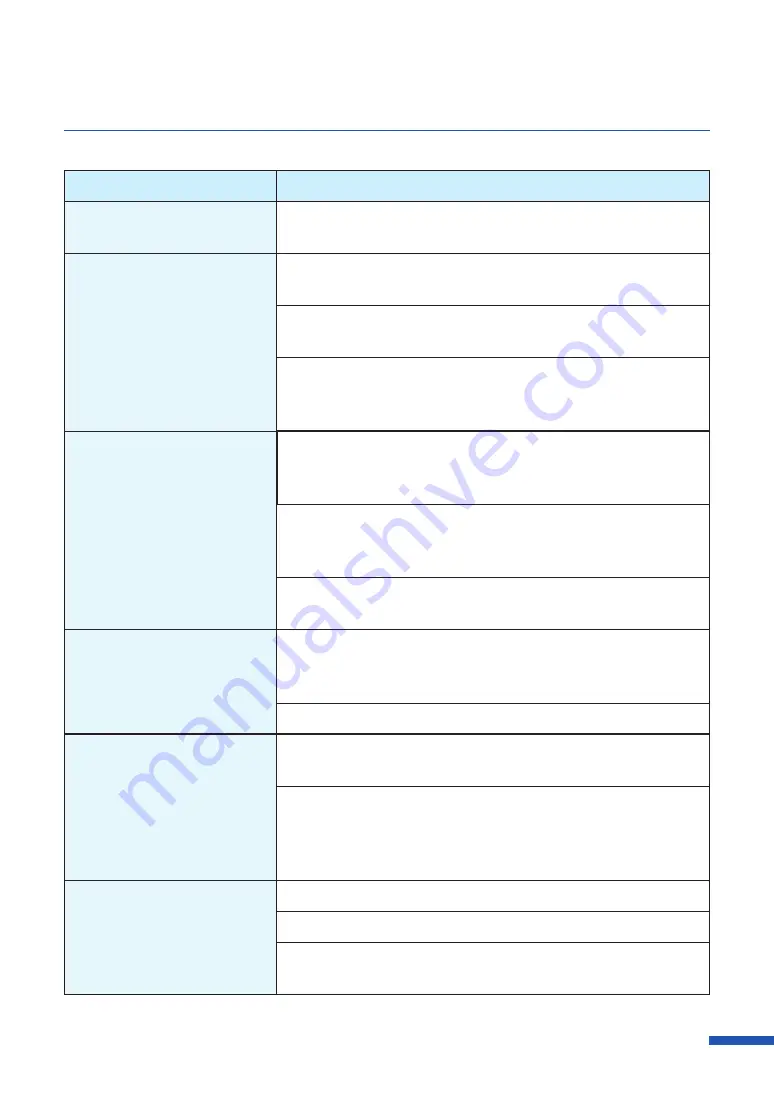
For Troubleshooting Operations
Condition
Solution
The halftone representation is
coarse.
Open the [Color] tab of the printer driver, and set the [Half-tone]
to [Error Diffusion].
The area around characters or
the layer areas appear uneven.
Open the [Utility] tab in the printer driver and then select the
[Prevent Unevenness] in the [Special Settings].
Open the [Color] tab of the printer driver, and set the [Half-tone]
to [Error Diffusion].
Confirm that the paper set (size, shape, and type) matches the
paper (size, shape, and type) configured by the application
software or printer driver.
Overall appearance of the print
is poor.
Use dedicated paper.
Do not use paper other than dedicated paper. It can cause paper
jams and malfunctions.
Confirm that the paper set (size, shape, and type) matches the
paper (size, shape, and type) configured by the application
software or printer driver.
Set the resolution to [Input resolution 1200dpi] (prioritize image
quality) and then print.
Printed paper is wavy and
rubbing marks are left on the
paper.
Confirm that the paper set (size, shape, and type) matches the
paper (size, shape, and type) configured by the application
software or printer driver.
The paper may be curled. Flatten the paper.
The color printed differs from
the color on screen.
Open [Color] tab of the printer driver, and adjust the settings for
image quality and color.
Confirm that the [Display] and [Screen Properties] are correctly
configured in the control panel of the computer used. Especially
if the type of display or gamma factor is wrongly configured, the
proper color will not be displayed.
The back side of the paper is
stained.
Clean the transport area.
The paper may be curled. Flatten the paper.
The sheets may be stacked before the printed surface is dry.
Adjust the Paper feed interval.
Содержание CX-G6400
Страница 1: ...CX G6400 COLOR CARD PRINTER User s Guide CANON FINETECH NISCA INC 2017 4Y1 8612 010 ...
Страница 55: ...51 Using Page Setup Features 6 Click Register A confirmation message appears 7 Click Yes 8 Click OK ...
Страница 108: ...104 Chapter 3 How to Use the Printer Driver ...
Страница 141: ...137 Detailed Printhead Position Adjustment 12 Click Close A confirmation message appears 13 Click Yes ...
Страница 147: ...143 Replacing the Ink Tank 1 Open the ink tank door 2 Open the ink tank cover 3 Slowly remove the ink tank ...
Страница 165: ...Chapter 6 Troubleshooting For Troubleshooting Operations 162 List of Error Messages Warning Messages 176 ...
Страница 199: ...195 Uninstall Printer Driver 3 Click Start Note A user account control dialog box may appear In this case click Yes ...


