


2-12
2002 Buell P3: Chassis
HOME
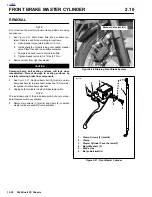
3.
Place
new
hardened washers on sprocket.
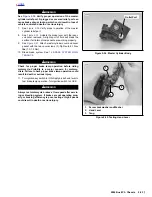
4.
Position sprocket cover over washers and install to
sprocket with five
new
sprocket bolts. Tighten sprocket
bolts to 18-22 ft-lbs (24-30 Nm).
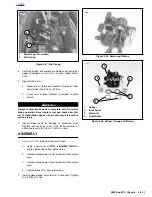
5.
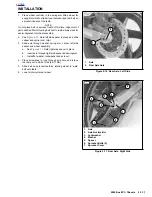
See
Figure 2-9.
Install brake rotor (9) to wheel.
a.
Verify that the brake rotor is thoroughly clean.
b.
Apply LOCTITE THREADLOCKER 272 (red) to
threads of each of the five T40 TORX screws (8).
c.
Install rotor (9) on wheel hub. Tighten TORX screws
in criss-cross pattern to 24-27 ft-lbs (33-37 Nm).
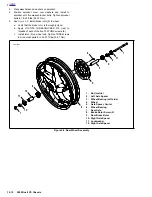
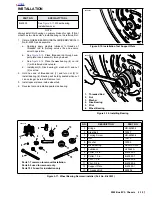
Figure 2-9. Rear Wheel Assembly
2
4
7
5
3
9
6
12
1
8
10
1.
Nut (metric)
2.
Left Axle Spacer
3.
Wheel Bearing (Left side)
4.
Wheel
5.
Axle Spacer, Center
6.
Wheel Bearing
7.
Rear Axle
8.
Brake Rotor Screw (5)
9.
Rear Brake Rotor
10. Right Axle Spacer
11. Lockwasher
12. Right Axle Spacer
a0079x2x
11
11
Содержание 2002 P3
Страница 2: ......
Страница 17: ...A 15 Appendix A Tools HOME ...
Страница 32: ...C 3 Appendix C Metric Conversions HOME ...
Страница 41: ...1 8 2002 Buell P3 Maintenance HOME NOTES ...
Страница 75: ......
Страница 111: ...2 36 2002 Buell P3 Chassis HOME NOTES ...
Страница 143: ...2 68 2002 Buell P3 Chassis HOME NOTES ...
Страница 144: ...2002 Buell P3 Chassis 2 69 HOME ...
Страница 146: ......
Страница 147: ......
Страница 223: ...3 76 2002 Buell P3 Engine HOME NOTES ...
Страница 225: ......
Страница 256: ...2002 Buell P3 Fuel System 4 31 HOME ...
Страница 258: ......
Страница 259: ......
Страница 279: ...5 20 2002 Buell P3 Electric Starter HOME NOTES ...
Страница 281: ......
Страница 327: ......
Страница 398: ...2002 Buell P3 Electrical 7 71 HOME ...
Страница 399: ...SUBJECT PAGE NO A 1 TOOLS A 1 B 1 ELECTRICAL CONNECTORS B 1 C 1 METRIC INFORMATION C 1 Table Of Contents APPENDICES ...
Страница 400: ...Product 1 2 ...