


2-56
2002 Buell P3: Chassis
HOME
SPROCKET COVER
2.22
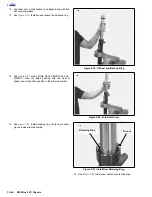
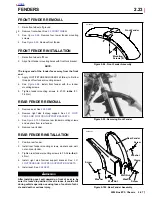
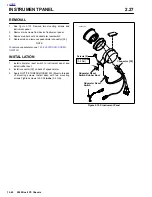
REMOVAL
1.
See
Figure 2-96.
Remove master cylinder bolts and
spacers.
2.
Remove rear pedal bolt and move pedal assembly down-
away from support bracket.
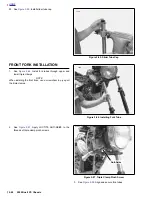
3.
See
Figure 2-97.
Remove the three screws and washers
on sprocket cover.
4.
Slide cover free.
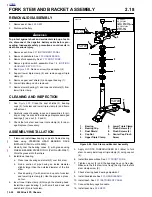
INSTALLATION
1.
Apply LOCTITE THREADLOCKER 243 (Blue) to threads
of three screws.
2.
Position sprocket cover and install three screws and
washers. Tighten fasteners to 30-36
in-lbs
(3-4 Nm).
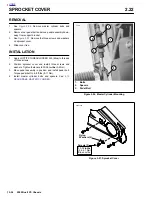
3.
Move pedal assembly in position and install pedal bolt.
Torque pedal bolt to 6-8 ft-lbs (8-11 Nm).
4.
Install master cylinder bolts and spacers. See
2.13
REAR BRAKE MASTER CYLINDER
.
Figure 2-96. Master Cylinder Mounting
Figure 2-97. Sprocket Cover
7704
1
1
2
2
3
1.
Bolts
2.
Spacers
3.
Pedal Bolt
a0131x2x
Screws (3)
Nylon
Washers (3)
30-36
in-lbs
(3.4-4.1 Nm)
Blue Loctite
Содержание 2002 P3
Страница 2: ......
Страница 17: ...A 15 Appendix A Tools HOME ...
Страница 32: ...C 3 Appendix C Metric Conversions HOME ...
Страница 41: ...1 8 2002 Buell P3 Maintenance HOME NOTES ...
Страница 75: ......
Страница 111: ...2 36 2002 Buell P3 Chassis HOME NOTES ...
Страница 143: ...2 68 2002 Buell P3 Chassis HOME NOTES ...
Страница 144: ...2002 Buell P3 Chassis 2 69 HOME ...
Страница 146: ......
Страница 147: ......
Страница 223: ...3 76 2002 Buell P3 Engine HOME NOTES ...
Страница 225: ......
Страница 256: ...2002 Buell P3 Fuel System 4 31 HOME ...
Страница 258: ......
Страница 259: ......
Страница 279: ...5 20 2002 Buell P3 Electric Starter HOME NOTES ...
Страница 281: ......
Страница 327: ......
Страница 398: ...2002 Buell P3 Electrical 7 71 HOME ...
Страница 399: ...SUBJECT PAGE NO A 1 TOOLS A 1 B 1 ELECTRICAL CONNECTORS B 1 C 1 METRIC INFORMATION C 1 Table Of Contents APPENDICES ...
Страница 400: ...Product 1 2 ...