


4-6
2002 Buell P3: Fuel System
HOME
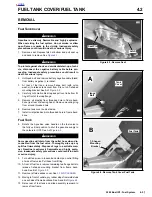
INSTALLATION
Fuel Tank
1.
Place fuel tank into position on frame backbone.
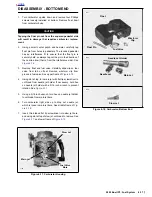
2.
Standing at front of vehicle, push rubber stops onto weld
studs on each side of frame backbone. Using a rubber
mallet, tap stops until fully seated. See A and B of
Figure
4-3.
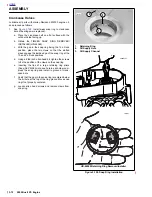
3.
With the lipped side up, slide two flange bolts through
forward holes in T-shaped mounting bracket. Pushing
down on rear of tank, start flange bolts into bosses in
frame backbone. Alternately tighten flange bolts to 6-8 ft-
lbs (8-11 Nm). See B of
Figure 4-2.
4.
Install airbox cover on left hand side. See
4.3 AIR
CLEANER.
5.
Push hose onto outlet fitting at side of fuel valve. Turn
slotted screw to tighten band clamp.
Fuel Tank Cover
6.
Remove oil dipstick from threaded hole in frame back-
bone (just rear of steering head).
7.
Install tank cover.
8.
At rear of fuel tank, install rear flange bolt (with nylon
washer) to fasten tank cover to clip nut on T-shaped
mounting bracket. Tighten flange bolt to 30-36
in-lbs
(3-
4 Nm). See A of
Figure 4-2.
9.
With the lipped side up, place mounting ring over
threaded hole in frame backbone. Install oil dipstick into
hole.
10. Push vent tube onto nozzle of vent tube fitting. Install
small cable strap to fix location. Cut any excess cable
strap material.
11. Insert bolt through battery negative cable (black) into
threaded hole of battery negative (-) terminal. Tighten
bolt to 60-96
in-lbs
(7-11 Nm).
12. Position seat on frame backbone, so that tongue at bot-
tom engages slot in frame weldment. Push down on rear
of seat until spring-loaded latch fully engages groove of
seat pin.
1
1
WARNING
1
WARNING
Pull up on seat to verify that it is properly secured, front
and rear. A loose seat may shift during vehicle operation
and startle the rider, possibly causing loss of vehicle
control that could result in death or serious injury.
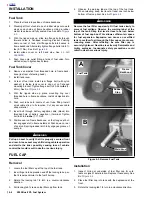
FUEL CAP
Removal
1.
Locate the fuel filler cap at the top of the fuel tank.
1.
Insert finger into depression and lift the locking tab up, so
that it is perpendicular to the fuel filler cap.
2.
Rotate the locking tab 1/4 turn in a counter-clockwise
direction.
3.
Pull locking tab to remove fuel filler cap from tank.
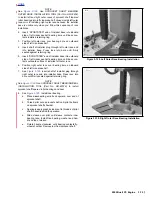
4.
Observe the warning label at the top of the fuel tank.
When refueling, keep fuel level at least one inch below
bottom of fuel cap boot. See A of
Figure 4-4.
1
1
WARNING
1
WARNING
Remove the fuel filler cap slowly. Fill fuel tank slowly to
prevent fuel spillage. Observe the warning label at the
top of the tank. Keep fuel level at least one inch below
bottom of fuel cap boot. This allows sufficient air space
for fuel expansion. Expansion can cause an overfilled
tank to overflow fuel through the filler cap vent onto sur-
rounding areas. After refueling, be sure filler cap is
securely tightened. Gasoline is extremely flammable and
highly explosive. Inadequate safety precautions could
result in death or serious injury.
Installation
1.
Inspect O-ring at underside of fuel filler cap for cuts,
tears or signs of deterioration. Replace if necessary. See
B of
Figure 4-4.
2.
Place fuel filler cap into tank with the depression at the
front.
3.
Rotate the locking tab 1/4 turn in a clockwise direction.
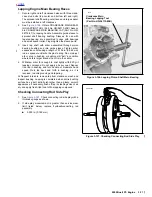
Figure 4-3. Remove Fuel Tank
A
Rubber
Stop
Fuel Tank
Frame
Backbone
7729
B
Weld Stud
77
Содержание 2002 P3
Страница 2: ......
Страница 17: ...A 15 Appendix A Tools HOME ...
Страница 32: ...C 3 Appendix C Metric Conversions HOME ...
Страница 41: ...1 8 2002 Buell P3 Maintenance HOME NOTES ...
Страница 75: ......
Страница 111: ...2 36 2002 Buell P3 Chassis HOME NOTES ...
Страница 143: ...2 68 2002 Buell P3 Chassis HOME NOTES ...
Страница 144: ...2002 Buell P3 Chassis 2 69 HOME ...
Страница 146: ......
Страница 147: ......
Страница 223: ...3 76 2002 Buell P3 Engine HOME NOTES ...
Страница 225: ......
Страница 256: ...2002 Buell P3 Fuel System 4 31 HOME ...
Страница 258: ......
Страница 259: ......
Страница 279: ...5 20 2002 Buell P3 Electric Starter HOME NOTES ...
Страница 281: ......
Страница 327: ......
Страница 398: ...2002 Buell P3 Electrical 7 71 HOME ...
Страница 399: ...SUBJECT PAGE NO A 1 TOOLS A 1 B 1 ELECTRICAL CONNECTORS B 1 C 1 METRIC INFORMATION C 1 Table Of Contents APPENDICES ...
Страница 400: ...Product 1 2 ...