


5.0
Operation
5.8
Erecting a Complete Tower Cont
inued.
Fig. 34
5.9
Placing
T
owers
A
gainst
E
xisting
T
owers
1.
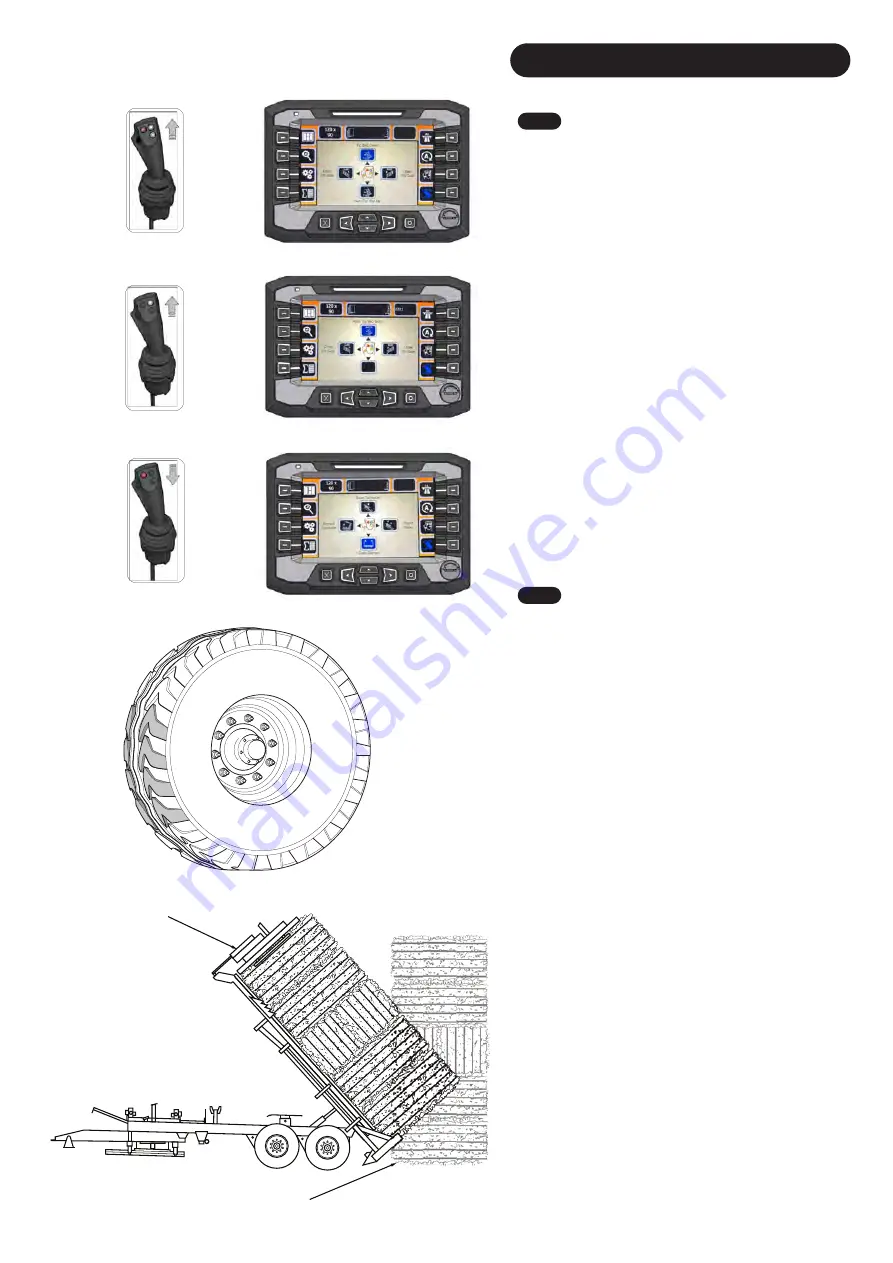
Half tip the machine, reverse gently into the previous
stack until it touches. Drive forward counting the lugs on the
tyres
(Fig. 3
6
)
.
After 4 lugs, stop and continue tipping and
allow
the machine to roll back as it tips. Adjust the number
of
lugs
to tighten or open the contact with previous stacks.
2.
Use a tramline or convenient features to maintain
alignment of subsequent stacks.
3.
When erecting towers side by side, either side gate can
be opened 90 degrees to its home position to enable closer
placing of adjacent stacks. Removal of the safety pins will
be
required (
Section 6.15
) but do not lower
the sides until
the
platform is half tipped and the individual
bales
are
secured
by inter layer friction
(Fig. 3
7
).
Move the
joystick left
and
right to open the gates (
Fig.
28
).
4.
Once the machine is half tipped, carefully lower the
appropriate side and gently manoeuvre the stack into
position before raising fully. Remember the machine will
roll
back as it tips, so ensure good alignment with the base
of
the adjacent stack so that the open side is not stressed
by
contact with the existing stack
Section 9.1
for further details.
Fig.
37
Note 1
Tip to at least 45°
before opening the side clamps, to
ensure bales are secured by inter-layer friction. This will
also reduce stress on the side
gates
cylinder pins
also
reducing damage to the mud guards.
Fig.
37
Note 2
Ensure good alignment of the stack bases so that an open
side clamp is not stressed by contact with an existing stack.
Fig. 33
1
2
Fig. 3
7
Fig. 3
6
Fig. 35
10a.
After you have released the stack vertically, drive
away from the stack (make sure it is stable).
Move the
joystick forward
(
Fig. 33)
to bring the
machine down
manually
about 5-10 degrees.
10b. If the machine is clear and the stack is stable, press
the
'GREY'
button and move the joystick forward
(Fig. 34)
to 'Auto Bed Tip Down'. This
function will bring the
Transtacker down automatically
and bring everything into a
home position except the rear clamps. These are kept open
it increase speed when engaging 'Auto Mode'.
Note
: The side gates will not close on 'Auto Bed Tip Down'.
Make sure you close the side gates before activating this
function or it may cause damage to the Transtacker.
Note
:
To reset the layer counter, you will need to activate
'Auto Bed Tip Down' be
fore going into 'Auto Mode' or
operating the machine manually. Make sure the top middle
of the screen is clear of any layers before starting another
stack.
11. If you want to close the rear clamps, press
t
he 'RED'
button and move the joystick
backwards (
Fig. 35
) to 'Close
Clamps'.
13
Содержание Transtacker 4100
Страница 61: ...58...
Страница 62: ...59...
Страница 63: ...11 0 Hydraulic Systems 11 4 Valve Block Schematic Fig 168 60...
Страница 67: ...13 0 Maintenance 13 2 Pickup Grease Points Fig 172 64...
Страница 68: ...13 0 Maintenance 13 3 Grab Arm Grease Points Fig 173 65...
Страница 69: ...13 0 Maintenance 13 4 Turntable A Frame Grease Points Fig 174 66...
Страница 70: ...13 0 Maintenance 13 5 Side Gate Grease Points Fig 175 67...
Страница 71: ...13 0 Maintenance 13 6 Rear Clamps Grease Points Fig 176 68...
Страница 72: ...13 0 Maintenance 13 7 Chassis Grease Points Fig 177 69...
Страница 73: ...13 0 Maintenance 13 8 Platform Grease Points Fig 178 70...
Страница 74: ...13 0 Maintenance 13 9 Axle Grease Points Fig 179 71...
Страница 84: ...16 0 Operators Notes 81...
Страница 85: ...82...
Страница 86: ...83...
Страница 87: ...84...