


C. Troubleshooting
C.1 Troubleshooting List
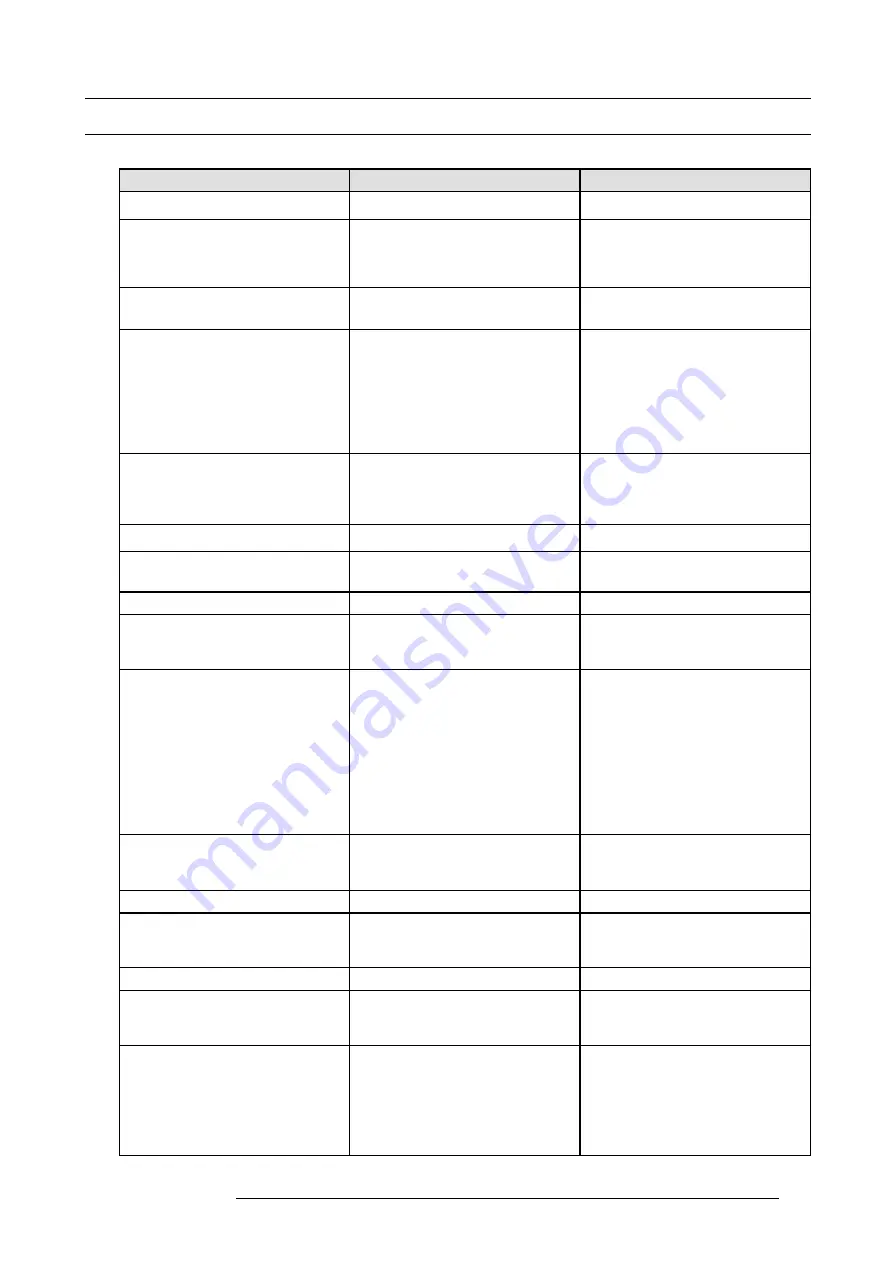
Problem solving
Problem
Possible cause
Remedy
E2 doesn’t start
The Power supplies are not connected to
a valid power source
Make sure that at least one power supply
is connected to a valid power source.
Make sure that the supplies are well
inserted in their slots. Remove the power
cord and apply a little pressure by using
the handle until both supplies are fully
inserted.
One of the Power Supplies is not coming
on
If the input AC power LED on the Power
supply is off, then the supply is not
receiving a valid AC power
Check the AC power cable and ensure
that the unit is connected to a valid power
source.
If the input AC power LED is green but
the output DC power LED is off or if the
status LED is amber, then the supply is not
producing valid DC output power
If the other Power supply is functioning
normally, swap it with the supply that
doesn’t work. If the problem follows the
power supply, then the you need to replace
the power supply. If the problem stays with
the slot, then the fault possibly lies with the
System Power card. Contact your local
Barco customer service support for further
assistance.
All or most images are unstable or/and
noisy
Temperature issue
Operating ambient temperature must be
higher than 0°C (32°F) and lower than
40°C (104°F).
Run the board diagnostics in order to
detect errors
Leave suf
fi
cient front and rear clearance
to ensure that air
fl
ow through the E2 is not
restricted.
Clean the EMI
fi
lter
A speci
fi
c image is unstable or/and noisy
Bad Input, output, VPU or motherboard
card
Run the board diagnostics in order to
detect errors. If the board diagnostics
doesn’t detect any errors proceed to the
next step.
From the GUI change the output card
from which the image is derived. If the
problem persists, then the issue is not with
the output card. Continue by switching
the input source to a different input card.
If the issue persists then the issue is not
with input card. If the input and output
cards have been ruled out, then the issue
is either with a VPU card or with the
motherboard. In this case, contact your
Barco customer service support for further
assistance.
The E2 and the PC running the GUI don’t
communicate
Cabling/network switch issue
Check all of the Ethernet cables and verify
that they are plugged in. If you are using
a network switch verify that is on and is
operating properly.
Wrong IP address
IP address is not within your LAN range.
Con
fl
ict between network addresses:
Check if the E2 network address is not
already in use by another device on the
local network.
DHCP is not enabled.
When the PC running Event Master
Control Software is connected directly with
the E2, the dynamic con
fi
guration (DHCP)
doesn’t work.
There is no DHCP server in this
con
fi
guration
You need to disable the DHCP option and
enter a static network address compatible
with the PC running the Event Master
control software (range, Subnet mask,..).
E2 constantly reboots after a software
upgrade
Invalid upgrade (deployment or defective
installation)
Press and hold the
SEL
and
ESC
keys
simultaneously until the front panel shows
the choice of performing a factory reset
or continuing. Performing a factory reset
will allow the E2 to boot normally. If
the problem persists, contact you local
Barco customer service support for further
assistance.
R5905948 E2 12/12/2014
297
Содержание Event Master E2
Страница 1: ...E2 User s guide R5905948 00 12 12 2014...
Страница 8: ...Table of contents 4 R5905948 E2 12 12 2014...
Страница 16: ...2 Safety 12 R5905948 E2 12 12 2014...
Страница 32: ...3 General 28 R5905948 E2 12 12 2014...
Страница 82: ...6 GUI orientation Image 6 8 78 R5905948 E2 12 12 2014...
Страница 94: ...6 GUI orientation Image 6 20 90 R5905948 E2 12 12 2014...
Страница 115: ...6 GUI orientation Image 6 37 Thumbnail view Image 6 38 R5905948 E2 12 12 2014 111...
Страница 186: ...7 System Setup 182 R5905948 E2 12 12 2014...
Страница 192: ...8 Updating firmware 188 R5905948 E2 12 12 2014...
Страница 196: ...9 General operation example Image 9 3 192 R5905948 E2 12 12 2014...
Страница 213: ...9 General operation example Image 9 25 R5905948 E2 12 12 2014 209...
Страница 216: ...9 General operation example 212 R5905948 E2 12 12 2014...
Страница 220: ...10 Maintenance 10 2 Process Overview Flow chart Image 10 2 216 R5905948 E2 12 12 2014...
Страница 226: ...10 Maintenance Image 10 11 2 Pull out the Front cover and lay it flat in front of the unit 222 R5905948 E2 12 12 2014...
Страница 281: ...10 Maintenance Disregard the heatsink from the spare kit R5905948 E2 12 12 2014 277...
Страница 282: ...10 Maintenance 278 R5905948 E2 12 12 2014...
Страница 286: ...11 Environmental information Republic of Turkey In conformity with the WEEE Regulation 282 R5905948 E2 12 12 2014...
Страница 288: ...11 Environmental information 284 R5905948 E2 12 12 2014...
Страница 298: ...B Remote Control Protocol 294 R5905948 E2 12 12 2014...
Страница 299: ...C Troubleshooting C TROUBLESHOOTING R5905948 E2 12 12 2014 295...
Страница 300: ...C Troubleshooting 296 R5905948 E2 12 12 2014...


