8. Updating firmware
8.1
Upgrading
fi
rmware using the USB port
Necessary tools
USB drive (Not supplied by Barco) formatted in FAT32.
How to upgrading
fi
rmware
1. Ensure that your
fl
ash drive is formatted to use the FAT32
fi
le system. If necessary, reformat the drive as described in the following
section “Formatting the
fl
ash drive”.
2. Prepare the
fl
ash drive with the upgrade
fi
le as describe below in the section “Preparing the
fl
ash drive with the upgrade
fi
le”
Note:
Upgrading software with the USB port requires the “e2_update_vp.xx.xx.tar.gz”
fi
le to be within a directory named E2.
3. When the drive is ready, refer to the chapter “Performing the
fi
rmware upgrade using the USB” describe below for the upgrade
procedure.
C
AUTION
:
Reformatting the
fl
ash drive erases existing data. To avoid losing data, download to a computer
or a secure site any
fi
les you wish to keep, then format the drive.
Formatting the
fl
ash drive
1. Insert the
fl
ash drive into a Windows PC or laptop’s USB port.
2. Select a Windows Explorer or a panel allowing an overview on the disk drives and the hardware connected to your computer
(e.g.
Start > Computer
on Windows 7 or
Start > My Computer
on Windows XP).
3. On this view, right-click the drive that represents the
fl
ash drive.
4. Select
Format
from the menu that appears.
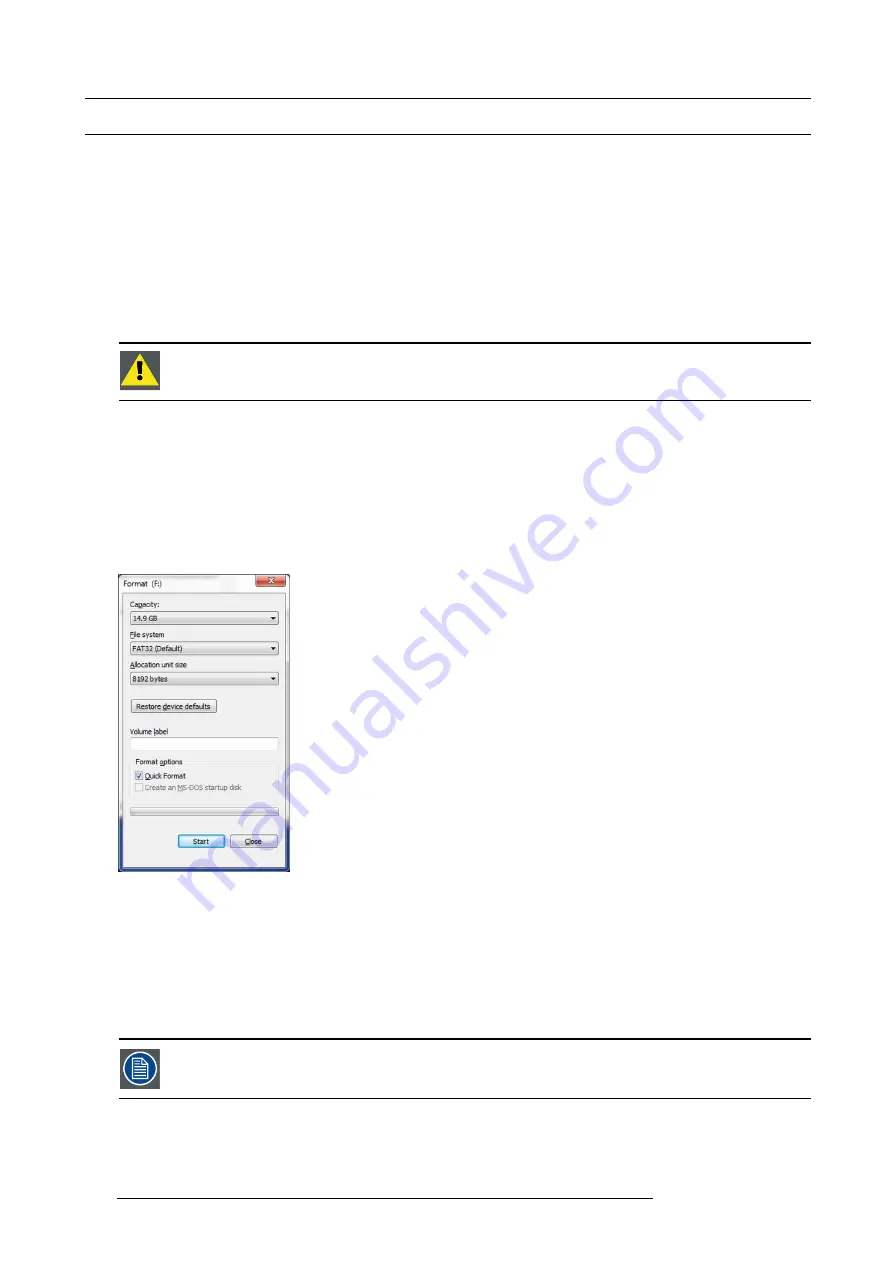
The Format Disk screen appears.
Image 8-1
Format Disk screen
5. Select
FAT32
as the
fi
le system, and
Quick Format
under
Format Options
, as shown above in the Format Disk screen illustra-
tion.
6. Click
Start
.
A message appears, warning that data will be erased during the formatting process.
7. Click
OK
to continue.
A con
fi
rmation message appears after a few seconds. The
fl
ash drive is now ready to use
Upgrading software with the USB port requires the “e2_update_vp.xx.xx.tar.gz”
fi
le to be within a directory
named E2.
184
R5905948 E2 12/12/2014
Содержание Event Master E2
Страница 1: ...E2 User s guide R5905948 00 12 12 2014...
Страница 8: ...Table of contents 4 R5905948 E2 12 12 2014...
Страница 16: ...2 Safety 12 R5905948 E2 12 12 2014...
Страница 32: ...3 General 28 R5905948 E2 12 12 2014...
Страница 82: ...6 GUI orientation Image 6 8 78 R5905948 E2 12 12 2014...
Страница 94: ...6 GUI orientation Image 6 20 90 R5905948 E2 12 12 2014...
Страница 115: ...6 GUI orientation Image 6 37 Thumbnail view Image 6 38 R5905948 E2 12 12 2014 111...
Страница 186: ...7 System Setup 182 R5905948 E2 12 12 2014...
Страница 192: ...8 Updating firmware 188 R5905948 E2 12 12 2014...
Страница 196: ...9 General operation example Image 9 3 192 R5905948 E2 12 12 2014...
Страница 213: ...9 General operation example Image 9 25 R5905948 E2 12 12 2014 209...
Страница 216: ...9 General operation example 212 R5905948 E2 12 12 2014...
Страница 220: ...10 Maintenance 10 2 Process Overview Flow chart Image 10 2 216 R5905948 E2 12 12 2014...
Страница 226: ...10 Maintenance Image 10 11 2 Pull out the Front cover and lay it flat in front of the unit 222 R5905948 E2 12 12 2014...
Страница 281: ...10 Maintenance Disregard the heatsink from the spare kit R5905948 E2 12 12 2014 277...
Страница 282: ...10 Maintenance 278 R5905948 E2 12 12 2014...
Страница 286: ...11 Environmental information Republic of Turkey In conformity with the WEEE Regulation 282 R5905948 E2 12 12 2014...
Страница 288: ...11 Environmental information 284 R5905948 E2 12 12 2014...
Страница 298: ...B Remote Control Protocol 294 R5905948 E2 12 12 2014...
Страница 299: ...C Troubleshooting C TROUBLESHOOTING R5905948 E2 12 12 2014 295...
Страница 300: ...C Troubleshooting 296 R5905948 E2 12 12 2014...


