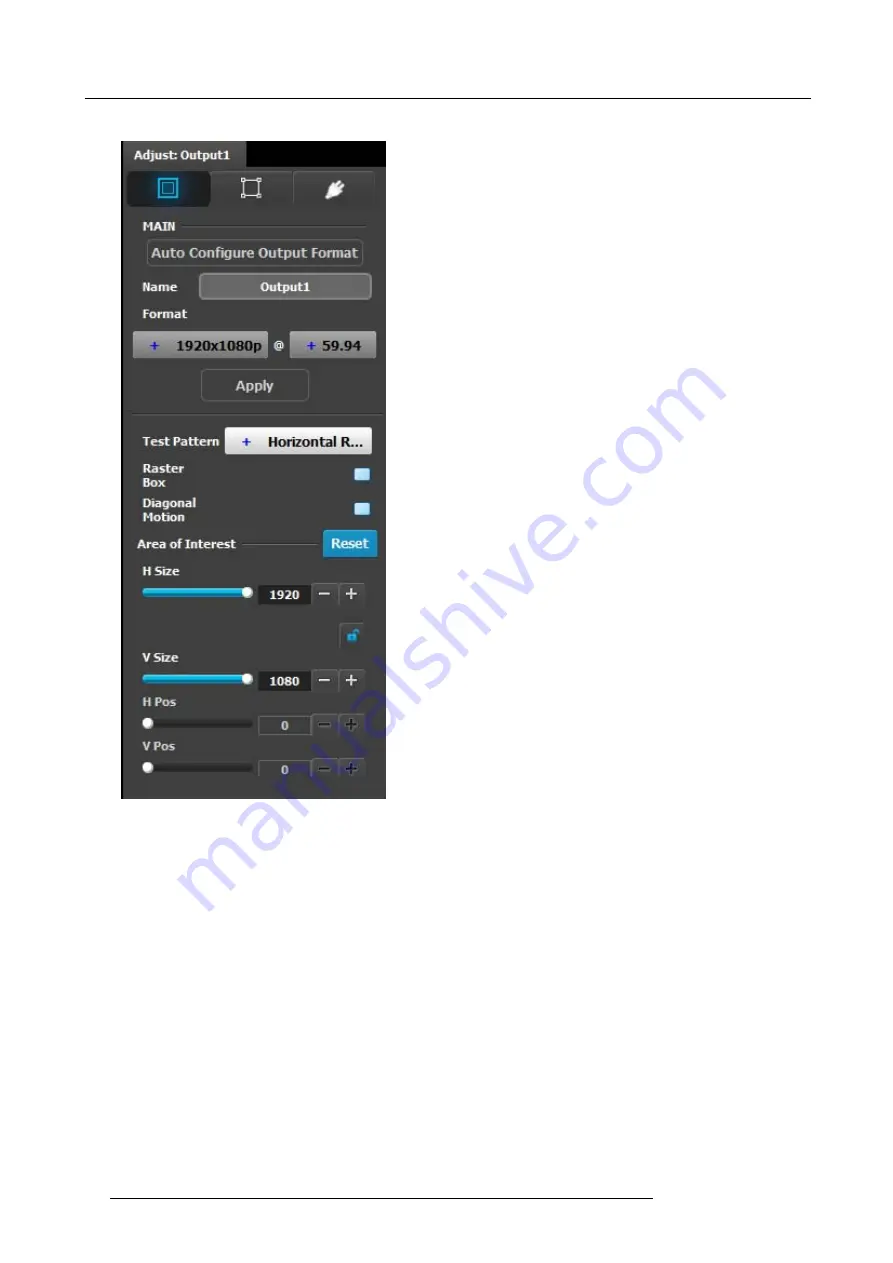
6. GUI orientation
Output adjustment panel > Main page
•
Auto Con
fi
gure Output format: Selects the output format
will be set to match the format contained in the EDID of the
display device connected to the corresponding output(s).
•
Name: The name of the output con
fi
guration can be edited
in this
fi
eld.
•
Format: Selects the video format of the output con
fi
guration
from the drop down menu. The available formats are in
compliance with the output con
fi
guration type. For example,
if the con
fi
guration is 4K, only 4K formats will be presented
in the drop-down menu.
•
Test pattern: Turns the Test Patterns ON and select the
desired type. The default setting is OFF. Test pattern types :
-
Horizontal Ramp
-
Vertical Ramp
-
100% Color Bars
-
16x16 Grid
-
32x32 Grid
•
Raster box: Turns ON or OFF on a raster around the default
active area. This raster box is a white, single-pixel-wide
broken line.
•
Diagonal Motion: Turns the Diagonal Motion ON or OFF
for select patterns
-
The motion is a bottom-right to top-left diagonal for
16x16, 32x32 grid
-
The motion is right to left for 100% Color Bars.
-
There is no motion in Horizontal and vertical Ramps
•
Area of Interest (AOI): Turns ON or OFF a raster box that
can be positioned and sized within the output active area.
This raster box is a green, single-pixel-wide broken line that
helps you adjust the AOI within the output’s active area.
The handles for the AOI menu are:
-
H Size and V size : Adjusts the horizontal and vertical
positions respectively
-
H Pos and V pos: Adjusts the horizontal and vertical
positions respectively
-
Note a lock button to allow user to lock the aspect ratio
of the size.
•
Reset button: resets the AOI to default which is the full
output area
96
R5905948 E2 12/12/2014
Содержание Event Master E2
Страница 1: ...E2 User s guide R5905948 00 12 12 2014...
Страница 8: ...Table of contents 4 R5905948 E2 12 12 2014...
Страница 16: ...2 Safety 12 R5905948 E2 12 12 2014...
Страница 32: ...3 General 28 R5905948 E2 12 12 2014...
Страница 82: ...6 GUI orientation Image 6 8 78 R5905948 E2 12 12 2014...
Страница 94: ...6 GUI orientation Image 6 20 90 R5905948 E2 12 12 2014...
Страница 115: ...6 GUI orientation Image 6 37 Thumbnail view Image 6 38 R5905948 E2 12 12 2014 111...
Страница 186: ...7 System Setup 182 R5905948 E2 12 12 2014...
Страница 192: ...8 Updating firmware 188 R5905948 E2 12 12 2014...
Страница 196: ...9 General operation example Image 9 3 192 R5905948 E2 12 12 2014...
Страница 213: ...9 General operation example Image 9 25 R5905948 E2 12 12 2014 209...
Страница 216: ...9 General operation example 212 R5905948 E2 12 12 2014...
Страница 220: ...10 Maintenance 10 2 Process Overview Flow chart Image 10 2 216 R5905948 E2 12 12 2014...
Страница 226: ...10 Maintenance Image 10 11 2 Pull out the Front cover and lay it flat in front of the unit 222 R5905948 E2 12 12 2014...
Страница 281: ...10 Maintenance Disregard the heatsink from the spare kit R5905948 E2 12 12 2014 277...
Страница 282: ...10 Maintenance 278 R5905948 E2 12 12 2014...
Страница 286: ...11 Environmental information Republic of Turkey In conformity with the WEEE Regulation 282 R5905948 E2 12 12 2014...
Страница 288: ...11 Environmental information 284 R5905948 E2 12 12 2014...
Страница 298: ...B Remote Control Protocol 294 R5905948 E2 12 12 2014...
Страница 299: ...C Troubleshooting C TROUBLESHOOTING R5905948 E2 12 12 2014 295...
Страница 300: ...C Troubleshooting 296 R5905948 E2 12 12 2014...


