24
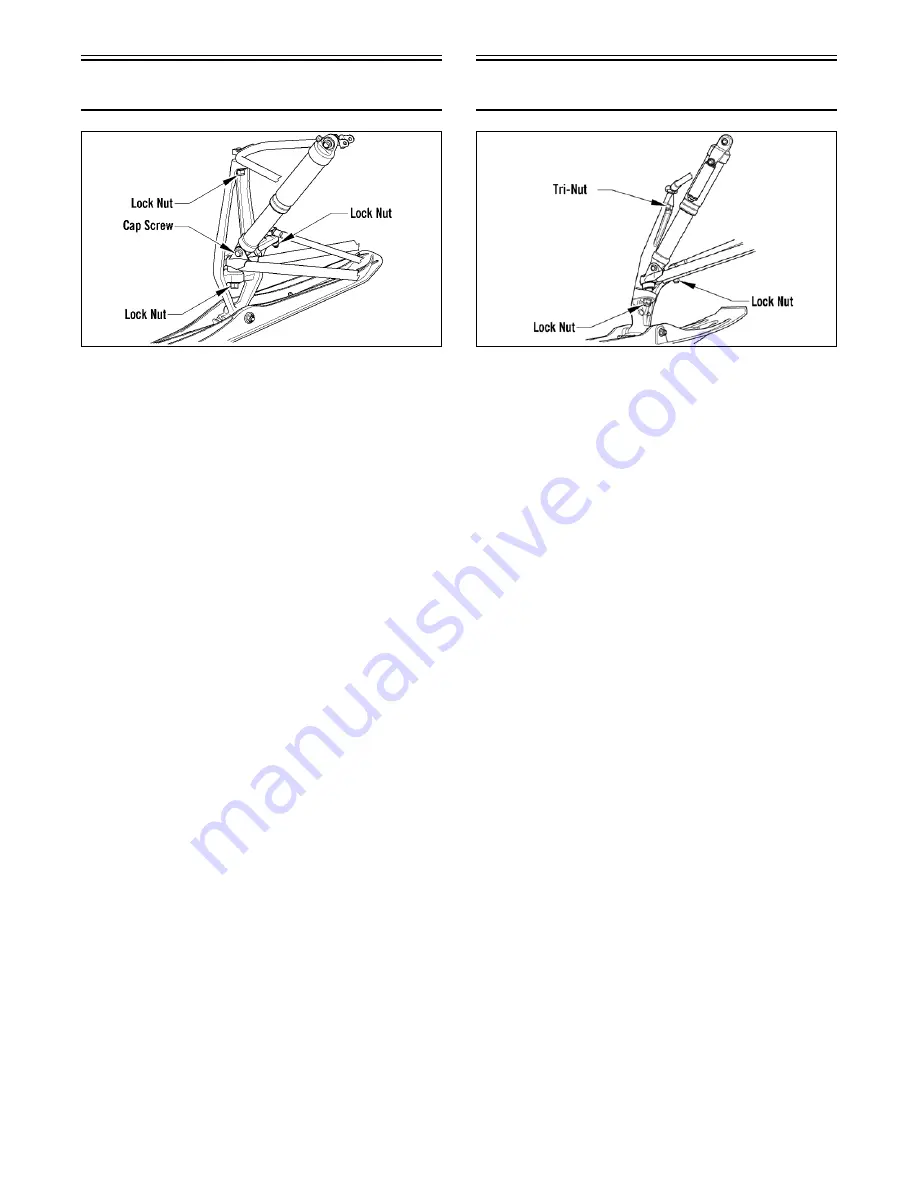
Spindle (ZR/XF)
0747-904
REMOVING
1. Position the front of the snowmobile on a safety
stand; then remove the ski.
2. Remove the cap screws and lock nuts securing the
shock absorber. Account for two axles.
3. Remove the lock nut securing the tie rod to the spin-
dle arm. Account for the washer on the top side.
4. Remove the two lock nuts securing the spindle to the
upper and lower A-arms; then using a rubber mallet,
remove the arms from the spindle.
5. Remove the spindle.
INSPECTING
1. Inspect the spindle for excessive wear, cracks, bends,
or imperfections.
2. Inspect the A-arm bushings and axle area for wear.
3. Inspect the ski spindle axle and bearings for wear,
damage, or loose fit. Replace the bearings as a set.
NOTE: Replacing the ski bolt bushings is difficult. The
existing bushings will be damaged during removal. Be
careful, however, not to damage the spindle when remov-
ing the bushings. Press the new bushings into the spindle.
INSTALLING
1. Place the shock absorber into position. Secure with
the cap screws and new lock nuts. Tighten to 32 ft-lb.
2. Install the upper and lower A-arms into the spindle
and loosely secure with new lock nuts; then remove
the snowmobile from the support stand. Tighten both
lock nuts to 45 ft-lb.
NOTE: The weight of the snowmobile will allow the
ball joints to seat into the spindle before tightening
the nuts.
3. Place the tie rod with washer into position on the
spindle arm. Secure with a new lock nut. Tighten to
32 ft-lb.
4. Install the ski.
5. Turn the handlebar fully to the right and then to the
left to verify the steering moves freely.
Spindle (XF HC/M)
0749-480
REMOVING
1. Position the front of the snowmobile on a safety
stand; then remove the ski.
2. Remove the lock nut securing the tie rod to the spin-
dle arm. Account for the washer on the top side.
3. Remove the machine screw and tri-nut securing the
upper A-arm ball joint to the spindle.
4. Remove two lock nut securing the spindle to the
lower A-arm; then using a rubber mallet, remove the
lower arm from the spindle.
INSPECTING
1. Inspect the spindle for excessive wear, cracks, bends,
or imperfections.
2. Inspect the A-arm bushings and axle area for wear.
3. Inspect the ski spindle axle and bearings for wear,
damage, or loose fit. Replace the bearings as a set.
NOTE: Replacing the ski bolt bushings is difficult. The
existing bushings will be damaged during removal. Be
careful, however, not to damage the spindle when remov-
ing the bushings. Press the new bushings into the spindle.
INSTALLING
1. Install the lower A-arm into the spindle and loosely
secure using a new lock nut.
2. Secure the upper A-arm ball joint to the spindle
using the existing machine screw and tri-nut. Tighten
the machine screw to 23 ft-lb.
3. Loosely install a new lock nut to secure the lower
A-arm to the spindle; then remove the snowmobile
from the support stand. Tighten to 45 ft-lb.
NOTE: The weight of the snowmobile will allow the
ball joint to seat into the spindle before tightening the
nut.
4. Place the tie rod with washer into position on the
spindle arm. Secure with a new lock nut. Tighten to
32 ft-lb.
5. Install the ski.
Содержание M 8000
Страница 1: ...www arcticcat com SERVICE MANUAL www arcticcat com...
Страница 42: ...41 500cc_2A_15...
Страница 50: ...49 600_14_2...
Страница 58: ...57 800_12_2...
Страница 155: ...154 Troubleshooting Servomotor SERVO1A16...
Страница 156: ...155 SERVO2rv16...
Страница 193: ...192 0747 414 M 141 High Country Models...
Страница 209: ...208 NOTES...
Страница 210: ...Printed in U S A Trademarks of Arctic Cat Inc Thief River Falls MN 56701 p n 2260 847...


