131
NOTE: If fuel pressure is not as specified, the pump
is defective and must be replaced.
5. Disconnect the fuel pump from the main wiring har-
ness.
6. Connect the positive lead of a 12-volt power supply
to the red wire and the negative lead of the 12-volt
power supply to the black wire.
7. The pump should operate (it would be heard run-
ning).
NOTE: If the fuel pump fails to operate, reverse the
power supply at the fuel pump connector allowing the
motor to run in the opposite direction. This will verify
that nothing has entered and/or obstructed the pump.
NOTE: If the fuel pump still fails to operate, the
pump is defective and must be replaced.
REMOVING
1. Remove both access panels, hood, upper and lower
consoles, and seat.
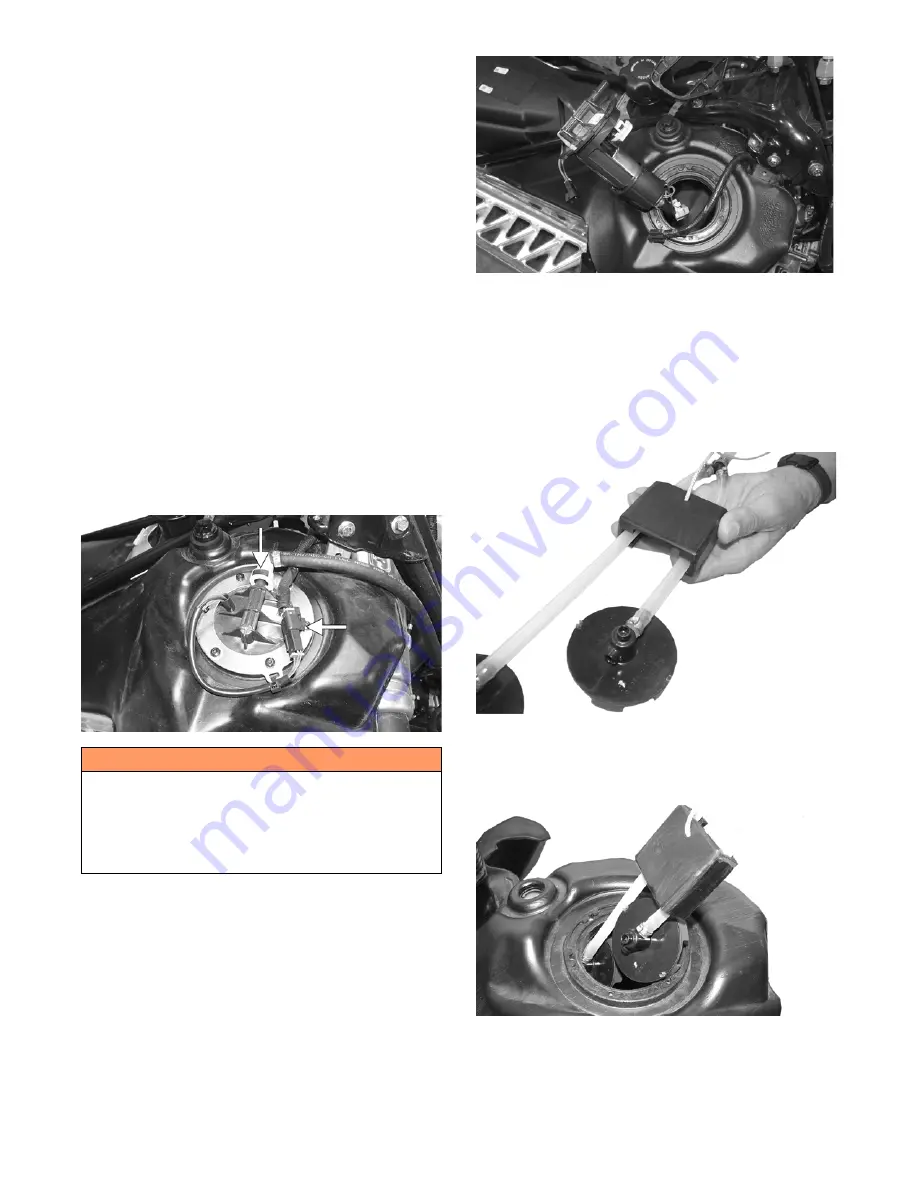
2. Disconnect the fuel pump harness connector; then
disconnect the gasline hose from the outlet of the
fuel pump by pressing inward on the white connec-
tor, pressing in the black release, and finally pulling
back on the hose.
XM211B
3. Remove and retain the six torx-head screws securing
the fuel pump in the fuel tank; then remove the
retaining ring.
4. Carefully remove the fuel pump and fuel pickup
assembly from the gas tank noting the orientation of
the fuel pump outlet for assembling purposes.
SNO-702
NOTE: If the fuel pickup assembly is not being
replaced, inspect the screens for any tears or obstruc-
tions. Also check the hoses and replace if necessary.
INSTALLING
1. Slide Fuel Pump Installation Tool onto the fuel hose
near the “Y” fitting until the tool touches the middle
pickup. The two rear pickups should be pulled
together.
SNO-704
2. Carefully push the fuel pump assembly down and
back into the fuel tank until the white fuel sensor
(below the fuel pump) is flush with the fuel pump
mounting surface.
SNO-705
3. While holding the fuel pump with the white fuel sen-
sor in this position, pull the tool up to the tank open-
ing with the retrieval cord.
WARNING
Since the fuel supply hose may be under pressure,
remove it slowly to release the pressure. Place an absor-
bent towel around the connection to absorb gasoline;
then remove the hose slowly to release the pressure.
Always wear safety glasses when removing the fuel
hoses.
Содержание M 8000
Страница 1: ...www arcticcat com SERVICE MANUAL www arcticcat com...
Страница 42: ...41 500cc_2A_15...
Страница 50: ...49 600_14_2...
Страница 58: ...57 800_12_2...
Страница 155: ...154 Troubleshooting Servomotor SERVO1A16...
Страница 156: ...155 SERVO2rv16...
Страница 193: ...192 0747 414 M 141 High Country Models...
Страница 209: ...208 NOTES...
Страница 210: ...Printed in U S A Trademarks of Arctic Cat Inc Thief River Falls MN 56701 p n 2260 847...


