203
FZ104
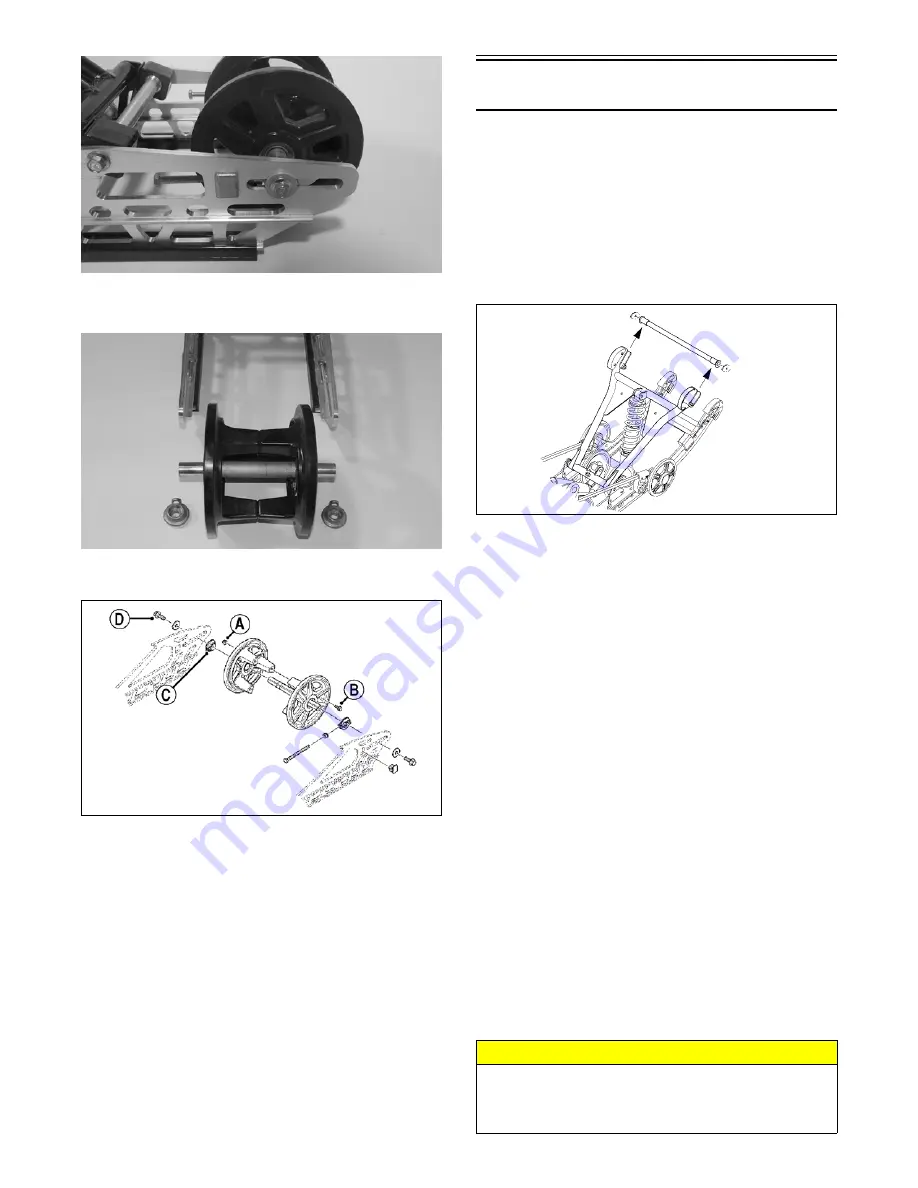
2. Loosen the track adjusting bolts then carefully
remove the rear axle assembly from the skid frame.
ZJ266
ASSEMBLING REAR AXLE
SNO-2239A
1. If the rear idler wheels were separated, install both
wheels onto the axle and secure using the existing
cap screws (B) and nuts (A). Tighten to 80 in.-lb.
2. Place the adjuster bushings (C) on the axle; then
install the idler wheels and secure with two cap
screws (D) (coated with blue Loctite #243) and flat
washers. Tighten cap screws only until snug.
NOTE: Tighten the rear idler wheel axle only until
snug until the skid frame has been installed and track
tension has been adjusted; then the axle assembly
must be tightened to 34 ft-lb.
3. Install the skid frame.
Installing Skid Frame
1. Using a piece of cardboard on the floor to protect
against scratching and an appropriate handle-
bar/steering post stand, tip the snowmobile onto one
side.
2. Pull the track away from the tunnel and spread open;
then place the skid frame into the track.
3. On the ZR, position the front of the skid frame into
the tunnel and engage the front arm with the slider
axle in the tunnel.
0742-187
4. On the M and XF, secure the front of the skid frame
to the tunnel using the existing cap screws, flat wash-
ers, and lock nuts.
NOTE: To aid in centering the front arm with the
hole in the tunnel, position the skid frame and track
at a 45° angle to the bottom of the tunnel.
5. Push the rear of the skid frame and the track into the
tunnel.
6. Align the rear arm assembly with the appropriate
hole in the tunnel. Secure the rear arm assembly with
a cap screw, lock washer, and flat washer. AT THIS
TIME, TIGHTEN ONLY UNTIL SNUG.
7. Tip the snowmobile onto the other side; then align
the offset arm assembly with the appropriate hole in
the tunnel. Secure the rear arm assembly with a cap
screw, lock washer, and flat washer. AT THIS TIME,
TIGHTEN ONLY UNTIL SNUG.
NOTE: Do not install the short legs of the rear
springs onto the adjusting cams at this time.
8. At this time, place the snowmobile to the upright
position; then tighten all cap screws to 40 ft-lb.
9. On the ZR, using the Rear Suspension Spring Tool,
install the short legs of the rear springs onto the
adjusting cams making sure the cams are in the same
adjustment positions.
10. Adjust track tension and track alignment.
CAUTION
After proper track tension and alignment have been
attained, make certain that the rear axle cap screws
tightened to specifications or component damage will
occur.
Содержание M 8000
Страница 1: ...www arcticcat com SERVICE MANUAL www arcticcat com...
Страница 42: ...41 500cc_2A_15...
Страница 50: ...49 600_14_2...
Страница 58: ...57 800_12_2...
Страница 155: ...154 Troubleshooting Servomotor SERVO1A16...
Страница 156: ...155 SERVO2rv16...
Страница 193: ...192 0747 414 M 141 High Country Models...
Страница 209: ...208 NOTES...
Страница 210: ...Printed in U S A Trademarks of Arctic Cat Inc Thief River Falls MN 56701 p n 2260 847...


