


Troubleshooting
190
10" Modero Touch Panels
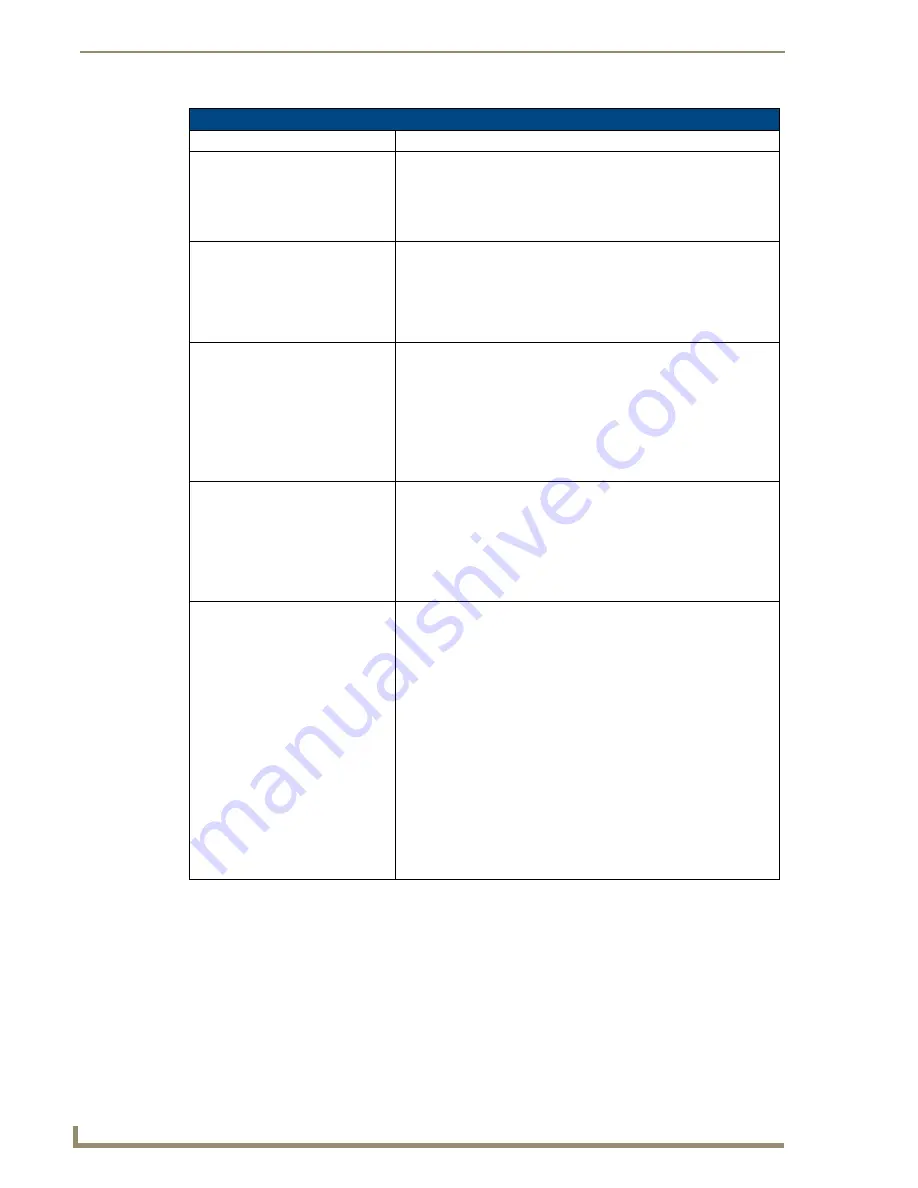
Troubleshooting Information (Cont.)
Symptom
Solution
I updated my panel firmware but
my Battery Base page doesn’t
seem to be working properly.
• Cycle power manually to the panel and check the Battery Base page
after startup.
• Verify that you are using the most current v2.XX Modero firmware.
• If downloading the firmware to the panel via a COM port, try using an
IP Address and retry the download of the firmware to the panel.
My Modero panel isn’t appearing
in my Workspace window.
• Verify that the System number is the same on both the NetLinx
Workspace window and the System Settings page on the Modero
panel.
• Verify you have entered the proper NetLinx Master IP and connection
methods into the Master Connection section of the System Settings
page.
My Modero panel can’t obtain a
DHCP Address
In requesting a DHCP Address, the DHCP Server can take up to a few
minutes to provide the address.
• Verify there is an active Ethernet connection attached to the rear of
the Modero before beginning these procedures.
• Select
Diagnostics
>
Network Address
, from the Main menu and
verify the System number.
• If the IP Address field is still empty, give the Modero a few minutes to
negotiate a DHCP Address and try again.
My NXT-BP battery pack is
blinking when I check the battery
life indicator.
• A blinking battery life LED indicates that there is less than 10% power
charge remaining on the battery.
• It is recommended that you fully charge the battery either in the
NXA-BASE/1 battery base or in the NXT-CHG battery charger.
• Refer to the
NXA-BASE/1 Battery Base Kit (FG2255-05K)
section on
page 26 and
NXT-CHG Battery Charger Kit (FG2255-50K)
section
on page 30 for more information.
My panel is not showing up in the
Virtual Master’s System list of
connected devices.
If you a Virtual Master has already connected to the target panel, the
G4 device retains the information of the previous Virtual Master System
number.
• Reboot the panel without the USB cable plugged into the panel.
• Configure NetLinx Studio for a Virtual Master connection. Note the
System Number used in the Edit Settings window.
• Stop communication on the Virtual Master by going to
Settings
>
Stop Communications
.
• Click
Yes
to stop communication.
• Select the System Number (from the Online Tree tab) and use a right
mouse click to select
Refresh System
. This re-establishes
communication with the Virtual Master.
• Plug-in the mini-USB cable into the corresponding port on the panel.
• Wait a few seconds and refresh the system. This re-establishes
communication with the Virtual Master. The panel should now appear
in the list of available devices.
Содержание modero NXD-CV10
Страница 1: ...Operation Reference Guide Touch Panels NXT D CV10 10 Modero Touch Panel Last Revised 7 2 2012 ...
Страница 44: ...CV10 Touch Panel Accessories 32 10 Modero Touch Panels ...
Страница 58: ...Installation 46 10 Modero Touch Panels ...
Страница 88: ...Configuring Communication 76 10 Modero Touch Panels ...
Страница 98: ...Upgrading Modero Firmware 86 10 Modero Touch Panels ...
Страница 192: ...Appendix A 180 10 Modero Touch Panels ...
Страница 206: ...Troubleshooting 194 10 Modero Touch Panels ...
Страница 207: ...Appendix 195 10 Modero Touch Panels ...


