


Configuring Communication
55
12” and 15” Modero Touch Panels
Master Connection - Using ICSNet
Before beginning:
1.
Verify that an
ICSNet
cable is connected from either the rear (NXT model) or side
(NXD model) of the panel to the NetLinx Master and from the Master to an ICSNet port.
2.
Verify that the NetLinx Master is receiving power and is turned On.
3.
Connect the terminal end of the PSN power cable to the 12 VDC power connector on the
rear/side of the panel, and supply power.
4.
After the panel powers-up, press and hold the grey Front Setup Access button (
for 3 seconds
) to continue
with the setup process and proceed to the Setup page.
5.
Press the
Protected Setup
>
System Connection
button (located on the lower-left) to open the System
Connection page (FIG. 57).
6.
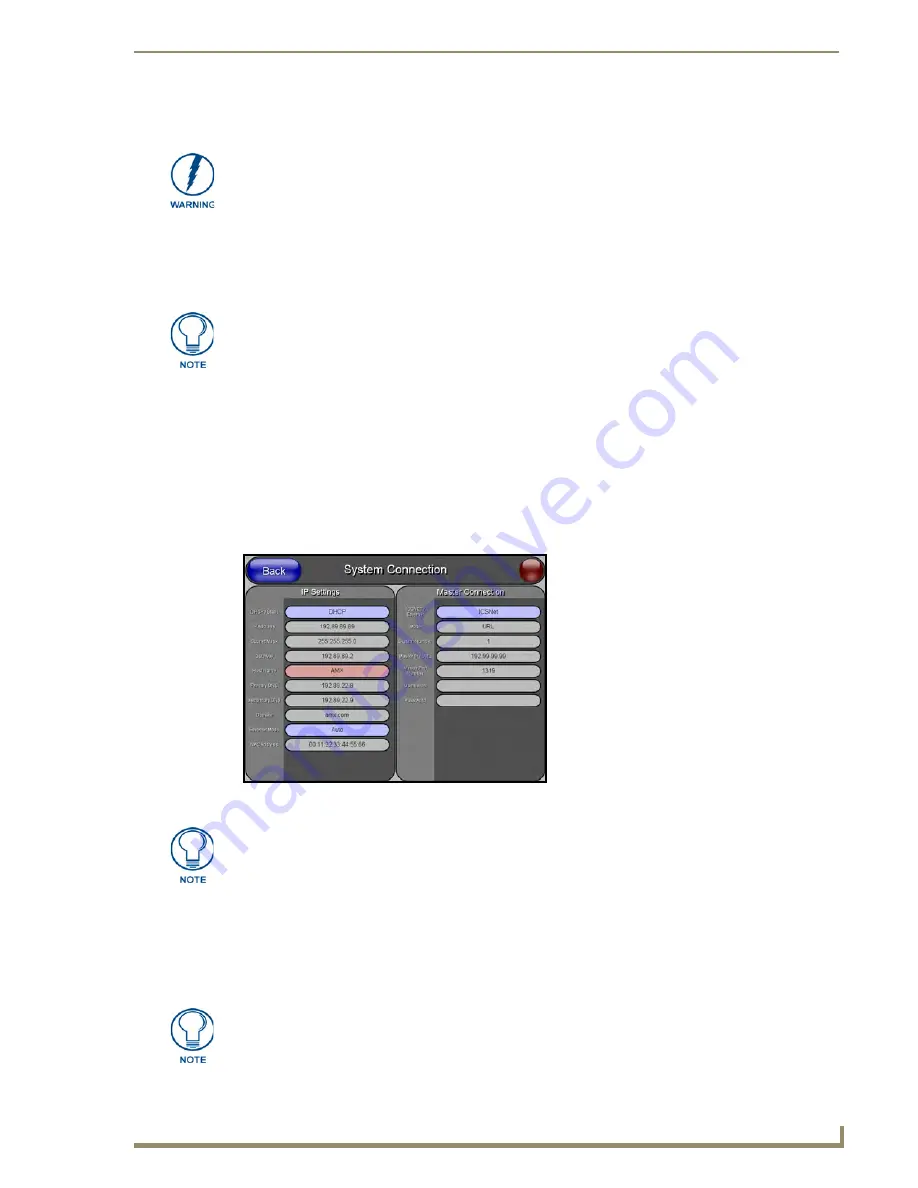
Toggle the
ICSNET/Ethernet
field (
from the Master Connection section
) until the choices cycle to
ICSNet
. Refer to the
System Connection Page
section on page 103 for more information about the fields
on this page.
7.
Do not alter any of the grey fields in the IP Settings section. These fields are not user-editable and are
used when connecting via ICSNet between the Master and the panel.
8.
Press the
Protected Setup
button on the touch panel to return to the Protected Setup page.
9.
Press the on-screen
Reboot
button from the Protected Setup page to both save any changes and restart the
panel.
Verify you are using the latest NetLinx Master firmware.
If the panel was not already powered, continue with steps 3 and 4. These steps allow
the panel to cycle through its available ports and detect any attached connectors.
FIG. 57
ICSNet System Connection page
ALL
grey fields are read-only but still display the network information. Blue fields
toggle through available options. Red fields open the on-screen keyboard for
information editing.
There are 2 possible Master Connection Types available:
Wireless Ethernet
(card)
or
Wired
Ethernet
(CAT5).
Содержание Modero NXD-CA12
Страница 20: ...Introduction 10 12 and 15 Modero Touch Panels...
Страница 60: ...Installation Procedures 12 and 15 Panels 50 12 and 15 Modero Touch Panels...
Страница 82: ...Configuring Communication 72 12 and 15 Modero Touch Panels...
Страница 90: ...Upgrading Modero Firmware 80 12 and 15 Modero Touch Panels...


