39
© American Time
© American Time
38
Glossar
y
App
endix
Tr
oublesho
oting
Clo
ck
Installation
Syst
em Contr
oller
Installation
Intr
oduction
Glossar
y
App
endix
Troublesho
oting
Clo
ck
Installation
Syst
em Contr
oller
Installation
Intr
oduction
SiteSync IQ Wired Installation Manual
SiteSync IQ Wired Installation Manual
Remote Connect Web Interface
Glossar
y
App
endix
Tr
oublesho
oting
Clo
ck
Installation
Syst
em Contr
oller
Installation
Intr
oduction
Remote Connect Web Interface
Glossar
y
App
endix
Troublesho
oting
Clo
ck
Installation
Syst
em Contr
oller
Installation
Intr
oduction
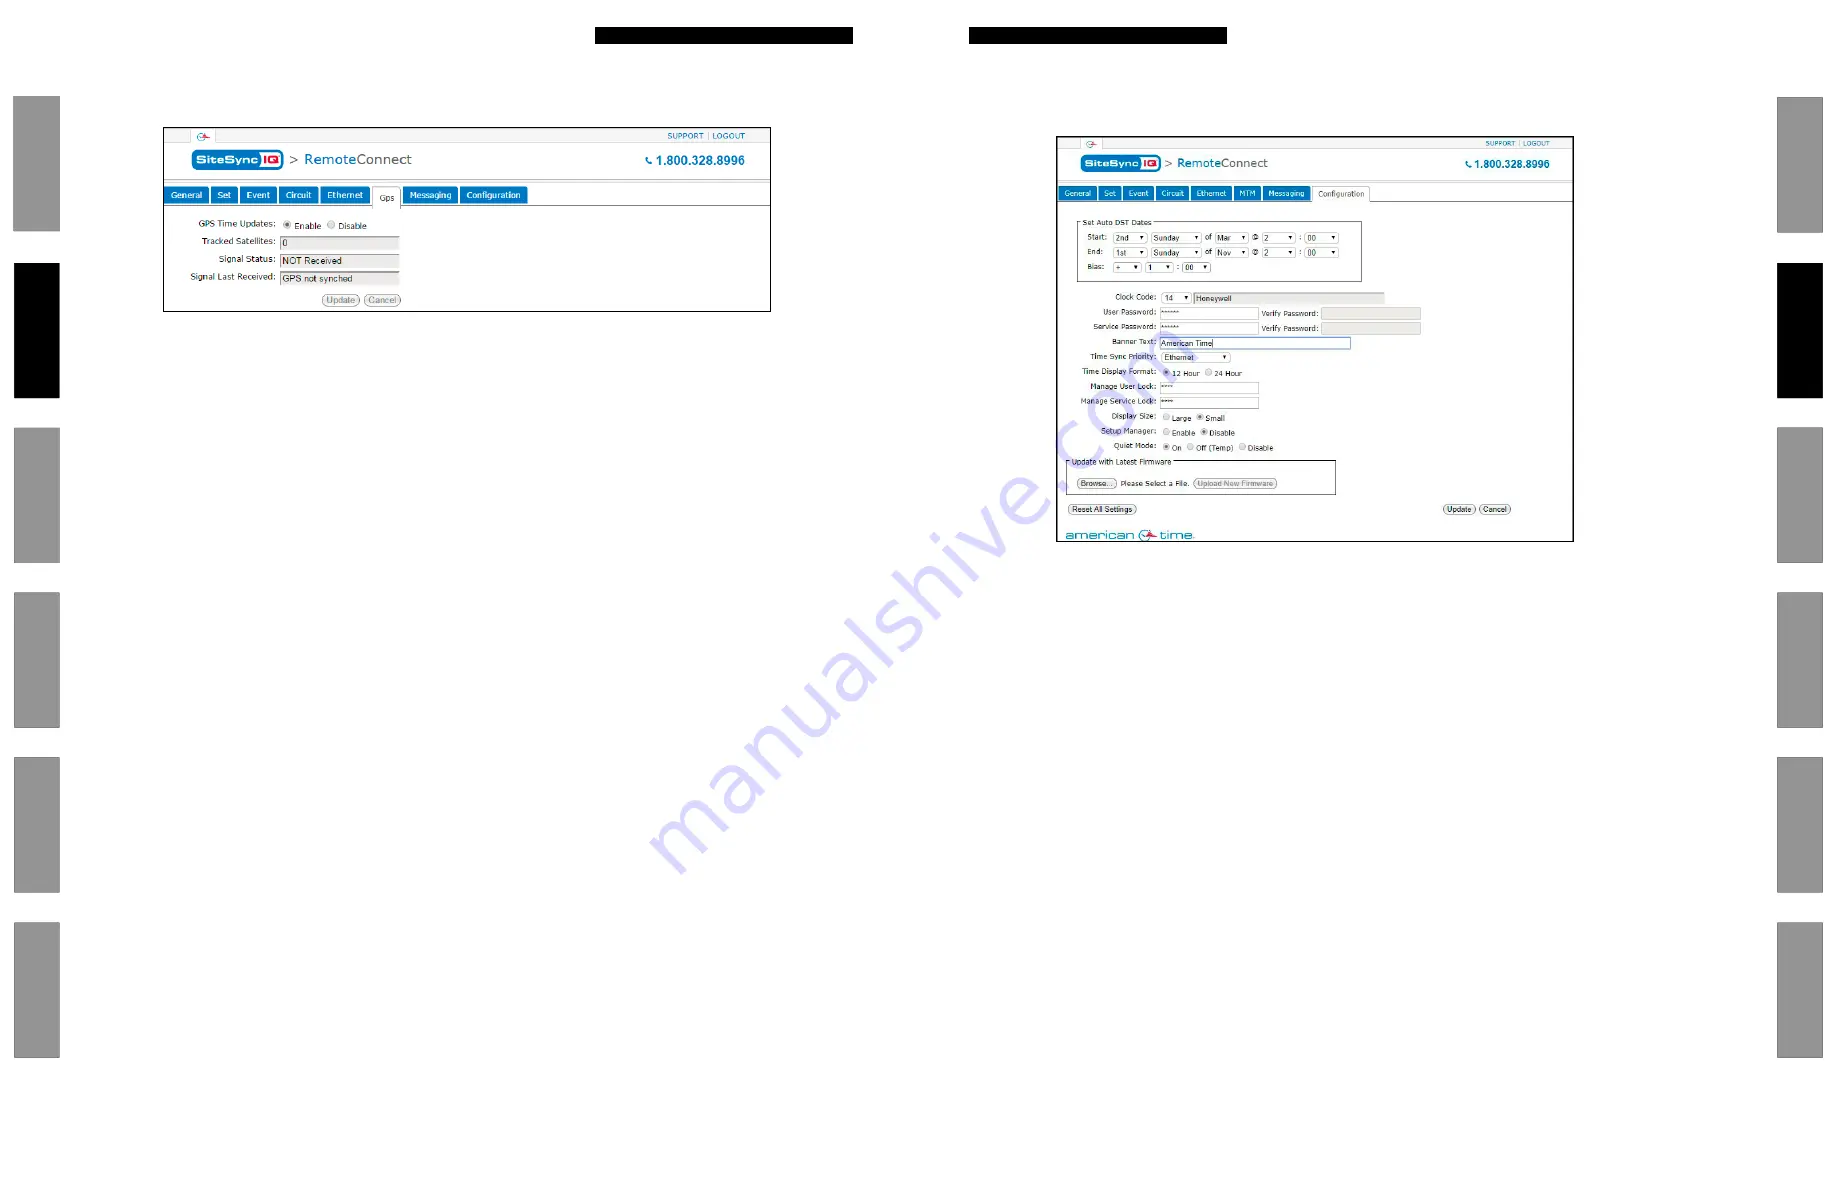
Configuration Tab:
The Configuration Tab requires a service password for access. Within this tab, the user can change their passwords, update their firmware,
change their time synchronization priority, or change the system controller’s banner text.
Figure 16
1.
Set Auto DST Dates:
This allows the user to change the AUTO DST dates and times. This allows for future flexibility if the
DST were to change. The
Update
button must be pressed for changes to take effect.
2.
Clock Code
– This allows the user to see which clock code is currently selected to run their wired clocks. If the text is cut off, hover
over with mouse to see full text. This field may not be selectable if the system controller is not configured for clock relays.
3.
User Password/Verify:
This allows the user to change the
User Password
. The
User Password
must match the
Verify Password
to
be accepted. The
Update
button must be pressed for changes to take effect.
4.
Service Password/Verify:
This allows the user to change the
Service Password
. The
Service Password
must match the
Verify Password
to be accepted. The
Update
button must be pressed for changes to take effect.
5.
Banner Text:
This allows the user to change the
Banner Text
displayed on the LCD screen of the system controller. The
Update
button
must be pressed for changes to take effect.
6.
Time Sync Priority:
This allows the user to change the
Time Sync Priority
. This feature is used to determine the priority of time
synchronization of the system controller. The
Update
button must be pressed for changes to take effect.
7.
Time Display Format:
This allows the user to change the
Time Display Format
on the LCD screens. The format chosen will also be
displayed on our American Digital Series Clocks. The
Update
button must be pressed for changes to take effect.
8.
Manage User Lock:
This allows the user to change the
User Lock
for accessing menus through the keypad of the system controller.
This lock must be numeric. The
Update
button must be pressed for changes to take effect.
9.
Manage Service Lock:
This allows the user to change the
Service Lock
for accessing menus through the keypad of the system
controller. This lock must be numeric. The
Update
button must be pressed for changes to take effect.
10.
Display Size:
This allows the user to change the LCD display size. The
Update
button must be pressed for changes to take effect.
11.
Setup Manager:
This allows the user to enable the Setup Wizard on a power cycle. If enabled the Setup Wizard will appear on a power
cycle. The
Update
button must be pressed for changes to take effect.
12.
Update with Latest Firmware:
This allows a user to update the firmware of the system controller. The firmware file must be
downloaded from the support site to the PC which is running Remote Connect.
13.
Reset All Settings:
Pressing this button will reset the system controller to factory defaults.
■
Note:
Pressing this will change the IP address of the unit and it will have to be reconfigured to meet the network specifications.
GPS Tab:
The GPS Tab contains status information of the GPS antenna. This displays the signal status, signal strength, and the last signal received.
Figure 15
1.
GPS Time Updates:
This allows the user to enable or disable the GPS time synchronization source. The
Update
button must be
pressed for this change to take effect.
2.
Tracked Satellites:
This displays the number of tracked satellites. There should be a minimum of 3 tracked satellites for proper
reception.
3.
Signal Status:
This displays if the GPS signal has been received within the last 2 hours.
4.
Signal Last Received:
This displays the date and time of the last GPS signal reception.


