Aficio 3228C Скачать руководство пользователя страница 921

Delivering Scan Files

61

5

GGGG

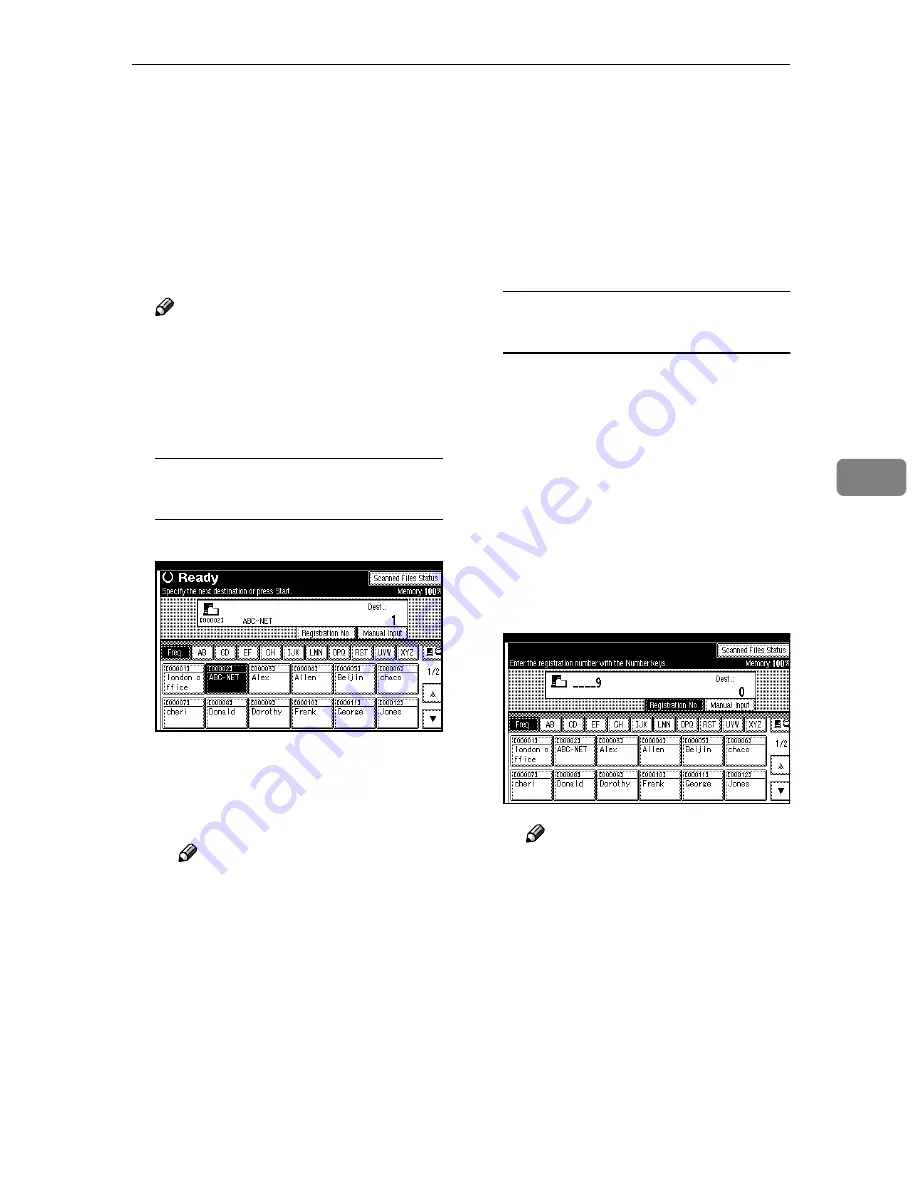
Specify the destination.

You can specify the destination in
the following ways:
• Select it from the destination list.
• Specify its registration number.
• Search for it.
• Enter the e-mail address directly.

Note

The destination list is updated
automatically.

Depending on the security set-
tings, certain destinations may
not be displayed.

Selecting a destination from the 
list

A

Select the destination.

The selected destination is high-
lighted and also is displayed in
the destination field at the top of
the screen.

Note

If the target destination does
not appear, take one of the
following steps:
• Display the destination by

selecting its initial letter
from the title.

• Display the destination by

pressing 

[

U

U

U

U

]

 or 

[

T

T

T

T

]

.

The destination titles are pro-
gramed in the delivery serv-
er.

To deselect a destination, press
the destination once more, or
press 

[

U

U

U

U

Prev.

]

 or 

[

T

T

T

T

Next

]

 to

display the destination in the
destination field, and then
press the 

{{{{

Clear/Stop

}}}}

 key.

B

To select more destinations, re-
peat step 

A

A

A

A

.

Using a registration number to 
select a destination

A

Press 

[

Registration No.

]

.

B

Enter the five digit registration
number that has been assigned
to a destination folder using
the number keys.

If the entered number is less
than five digits, press the 

{{{{

#

}}}}

key after the last number.
Example: To enter 00009
Press the 

{{{{

9

}}}}

 key, and then

press the 

{{{{

#

}}}}

 key.

Note

To deselect a destination,
press 

[

U

U

U

U

Prev.

]

 or 

[

T

T

T

T

Next

]

 to

display the destination in the
destination field, and then
press the 

{{{{

Clear/Stop

}}}}

 key.

C

To select more destinations, re-
peat step 

B

B

B

B

.

Содержание 3228C

Страница 1: ...3228C 3235C 3245C Operating Instructions General Settings Guide Getting Started Combined Function Operations Document Server User Tools System Settings Troubleshooting Remarks...

Страница 2: ...ase contact your local dealer Laser Safety This machine is considered a Class 1 laser device safe for office EDP use The machine contains five AIGalnP laser diodes 7 milliwatt 645 660 nanometer wavele...

Страница 3: ...t data from being tampered or prevent the machine from unauthorized use Also refer to this manual for the procedures for registering administrators as well as setting user and administrator authentica...

Страница 4: ...displayed from the Setup display when DeskTopBinder Lite is installed DeskTopBinder Introduction Guide PDF file CD ROM2 Describes operations of DeskTopBinder Lite and provides an overview of its func...

Страница 5: ...erence Advanced Features You can print documents created using applications See Printer Ref erence You can scan originals and send the scan file to a computer See Scanner Reference Utilizing Stored Do...

Страница 6: ...hine directly without performing a print job LAN Fax See Facsimile Reference Advanced Features Fax Transmission and Reception Through the Internet You can send fax documents through e mail by specifyi...

Страница 7: ...rence Administrating the Machine Protecting Documents Security Functions You can protect documents from unauthorized access and stop them from being copied without permission See Security Reference Yo...

Страница 8: ...rowser you can use a computer to view the ma chine s status such as to check on paper quantities or misfeeds etc See Network Guide You can also use a Web browser to make network settings See Net work...

Страница 9: ...eration 10 Positions of Labels and Hallmarks for R R R RWARNING and R R R RCAUTION 12 ENERGY STAR Program 13 Machine Types 15 1 Getting Started Guide to Components 17 External Options 19 Internal Opti...

Страница 10: ...74 Deleting a User Code 74 Displaying the Counter for Each User Code 75 Printing the Counter for Each User Code 75 Clearing the Number of Prints 76 Fax Destination 77 Registering a Fax Destination 78...

Страница 11: ...Paper Tray Unit 111 Loading Paper into Large Capacity Tray optional 112 D D D DAdding Toner 114 Inserting Toner 115 x x x xClearing Misfeeds 117 Changing the Paper Size 126 Changing the Paper Size of...

Страница 12: ...e Display Language 154 Changing Paper Thickness Settings 155 Counter 156 Displaying the Total Counter 156 7 Entering Text Entering Text 157 Available Characters 157 Keys 157 How to Enter Text 158 8 Sp...

Страница 13: ...nt and of the Council of 9 March 1999 on radio equipment and telecommunications terminal equipment and the mu tual recognition of their conformity The CE Declaration of Conformity is available on the...

Страница 14: ...r names of the Windows operating systems are as follows The product name of Windows 95 is Microsoft Windows 95 The product name of Windows 98 is Microsoft Windows 98 The product name of Windows Me is...

Страница 15: ...o so sub ject to the following conditions The above copyright notice and this permission notice shall be included in all copies or substantial portions of the Software THE SOFTWARE IS PROVIDED AS IS W...

Страница 16: ...NTAL SPECIAL EXEM PLARY OR CONSEQUENTIAL DAMAGES INCLUDING BUT NOT LIMIT ED TO PROCUREMENT OF SUBSTITUTE GOODS OR SERVICES LOSS OF USE DATA OR PROFITS OR BUSINESS INTERRUPTION HOWEVER CAUSED AND ON AN...

Страница 17: ...ia Berkeley and contributors Sablotron Sablotron Version 0 82 Copyright 2000 Ginger Alliance Ltd All Rights Re served a The application software installed on this product includes the Sablotron soft w...

Страница 18: ...bution C The name Carnegie Mellon University must not be used to endorse or pro mote products derived from this software without prior written permission For permission or any other legal details plea...

Страница 19: ...These notices must be retained in any copies of any part of this documentation and or software MD5 Copyright 1991 2 RSA Data Security Inc Created 1991 All rights reserved License to copy and use this...

Страница 20: ...ven the implied warranty of MERCHANTABILI TY or FITNESS FOR A PARTICULAR PURPOSE See the GNU General Public License for more details You should have received a copy of the GNU General Public License a...

Страница 21: ...Be sure to read the instructions all of which are included in the Safety Information section in the General Settings Guide WARNINGS and CAUTIONS are notes for your safety Important If these instructi...

Страница 22: ...plug not the cable if the power cable or plug becomes frayed or otherwise damaged To avoid hazardous electric shock or laser radiation exposure do not remove any covers or screws other than those spec...

Страница 23: ...gets into your eyes flush immediately with large amounts of water Consult a doctor if necessary If toner or used toner is swallowed dilute by drinking a large amount of wa ter Consult a doctor if nece...

Страница 24: ...ls and Hallmarks for R R R RWARNING and R R R RCAUTION This machine has labels for RWARNING and RCAUTION at the positions shown below For safety please follow the instructions and handle the machine a...

Страница 25: ...s this function reduces a burden to the environment For applicable machines duplex function one sided originals two sided cop ies can be selected preferentially when the operation switch or the main p...

Страница 26: ...cycled paper Please contact your sales representative for recommended paper Type 1 Type 2 Type 3 Low Power mode Power consumption 130W 135W 135W Default interval 15 minutes Recovery Time 25 seconds Sl...

Страница 27: ...ich model you have see the inside front cover Type 1 Type 2 Type 3 Copy speed B W 28 copies minute A4K 81 2 11 K 35 copies minute A4K 81 2 11 K 45 copies minute A4K 81 2 11 K Copy speed Full Colour 24...

Страница 28: ...16...

Страница 29: ...sfed paper The upper left cover can be opened by first opening the duplex reversal unit 5 Earth Leakage Breaker Prevents electric shock See p 150 Earth Leakage Breaker 6 Ventilation holes Prevents ove...

Страница 30: ...o replace the toner car tridge 2 Ventilation holes Prevent overheating Do not obstruct the ventilation holes by placing an object near it or leaning things against it If the machine overheats a fault...

Страница 31: ...e control panel on the machine Note When the scanner accessibility unit is installed the control panel and the scanner unit on the machine cannot be used 5 2 Tray finisher Sorts stacks staples and pun...

Страница 32: ...from the Document Server stored by copier and printer functions See p 46 Downloading Stored Documents E IEEE 802 1b Wireless LAN Board 1 You can install a wireless LAN interface F IEEE 1284 Interface...

Страница 33: ...ing Toner B Load Paper indicator See p 111 BLoading Paper L Service Call indicator M Open Cover indicator x Misfeed indicator See p 117 xClearing Misfeeds Communicating Communicating in dicator See Co...

Страница 34: ...rints to check print quality before mak ing multiple sets See Sample Copy Copy Reference 15 Start key Press to start copying Press to start scan ning or printing documents stored using the Document Se...

Страница 35: ...ng screen is displayed as default after power on The following display shows a machine with options fully installed Common key operations The following keys are common to all screens Key list OK Ackno...

Страница 36: ...ation consult the re spective administrators When User Code Authentication is set the screen for entering a user code is displayed instead For details see p 73 Authentication Information A A A A Press...

Страница 37: ...ortant To prevent unauthorized users from using the machine always log off when you have finished using the machine A A A A Press User Tools Counter B B B B Press Logout C C C C Press Yes D D D D Pres...

Страница 38: ...Note This machine automatically enters Energy Saver mode or turns itself off if you do not use it for a while See p 59 Auto Off Timer Ener gy Saver Timer Turning On the Main Power A A A A Make sure t...

Страница 39: ...not lit B B B B Open the switch cover and then turn off the main power switch The main power indicator turns off When the fax unit optional is installed When the main power switch is turned off while...

Страница 40: ...hed after a certain period of time has elapsed This function is called Auto Off Note You can change the Auto Off time See p 59 Auto Off Timer The Auto Off Timer function will not operate in the follow...

Страница 41: ...u cannot switch modes in any of the following situations When scanning in a fax message for transmission During immediate transmission When accessing User Tools During interrupt copying During On hook...

Страница 42: ...etting See p 53 Function Priority System Reset The machine returns automatically to its initial condition when the job is fin ished after a certain period of time has elapsed This function is called S...

Страница 43: ...finisher or booklet finisher is installed on the machine you can specify the output tray where documents are delivered For details about how to specify the output tray for each function see the follo...

Страница 44: ...Stapling Operations for Scanning Scanning Operations for Document Server Scanning a Document to Store in Document Server Printing from Document Server Printing from Document Server Sending a Facsimile...

Страница 45: ...ocument Server Scanning a Docu ment to Store in Document Server Printing from Doc ument Server 4 4 6 6 6 DeskTopBinder Professional Lite Printing from Doc ument Server 4 Sending a Facsimi le from Docu...

Страница 46: ...Combined Function Operations 34 2...

Страница 47: ...nts using the scanner function See Sending Stored Files by E mail or Scan to Folder or Delivering Scanner Reference Note The following table shows the capacity of the Document Server function Where to...

Страница 48: ...bers of originals copies and printed pages 4 The operation keys 5 The functions under which the documents were stored The icons below show the functions active when the documents were stored in the Do...

Страница 49: ...rding it Keep any record of your pass word in a secure place Avoid using a single number or consecutive numbers for a pass word such as 0000 or 1234 since the numbers like this are easy to guess so us...

Страница 50: ...ee Copy Reference F F F F Press the Start key The document is stored in the Doc ument Server Note To stop scanning press the Clear Stop key To restart a paused scanning job press Con tinue in the conf...

Страница 51: ...r name press Non programmed Name B Enter a new user name and then press OK Reference p 157 Entering Text When no user names are registered in the Address Book A Enter a new user name and then press OK...

Страница 52: ...for the document enter that pass word and then press OK C C C C Press File Management D D D D Press Change User Name Change File Name or Change Password E E E E Enter the new user name file name or pa...

Страница 53: ...lear Modes key selection of all documents will be canceled If you press Printg Odr the doc uments in print order To check the details of stored documents A A A A Select a document to display its detai...

Страница 54: ...ote To specify an unregistered user name follow the procedure be low D D D D To specify an unregistered user name press Non programmed Name Enter a user name and then press OK Reference p 157 Entering...

Страница 55: ...rt Rotate Sort Stack Staple Punch If you print more than one set using the Sort function you can check the print result by print ing out only the first set See p 44 Sample copy When multiple documents...

Страница 56: ...ing Search by User Name or Search by File Name at the left top of the display See p 41 Searching for Stored Doc uments You can sort document names in the list by user name file name or date To sort do...

Страница 57: ...erver key B B B B Select the document to delete Note If a password is already set for the document enter that pass word and then press OK You can delete multiple docu ments at once See p 40 Select ing...

Страница 58: ...nter mode A A A A Start a Web browser B B B B Enter http IP address of this machine in the Address box The top page appears on the Web browser C C C C Click Document Server The Document Server File Li...

Страница 59: ...rver Storage Key F2 1 Sided 1 Sided Combine Document Server Storage Key F3 1 Sided 1 Sided Combine 4 originals Document Server Storage Key F4 1 Sided 1 Sided Combine 8 originals Document Server Storag...

Страница 60: ...Document Server 48 3...

Страница 61: ...terface see System Settings Parallel Connec tion Printer Reference General Features See p 53 General Features Default Panel Tone On Warm Up Notice On Copy Count Display Up Function Priority Copier Pri...

Страница 62: ...Size Tray 4 Auto Detect Paper Type Bypass tray No Display Paper Type Tray 1 No Display 2 Sided Copy Auto Paper Select On Paper Type Tray 2 No Display 2 Sided Copy Auto Paper Select On Paper Type Tray...

Страница 63: ...Management Extended Security Display Print Counter Display Clear Print Counter per User Address Book Management Address Book Program Change Delete Group Address Book Program Change Delete Transfer Re...

Страница 64: ...eration switch is turned off or the Energy Saver or Clear Modes key is pressed Changing Default Settings A A A A Press the User Tools Counter key B B B B Press System Settings C C C C Select the menu...

Страница 65: ...ting is OFF the beeper does not sound regardless of the Warm Up Notice setting Default On Copy Count Display copier Document Server The copy counter can be set to show the number of copies made count...

Страница 66: ...ess This is useful if you are making many copies and have to change settings for each copy If you set a longer reset period you can prevent interruption from other func tions Note Default 3 seconds Th...

Страница 67: ...opier The left tray cannot be used as the output tray for duplex printing If you specify the left tray as the output tray when printing prints are de livered printed side up Output Printer printer You...

Страница 68: ...ver You can specify the tray to supply paper for output Note Default Tray 1 When optional paper tray unit is installed Tray3 and Tray4 is dis played When optional LCT is installed LCT is displayed Pap...

Страница 69: ...y 4 Auto Detect Reference p 126 Changing the Paper Size Paper Type Bypass tray Sets the display so you can see what type of paper is loaded in the bypass tray The paper types you can set for the bypas...

Страница 70: ...you can also specify the display timing and copy method for two sided copying Note Default Tray to Program Off Functions using the cover sheet tray setting are the front cover function and front back...

Страница 71: ...e status after the Auto Off operation is referred to as Sleep mode For the Auto Off Timer specify the time to elapse before Auto Off Note Default 60 minute s Enter a time interval between 10 seconds a...

Страница 72: ...ds using the number keys Facsimile Auto Reset Timer facsimile Specifies the time to elapse before the facsimile mode resets Note Default On 30 seconds The time can be set from 30 to 999 seconds using...

Страница 73: ...act the administrator We recommend specifying Administrator Authentication before making Ad ministrator Tools settings See Security Reference User Authentication Management User Code Authentication Al...

Страница 74: ...unter key B Press System Settings C Press Administrator Tools D Press Display Print Counter E Press Print Counter List F Press the Start key G Press Exit Display Clear Print Counter per User Allows yo...

Страница 75: ...nd protocol E mail You can register an e mail address Folder You can register the protocol path user name password port number and server name Add to Group You can put names registered in the Address...

Страница 76: ...dress Delete Deletes a transfer request Note You can register up to 10 transfer requests Address Book Change Order You can change the order of the names in the Address Book Note You can rearrange the...

Страница 77: ...a list of the names according to the order in Title 2 Print in Title 3 Order Prints a list of the names according to the order in Title 3 Print Group Dial List Prints a list of the groups registered...

Страница 78: ...three days 72 hours after they have been stored Delete All Files All documents stored in Document Server will be deleted Note Even if a password has been set all documents will be deleted A confirmat...

Страница 79: ...matically deleted after a job is completed Note Default Off You can also specify the method of overwriting Reference See the manual for DataOverwriteSecurity Unit Erase All Memory When the optional Da...

Страница 80: ...about using a Web browser see the Web browser Help For details about SmartDevice Monitor for Admin and how to in stall it see Printer Reference For operating instructions see SmartDeviceMonitor for Ad...

Страница 81: ...ame and key dis play beforehand you can specify e mail and folder destinations simply by selecting the name key See p 71 Registering Names Sending fax by Quick Dial Register a fax number in the Addres...

Страница 82: ...nd password you can connect to a shared folder simply by selecting the destination shown on the initial scanner display whenever sending files using the scanner function to a shared folder To share th...

Страница 83: ...t Server see p 37 Using the Doc ument Server Reference p 157 Entering Text H H H H Press the key for the classification you want to use under Select Ti tle Note The keys you can select are as follows...

Страница 84: ...ress the key for the classifica tion you want to use from Se lect Title F F F F Press OK G G G G Press Exit H H H H Press the User Tools Counter key Deleting a Registered Name If you delete a name dat...

Страница 85: ...istered in User Tools for the printer driver See p 61 User Authentication Management Reference For details about setting user codes for the printer driver see Printer Reference or the printer driver H...

Страница 86: ...ber keys Note If you press you can search by the registered name user code fax number folder name e mail address or IP Fax desti nation To change the name key dis play and title see p 71 Chang ing a R...

Страница 87: ...play Clear Print Counter per User E E E E Select Copy Counter Print Coun ter Transmission Counter or Scan ner Counter Counters for individual function usage under each user code ap pear Printing the C...

Страница 88: ...r key B B B B Press System Settings C C C C Press Administrator Tools D D D D Press Display Clear Print Counter per User E E E E Select the user code to clear To clear the number of prints made under...

Страница 89: ...You must include every digit in the number SUB Code Registering a SUB Code allows you to use Confidential Trans mission to send messages to the other fax machines that support a similar function call...

Страница 90: ...that support a similar function called SUB Code See SUB Code Facsim ile Reference Advanced Fea tures SEP Code Registering a SEP Code allows you to use Polling Reception to receive faxes from the othe...

Страница 91: ...the number keys and then press OK F Press OK To set the International TX Mode A Press Change under Interna tional TX Mode B Select Off or On and then press OK To select the fax header Note You can re...

Страница 92: ...nation you want to change Press the name key or enter the registered number using the number keys Note If you press you can search by the registered name user code fax number folder name e mail addre...

Страница 93: ...I I Press Exit J J J J Press the User Tools Counter key Deleting a Registered Fax Destination Note If you delete a destination that is a specified delivery destination messages to its registered Perso...

Страница 94: ...number keys Note If you press you can search by the registered name user code fax number folder name e mail address or IP Fax desti nation To register the name key dis play and title see p 71 Regis te...

Страница 95: ...by the registered name user code fax number folder name e mail address or IP Fax destination To change the name key dis play and title see p 71 Chang ing a Registered Name F F F F Press Fax Dest G G G...

Страница 96: ...ess from an LDAP server and then register it in the Address Book Sending Scan File by E mail Scanner Reference You can set the machine to send a transmission result e mail when ever a user transmissio...

Страница 97: ...s to a Group Changing a Registered E mail Destination A A A A Press the User Tools Counter key B B B B Press System Settings C C C C Press Administrator Tools and then press T T T TNext D D D D Press...

Страница 98: ...lect the name whose e mail ad dress you want to delete Press the name key or enter the registered number using the number keys Note If you press you can search by the registered name user code fax num...

Страница 99: ...etails about network settings see Setting Up the Machine on a Network Network Guide For details about Scan to Folder see Sending Scan Files by Scan to Folder Scanner Reference Using SMB to Connect Not...

Страница 100: ...nter up to 128 charac ters for the password L L L L Enter the password again to con firm and then press OK M M M M Press Folder N N N N Confirm that SMB is selected Note To specify a folder you can ei...

Страница 101: ...assword is not correct a message appears Press Exit and then enter the user name and password again F Press OK O O O O Press Connection Test to check the path is set correctly P P P P Press Exit Note...

Страница 102: ...try again J J J J Press OK K K K K Press Exit L L L L Press the User Tools Counter key Deleting a registered folder Note To delete a name entirely see p 72 Deleting a Registered Name A A A A Press th...

Страница 103: ...ee p 71 Regis tering a Name F F F F Press Auth Info and then press T T T TNext G G G G Press Specify Other Auth Info on the right side of Folder Authenti cation Note When Do not Specify is selected th...

Страница 104: ...T T T Press Connection Test to check the path is set correctly U U U U Press Exit Note If the connection test fails check the settings and then try again V V V V Press OK W W W W Press Exit X X X X P...

Страница 105: ...ser Tools Counter key Deleting a registered folder Note To delete a name entirely see p 72 Deleting a Registered Name A A A A Press the User Tools Counter key B B B B Press System Settings C C C C Pre...

Страница 106: ...Settings C C C C Press Administrator Tools and then press T T T TNext D D D D Press Address Book Program Change Delete Group E E E E Press New Program F F F F Press Change under Group Name G G G G En...

Страница 107: ...F F Press Add to Group G G G G Select a group to which you want to add the name to Note If you press you can search for a group by entering the group name The group key that you have se lected becomes...

Страница 108: ...from the group H H H H Press OK I I I I Press Exit J J J J Press the User Tools Counter key Changing a Group Name A A A A Press the User Tools Counter key B B B B Press System Settings C C C C Press...

Страница 109: ...Address Book Program Change Delete Group E E E E Select the group that you want to put into another group Press the group key or enter the registered number using the number keys F F F F Press Add to...

Страница 110: ...User Tools System Settings 98 4 G G G G Select the group that you want to delete from H H H H Press OK The group key is deselected and the group is deleted from it...

Страница 111: ...D D Press Address Book Management E E E E Select the name whose protection code you want to register Press the name key or enter the registered number using the number keys Note If you press you can...

Страница 112: ...Administrator Tools and then press T T T TNext D D D D Press Address Book Program Change Delete Group E E E E Press the group key you want to register or enter the registered number using the number k...

Страница 113: ...by e mail Transfer Stations must be machines of the same manufactur er as this one and have both the Transfer Station and Internet Fax functions You cannot use Transfer Request without programming th...

Страница 114: ...ing Stations Note When specifying the Receiving Stations use the numbers stored in Quick Dial keys or Groups in the Transfer Station Quick Dial A Press q q q qQuick Dial B Enter the number stored in t...

Страница 115: ...d Name Note If you press you can search for a user by Transfer Request name fax number or e mail ad dress F F F F Enter the items To change the Transfer Request name and key display A Press Change und...

Страница 116: ...D D D D Press Address Book Program Change Delete Transfer Request E E E E Press Delete F F F F Select the name whose Transfer Station Receiving Station you want to delete Press the name key or enter...

Страница 117: ...ministrator Tools and then press T T T TNext D D D D Press Address Book Management E E E E Press the name you want to regis ter or enter the registered number using the number keys Note To register a...

Страница 118: ...ings C C C C Press Administrator Tools and then press T T T TNext D D D D Press Address Book Management E E E E Press the name you want to regis ter or enter the registered number using the number key...

Страница 119: ...e display is off The screen contrast knob is turned to the dark position Set the screen contrast knob to the light position to see the display pan el properly The machine is in Energy Saver mode Press...

Страница 120: ...may not be locked or may not be set properly Check the side guides are locked and set properly See p 126 Chang ing the Paper Size The tray s end guide may not be set properly Check the end guide is se...

Страница 121: ...Press the Energy Saver key Con firm that the display goes off and then press the Energy Saver key again The display will return to the user code entry display Authentication has failed The entered lo...

Страница 122: ...iles to Print display and then press Print 1st Page fol lowed by the Start key Memory frequently becomes full Press Delete File to delete selected documents to in crease available memory Delete docume...

Страница 123: ...d 8 1 2 11 K contact your sales or service representative The position of the side and end guides can be changed in tray 2 1 tray paper unit and 2 tray paper unit Pa per of various sizes can then be l...

Страница 124: ...ant to load 81 2 11 K contact your sales or service representative A A A A Pull out the LCT slowly until it stops B B B B With the print side down align all four sides of two paper stacks and then loa...

Страница 125: ...hed paper or copied paper might not print correctly depending on how the originals and paper are placed Select Yes in Letterhead Setting under Copier Document Server Features and then place the origin...

Страница 126: ...when exposed to an open flame Dispose of used toner containers in accordance with local regulations Keep toner used or unused and toner containers out of reach of children If toner or used toner is in...

Страница 127: ...e humidity temperature and print ing factors such as image size density number of prints paper size and pa per type Moreover to preserve print quality this machine automatically performs periodic main...

Страница 128: ...g 116 5 When toner remains Toner can remain inside the toner cartridge in certain environments If this hap pens set the toner cartridge again Toner will be supplied automatically and you can then cont...

Страница 129: ...ds occur frequently contact your service representative Note More than one misfed area may be indicated When this happens check all the areas indicated See the following charts A B Y Z1 p 118 R 2 Tray...

Страница 130: ...Troubleshooting 118 5...

Страница 131: ...xClearing Misfeeds 119 5 AFZ009S...

Страница 132: ...Troubleshooting 120 5...

Страница 133: ...xClearing Misfeeds 121 5 AFZ010S...

Страница 134: ...Troubleshooting 122 5...

Страница 135: ...xClearing Misfeeds 123 5 AFZ011S...

Страница 136: ...Troubleshooting 124 5...

Страница 137: ...xClearing Misfeeds 125 5 AFZ012S...

Страница 138: ...1 or other optional paper tray units Make sure you are follow ing the appropriate procedure be fore you begin Reference For details about paper sizes and types see p 171 Copy Paper Changing the Paper...

Страница 139: ...ps I I I I Check the paper size shown on the display panel If you load a paper size that is not selected automatically If you load a paper size that is not se lected automatically you need to specify...

Страница 140: ...Press the User Tools Counter key The initial display is shown Important If you want to print on paper that is selected automatically af ter printing on a paper size that is not selected automatically...

Страница 141: ...d d dAdding Staples Important Stapling failures or jams may occur if you use a staple cartridge other than that recommended Reference For details about the type of finisher see p 19 External Options...

Страница 142: ...Troubleshooting 130 5 Booklet Finisher AFZ013S...

Страница 143: ...am To avoid this turn copy paper over in the tray If there is no improvement change to a stiffer copy paper After removing jammed staples staples will not be ejected the first few times you try to use...

Страница 144: ...Troubleshooting 132 5 Booklet Finisher AFZ014S...

Страница 145: ...waste box Note If you do not Punch Recepta cle Full will remain dis played D D D D Close the front cover of the 2 tray finisher Punch Receptacle Full disap pears Note If the message is still displaye...

Страница 146: ...then pull out the booklet finisher B B B B Pull out the punch waste box and then remove the paper chips C C C C Reinstall the punch waste box Note If the message does not disap pear reinstall the punc...

Страница 147: ...Be sure not to dirty your fingers with ink from the cartridge A A A A Open the ADF unit B B B B Open the stamp cover C C C C Pull out the old stamp cartridge Tap the cartridge lock lever several times...

Страница 148: ...istration D D D D Press Auto Colour Registration E E E E Press OK Auto colour registration will be started Auto colour registration takes about fifty seconds When it is completed the display returns t...

Страница 149: ...opy Reference B B B B Press the User Tools Counter key C C C C Press Maintenance D D D D Press Colour Registration E E E E Press Fuser Adjustment Thick Pa per Important When the toner cartridge is al...

Страница 150: ...nd the display that ap peared in step returns If you specify 1 or 1 the fol lowing display appears Press Start Printing An adjusted Fuser Adjustment Sheet II is print ed and the display that appeared...

Страница 151: ...Adjusting the Colour Registration 139 5 Checking the Fuser Adjustment Sheet Following image is sample of the test sheet Fuser Adjust Sheet II...

Страница 152: ...ern will be printed Note When performing the auto col our calibration from the printer function select test patterns from 600 x 600 dpi 1800 600 dpi and 1200 x 1200 dpi and then press Start Printing T...

Страница 153: ...changes A Press Previous Setting in the Auto Colour Calibration When returning the auto colour calibration of the copy function press Previous Setting of the Copier Function If returning the auto col...

Страница 154: ...Troubleshooting 142 5...

Страница 155: ...n Do not turn off the power when the machine is in operation The machine might not produce good copy images if condensation forms inside as a result of rapid temperature change Do not open the covers...

Страница 156: ...elt if a print and a half dried print are put on top of each other Toner may also melt when using solvent type adhesive agents for pasting prints When folding prints toner in the folds will come off T...

Страница 157: ...ng precautions should always be followed Store toner containers in a cool dry place free from direct sunlight Store on a flat surface Used Toner Note Toner cannot be re used Do not incinerate used ton...

Страница 158: ...ause condensation to form inside the machine Locations close to machines gener ating ammonia such as a diazo copy machine Places where the machine will be subject to frequent strong vibra tion Dusty a...

Страница 159: ...d near the machine and shall be eas ily accessible Access to the Machine Place the machine near the power source providing the clearance areas shown 1 Rear more than 10 cm 4 2 Right more than 55 cm 21...

Страница 160: ...e water Important Do not use chemical cleaners or or ganic solvents such as thinner or benzene If such substances get in side the machine or melt plastic parts a failure might occur Do not clean parts...

Страница 161: ...B B B Open the front cover and remove the cleaning brush There are four holes for cleaning the dustproof glass C C C C Slide the cleaning brush in and out slowly 2 to 3 times to clean all four areas...

Страница 162: ...e exposure glass cov er or the ADF is closed B B B B Turn off the power Reference p 27 Turning Off the Pow er p 27 Turning Off the Main Power C C C C If the finisher is installed detach it from the ma...

Страница 163: ...Turn on the main power switch of the machine Note If the power does not come on check if the earth leakage break er is in the off position If so do not turn it to the on position Contact your sales o...

Страница 164: ...e two areas on the left and right C C C C Take the new waste toner bottle out of the bag D D D D Slowly remove the used waste toner bottle from inside the ma chine Important Be sure to remove the wast...

Страница 165: ...carefully so waste toner does not spill G G G G Insert the new waste toner bottle as shown H H H H Push it in until it stops Important Be sure to firmly insert the waste toner bottle to avoid ton er l...

Страница 166: ...Representative Telephone No A A A A Press the User Tools Counter key B B B B Press Inquiry Inquiry information appears Printing inquiry information A Press Print Inquiry List B Press the Start key Inq...

Страница 167: ...essed or the power is turned off All paper trays are set to Normal as default A A A A Press the User Tools Counter key B B B B Press Maintenance C C C C Press Plain Paper Type D D D D Select the plain...

Страница 168: ...r You can display the total counter val ue used for all functions A A A A Press the User Tools Counter key B B B B Press Counter C C C C To print a counter list press Print Counter List D D D D Press...

Страница 169: ...the cursor If there is a character already at the cursor po sition the entered character appears before it Available Characters Alphabetic characters ABCDEFGHIJKLMNOPQRSTUVWXYZabcdefghijklmnopqrstuvwx...

Страница 170: ...How to Enter Text Entering letters A A A A Press Shift to switch between uppercase and lowercase B B B B Press the letters you want to enter Deleting characters A A A A Press Backspace or Delete All t...

Страница 171: ...Copy process Dry electrostatic transfer system Development Dry two component magnetic brush development system Fusing Oilless belt fusing Resolution 600 dpi Exposure glass Stationary original exposur...

Страница 172: ...Non reproduction area Leading edge 1 5 5 0mm 0 06 0 20 Trailing edge 0 5 6 0mm 0 0 24 Left edge 0 5 4 0mm 0 0 16 Right edge 0 5 4 0 mm 0 0 16 First copy time Types 1 2 Colour 10 seconds or less B W 8...

Страница 173: ...b Power consumption Main unit only Metric version Inch version Enlargement 400 400 200 200 141 155 122 129 115 121 Full size 100 100 Reduction 93 93 82 85 75 78 71 73 65 65 50 50 25 25 Type 1 Type 2 T...

Страница 174: ...Type 3 Warm up about 1 41 kw about 1 41 kw about 1 46 kw Stand by about 0 28 kw about 0 28 kw about 0 28 kw During printing about 0 95 kw about 0 95 kw about 1 1 kw Maximum less than 1 68 kw less than...

Страница 175: ...Main Unit 163 8 Weight Types 1 2 3 Approx 120 kg 264 6 lb HDD 40 GB 2 Capacity for Document Server 37 5 GB Capacity for memory sorting 14 4 17 2 GB Capacity for others 8 GB or more...

Страница 176: ...2 KL Original weight One sided originals 40 128 g m2 11 34 lb Two sided originals 52 105 g m2 14 28 lb Maximum number of originals 80 sheets 80 g m2 20 lb or less than 11 mm 0 43 Maximum power consump...

Страница 177: ...28 lb Stack capacity No Staple 2 000 sheets A4K 81 2 11 K 80 g m2 20 lb 750 sheets A3L B4 JISL A4L B5 JISKL 11 17 L 81 2 14 L 81 2 11 L 80 g m2 20 lb 500 sheets A5K 80 g m2 20 lb Staple 1 500 sheets A...

Страница 178: ...etric version A3L B4 JISL A4K B5 JISK 11 17 L 81 2 11 K Narrow 2 2 version A3L A5K 11 17 L 81 2 14 L Paper weight 4 holes 52 163 g m2 14 lb 43 lb 2 or 3 holes 52 163 g m2 14 lb 43 lb Power consumption...

Страница 179: ...JISK 11 17 L 81 2 14 L 81 2 11 KL Staple paper weight 64 80 g m2 17 21 lb Staple position 1 staple 2 positions 2 staples 1 position Saddle stitch Paper size A3L B4 JISL A4L 11 17 L 81 2 11 L 81 2 14...

Страница 180: ...6 7 lb Note Specifications are subject to change without notice 1 Tray Paper Unit Paper weight 60 105 g m2 16 28 lb Paper size A3L B4 JISL A4KL B5 JISKL A5K 11 17 L 81 2 14 L 81 2 13 L 81 2 11 KL 81 4...

Страница 181: ...ain unit Paper capacity 1 100 sheets 80 g m2 20 lb 2 trays Dimensions W D H 578 648 974 mm 22 8 25 6 38 4 Weight Approx 25 kg 55 2 lb Large Capacity Tray Paper size A4K 81 2 11 K Paper weight 60 105 g...

Страница 182: ...t This unit lets you operate the machine or scan documents from the side instead of using the control panel on the machine Note When the scanner accessibility unit is installed the control panel and t...

Страница 183: ...ray Tray type Paper type and weight Metric version Inch version Paper ca pacity Tray 1 60 105 g m2 16 28 lb A4K 81 2 11 K 500 sheets Tray 2 Paper Tray Unit Tray 3 4 option 60 105 g m2 16 28 lb A3L B4...

Страница 184: ...l 3 6 12 0 Horizontal 5 8 18 0 Middle thick pa per 91 105 g m2 24 28 lb A3L B4 JISL A4KL A6L B5JISKL A5KL B6 JISL 11 17 L 81 2 11 KL 81 2 14 L 51 2 81 2 L 12 18 L B4JISL A4KL B5 JISKL A5KL B6 JISL A6L...

Страница 185: ...and may cause feeding problems When copying onto OHP transparencies remove copied sheets one by one If multiple sheet jams occur load the paper sheet by sheet Postcards should be fed using the bypass...

Страница 186: ...these may stick to the fusing unit and cause a misfeed Do not use copy paper that has been already copied onto faults could occur if you do Note To prevent misfeeds do not use the following kinds of...

Страница 187: ...be followed Do not store paper where it will be exposed to direct sunlight Avoid storing paper in humid areas humidity 70 or less Store on a flat surface Do not store paper vertically Under high tempe...

Страница 188: ...anging a registered fax destination 80 Changing a registered folder 89 92 Changing a Registered IP Fax Destination 83 Changing a registered Transfer Station Receiving Station 103 Changing a user code...

Страница 189: ...Management 61 L Large Capacity Tray 169 Large Capacity Tray LCT 19 LDAP Authentication 106 Left tray 19 Loading Paper Large Capacity Tray 112 Loading paper 111 paper size 126 paper tray 111 M Machine...

Страница 190: ...n 10 Sample Copy key 22 Saving Colour Copies 144 Saving energy 28 Scanner Accessibility Unit 170 Screen contrast knob 21 Set date 60 Set time 61 size setting 55 Slip sheet tray 58 SMB 87 SMTP Authenti...

Страница 191: ...irective 89 336 EEC and its amending di rectives and the Low Voltage Directive 73 23 EEC and its amending directives In accordance with IEC 60417 this machine uses the following symbols for the main p...

Страница 192: ...ldwell New Jersey 07006 Phone 1 973 882 2000 The Netherlands RICOH EUROPE B V Groenelaan 3 1186 AA Amstelveen Phone 31 0 20 5474111 United Kingdom RICOH UK LTD Ricoh House 1 Plane Tree Crescent Feltha...

Страница 193: ...245C Operating Instructions Cop 3228C 3235C 3245C Operating Instructions Copy Reference Placing Originals Copying Colour Adjustment Program Troubleshooting User Tools Copier Document Server Features S...

Страница 194: ...Caution Use of controls or adjustments or performance of procedures other than those specified in this manual might result in hazardous radiation exposure Notes The model names of the machines do not...

Страница 195: ...being tampered or prevent the machine from unauthorized use Also refer to this manual for the procedures for registering administrators as well as setting user and administrator authentication Network...

Страница 196: ...displayed from the Setup display when DeskTopBinder Lite is installed DeskTopBinder Introduction Guide PDF file CD ROM2 Describes operations of DeskTopBinder Lite and provides an overview of its func...

Страница 197: ...iii What You Can Do with This Machine Colour Functions Colour Adjustments GCMO022e...

Страница 198: ...iv AFZ003S...

Страница 199: ...v GCMO023e...

Страница 200: ...vi What You Can Do with This Machine Functions differ depending on machine type and options See p 4 Functions Re quiring Optional Configurations...

Страница 201: ...vii...

Страница 202: ...viii...

Страница 203: ...s 14 Placing Originals in the Auto Document Feeder 15 2 Copying Basic Procedure 19 Interrupt Copy 20 Left Original Beeper 20 Job Preset 21 Copying from the Bypass Tray 22 When copying onto OHP Transpa...

Страница 204: ...83 Programs 85 Storing a Program 85 Changing a stored program 86 Deleting a Program 86 Recalling a Program 86 3 Colour Adjustment Program Colour Adjustment 87 Colour Balance 88 Colour Balance Program...

Страница 205: ...an Change with User Tools 111 General Features P 1 5 111 General Features P 2 5 112 General Features P 3 5 113 General Features P 4 5 113 General Features P 5 5 113 Reproduction Ratio P 1 2 114 Reprod...

Страница 206: ...xii...

Страница 207: ...no responsibility for its completeness or accuracy If you have any questions con cerning the legality of copying or printing certain items consult with your legal advisor The colour samples in this m...

Страница 208: ...Be sure to read the instructions all of which are included in the Safety Information section in the General Settings Guide WARNINGS and CAUTIONS are notes for your safety Important If these instructio...

Страница 209: ...l you have see the inside front cover of this manual Type 1 Type 2 Type 3 Copy speed B W 28 copies minute A4K 81 2 11 K 35 copies minute A4K 81 2 11 K 45 copies minute A4K 81 2 11 K Copy speed Full Co...

Страница 210: ...hine configuration and extra options See the table below Required options 1 The paper tray unit is required in order to install the finisher Function Batch SADF Mixed Size Shift Sort Stack Staple Stap...

Страница 211: ...errors d Add Staple indicator D Add Toner indicator B Load Paper indicator L Service Call indicator M Open Cover indicator x Misfeed indicator See Control Panel General Settings Guide 4 Adjust Progra...

Страница 212: ...14 Sample Copy key Press to make a single set of copies or prints to check print quality before mak ing multiple sets See p 43 Sample copy 15 Start key Press to start copying Press to start scan ning...

Страница 213: ...Original function 2 Operational status and messages 3 You can register up to three fre quently used reduce enlarge ratios other than the fixed reduce enlarge ratios See p 114 Shortcut R E 4 Numbers o...

Страница 214: ...8...

Страница 215: ...eeder ADF Placing the following types of originals in the ADF can cause paper misfeeds or result in damage to the originals Place these originals on the exposure glass in stead Originals other than th...

Страница 216: ...sparent originals such as OHP transparencies or translucent paper Note The original might become dirty if it is written on with a pencil or a similar instrument Sizes Detectable by Auto Paper Select D...

Страница 217: ...s difficult to detect It is difficult for the machine to automatically detect the sizes of the following types of originals so select the paper size manually Originals with indexes tags or other protr...

Страница 218: ...if you correctly place originals in the ADF or on the exposure glass mar gins of a few millimeters on all four sides of the original might not be copied 1 0 5 4 0 mm 0 0 16 2 0 5 6 0 mm 0 0 24 3 0 5...

Страница 219: ...al orientation in the following ways Standard orientation Select this function when original orientation is the same as copy pa per orientation 90 turn Use this to copy A3K B4 JISKor 11 17 K size orig...

Страница 220: ...F Important Do not lift the exposure glass cover or the ADF forcefully Otherwise the ADF cover might open or be damaged Note Be sure to lift the exposure glass cover or ADF more than 30 Otherwise the...

Страница 221: ...or cover them with your hands or the original size may not be detect ed properly Also do not place an ything on the exposure glass cover as this could cause a malfunction 1 Sensors A A A A Set the doc...

Страница 222: ...For related default settings see p 114 Shortcut R E A A A A Press Special Original B B B B Press SADF and then press OK C C C C Place one page of an original and then press the Start key D D D D When...

Страница 223: ...art key Placing custom size originals When placing custom size originals specify the size of the originals Note Paper with a vertical size of 128 297 mm 5 1 11 6 and a horizon tal size of 128 432 mm 5...

Страница 224: ...Placing Originals 18 1...

Страница 225: ...nction is displayed press the Copy key Initial copy display B B B B Make sure no previous settings remain Note When there are previous set tings remaining press the Clear Modes key before entering you...

Страница 226: ...C When copying is complete re move the originals and copies D Press the Interrupt key again The Interrupt indicator turns off E When the display prompts you to do so place the former set of originals...

Страница 227: ...es the next job begins automatically A A A A Press NextJob when Copying is displayed B B B B Make settings for the next copy job C C C C Place the originals in the ADF and then press the Start key All...

Страница 228: ...paper type See p 24 When copying onto OHP Trans parencies or Thick Paper You must specify the paper size when using paper tracing paper etc of less than 59g m2 thickness The maximum number of sheets...

Страница 229: ...sheet feeds C C C C Select the paper type and size Note When copying onto OHP trans parencies or thick paper see p 24 When copying onto OHP Transparencies or Thick Paper When copying on the back side...

Страница 230: ...will be delivered to external tray when copying onto OHP transparencies or thick paper from the bypass tray even if you have specified not to use the external tray as the output tray A A A A Open the...

Страница 231: ...curled straighten it out and then insert it If the paper is not straightened out it can cause paper jams Original and paper orientations Pay attention to the orientation of pa per and originals Top to...

Страница 232: ...erence For more information about sup ported size of envelope see Rec ommended Paper Sizes and Types General Settings Guide A A A A Open the bypass tray and then insert the envelopes with the side you...

Страница 233: ...a coloured background e g cata logues 1 A3 11 17 size Original 2 In standard copy mode margins appear on copies 3 12 18 Full Bleed Copy 4 Cut around the margins to pro duce a full image Note You can...

Страница 234: ...Yellow magenta and cyan will be copied with one toner colour but beige orange red light green pink green marine blue blue and purple uses 2 toner colours to copy Two Colour Copy Two Colour Copy Normal...

Страница 235: ...ser colours press User Colour C Press Non black Portion and then select the colour to replace the black colour of the original D Press OK twice Convert Colours Copies by changing the colour in the ori...

Страница 236: ...nals and then press the Start key Erase Colour You can erase a certain colour in the image of the original Note It is possible to select up to 4 col ours The width of the colour to be delet ed can be...

Страница 237: ...ion B B B B Press Colour Creation C C C C Press Colour Background D D D D Select the background colour then press OK Note You can adjust the density of each colour in 4 levels You can cancel the selec...

Страница 238: ...age density Use when copying originals with dirty backgrounds such as news papers You can adjust fore ground density while leaving the background unchanged Auto image density A A A A Make sure Auto Im...

Страница 239: ...riginals generated by print ers Generation Copy When originals are copies genera tion copies the copy image can be reproduced sharply and clearly Pale When you need to reproduce orig inals that have l...

Страница 240: ...hen copying at a ratio of 100 Metric version Inch version Only the paper trays set to No Display or Recycled Paper in Paper Type and also set to Yes in Apply Auto Paper Select can be selected for the...

Страница 241: ...tomatically selected See Paper Type in Tray Paper Settings General Settings Guide Manual Paper Select A A A A Select the paper tray bypass tray or LCT The selected paper tray is highlighted Reference...

Страница 242: ...See p 111 Auto Tray Switching You cannot use the Rotated Copy function when enlarging onto A3 B4 JIS or 11 17 81 2 14 size paper To do this place the original in the L orien tation When using the 2 t...

Страница 243: ...E Priority A A A A Press Reduce Enlarge Note To select a preset ratio on the in itial display press the shortcut reduce enlarge key and then proceed to step D B B B B Press Enlarge or Reduce C C C C S...

Страница 244: ...o o o o A Select a preset ratio close to the ratio using Reduce or Enlarge B Adjust the ratio further using n n n n or o o o o Note Pressing n n n n or o o o o changes the ratio in increments of 1 Pre...

Страница 245: ...ls of mixed siz es A A A A Press Auto Reduce Enlarge B B B B Select the paper tray C C C C Place the originals and then press the Start key Size Magnification You can calculate an enlargement or reduc...

Страница 246: ...atio Note You can also select a preset ratio close to the ratio using Reduce or Enlarge and then adjust it further using n n n n or o o o o A A A A Press Reduce Enlarge B B B B Press Specifd Ratio C C...

Страница 247: ...of the copy as shown Note You can enter sizes within the fol lowing ranges A A A A Press Reduce Enlarge B B B B Press Specifd Ratio C C C C Press Dir Size Mag mm D D D D Enter the horizontal size of...

Страница 248: ...d delivered to the copy tray Note To use the Rotate Sort function two paper trays with paper of the same size and type but dif ferent orientation KL are re quired See Paper Type Tray1 4 General Settin...

Страница 249: ...ss the key after all the originals have been scanned D D D D Press the Start key Sample copy You can use this function to check copy settings before making a long copy run Note This function can be us...

Страница 250: ...es can be assembled with each page shifted When a finisher is installed This function groups together cop ies of each page in a multi page original Every other page stack is shifted for ease of separa...

Страница 251: ...tion Stapling position and original setting Place all the originals in an orientation in which they can be read They will be automatically rotated for copying When copy paper is identical in size and...

Страница 252: ...Copying 46 2 Bottom K L Left 2 K 2 L Top 2 K L 2 Original location Stapling position 1 Exposure glass ADF...

Страница 253: ...Copier Functions 47 2 Booklet finisher Original location Stapling position 1 Exposure glass ADF Top K L Bottom K L Left 2 K 2 L Top 2 K L 2...

Страница 254: ...tions 2 tray finisher Booklet finisher Note When you select the stapling position the Sort function is automatically se lected Reference p 45 Stapling position and original setting p 131 Staple B B B...

Страница 255: ...be copied When placing originals in the ADF set the first page on top When placing originals on the exposure glass or in the ADF using the Batch function press the key after all the originals have bee...

Страница 256: ...bypass tray with this function The relationship between the orientation in which you place the original and the punch hole positions is as follows Punch hole positions 2 tray finisher Original locatio...

Страница 257: ...1 2 Booklet finisher 90 Turn 2 holes K L 3 holes K L 4 holes K L Original location Punch hole positions 1 Exposure glass ADF Standard 2 holes K L 4 holes K L Original location Punch hole positions 1 E...

Страница 258: ...tion of delivery A A A A Select one of the punch hole positions B B B B Enter the number of copy sets with the number keys C C C C Place the originals and then press the Start key 90 Turn 2 holes K L...

Страница 259: ...r according to the orientation in which you place origi nals vertical K or horizontal L 1 This table shows the orientation of im ages on the front and back of copies not the orientation of delivered c...

Страница 260: ...sure glass start with the first page to be copied When placing originals in the ADF set the first page on top When placing originals on the exposure glass or in the ADF us ing the Batch function press...

Страница 261: ...onto one side of a sheet 2 Sided 2 Pages Combine 1 Side Copies 2 two sided originals onto one side of a sheet 2 Sided 4 Pages Combine 1 Side Copies 4 two sided originals onto one side of a sheet 2 Sid...

Страница 262: ...Orig inal and then press Combine 1 Side for Copy Reference p 54 Originals and copy orien tation C C C C Select the number of originals to combine and then press OK D D D D Select the paper size E E E...

Страница 263: ...Side Copies 4 two sided originals onto a sheet four pages per side 2 Sided 16 Pages Combine 2 Side Copies 8 two sided originals onto a sheet eight pages per side Note You cannot use the bypass tray w...

Страница 264: ...elect the paper size E E E E Press OK F F F F Place the originals and then press the Start key Series Copies This function copies the front and back of a two sided original separate ly or two facing p...

Страница 265: ...D D D Select Book 1 Sided Book 2 Sided or Front Back 2 Sided and then press OK E E E E Press OK F F F F Make sure Auto Paper Select is se lected G G G G Place the original on the exposure glass and th...

Страница 266: ...d booklet Open to left Open to right 2 Sided Booklet Makes 2 sided originals into page ordered copies for a folded booklet Open to left Open to right 1 Sided Magazine Copies two or more originals into...

Страница 267: ...o make a magazine Open to left Open to right Note You cannot use the bypass tray with this function The machine sets the reproduction ratio automatically to fit the paper size Reference Related defaul...

Страница 268: ...eat Repeatedly copies a specified por tion of the image Decide the base point of the area specify the length and the width and then specify the location of the area Reference Related Initial Settings...

Страница 269: ...0 412mm 0 16 2 X2 20 432mm 0 8 17 0 Y1 0 277mm 0 10 8 and Y2 20 297mm 0 8 11 6 B B B B Select the size of the copy paper and the reproduction ratio C C C C Press Edit Colour Creation D D D D Press Edi...

Страница 270: ...to the centre Note You cannot use the bypass tray with this function Original sizes and orientations for centring are listed below Metric version Inch version Original size and orientation Copy paper...

Страница 271: ...lect ed copy images are copied in white and specified colours If Two colour normal is selected the white part of the original be comes black and the black part be comes white and the coloured part is...

Страница 272: ...ge margin from the copy Centre Erases the original s centre margin from the copy Centre Border Erases both the original s centre and edge margins from the copy Reference The erase width is set to 10 m...

Страница 273: ...Press OK Selecting Diff Width A Press Diff Width B Press the key for the border you want to change and then set the erase border width us ing n n n n and o o o o C Press OK E E E E Press OK twice F F...

Страница 274: ...e erase border width using n n n n and o o o o D Press OK Selecting Diff Width A Press Diff Width B Press the key for the part you want to change and then set the erase margin width using n n n n and...

Страница 275: ...p and bottom margins Note Margins on the back side of the page are possible only when 2 Sided or Combine 2 Side is se lected F F F F Press OK 3 times G G G G Place the originals and then press the Sta...

Страница 276: ...eight messages can be stamped on copies with a frame around it COPY URGENT PRIORITY For Your Info PRELIMINARY For Internal Use Only CONFI DENTIAL DRAFT Stamp position and original orientation Note Yo...

Страница 277: ...he originals and then press the Start key Changing the stamp colour A A A A Press Stamp Colour B B B B Select the stamp colour then press OK To change stamp position size and density A A A A Press Cha...

Страница 278: ...G G G Press OK twice H H H H Place the originals and then press the Start key Changing the stamp colour A A A A Press Stamp Colour B B B B Select the stamp colour then press OK To change the stamp pos...

Страница 279: ...J Enter the horizontal size of the stamp using the number keys and then press K K K K Press Vertical and then enter the vertical size of the stamp using the number keys and then press L L L L Place t...

Страница 280: ...nd gets ready to copy Date Stamp You can use this function to print dates onto copies You can select from the following date formats MM DD YYYY MM DD YYYY DD MM YYYY DD MM YYYY YYYY MM DD Stamp positi...

Страница 281: ...fter all settings are complete press OK F F F F Press OK twice G G G G Place the originals and then press the Start key Changing the stamp colour A A A A Press Stamp Colour B B B B Select the stamp co...

Страница 282: ...Duplex Back Page Stamp ing Position p 121 Page Numbering in Com bine p 122 Stamp Position p 122 Superimpose p 122 Stamp Colour A A A A Press Edit Colour Creation B B B B Press Stamp C C C C Press Page...

Страница 283: ...mple The steps are the same for other selections A A A A Press Change on the right side B B B B Press First Printing Page then en ter the original page number from which to start printing using the nu...

Страница 284: ...and then enter a new number C C C C Press Numbering from to then en ter the number of page from which to start numbering using the number keys and then press the key D D D D Press Last Number then ent...

Страница 285: ...e number keys and then press the key E E E E When page designation is com plete press OK F F F F Press OK 3 times Covers You can use this function to create cover sheets by adding additional pages of...

Страница 286: ...and then press the Start key Designate You can use this function to copy cer tain pages of your original onto slip sheets Preparation Before using this function set the special paper tray for slip sh...

Страница 287: ...sheets Preparation Before selecting this function press the Dup Combine Series key and select Duplex 1 Sided 2 Sided mode or Combine mode Note You can specify up to 20 pages This function can be used...

Страница 288: ...es When using OHP transparencies from the bypass tray Copy Blank Note Press the key and select OHP Sheet in Special paper See p 24 When copying onto OHP Trans parencies or Thick Paper Paper will be de...

Страница 289: ...A A A Press Store File B B B B Enter a user name file name or password if necessary Reference For details about how to regis ter the user name file name or password see To register or change a user n...

Страница 290: ...Server key to display the document selection screen When the machine is printing a document stored using the cop ier function wait until printing has finished before you store another copy document To...

Страница 291: ...General Settings Guide Programs are not deleted by turn ing the power off or pressing the Clear Modes key They are can celed only when you delete or overwrite them with another pro gram Storing a Prog...

Страница 292: ...Press Register Repeat steps E and F of Storing a Program Note When overwritten the previous program is deleted Deleting a Program A A A A Press the Program key B B B B Press Delete C C C C Press the n...

Страница 293: ...is only available in Full Colour mode A A A A Press the Adjust Program Colour key B B B B Press Adjust Colour The colour circle is displayed C C C C Select the colours you want to ad just You can sele...

Страница 294: ...es will be reset when either Auto Clear has been performed when the Clear Modes key has been pressed or when the power has been turned off Colour Balance Program You can also store the colour balance...

Страница 295: ...ings A A A A Press the Adjust Program Colour key B B B B Make sure that Colour Balance is selected and then press Program Colour Balance C C C C Make sure that Recall has been selected and then select...

Страница 296: ...ing the image in the text and the photo part when using Text Photo Note Sharp Soft Contrast Back ground Density can each be ad justed However their adjustments can affect the level of other adjust me...

Страница 297: ...s However highlighter pen colours are difficult to repro duce Depending on the col our used they may not come out on copies or may come out as a different colour B Press OK Adjusting the U C R A Adjus...

Страница 298: ...user colours the finer shades may vary depend ing on the condition of the ma chine In order to correctly reproduce originals the values entered are corrected by the machine and cop ies are made using...

Страница 299: ...o o If you enter the wrong densi ty press Clear or the Clear Stop key and then re enter the correct density Repeat steps B and C to specify the density of multi ple colours When renaming a colour A P...

Страница 300: ...User Colours Note You cannot delete colours regis tered in the program or registered colours currently in use A A A A Press the Adjust Program Colour key B B B B Press User Colour C C C C Press Delet...

Страница 301: ...unction Do not use the Auto Reduce En large function Original is not placed Place originals Check original orientation There is no copy paper in the same orientation as the originals Place the origina...

Страница 302: ...er key Next press the Clear Stop key When the message Stop key was pressed Stop storing is displayed press Stop You do not have the privileges to use this function The use of this function is restrict...

Страница 303: ...rea is dirty whenever making copies The exposure glass or ADF is dirty Clean them See Maintaining Your Machine General Settings Guide Copies are too light The image density is too light Adjust the ima...

Страница 304: ...d make the settings again See p 125 Combination Chart When sorting the pages are divided into two blocks The memory became full in the middle of sorting and the pages were delivered in two blocks You...

Страница 305: ...nals correctly When using the Margin Adjustment function parts of the original image are not copied You set a wide erased mar gin Set a narrower margin with User Tools You can set the width be tween 0...

Страница 306: ...production ratio before using the Combine function Copies are not in correct or der You placed the originals in incorrect order When placing a stack of originals in the ADF the last page should be on...

Страница 307: ...Memory is full originals have been scanned Press Print to copy scanned origi nals Do not remove remaining originals Note Copying will stop and this message will be displayed when the memory is full T...

Страница 308: ...Troubleshooting 102 4...

Страница 309: ...rinted Photo Photo Printed Photo Auto Tray Switching With Image Rotation General Features P 2 5 See p 112 General Features P 2 5 Duplex Mode Priority 1 Sided 1 Sided metric 1 Sided 2 Sided inch Copy O...

Страница 310: ...e Two colour Mode Priority Red Black Auto Image Density Priority Full Colour Two colour Off B W Single Colour On Reproduction Ratio P 1 2 See p 114 Reproduction Ratio P 1 2 Shortcut R E Metric version...

Страница 311: ...3 Front Margin Left Right Metric version Left 5mm Inch version Left 0 2 Back Margin Left Right Metric version Right 5mm Inch version Right 0 2 Front Margin Top Bottom Metric version T B 0mm Inch vers...

Страница 312: ...ge Repeat Separation Line None Double Copies Separation Line None Separation Line in Combine None Stamp See p 119 Stamp Background Numbering Size Normal Density Normal Stamp Colour Black Preset Stamp...

Страница 313: ...Margin 1 0 Right Margin 1 0 Stamp Format 1 4 All Pages Stamp Colour 1 4 Black Date Stamp Format Metric version DD MM YYYY Inch version MM DD YYYY Font Font 1 Stamp Position Metric version Position Top...

Страница 314: ...1 1 12mm 1 1 1 8mm Left Right Margin P1 1 5 P 1 1 12mm 1 1 1 0mm Inch version Position P1 1 5 P 1 1 Top Right 1 1 1 Bottom Centre Top Bottom Margin P1 1 5 P 1 1 0 5 1 1 1 0 3 Left Right Margin P1 1 5...

Страница 315: ...d Density of ADS Full Colour Two colour Centre of the 5 level adjustment Colour Sensitivity Centre of the 5 level adjustment A C S Sensitivity Centre of the 5 level adjustment A C S Priority Full Colo...

Страница 316: ...For details see Changing Default Settings in User Tools System Settings General Settings Guide Changing Default Settings A A A A Press the User Tools Counter key The User Tools main menu ap pears B B...

Страница 317: ...ou select Hide the display is as below Original Type Priority You can select the original type ef fective when the power is turned on or modes cleared See p 33 Se lecting the Original Type Note Defaul...

Страница 318: ...when making two sided copies Note Default Top to Top Original Orientation in Duplex Mode You can set the original orientation when making two sided copies Note Default Top to Top Change Initial Mode...

Страница 319: ...Document Server Storage Key F1 2 Sided Original Top to Top Document Server Storage Key F2 1 Sided 1 Sided Combine Document Server Storage Key F3 1 Sided 1 Sided Combine 4 originals Document Server St...

Страница 320: ...ce Enlarge ratio has been set when selecting Shortcut R E 1 Shortcut R E 2 or Shortcut R E 3 enter the ratio using the number keys Enlarge 1 5 You can customize available en largement ratios by pressi...

Страница 321: ...Priority Specifies which tab has priority on the display panel when Reduce Enlarge is pressed Note Default Reduce Edit P 1 3 Note Enter the width of the binding mar gin using the number keys as fol lo...

Страница 322: ...plex function you can specify margins on the back side The mar gin is set to the same value as Back Margin Top Bottom Note Default Metric version T B 0 mm Inch version T B 0 0 Erase Border Width You c...

Страница 323: ...Booklet function Note Default Open to Left Reference p 61 How to fold and unfold copies to make a magazine Edit P 3 3 Image Repeat Separation Line You can select a separation line and colour using th...

Страница 324: ...e spec ified when using None In Black and White printing will be done in black in Single Colour printing will be done in the specified colour in Two Colour standard printing will be done in the specif...

Страница 325: ...num bers Note Default Normal Density You can set the density of the num bers Note Default Normal Stamp Colour You can set the colour of the num bers Note Default Black Preset Stamp P 1 4 4 4 Stamp Pri...

Страница 326: ...ns See p 72 To program the user stamp Reference For how to delete the user stamp see p 73 To delete the user stamp Stamp Position 1 4 You can set the position where the stamp is printed Press the arro...

Страница 327: ...rimpose You can have the Date Stamp printed in white where it overlaps black parts of the image Note Default No Stamp Colour You can set the selected priority colour when printing the date Note Defaul...

Страница 328: ...al must be set within a specific time after the previous original has been fed You can adjust this time from 3 sec onds to 99 in 1 second increments Note Default 5 seconds Rotate Sort Auto Paper Conti...

Страница 329: ...inals and paper are placed Reference When using letterhead paper pay attention to the paper orien tation See Orientation Fixed Paper or Two Sided Paper in Loading Paper General Set tings Guide Adjust...

Страница 330: ...S Priority This setting determines the copy priority between Black White and Full Colour when Auto Colour Select is selected Note Default Full Colour Administrator Tools Menu Protect You can prevent...

Страница 331: ...plains the symbols used in the chart means that these functions can be used together means that these functions cannot be used together The second function selected will be the function you are workin...

Страница 332: ...Specifications 126 6 AFZ029S...

Страница 333: ...e beeper is turned off it will not sound when you insert paper into the bypass tray See Panel Tone General Settings Guide Preset Enlarge Reduce You can select one of 12 preset ratios 5 enlargement rat...

Страница 334: ...ify are 25 400 When entering a percentage ratio you can specify any value in the permit ted range regardless of original or copy paper size However depending on settings and other conditions part of t...

Страница 335: ...isher Booklet finisher Paper size and orientation A3L B4 JISL A4KL B5 JISKL A5K 11 17 L 81 2 14 L 81 2 11 KL A3L B4 JISL A4KL B5 JISKL 11 17 L 81 2 14 L 81 2 11 KL Paper size and orientation Papercapa...

Страница 336: ...L 11 17 L 81 2 14 L 81 2 11 L 750 sheets 80 g m2 20 lb A5K 500 sheets 80 g m2 20 lb Finisher shift tray 2 staple A4K 81 2 11 K 1500 sheets 80 g m2 20 lb A3L B4 JISL A4L B5 JISKL 11 17 L 81 2 14 L 81 2...

Страница 337: ...1 Sided 1 Sided 1 Sided 2 Sided 2 Sided 1 Sided or 2 Sided 2 Sided in Combine mode select K paper for L original and L paper for K original When the finisher is installed even if you place different s...

Страница 338: ...ray capacity 2 tray finisher Finisher shift tray 1 A4KL B5 JISKL 81 2 11 KL 10 50 sheets 50 10 sets 2 9 sheets 50 sets A3L B4 JISL 11 17 L 81 2 14 L 10 30 sheets 25 8 sets 2 9 sheets 25 sets mixed siz...

Страница 339: ...paper folded If you select Saddle Stitch function in Magazine or Booklet mode the ma chine staples the paper and folds it like a book then delivers the paper folded Punch When using Punch and Combine...

Страница 340: ...exed A3L B4 JISL A4KL B5 JISKL A5K 11 17 L 81 2 14 L 81 2 11 KL Combine In this mode the machine selects the reproduction ratio automatically This reproduction ratio depends on copy paper sizes and th...

Страница 341: ...that of the copy paper the machine will automatically rotate the image by 90 to make copies proper ly You cannot copy with originals different in size and orientation If the number of originals scanne...

Страница 342: ...he combination is finished Background Numbering If the numbers overlap the copied image the parts overlapped may look like some pattern Preset Stamp You can change the size and density of the stamp wi...

Страница 343: ...as fol lows Page Numbering When page numbering is used with Combine mode page numbers are print ed as follows Page Numbering per original Combined with 1 Sided 2 Sided in the Combine function Page Nu...

Страница 344: ...two sided copied depending on the settings made in Display Time in Cover Sheet Tray of User Tools System Settings If Display Time is selected to the At Mode Selected settings made in Cover Sheet Tray...

Страница 345: ...hanging number of sets 44 registered settings 89 stamp position 77 stamp position size and density 71 stored program 86 Check Modes key 5 Clear Modes key 5 Clear Stop key 6 Colour adjustment 87 adjust...

Страница 346: ...sided 2 sided auto margin T to T 116 back margin left right 115 back margin top bottom 116 Copy on Designating Page in Combine 117 copy order in combine 117 double copies separation line 118 erase bor...

Страница 347: ...al image density 32 Manual paper select 35 Map 33 Messages 95 Missing image area 12 Mixed size 16 N Number keys 6 O OHP transparencies 82 one sided combine 1 sided 2 pages combine 1 side 55 1 sided 4...

Страница 348: ...9 sharp key 6 Single colour copy 28 Sizes detectable by auto paper select 10 difficult to detect 11 of recommended originals 9 Sort 42 rotate sort 42 shift sort 42 Specifications 125 Stack 44 Stamp 11...

Страница 349: ...ombine 2 side 56 1 sided 8 pages combine 2 side 56 2 sided 16 pages combine 2 side 57 2 sided 4 pages combine 2 side 57 2 sided 8 pages combine 2 side 57 Types of duplex copies vi U User colour 92 Use...

Страница 350: ...144 GB GB B180 7501 MEMO...

Страница 351: ...di rectives and the Low Voltage Directive 73 23 EEC and its amending directives In accordance with IEC 60417 this machine uses the following symbols for the main power switch a a a a means POWER ON b...

Страница 352: ...well New Jersey 07006 Phone 1 973 882 2000 The Netherlands RICOH EUROPE B V Groenelaan 3 1186 AA Amstelveen Phone 31 0 20 5474111 United Kingdom RICOH UK LTD Ricoh House 1 Plane Tree Crescent Feltham...

Страница 353: ...keep it handy for future reference For safe and correct use be sure to read the Safety Information in the General Settings Guide before using the machine Getting Started Preparing the Machine Setting...

Страница 354: ...obe Systems Incorporated PCL is a registered trademark of Hewlett Packard Company AppleTalk Apple Macintosh and Mac OS are registered trademarks of Apple Computer Incorporated IPS PRINT Printer Langua...

Страница 355: ...er 16 Setting thick paper or OHP transparencies 17 2 Preparing the Machine Quick Install 19 Confirming the Connection Method 21 Network Connection 21 Local Connection 24 Using the SmartDeviceMonitor f...

Страница 356: ...Conditions for Bidirectional Communication 58 If Bidirectional Communication is Disabled 60 Installing Font Manager 2000 61 Using Adobe PageMaker Version 6 0 6 5 or 7 0 62 3 Setting Up the Printer Dr...

Страница 357: ...Collate 89 Printing with the Finisher 91 Staple 92 Punch 96 Spool Printing 98 Covers 99 Slip Sheet 103 User Defined Pages 104 Form Feed 105 Print Using a Selected Tray 105 Canceling Form Feed 106 Canc...

Страница 358: ...n the CD ROM 131 Printer Drivers for This Printer 132 SmartDeviceMonitor for Admin 134 SmartDeviceMonitor for Client 135 Troubleshooting 137 Error Status Messages on the Display Panel 137 Checking the...

Страница 359: ...being tampered or prevent the machine from unauthorized use Also refer to this manual for the procedures for registering administrators as well as setting user and admin istrator authentication Networ...

Страница 360: ...ayed from the Setup dialog box when DeskTopBinder Lite is installed DeskTopBinder Introduction Guide PDF file CD ROM2 Describes operations of DeskTopBinder Lite and provides an overview of its functio...

Страница 361: ...is not followed paper might misfeed originals might be dam aged or data might be lost Be sure to read this Preparation This symbol indicates prior knowledge or preparation is required before opera ti...

Страница 362: ...4...

Страница 363: ...ration status error messag es and function menus See p 7 Display Panel 4 Energy Saver key Press to switch to and from Energy Saver Mode Note This key is ineffective during System Settings User Tools o...

Страница 364: ...rinter and Scanner screens The indicator for the selected function lights 12 Function status indicators These show the status of the above func tions Green the function is active Red the function has...

Страница 365: ...cannot be used 1 Operational status or messages Displays current machine status such as Ready Offline and Printing In formation about the print job user ID and document name appears in this sec tion...

Страница 366: ...r logs such as Locked Sample Print jobs sent from a computer 7 Spooling Job List Press to display spooled jobs 8 V V V VPaper Tray Status key The paper tray settings appear Note When the power is turn...

Страница 367: ...n enter a number that is registered in the Address Book as a login user name as the user code User Code Authentication Using the Control Panel When user authentication is set the following screen appe...

Страница 368: ...B B Press Logout C C C C Press Yes D D D D Press User Tools Counter key Login Using a Printer Driver When Basic Authentication Win dows Authentication or LDAP Au thentication is set make encryption se...

Страница 369: ...connect the machine to the host computer using a USB interface cable This machine does not come with a USB interface cable Make sure you purchase the appropriate cable for the machine and your comput...

Страница 370: ...e con nector Max DC 5V Follow the procedure below to con nect the machine to the host computer using a parallel cable or IEEE 1394 in terface cable Important Before connecting the machine and a comput...

Страница 371: ...supports 10 BASE T or 100 BASE TX connec tions Important Before making the connection touch the metallic part to ground yourself A A A A A core for the Ethernet cable is supplied with this machine The...

Страница 372: ...ntrol panel or printer driver The number of sheets that can be loaded in the bypass tray depends on the paper type Paper sizes fed from the bypass tray are output first sheet down print side up Limita...

Страница 373: ...ies or thick paper over 127 9 g m2 For de tails see p 17 Setting thick pa per or OHP transparencies D D D D Select the paper size Note You can set paper size using the printer driver The following pro...

Страница 374: ...er have priority over those set using the machine s dis play panel When the printer driver is not used make settings using the dis play panel Reference For printer driver settings see the printer driv...

Страница 375: ...he dis play panel Reference For printer driver settings see the printer driver Help A A A A Press the User Tools Counter key on the control panel B B B B Press System Settings C C C C Press the Tray P...

Страница 376: ...Getting Started 18 1...

Страница 377: ...inter Driver Us ing USB A A A A Quit all applications currently running B B B B Insert the CD ROM into the CD ROM drive The installer starts Auto Run may not work with certain operating system setting...

Страница 378: ...mplete Auto Run may not work with certain operating system settings If this hap pens launch Setup exe on the CD ROM root directory Select a machine to whose IP address is displayed in Connect To to in...

Страница 379: ...er Using this machine as the Windows printing port Network connections can be established through Ethernet IEEE 802 11b and IEEE 1394 IP over 1394 Available ports are determined based on the combinati...

Страница 380: ...s Ethernet IEEE 802 11b SmartDeviceMonitor for Client port Standard TCP IP LPR port IEEE 1394 IP over 1394 None Connection Method Available Ports Ethernet IEEE 802 11b SmartDeviceMonitor for Client po...

Страница 381: ...int server or the NetWare remote printer Reference See the explanation of how to install the printer driver for each type of net work printer For the Windows network printer see p 38 Using as the Wind...

Страница 382: ...ons Windows XP USB Parallel IEEE 1394 SCSI print and Bluetooth connections Windows Server 2003 USB Parallel IEEE 1394 SCSI print and Bluetooth connections Windows NT 4 0 Parallel and Bluetooth connect...

Страница 383: ...hap pens launch Setup exe on the CD ROM root directory C C C C Select an interface language and then click OK The default interface language is English D D D D Click SmartDeviceMonitor for Client Admi...

Страница 384: ...language is English D D D D Click PCL RPCS Printer Drivers E E E E The software license agreement appears in the License Agreement dialog box After reading the agreement click I accept the agreement...

Страница 385: ...s a SmartDeviceMonitor for Admin user to display and check sta tistics about the number of sheets which each user prints For details see SmartDeviceMonitor for Admin Help Up to 8 numeric characters ca...

Страница 386: ...hen click OK The default interface language is English D D D D Click PCL RPCS Printer Drivers E E E E The software license agreement appears in the License Agreement dialog box After reading the agree...

Страница 387: ...y and check sta tistics about the number of sheets which each user prints For details see SmartDeviceMonitor for Admin Help Up to 8 numeric characters can be entered Neither alphabetic characters nor...

Страница 388: ...hen click OK The default interface language is English D D D D Click PCL RPCS Printer Drivers E E E E The software license agreement appears in the License Agreement dialog box After reading the agree...

Страница 389: ...for Client Help O O O O Check that the port of the selected printer is displayed in Port P P P P Set a user code if necessary This allows a SmartDeviceMonitor for Admin user to display and check the...

Страница 390: ...en Printers window from Start menu B B B B In the Printers window click the icon of the printer you want to use On the File menu click Properties C C C C Click the Details tab and then click Configure...

Страница 391: ...d Note If no settings on the Recovery Parallel Printing tab are available follow the procedure below A Click Cancel to close the Port Configuration dialog box B Start SmartDeviceMonitor for Client and...

Страница 392: ...nter Drivers E E E E The software license agreement appears in the License Agreement dialog box After reading the agreement click I accept the agreement and then click Next F F F F Select a printer dr...

Страница 393: ...is displayed in Port O O O O Configure the default printer as necessary P P P P Click Finish The printer driver installation starts Q Q Q Q Click Finish in the installation completion dialog box A me...

Страница 394: ...D D D Click PCL RPCS Printer Drivers E E E E The software license agreement appears in the License Agreement dialog box After reading the agreement click I accept the agreement and then click Next F...

Страница 395: ...sh The printer driver installation starts P P P P Click Finish in the installation completion dialog box A message about restarting the computer may appear Restart the computer to complete installatio...

Страница 396: ...the SmartDe viceMonitor port Recovery Printing and Parallel Printing cannot be used from the client If you print with a Windows XP or Windows Server 2003 print server notifi cation functions of Smart...

Страница 397: ...M M Check that the port of the selected printer is displayed in Port N N N N Configure the user code as necessary For an RPCS printer driver a user code can be set after the printer driver in stallati...

Страница 398: ...e CAREE Queue name R QUEUE A A A A Insert the CD ROM into the CD ROM drive The installer starts Auto Run may not work with certain operating system settings If this hap pens launch Setup exe on the CD...

Страница 399: ...ick Finish in the Introduction complete dialog box P P P P In the Printers window open the printer properties Under Windows XP or Windows Server 2003 open the printer properties from the Printers and...

Страница 400: ...e to configure a banner page Follow the procedure below to disable banner pages according to the operating system used Under Windows 95 98 Me clear the Enable banner check box on the Printer Settings...

Страница 401: ...SB port is added to the Printers window A A A A Turn off the power of the machine B B B B Connect the machine with the computer via USB cable Connect the USB cable firmly C C C C Turn on the power of...

Страница 402: ...e printer driver is stored and then click Next If the CD ROM drive is D the source files of the printer driver are stored in the following location RPCS D DRIVERS RPCS WIN9X_ME Language DISK1 PCL 5c D...

Страница 403: ...on the power of the computer D D D D Click Next in the Found New Hardware Wizard dialog box E E E E Select the Search for a suitable driver for my device recommended check box and then click Next F F...

Страница 404: ...and the icon of the printer connected to the USB port is added to the Printers window The printer drivers can be installed from the CD ROM provided with this ma chine If the printer driver is not ins...

Страница 405: ...ick Finish If installation is successful the icon of the printer connected to the USB001 port is added to the Printers window Note The number after USB varies depending on the number of printers con n...

Страница 406: ...C C C C Select an interface language and then click OK The default interface language is English D D D D Click PCL RPCS Printer Drivers E E E E The software license agreement appears in the License Ag...

Страница 407: ...To stop installation of the selected software click Cancel before installa tion is complete Reference A message appears if there is a newer version of the printer driver already installed If there is...

Страница 408: ...g or disconnecting the optional IEEE 1394 cable causes the printer icon to change Windows 2000 Note If Found New Hardware Wizard appears every time the computer is started or the cable is connected di...

Страница 409: ...ready been installed the printer icon is added to the Printers window In this case printer driver installation is not necessary If printing does not work properly after the installation delete the por...

Страница 410: ...e causes the printer icon to change A A A A Connect the machine and computer using the IEEE 1394 interface cable When the Found New Hardware Wizard dialog box appears check that This wiz ard helps you...

Страница 411: ...en the machine and the computer are connected using the IEEE 1394 interface cable for the first time If it does install the printer driver If printing does not work properly after the installation del...

Страница 412: ...he machine Only one Bluetooth adaptor or Bluetooth equipped computer can be con nected via BIP Only JPEG images that can be printed using BIP User codes are disabled for BIP You cannot print if print...

Страница 413: ...s window appears G G G G Click the icon of the printer you want to use H H H H On the File menu click Properties I I I I Click the Ports tab J J J J Under Port select the COMx check box X indicates th...

Страница 414: ...ence For details about the security mode see 3Com Bluetooth Connection Man ager Help For details about the password entry which is required to trans mit print jobs see p 56 Printing in the Security Mo...

Страница 415: ...or DRIVERS RPCS NT4 If the installer starts click Cancel to quit For Windows XP Professional and Windows Server 2003 A A A A On the Start menu click Printers and Faxes B B B B Click Add a printer C C...

Страница 416: ...led under Windows 2000 the Change Accessories tab is unavailable Note The RPCS printer driver supports bidirectional communications and updates the machine status automatically The PCL printer driver...

Страница 417: ...soft TCP IP print IP address must be specified for use for Win dows NT 4 0 IPP port name must include the IP address when using the IPP protocol When connected with IEEE 1394 The computer must support...

Страница 418: ...are disabled bidirectional connection is enabled In this case no change is necessary for option settings Note If you are using the RPCS printer driver click the Change Accessories tab If you are usin...

Страница 419: ...lications by Auto Run requires administrator permission To install a printer driver by Auto Run log on using an account that has administrator permission A A A A Quit all applications currently runnin...

Страница 420: ...Maker folder For PageMaker 6 0 default installation The directory is C PM6 RSRC PPD4 For PageMaker 6 5 default installation The directory is C PM65 RSRC USENGLISH PPD4 The USENGLISH may vary depending...

Страница 421: ...er you want to use C C C C On the File menu click Properties D D D D Make the necessary settings and then click OK Note With some applications the printer driver settings are not used and the applicat...

Страница 422: ...ssing the Printer Properties Making printer default settings the printer properties Important To change the printer default settings including option configuration settings log on using an account tha...

Страница 423: ...settings for a specific application To make printer settings for a specific application open the Printing Preferences dialog box from that application The following explains how to make settings for t...

Страница 424: ...ck Properties The printer properties dialog box appears D D D D Make the necessary settings and then click OK Note Settings you make here are used as the default settings for all applications Do not m...

Страница 425: ...y vary depend ing on the application For details see the manuals provided with the appli cation you use Any settings you make in the following procedure are valid for the current application only Gene...

Страница 426: ...nter properties dialog box appears D D D D Make the necessary settings and then click OK Note Settings you make here are used as the default settings for all applications Do not make a setting for For...

Страница 427: ...y depending on the application For details see the manuals provided with the application you use With some applications the printer driver settings are not used and the ap plication s own default sett...

Страница 428: ...nter default settings open the printer properties dialog box from the Printers window Important You cannot change the printer default settings for each user Settings made in the printer properties dia...

Страница 429: ...you use With some applications the printer driver settings are not used and the ap plication s own default settings are applied Any settings you make in the following procedure are valid for the curre...

Страница 430: ...box are applied to all users A A A A On the Start menu point to Settings and then click Printers The Printers window appears B B B B Click the icon of the printer you want to use C C C C On the File m...

Страница 431: ...settings for a specific application To make printer settings for a specific application open the Printing Preferences dialog box from that application The following explains how to make settings for t...

Страница 432: ...ties dialog box are applied to all users A A A A On the Start menu click Printers and Faxes The Printers and Faxes window appears B B B B Click the icon of the printer you want to use C C C C On the F...

Страница 433: ...ttings for a specific application To make printer settings for a specific application open the Printing Preferences dialog box from that application The following explains how to make settings for the...

Страница 434: ...perties dialog box are applied to all users A A A A On the Start menu point to Settings and then click Printers The Printers window appears B B B B Click the icon of the printer you want to use C C C...

Страница 435: ...ult You cannot change the printer default settings for each user Settings made in the printer properties dialog box are applied to all users A A A A On the Start menu point to Settings and then click...

Страница 436: ...With some applications the printer driver settings are not used and the ap plication s own default settings are applied Any settings you make in the following procedure are valid for the current appl...

Страница 437: ...Lite PDF files registered with Desk TopBinder Lite can be sent directly to the machine for printing Limitation Use DeskTopBinder Lite on the provided CD ROM Note PDF Direct Print settings can be made...

Страница 438: ...80 4 Using Locked Sample Print Job List A list of files stored in the machine can be viewed on the display panel A A A A Press the Printer key The Printer screen appears B B B B Press Locked Sample P...

Страница 439: ...he time when the instruc tion to print the stored files was en tered User ID and the remaining number of copies 5 U U U UPrev T T T TNext If the list of files does not fit on the screen scroll down to...

Страница 440: ...nt files is not as you expected and you do not want to print remaining sets delete the sample print file us ing the display panel If you print the remaining sets of the sample print file the job in th...

Страница 441: ...be displayed F F F F Select the file you want to print by pressing it Note Press U U U UPrev or T T T TNext to scroll through the list Only one file can be selected at a time G G G G Press Print to ch...

Страница 442: ...ess Delete The delete confirmation screen will appear F F F F Press Yes to delete the file After the file has been deleted the file list screen will return Note If you do not want to delete the file p...

Страница 443: ...s An error log list appears Note Press U U U UPrev or T T T TNext to scroll through the error files Press Exit after checking the log To print files that appear in the error log resend them after stor...

Страница 444: ...00 pag es including sample print files de pending on data volume After the locked print file is print ed the job is automatically deleted Turning off the machine s main power switch deletes locked pri...

Страница 445: ...e A confirmation screen will ap pear if the password is not en tered correctly Press OK to enter the password again I I I I Press Yes The locked file is printed Note Press No to cancel printing To can...

Страница 446: ...e is added when there are 30 error files already stored the oldest file is de leted However if the oldest error file is a locked print file it is not de leted but stored instead in the locked print er...

Страница 447: ...90 degrees K Shift Collate The optional finisher is required for this function The finisher shift tray moves backward or forward when a job or set is output causing the next to shift so you can separ...

Страница 448: ...ected If the following functions are selected Collate or Shift Collate will be applied even if Rotating Collate is selected Covers Slip Sheet When Rotating Collate has been selected printing speed wil...

Страница 449: ...aking Op tion Settings for the Printer Be sure to set the paper size and paper orientation in the printer driver when using duplex printing booklet combine layout staple and punch functions Reference...

Страница 450: ...onal finisher installed sets can be stapled individually when print ing multiple sets Staple Position The specified staple position varies depending on paper size type quantity and feed orientation Th...

Страница 451: ...mbers of sheets available for stapling see Specifications General Settings Guide For printing methods see the printer driver Help The staple position will vary when using the PostScript 3 printer driv...

Страница 452: ...to the binding orien tation When the finisher is being used for another function s job for example a copy job printing will start after that job ends When setting Staple in the printer driver setting...

Страница 453: ...r stapling are specified If there are inconsistencies between the orientation in duplex mode and the staple position If paper sizes are mixed when a different paper size is specified during a print jo...

Страница 454: ...ng table shows punch positions Note Punch positions will vary slightly from page to page as holes are punched into each sheet individually Reference For information about paper sizes that can be punch...

Страница 455: ...on Be sure to set paper size and orientation in the printer driver when punching Depending on the software you are using print settings may not be ena bled and the printed result may not be as expecte...

Страница 456: ...e first page with Spool Printing will be slow The computer requires less print processing time when large amounts of data are spooled Stored spool jobs can be viewed or deleted using a Web browser Set...

Страница 457: ...n To use this function Collate must be set Rotating Collate cannot be set Note The cover sheets should be the same size and orientation as the body of the paper If Auto Tray Select is set as the paper...

Страница 458: ...nts on one side of the cover sheet only even when duplex printing is se lected Print on both sides Prints on both sides of the cover sheet when duplex printing is selected Front cover printed on both...

Страница 459: ...x printing is selected Back cover page face inside Back cover page face outside Print on both sides Prints on both sides of the cover sheets when duplex printing is selected Front cover printed on bot...

Страница 460: ...one side back cover page face inside and the number of pages is even Front cover printed on one side back cover page face inside and the number of pages is odd Blank When printing one side When print...

Страница 461: ...The slip sheet should be the same size and orientation as the main paper If Auto Tray Select has been set as the paper feed tray for the body paper the paper will be delivered from a tray containing p...

Страница 462: ...Help Limitation This function is available with the PCL 6 5c printer driver only If Document Server is selected under Job Type User Defined Page cannot be used If User Defined Pages is selected under...

Страница 463: ...ted form fed paper is printed after a set in terval See p 115 System If the machine does not have a tray for the selected paper size or paper type or if the selected paper loaded in the machine has ru...

Страница 464: ...uters be careful not to accidentally cancel someone else s print job Under Windows If the machine is connected to the computer us ing a parallel cable sent print jobs may be canceled if Reset All Jobs...

Страница 465: ...Press the Printer key on the ma chine s control panel E E E E Press Job Reset on the display panel F F F F Press Reset Current Job or Reset All Jobs Reset Current Job cancels the print job currently...

Страница 466: ...Note You cannot stop printing data that has already been proc essed For this reason printing may continue for a few pages after you press Job Reset A print job containing a large volume of data may ta...

Страница 467: ...st Test Print Maintenance System Host Interface PCL Menu PS Menu optional PDF Menu optional You can select the functions in the following table Menu Default List Test Print See p 113 List Test Print C...

Страница 468: ...tterhead Setting Bypass Tray Setting Priority Default Printer Language 1 Host Interface See p 118 Host Inter face I O Buffer I O Timeout PCL Menu See p 119 PCL Menu Extend A4 Width Orientation Form Li...

Страница 469: ...ears when the PostScript 3 unit optional is installed 2 Appears when a finisher optional is installed PDF Menu optional 1 See p 121 PDF Menu Change PDF Password PDF Group Password Resolution Colour Se...

Страница 470: ...al Settings Guide A A A A Press the User Tools Counter key on the control panel B B B B Press Printer Features C C C C Select the desired item by pressing the tab and then change its settings Note OK...

Страница 471: ...error logs records of Auto Job Cancel and jobs canceled manually from the control panel can be printed Menu List You can print a Menu List showing the machine s function menus PCL Config Font Page You...

Страница 472: ...ve Printer Language Displays the version number of the printer driver language Options Displays optional trays in stalled Consumption Status Displays the amount of toner re maining Paper Input Display...

Страница 473: ...n lock the List Test Print menu On Off Note Default Off 4 Colour Graphic Mode Text Priority Use the optimum CMYK toner combination for text printing Photo Priority Use the optimum CMYK toner combinati...

Страница 474: ...e number of pages to print has been specified with the printer driver or another command 1 to 999 by 1 Note Default 1 Blank Page Print You can select whether or not to print blank pages On Off Pages t...

Страница 475: ...Therefore output might not be as expected when printing onto let terhead or preprinted paper re quiring orientation Using this function you can specify image ro tation Off Auto Detect On Always Note...

Страница 476: ...alled Host Interface I O Buffer You can set the size of the I O Buffer Normally it is not neces sary to change this setting 128 KB 256 KB 512 KB Note Default 128 KB I O Timeout You can set how many se...

Страница 477: ...oint size you want to use for the selected font 4 00 to 999 75 by 0 25 Note Default 12 00 This setting is effective only with variable space fonts Font Pitch You can set the number of charac ters per...

Страница 478: ...a data format Binary Data TBCP Limitation This setting is not effective when operating the machine with a parallel USB or EtherTalk con nection When operating the machine with a parallel or USB connec...

Страница 479: ...New Password Confirm New Password A password can be set using on the Web Image Monitor but in this case the password information is sent through the network If secu rity is a priority set the password...

Страница 480: ...inch 600 dpi Fast 600 dpi Standard 1200 dpi Note Default 600 dpi Fast Colour Setting You can make an RGB setting None Fine Super Fine Note Default Super Fine Colour Profile You can set the colour prof...

Страница 481: ...rom the printer prop erties dialog box when the Document Server is selected You must enter a user ID using up to eight alphanumeric characters You should enter a Password and File Name to distinguish...

Страница 482: ...Using the Document Server 124 6...

Страница 483: ...th the machine Copy Printer Scanner Fax Document Server Note The machine must be equipped with the Printer Scanner Unit in order to use the printer or scanner function Interface The following interfac...

Страница 484: ...tems may not be displayed Menu Before login After login as Admin Top Page R R Reset Printer Job RW Reset Device RW Status Input Tray R R Output Tray R R Toner R R Function R R System R R Counter R R P...

Страница 485: ...en tication Management RW Printer R RW Fax General RW Administrator Tools RW E mail Settings RW IP Fax Settings RW Gateway Settings RW Parameter Settings RW Interface R R Network Protocol R RW TCP IP...

Страница 486: ...inter language for printing filter text Specifies the text printing mediatype plain recycled special thick transparency color letterhead preprinted labels plainduplexbacks thickduplexbacks plainorrecy...

Страница 487: ...or Black and White Color Profile Auto User Setting Photographic Presentation Solid Color CLP Simulation Color Setting Off Fine Super Fine Dithering Auto User Setting Text Photographic Duplex Off Open...

Страница 488: ...The Functions and Settings of the Machine 130 7...

Страница 489: ...tor for Admin Help SmartDeviceMonitor for Client For users to manage their network print status Reference SmartDeviceMonitor for Client Help 1394 Utility For the optional IEEE 1394 interface unit For...

Страница 490: ...rprise Edition 7 Microsoft Windows NT Server operating system version 4 0 Microsoft Windows NT Workstation operating system version 4 0 in a computer using x86 processors 8 Versions 8 6 to 9 2 of the...

Страница 491: ...with the printer us ing a printer language In addition to the conventional user interface another preset user interface is provided Reference See p 19 Preparing the Machine Adobe PostScript Printer Dr...

Страница 492: ...for Admin Help Operating system Protocol stack Windows 95 98 Me TCP IP provided with Windows 95 98 Me IPX SPX provided with Windows 95 98 Me NetWare Client provided with Windows 95 98 Novell Client p...

Страница 493: ...ws 95 98 Me NetWare Client provided with Windows 95 98 Me Novell Client provided with Windows 95 98 Me Windows 2000 TCP IP provided with Windows 2000 IPX SPX provided with Windows 2000 NetBEUI provide...

Страница 494: ...hen Recovery Printing is exe cuted Monitoring function Checks printer supplies such as paper or toner Simultaneously monitors multiple printers in use Checks the printer s network settings and detaile...

Страница 495: ...Wait a while Ready This is the default ready message The machine is ready for use No action is required Resetting job The machine is resetting the print job Wait until Ready ap pears on the display p...

Страница 496: ...ge appears again contact your sales or service representative Exceeded max capacity of document server Cannot store Hard disk drive capacity ex ceeded storing to the Docu ment Server Delete some files...

Страница 497: ...the IEEE 1394 board IEEE 802 11b Wireless LAN has a problem IEEE 802 11b interface unit was not inserted when the ma chine was turned on or it was pulled out after the machine turned on Turn off the...

Страница 498: ...The maximum number of stored capture pages has been exceeded Delete some files stored in the Document Server or reduce the size of files to be printed DToner is almost empty The toner has almost run o...

Страница 499: ...le is added when there are 30 error files already stored the oldest file is deleted Howev er if the oldest error file is a sample print file or a locked print file it is not deleted but stored instead...

Страница 500: ...astener fasten that securely as well See p 11 Connecting the Machine Are you using the correct interface cable The type of interface cable you should use depends on the compu ter Be sure to use the co...

Страница 501: ...or may occur if you change the op tion settings on the machine In this case follow the procedure below A Unplug the IEEE 1394 interface cables connected to the computer B Run the utility tool for the...

Страница 502: ...Print to the following port s list confirm the correct port is selected Windows XP Professional Windows Server 2003 A Click the Start button and then click Printers and Faxes B Click the icon of the m...

Страница 503: ...nt If you want to print accurately set the printer driver to print without using the graphics command See the printer driver Help Page layout is not as expected Print areas differ depending on machine...

Страница 504: ...machine is offline printing is performed when Job Accept ance Priority has been set in Parallel Interface in the Interface Settings in the System Settings menu Change the setting of Signal Control to...

Страница 505: ...er properties dialog box Windows NT 4 0 Graphics on Advanced on Paper Quality tab in the printer proper ties dialog box Mac OS 9 x Printer Specifications in the print dialog box Mac OS X Set 3 tab in...

Страница 506: ...g setting on the Image Adjustments tab in the Change User Settings dialog box on the Print Quality tab in the RPCS printer driver See the printer driver Help Optional compo nents connected to themachi...

Страница 507: ...o the computer D Run the utility tool for the IEEE 1394 interface board which is stored in the following path on the CD ROM Printer Drivers and Utilities UTILITY 1394 Reference For more information ab...

Страница 508: ...High Low Note Default High Input Prime Specifies whether the prime signal is active or inactive when an input prime signal is sent Normally you do not need to change this setting Effective Invalid No...

Страница 509: ...autions when using Windows Server 2003 Precautions when using the Terminal Server mode Certain printer driver functions are disabled Disabled functions are displayed in gray When using all printer dri...

Страница 510: ...n paper Note Printing speeds depend on the machine Check which type of machine you have See General Settings Guide Interface Standard Ethernet interface 100BASE TX 10BASE T USB 2 0 interface Option IE...

Страница 511: ...sk Storage capacity 80 GB Operating systems sup ported by this machine Windows 95 98 Me Windows 2000 Windows XP Windows Server 2003 Windows NT 4 0 Mac OS 8 6 to 9 2 Mac OS X Network cable 100BASE TX 1...

Страница 512: ...2000 compliant Device class SCSI print Windows 2000 XP Windows Server 2003 IP over 1394 Windows Me XP Windows Server 2003 Protocol SBP 2 SCSI print TCP IP IP over 1394 Interface connector IEEE 1394 6...

Страница 513: ...t from below speed 1 Mbps 2 Mbps 5 5 Mbps 11 Mbps Frequency range Inch version 2412 2462 MHz 1 11 channels Metric version 2412 2472 MHz 1 13 channels Transmittable distance 1 Mbps 400 m 1 2 Mbps 270 m...

Страница 514: ...37 Document Server 123 E Energy Saver key 5 Error Log 141 Error messages 137 F Finisher 91 Font Manager 2000 61 Fonts 152 Function keys 6 Function status indicator 6 H Hard disk 153 Host Interface 118...

Страница 515: ...t 82 deleting 84 Slip Sheet 103 SmartDeviceMonitor for Admin 134 SmartDeviceMonitor for Client 135 Specifications 152 Spool printing 98 Staple 92 System 115 T Thick Paper printing bypass tray 17 Troub...

Страница 516: ...158 MEMO...

Страница 517: ...159 MEMO...

Страница 518: ...160 GB GB B180 7510 MEMO...

Страница 519: ...e requirements of the EMC Directive 89 336 EEC and its amending di rectives and the Low Voltage Directive 73 23 EEC and its amending directives Caution Network interface cables with ferrite core must...

Страница 520: ...Operating Instructions Printer Reference B1807510 Operating Instructions Printer Reference Printed in The Netherlands GB GB B180 7510...

Страница 521: ...5 Operating Instructions Facsimile Reference Basic Features FAX Option Type 3245 Operating Instructions Facsimile Reference Basic Features Getting Started Faxing Using Internet Fax Functions Programmi...

Страница 522: ...please contact your local dealer Two kinds of size notation are employed in this manual With this machine refer to the metric version Important Contents of this manual are subject to change without pr...

Страница 523: ...harge for local calls is unacceptable the Dial button should NOT be used for local calls Only the 7 digits of the local number should be dialled from your telephone DO NOT dial the area code digit or...

Страница 524: ...being tampered or prevent the machine from unauthorized use Also refer to this manual for the procedures for registering administrators as well as setting user and admin istrator authentication Networ...

Страница 525: ...provides an overview of its functions This guide is added to the Start menu when DeskTopBinder Lite is installed Auto Document Link Guide PDF file CD ROM2 Describes operations and functions of Auto Do...

Страница 526: ...on and Immediate Transmission 16 Memory Transmission 17 Canceling a Memory Transmission 21 Before the Original Is Scanned 21 While the Original Is Being Scanned 21 While the Original Is Being Transmit...

Страница 527: ...tions by E Mail 51 Internet Fax Precautions 52 Functions Not Supported by E mail Transmission 52 Functions Not Supported by E mail Reception 53 T 37 Full Mode 53 Sending Internet Fax Documents 55 Conf...

Страница 528: ...Troubleshooting Adjusting the Volume 79 When the Facsimile Key Is Lit in Red 81 When Toner Runs Out 82 Error Messages and Their Meanings 83 Solving Problems 89 When Things Don t Go as Expected 92 INDE...

Страница 529: ...bol Be sure to read the instructions all of which are included in Safety In formation General Settings Guide The statements above are notes for your safety Important If this instruction is not followe...

Страница 530: ...2...

Страница 531: ...d See p 85 Substitute Recep tion Facsimile Reference Advanced Fea tures When Reception File Setting is set to Store also lights when a message is re ceived See p 193 Storing or Printing Re ceived Docu...

Страница 532: ...erence Advanced Features Note The Operation switch does not func tion when the User Tools Counter In quiry display is shown 13 Function status indicators When lit green the corresponding func tion is...

Страница 533: ...dby mode Each function name displayed acts as a selection key which you can touch to se lect or specify the function When a function is selected or specified the function name is highlighted like this...

Страница 534: ...ser authentication is set a login user name appears 3 Press this button to enter or add fax number e mail address or IP Fax number Internet Fax setting ON IP Fax H 323 SIP setting ON Internet Fax sett...

Страница 535: ...e Reference Advanced Features p 134 Stor ing a Document Facsimile Refer ence Advanced Features 10 Title word keys appear Allows you to switch from one page dis play to another on the destination list...

Страница 536: ...enter a number that is registered in the Address Book as a login user name as the user code User Code Authentication using the Control Panel When user authentication is set the following screen appear...

Страница 537: ...ryption settings in the printer properties of a printer driver and then specify a login user name and password For details see the printer driver Help Note When logged on using a printer driver loggin...

Страница 538: ...Getting Started 10 1...

Страница 539: ...opy Reference See p 209 Original sizes difficult to detect Facsimile Reference Advanced Features How to place A4 B4 JIS Japanese Industrial Standard A3 81 2 11 81 2 14 and 11 17 size originals How to...

Страница 540: ...vanced Features switch 14 bit 1 Documents longer than 800mm 32 must be sent by memory transmission immediate transmis sion may not be possible If an original jam press the Clear Stop key and then care...

Страница 541: ...A4KL B4 JISL A3L 81 2 11 KL 81 2 14 L and 11 17 L Area Enter the area to be scanned Only the area in the specified size is scanned regardless of the actual size of a placed document See p 160 Programm...

Страница 542: ...he size of the originals to be sent and then press OK Note 81 2 11 indicates LT 81 2 14 indicates LG 11 17 indi cates DLT C Press OK The selected size is shown above the highlighted Scan Ar ea Specify...

Страница 543: ...Sizes B Press OK Mixed Original Sizes is shown above the highlighted Scan Area Specifying Auto Detect A Make sure that Auto Detect is selected If it is not press Auto Detect B Press OK Auto Detect is...

Страница 544: ...g the original sends it It is very conven ient when you want to send an original quickly or when you want to check the destination you are sending to When using this type of transmission the original...

Страница 545: ...numbers ex ceeds 500 you can perform only Immediate Transmission The number of documents you can store is 400 The number of pages you can store in memory depends on the origi nal images and the scan...

Страница 546: ...ke a mistake press the Clear Stop key and then enter the correct number Reference p 33 Entering a Fax Number p 34 Entering an E mail Ad dress p 35 Entering an IP Fax Desti nation p 38 Using Destinatio...

Страница 547: ...the standby dis play appears Sending originals using the exposure glass A Make sure that Memory TX is se lected B Place the first page of your original face down on the exposure glass C Dial a destina...

Страница 548: ...e message broadcasting the messages are sent in the order in which they were dialed If the fax message could not be transmitted the machine redials that destination after the last destination specifie...

Страница 549: ...l trans mission simply by removing them While the Original Is Being Scanned Use this procedure to cancel a trans mission after pressing the Start key A A A A Press the Clear Stop key The machine stops...

Страница 550: ...ay not be selected as the destination appears as de pending on the security set tings C C C C Press Stop Transmission Note To cancel another file repeat steps B and C To cancel stopping transmis sion...

Страница 551: ...U Prev or T T T T Next to find it There are cases when a destina tion may not be selected as the destination appears as de pending on the security set tings C C C C Press Stop Transmission Note To ca...

Страница 552: ...specified e mail addresses The destination for notification is se lected from Internet Fax destina tions in the destination list See p 81 Immediate TX Result Report Immediate Transmission Fac simile...

Страница 553: ...during scan ning After transmission the standby display appears Sending originals using the exposure glass A Make sure that Immed TX is se lected B Place the first page face down on the exposure glas...

Страница 554: ...DF you can also cancel an Immediate Transmission by re moving the original After You Have Pressed the Start Key A A A A Press the Clear Stop key and then remove the original Note You can also cancel a...

Страница 555: ...Facsimile Reference Advanced Fea tures Immediate Transmission You can confirm the result with an Immediate TX Result Report Select to print this report in User Pa rameters A report is printed after e...

Страница 556: ...ntaining nor mal size characters Detail 8 x 7 7 lines mm 200 x 200dpi Select for originals containing small characters or when you re quire greater clarity This resolu tion is twice as fine as Standar...

Страница 557: ...originals Use this setting even if your origi nal contains text and photographs or if you only want to send clearer text Text Photo Select Text Photo to send an orig inal containing both a high con tr...

Страница 558: ...density yourself You can select one of seven image density levels Combined Auto and Manual Image Density You can only adjust image density for photographs illustrations or diagrams if the original ha...

Страница 559: ...type setting for each page Place the original select the scan set tings for the first page dial and then press the Start key as you would normally Then follow one of the fol lowing two procedures Not...

Страница 560: ...optional Auto Document Feeder Note Depending on what time the scan settings are adjusted the settings may not be reflected in the result ing operation A A A A Check which pages you want to scan with d...

Страница 561: ...tage on the display Entering a Fax Number Enter numbers directly using the key pad on the right side of the control panel Note Maximum length of a fax number 128 digits You can insert pauses and tones...

Страница 562: ...e When you press the Tone key the machine dials the number us ing tonal signals Limitation Certain services may be unavaila ble when using the Tone key Note A tone is shown as a on the dis play Using...

Страница 563: ...ess af ter pressing OK press Edit Dest re enter an e mail ad dress and then press OK Reference Entering Text General Set tings Guide The destination is specified Note Press ProgDest in this order to s...

Страница 564: ...e Press ProgDest in this order to store the entered IP Fax destina tion in the Address Book See p 37 Registering Entered Des tinations to the Address Book IP Fax Destination Depending on the network t...

Страница 565: ...ecify to kyo abc co jp Ask the network administrator for details An alias telephone number is a tel ephone number available in the network registered in the gate keeper An ID number identifies the gat...

Страница 566: ...Destina tion and Registering Names to a Group General Settings Guide Limitation Group Dial can be used only for Memory Transmission it cannot be used for Immediate Transmis sion The machine automatic...

Страница 567: ...ick Dial key pro grammed with the desired des tination Note If the desired Quick Dial key is not shown press U U U U and T T T T to look through the list To cancel the selection press the selected Qui...

Страница 568: ...estination s mes sage appears Press Select to specify destinations where the fax number the e mail address or IP Fax is pro grammed Press Cancel to change the destination If the destination in destina...

Страница 569: ...r Specifying a Registration Number p 47 Specifying a Registration Number Note If you press Fax E mail or IP Fax on the search result display you can switch between fax desti nation e mail destination...

Страница 570: ...in E E E E Confirm the entered character and press OK When the search is finished a re sult appears F F F F Select a destination Note If the desired destination does not appear use U U U U or T T T T...

Страница 571: ...pears When the search is finished a re sult appears F F F F Select a destination Note If the desired destination does not appear use U U U U or T T T T to scroll through the list Search by E mail Addr...

Страница 572: ...E E E E Confirm the entered characters and press OK A search in progress message ap pears When the search is finished a re sult appears F F F F Select a destination Note If the desired destination do...

Страница 573: ...appears F F F F Select a destination Note If the desired destination does not appear use U U U U or T T T T to scroll through the list Search by LDAP Server A A A A Press B B B B Press Search LDAP C...

Страница 574: ...strator whether you should enter John or Doe H H H H Press Search Criteria for each con dition and then select the search criteria Note The meanings of the search cri teria are as follows Search Begin...

Страница 575: ...A A A A Press to switch the destina tion between fax number e mail address and IP Fax number B B B B Press Registration No The registration number entry dis play appears C C C C Enter a registration n...

Страница 576: ...rnal telephone is re quired to use this machine as a telephone Switching the Reception Mode You can switch reception modes us ing the Reception Settings menu un der Facsimile Features See p 147 Recept...

Страница 577: ...he Start Manual RX key The Start key is only available in facsimile mode when an origi nal is not placed C C C C Replace the handset of the exter nal telephone The machine will start receiving Limitat...

Страница 578: ...Faxing 50 2...

Страница 579: ...the telephone number of the destination you want to send to you enter the relevant e mail address You can also print or forward received e mail messages Note In the following explanation Internet Fax...

Страница 580: ...e delayed due to network congestion Use a standard fax whenever communication is time sensitive If you use this machine with dial up connection the Auto E mail Reception function accesses the provider...

Страница 581: ...er is programmed in the Address Book as the full mode destination the sender side automatically registers the re ceived information in the Address Book This allows you to send subsequent an Internet F...

Страница 582: ...n Requesting a Reception Confirmation When the receiver s machine supports T 37 full mode and is programmed as a full mode machine and its reception capability is set in the Address Book the machine r...

Страница 583: ...ot send a subject only as e mail without an original Enter Text Allows you to enter the text to be transmitted Note To enter text program it before hand See Connection and Set up Network Guide You can...

Страница 584: ...required in order to view documents when they are re ceived on a computer You can limit the size of transmit ted e mail messages in E mail Set tings of Fax Features See p 148 E mail Settings Facsimile...

Страница 585: ...m the dis played list The selected subject appears in the manual input column Note You can enter extra charac ters after the selected subject If you do not need to enter extra characters proceed to st...

Страница 586: ...or Off for Recept Notice Reference p 60 Confirming Reception To set BCC transmission A Select Yes or No for BCC TX D D D D Press OK E E E E Press OK F F F F Place the original Note Place the original...

Страница 587: ...ring an E mail Ad dress p 38 Using Destination Lists p 45 Search by LDAP Server p 47 Redial Facsimile Refer ence Advanced Features I I I I To send the same document to multiple destinations press Add...

Страница 588: ...x Mes sage NO xxxx If neither Own Fax Number nor Own Name are programmed Fax Message NO xxxx Note xxxx is the document number that appears in the Journal Reference p 74 Selecting transmission op tions...

Страница 589: ...esult column will be overwritten each time a new notice message is re ceived However if you receive a reception notice message indicat ing an error Error appears in the Result column and will not be o...

Страница 590: ...cel a trans mission before pressing the Start key A A A A Press the Clear Modes key Note When documents are placed in the ADF you can cancel trans mission simply by removing them While the Original Is...

Страница 591: ...mitted or waiting for transmission appears B B B B Select the file you want to cancel Note If the desired file is not shown press U U U U Prev or T T T T Next to find it There are cases when a destin...

Страница 592: ...e mail or delete it from the server in Sys tem Settings See File Transfer Network Guide With User Parameters you can have the machine return the ac knowledgment of e mail to the sender See p 166 User...

Страница 593: ...Receiving Internet Fax 65 3 B B B B Check the message and then press Exit The standby display appears...

Страница 594: ...of the sender name differs according to that of the Stamp Sender Name setting and other func tions 4 Date The date and time of e mail transmission 5 To The e mail address of the recipient 6 Subject S...

Страница 595: ...al Settings See p 150 IP Fax Settings Facsim ile Reference Advanced Features You can also send to a G3 facsimile connected to the public switched telephone network PSTN via a gateway T 38 compli ant W...

Страница 596: ...tandard faxes See p 48 Recep tion Note To use IP Fax functions this machine must be connected to a LAN and set up correctly under Setting IP Fax See p 150 IP Fax Settings Facsimile Refer ence Advanced...

Страница 597: ...c cess control Gateway VoIP gateway A gateway connecting a telephone network and IP network it has functions such as protocol conversion for connect these different network and also con nects communic...

Страница 598: ...must also be connect ed to the Internet You cannot send to a firewall protected network For a list of gateways T 38 compli ant or gatekeepers that are certi fied as operable with this machine contact...

Страница 599: ...ion proceed to Step E Note When using a destination list multiple destinations are added automatically and you need not press Add D D D D Specify the next destination Note Press to switch the destina...

Страница 600: ...Using Internet Fax Functions 72 3...

Страница 601: ...use characters sym bols numbers and spaces You can set whether or not to print a Fax Header using Fax Header Print under Options See p 73 Fax Header Print Fac simile Reference Advanced Fea tures In p...

Страница 602: ...of the other party s machine Note You can register up to 20 char acters in Own Fax Number Programming A A A A Press the User Tools Counter key B B B B Press Facsimile Features C C C C Make sure the Ge...

Страница 603: ...units in stalled on your machine C Enter your own facsimile s number using the number keys and then press OK Note To enter a sign or a space press or Space If you make a mistake press Clear or the Cle...

Страница 604: ...D D Press Program Fax Information E E E E Press Fax Header Own Name or Own Fax Number to edit F F F F Press the item you want to edit G G G G Press Backspace or Delete All and then re enter the name...

Страница 605: ...B B B B Press Facsimile Features C C C C Make sure the Gen Settings Adjust screen is displayed D D D D Press Program Fax Information E E E E Press Fax Header Own Name or Own Fax Number to delete F F F...

Страница 606: ...y to show the facsimile initial display after changing the contents of the Address Book the Destination List Device Set tings have been updated message appears Press Exit to bring up the fac simile s...

Страница 607: ...ter pressing the Start key until the line connects to the destination At Printing Heard when a received message is printed See p 96 Print Comple tion Beep Facsimile Reference Ad vanced Features Note Y...

Страница 608: ...der for each item and then press OK Note You can hear the actual volume by pressing Check If you press Cancel the volume setting is canceled The display returns to that of step D F F F F Press the Use...

Страница 609: ...act your service representative See p 83 Error Mes sages and Their Meanings The copier will still function normally Out of paper Add more paper Loading Paper General Settings Guide A network error has...

Страница 610: ...auto matically output Journal has not list exceeds 200 communication will not be possible Limitation The Memory Storage Report Poll ing RX Reserve Report and Confi dential File Report are not printed...

Страница 611: ...g Memory Transmis sion Place originals that have not been scanned again Error occurred and transmis sion was canceled A document jam occurred during Immediate Transmission Press OK and then resend the...

Страница 612: ...Check if the alias telephone number is correct ly programmed Check the alias telephone number is cor rectly programmed using the Web Image Monitor See the Web Image Monitor s Help Consult your networ...

Страница 613: ...e Monitor s Help Check the host name or IP address of the SMTP server is correctly programmed us ing the Web Image Monitor See the Web Image Monitor s Help Check the SMTP server is correctly pro gramm...

Страница 614: ...onitor s Help Check the login user ID and password for PC in which folder for transfer is specified are correctly programmed Check the folder for transfer is correctly specified Check the PC in which...

Страница 615: ...sfer Network Guide You can also use the Web Image Monitor for confirmation See the Web Image Monitor s Help Check whether there are any network problems 15 11 Cannot find the DNS server or POP3 IMAP4...

Страница 616: ...so that the message disappear and the key goes out with User Pa rameters See p 166 User Parameters Facsimile Reference Advanced Features switch 21 bit 6 Note When you restart connecting the machine t...

Страница 617: ...Settings Guide The machine failed to print re ceived fax messages If this happened when the re ceive file indicator was lit a problem such as run out of pa per or toner might disable printing p 85 Sub...

Страница 618: ...high security level is set by the extended security func tion Consult your administra tor about appropriate security settings Ask the administrator All fax messages stored in memory have been lost Th...

Страница 619: ...x Forwarding Store File in the Information Box SMTP Re ception Using Internet Fax and Polling Transmission This function is made unavail able by the enhanced security function Consult your user admini...

Страница 620: ...Stop key p 21 Canceling a Memory Transmission If the original is being sent or if it is in standby press Change Stop TX File or the Clear Stop key p 21 Canceling a Memory Transmission p 19 Canceling...

Страница 621: ...Error Correction Mode 52 Entering a fax number 33 Entering an e mail address 34 Enter key key 4 Enter Text in e mail 55 Error Messages 83 F Facsimile key 81 Fax Header 73 Deleting 77 Editing 75 Progra...

Страница 622: ...rogram key 4 Programming 73 Q Quick Dial Specifying a Destination 33 R Received Images 66 Receive File indicator 3 Reception 48 Auto Reception 48 Manual Reception 48 Reception File Print Quantity 53 R...

Страница 623: ......

Страница 624: ...80 m Pages in book 100 Print scale 81 Gap when printed at 81 scale Pages in book Paper thickness 2 4 000000 mm FAX Option Type 3245 Operating Instructions Facsimile Reference Basic Features FAX Option...

Страница 625: ...ile Reference Adva FAX Option Type 3245 Operating Instructions Facsimile Reference Advanced Features Transmission Mode Checking and Canceling Transmission Files Communication Information Other Transmi...

Страница 626: ...poration in the United States and or other countries Adobe and Acrobat are registered trademarks of Adobe Systems Incorporated Ethernet is a registered trademark of Xerox Corporation Other product nam...

Страница 627: ...eing tampered or prevent the machine from unauthorized use Also refer to this manual for the procedures for registering administrators as well as setting user and admin istrator authentication Network...

Страница 628: ...provides an overview of its functions This guide is added to the Start menu when DeskTopBinder Lite is installed Auto Document Link Guide PDF file CD ROM2 Describes operations and functions of Auto Do...

Страница 629: ...esending a File 24 Printing a List of Files in Memory Print TX File List 25 3 Communication Information Printing the Journal 27 Journal 29 Checking the Transmission Result TX File Status 31 Checking t...

Страница 630: ...rinting stored documents 70 Stamp 72 Transmission Options 73 Fax Header Print 73 Label Insertion 73 Reduced Image Transmission 73 Auto Reduce 74 Default ID Transmission 74 Selecting transmission optio...

Страница 631: ...tre Mark 96 Reception Time 97 Two Sided Printing 97 180 Degree Rotation Printing 98 Multi copy Reception 98 Image Rotation 99 Combine Two Originals 99 Page Separation and Length Reduction 100 Reverse...

Страница 632: ...eb browser 124 Deleting fax information using a Web browser 124 Programming Destination Information from Web Browser 125 Delivering Files Received by Fax 127 7 Simplifying the Operation Programs 129 R...

Страница 633: ...warding 173 Reception File Print Quantity 173 Print 2 Sided 173 Memory Lock 174 Reception Reverse Printing 174 Paper Tray 174 Programming Changing Special Senders 174 Programming Initial Set Up of a S...

Страница 634: ...Error E mail 199 11 Appendix Connecting the Machine to a Telephone Line and Telephone 201 Connecting the Telephone Line 201 Selecting the Line Type 202 Optional Equipment 203 Expansion Memory 32MB DI...

Страница 635: ...bol Be sure to read the instructions all of which are included in Safety In formation General Settings Guide The statements above are notes for your safety Important If this instruction is not followe...

Страница 636: ...2...

Страница 637: ...entify lost messages Limitation This function is unavailable with Immediate Transmission Use Memory Transmission Note You can specify a time within 24 hours If the current time shown is not correct ch...

Страница 638: ...small er than 10 add a zero at the be ginning If you make a mistake press Clear or the Clear Stop key be fore pressing OK and then try again To cancel Send Later press Cancel The display returns to th...

Страница 639: ...peration keys with operations for Sender Settings Quick Operation keys allow you to omit step B See p 144 General Settings Adjust ment You can use communication man agement report etc to check usage s...

Страница 640: ...the sender s e mail address is registered you can specify whether or not to send the transmission re sult by e mail to the sender If you enable this function sent to the registered mail address Note...

Страница 641: ...K The standby display appears Note To check the settings press Transmission Mode I I I I Specify the destination and then press the Start key Note To cancel the Sender Settings cancel the transmission...

Страница 642: ...ssion Note If there is already a message stored with this function or a transmis sion in progress your message will be sent after that message has been transmitted A A A A Place the original and then...

Страница 643: ...et to tell the re ceiver the ID that must be entered to print the message Limitation The destination machine must be of the same manufacturer and have the Confidential Reception function The destinati...

Страница 644: ...the number keys and then press OK ID Override and the entered Confidential ID are shown above the highlighted Confiden tial TX Note If you make a mistake press Clear or the Clear Stop key before pres...

Страница 645: ...e Poll ing ID unique to the transmission This ID overrides the ID stored in the machine The user must supply this ID when they poll your ma chine If the IDs match the mes sage is sent Make sure in adv...

Страница 646: ...charged to the receiver A A A A Place the original and then select the scan settings you require Reference p 11 Placing Originals Fac simile Reference Basic Features p 28 Scan Settings Facsimile Refe...

Страница 647: ...med in a Quick Operation key you can have the report e mail sent after transmission See p 146 Quick Oper ation Key Limitation This report is not printed if the User Parameters are set to allow the sto...

Страница 648: ...on You must enter an Override Poll ing ID unique to this transmission This ID overrides the one stored in this machine Your machine will receive any messages waiting in the transmit ting machine that...

Страница 649: ...g select one of the follow ing procedures Default ID Free Polling Reception A Check that Default ID Free Poll ing RX is selected and then press OK Note To cancel Polling Reception press Cancel The dis...

Страница 650: ...leted and shows its result If E mail TX Results is programmed in a Quick Operation key you can se lect whether a report e mail is sent af ter reception See p 146 Quick Operation Key Note You can also...

Страница 651: ...ry Transmission Internet Fax Transmission Send Later Sender Settings Priority Transmission Confidential Transmission Polling Reception Polling Transmission Transfer Request Note If there are no files...

Страница 652: ...ress Check Change Settings C C C C Select a file to check Note If multiple destinations were spec ified only the destination select ed first appears If multiple destinations were spec ified only the n...

Страница 653: ...pages of your file may have already been sent and will be received at the other end If the transmission finishes while you are carrying out this proce dure transmission cannot be can celed A A A A Pre...

Страница 654: ...D D Press Change for the destination you want to delete Note Press to switch the destina tion between fax number Inter net Fax address and IP Fax address E E E E Press Clear to delete the destination...

Страница 655: ...s Add Note Press to switch the destina tion between fax number Inter net Fax address and IP Fax address E E E E Specify the destination using the number keys or soft on screen keys Note To add e mail...

Страница 656: ...u want to change or cancel the transmis sion time D D D D The recipient appears E E E E Press Change TX Time F F F F Press Clear and then re enter the transmission time using the number keys or select...

Страница 657: ...File B B B B Press Print File C C C C Select the file you want to print Note If multiple destinations were spec ified only the number of unsent messages appears If you want two sided printing press P...

Страница 658: ...u pro gram this function See p 166 User Parameters switch 24 bit 1 A A A A Press Change Stop TX File B B B B Press Transmit Failed File C C C C Select the file you want to resend TX failed is displaye...

Страница 659: ...e stored in memory can also be printed See p 23 Printing a File You can display a sender name with the User Parameters See p 166 User Parameters switch 04 bit 5 A A A A Press Change Stop TX File B B B...

Страница 660: ...Checking and Canceling Transmission Files 26 2...

Страница 661: ...by file number Print per User Prints the results of communica tions by individual sender Note The setting on the machine can be changed so that user codes will be printed instead of user names For mor...

Страница 662: ...User A Select Print per User B Select a user Note Press Cancel if the user is not registered The display returns to that of step B C Press OK after checking the user name shown on the dis play Note Pr...

Страница 663: ...end For fax destinations Shows the name for display pro grammed by the other end Shows the programmed fax number if the name for display has not been programmed If neither name nor fax number has been...

Страница 664: ...ter and T for outgoing e mail or R for ingoing e mail the commu nication mode appears in alphabetical letters or symbols Outgoing e mail set for Reception Notice of E mail Op tions bears a Q whereas A...

Страница 665: ...s for this function Using the key allows you to omit steps A See p 144 General Settings Adjustment A A A A Press Information B B B B Select TX File Status C C C C Check the transmission results Transm...

Страница 666: ...l not appear To view the latest result exit RX File Status and then try again You can program one of the Quick Operation keys with operations for this function Using the key allows you to omit steps A...

Страница 667: ...B B Press Memory Status C C C C Check the memory status Note Others will be displayed When storing attachment files See p 65 Sending an Auto Document For storing Reception Request files See p 52 Tran...

Страница 668: ...eport e mail You can store up to 400 received documents on the hard disk You can view print received and stored documents using a Web Im age Monitor or DeskTopBinder See p 123 Viewing Fax Informa tion...

Страница 669: ...appears Deleting Received and Stored Documents Use the following procedure to delete documents stored on the hard disk Note You cannot delete a document while another person is previewing or printing...

Страница 670: ...s happens use the Power Fail ure Report to identify which mes sages have been deleted See p 198 Turning Off the Main Power When a Power Failure Occurs Limitation You must program the Confiden tial ID...

Страница 671: ...E Press Exit The standby display appears If you cannot print confidential files even if the Confidential File i i i i indicator is lit The Confidential File indicator also lights if the machine recei...

Страница 672: ...g Off the Main Power When a Power Failure Occurs Note If Memory Lock and received doc ument storage are both set to on Memory Lock is unavailable and received documents become stored documents For det...

Страница 673: ...ID with the number keys and then press the Start key Note If the Memory Lock ID does not match the message Speci fied code does not corre spond to programmed Memory Lock ID appears Press Exit and retr...

Страница 674: ...ation you specify You can specify a fax number e mail address or IP Fax destination as the receiver See p 181 Programming changing Personal Boxes for details on pro gramming receivers To be able to re...

Страница 675: ...se lected Personal Box password is set in advance Note The password is programmed in Administrator Tools See p 181 Programming chang ing Personal Boxes A Enter the password and then press OK Note If y...

Страница 676: ...ecep tion request is made by another party the SEP Code they specify is matched against the SEP Codes programmed in that Information Boxes If a code matches the mes sage stored in the Information Box...

Страница 677: ...o cancel entering a pass word press Cancel The dis play returns to that of step C D D D D Place the original and then select the scan settings you require Note You can also select the follow ing setti...

Страница 678: ...ote If you make a mistake press Clear or the Clear Stop key before pressing OK and then try again To cancel entering a pass word press Cancel The dis play returns to that of step D E E E E Press the S...

Страница 679: ...delete When a password is required A Enter the password and then press OK Note If you make a mistake press Clear or the Clear Stop key before pressing OK and then try again To cancel entering a pass w...

Страница 680: ...Communication Information 46 3...

Страница 681: ...C C C Press the Pause Redial key D D D D Enter 1 5 5 5 3 3 3 using the number keys E E E E Press the Start key Redial The machine stores the last 10 desti nations specified in each transmission method...

Страница 682: ...key C C C C Select the destination you want to redial to Note Now that the date and time the original was read appears as a key select by pressing it When you press ProgDest you can register a select...

Страница 683: ...tion General Settings Guide See p 129 Registering and Changing Keystroke Programs Messages you send using this function are marked SUB on all reports This function is not available with Internet Fax A...

Страница 684: ...m ma chines that have the Polling Recep tion function and the same manufacturer However if a machine of another manufacturer supports Polling Reception you can receive fax messages from the other part...

Страница 685: ...ess Default ID Free Polling RX and then press OK Note To cancel Polling RX press Can cel The display returns to that of step J L L L L Press OK The standby display appears M M M M Press the Start key...

Страница 686: ...Party and in the Transfer Station itself See p 190 Transfer Report Program the same Polling ID in both this machine Requesting Party and the Transfer Station See p 192 Programming a Poll ing ID To sen...

Страница 687: ...registering the destina tions in the Address Book See p 53 T 37 Full Mode Facsimile Reference Basic Features When using a Transfer Request by e mail documents are sent at A4 width Documents larger th...

Страница 688: ...Transfer Station enter 0 1 Note You can enter up to five dig its Speed Dial A Select q q q qp p p p Speed Dial B Enter the number of the Speed Dial code For example to select the number stored in Spe...

Страница 689: ...gs Facsimile Reference Basic Features B B B B Press the key programmed with Transfer Request C C C C Press the Start key Setting Multistep Transfer Program a Transfer Station in a desti nation list Wh...

Страница 690: ...B Press the On Hook Dial key You will hear a low tone from the internal speaker Note If you want to cancel this oper ation press the On Hook Dial key again C C C C Dial The machine immediately dials t...

Страница 691: ...xternal telephone on the fax machine you can speak with the other party when you hear a voice If you hear a voice before press ing the Start key pick up the exter nal telephone and tell the receiver y...

Страница 692: ...the scan settings you require Reference p 11 Placing Originals Fac simile Reference Basic Features p 28 Scan Settings Facsimile Reference Basic Features B B B B Pick up the external telephone You wil...

Страница 693: ...unit you can select G3 1 G3 2 G3 3 or G3 Auto depending on the number of the installed unit Multi port When the extra G3 interface unit is installed communications can take place simultaneously throu...

Страница 694: ...0 4 B B B B Select the line you want to use When one optional extra G3 unit is installed Note If you select G3 Auto the ma chine will use any available line This increases efficiency C C C C Press Exi...

Страница 695: ...ents are sent at A4 width Documents larger than A4 are reduced to A4 width See p 11 Placing Originals Facsimile Ref erence Basic Features If the re ceiver is T 37 full mode compliant documents are sen...

Страница 696: ...ly one after the other pressing the Start key after each page After the last original has been scanned press If is not pressed the ma chine will automatically start sending the documents 60 sec onds a...

Страница 697: ...ep B See p 144 General Set tings Adjustment A A A A Place the original in the ADF and then select the scan settings you require Reference p 11 Placing Originals Fac simile Reference Basic Features p 2...

Страница 698: ...andard message at the top of the first original sent There are four types of standard mes sages Confidential Urgent Please phone and Copy to corres You can also program other messages Note While this...

Страница 699: ...ring Chang ing and Deleting an Auto Document Note You can attach one Auto Docu ment to each transmission You can store up to 6 Auto Docu ments See p 158 Storing Chang ing and Deleting an Auto Document...

Страница 700: ...estination and then press the Start key Printing documents stored as Auto Documents This function is used for printing doc uments stored as Auto Documents This function is very convenient as it can be...

Страница 701: ...on files See p 34 Printing De leting Received and Stored Documents Print Delete Stored RX File You can program one of the Quick Operation keys with operations for this function Using the quick op erat...

Страница 702: ...to place the documents in order by pro grammed user name Press Date to place the docu ments in order of programmed date Specifying documents from the file list A Press U U U U Prev or T T T T Next to...

Страница 703: ...ant to add your origi nals to stored documents and send them all at once press R R R ROri gi Stored File or Stored file R R R R Origi When sending only stored docu ments proceed to step F Note When R...

Страница 704: ...of 30 documents at one time A A A A Press Sub TX Mode B B B B Press Select Stored File C C C C Select the document to be printed Note The documents stored using the facsimile function appear on the d...

Страница 705: ...a password proceed to step E E E E E Press Print File or Print 1st Page When Print File is pressed the ma chine prints all the pages When Print 1st Page is pressed the ma chine prints only the first...

Страница 706: ...ned on you need to resend that page If you use this function often you can set the default in General Set tings and Adjustment so that this function is always on In this case Stamp can easily be turne...

Страница 707: ...ma tion function You can select whether or not dates fax header names file num bers or page numbers are printed by changing their respective User Parameters switch 18 bit 3 2 1 0 See p 166 User Parame...

Страница 708: ...s Polling ID is the same as yours This function can stop you ac cidentally sending information to the wrong place Preparation You need to register a polling ID beforehand See p 192 Program ming a Pol...

Страница 709: ...t to insert a destination Programming the Reduced Image Transmission A Press On in for Reduced Im age TX Note Press Off if you do not want to do a reduced transmission Programming the Auto Reduce A Pr...

Страница 710: ...mission is used instead of Parallel Memory Transmission in the following cas es When the line is busy and could not be connected to With Send Later When you store an original for Memory Transmission w...

Страница 711: ...eport or Communication Failure Report See p 81 Communication Failure Re port and p 80 Communication Re sult Report Memory Transmission Batch Transmission If you send a fax message by Memory Transmissi...

Страница 712: ...ltiple destinations in the order of specified destinations The Simultaneous Broadcast func tion however can simultaneously send faxes to multiple destinations using different lines This results in a s...

Страница 713: ...wrong you may not be able to acquire Journal If the Journal in e mail format fails to be transmitted the Journal is printed out The name of an attached CSV file is JOURNAL year month hours minutes For...

Страница 714: ...u can select whether a report e mail is sent after transmission See p 146 Quick Operation Key Note If two or more destinations are specified this report is printed af ter the fax message has been sent...

Страница 715: ...that could not be sent successfully Unprogrammed destination col umn indicates the message could not be sent because the transfer s fax number is incorrect or not pro grammed column indicates the Int...

Страница 716: ...Other Transmission Features 82 4...

Страница 717: ...eaches 0 during Immediate Reception any further reception becomes impossible and the current communication is ter minated Reception resolution This machine supports Standard Detail and Super Fine reso...

Страница 718: ...n tent In such cases we recommend you switch off the above functions or install the optional expansion memory Limitation The machine may not be able to re ceive fax messages when free memory space is...

Страница 719: ...If free memory reaches 0 during Substitute Reception any further reception becomes impossible and the current communication is terminated When a fax message is received after Store has been selected f...

Страница 720: ...ges are lost so you can ask the senders to transmit them again Important If a sender has not programmed their Own Name or Own Fax Number the machine may fail to receive an important fax message We rec...

Страница 721: ...you must make the following preparations Program each Transfer Station number in this machine Trans fer Station and in the Request ing Party itself See p 190 Transfer Report Program the same Polling...

Страница 722: ...Party For example Requesting Party s own dial number 001813 11112222 Transfer Station s Quick Dial 03 11112222 Transfer Result Report Preparation Program the Requesting Party fax number into a Quick...

Страница 723: ...nistrator s e mail address has been programmed the Transfer Result Report e mail is forwarded to that address Note Unprogrammed destination col umn indicates the message could not be sent because the...

Страница 724: ...address is programmed as the destination documents received are forwarded as e mail Limitation A maximum of 500 parties can be specified in a group Note You need to specify the Forwarding destination...

Страница 725: ...ersonal Boxes Limitation This function is not available when you set received documents to be deliv ered to the network delivery server Note You can route documents received from any fax machine regar...

Страница 726: ...il sent from the SMTP server will not be received and the machine reports an error if SMTP reception is not set Also the SMTP server sends an error notification to the originator If an error occurs wh...

Страница 727: ...n security settings this function may not be available Note If an e mail transfer request is received when the SMTP RX File Delivery Set tings to Off this machine responds with an error message to the...

Страница 728: ...4567 specify fax 2121234567 abc company com Quick Dial Destination fax registration number of 5 digits or less host name of this machine do main name Example to transfer to the destination number 0000...

Страница 729: ...ption Power up This machine can be set to shut down automatically if no one has used it for a while In these situations even though the operation switch is off the machine can still receive incoming m...

Страница 730: ...n a Checkered Mark is printed on the first page of fax messages to help you separate them Note You can turn this function on or off using Reception Setting See p 147 Reception Settings Centre Mark Whe...

Страница 731: ...sides of a sheet You can turn this function on or off using Reception Settings See p 147 Recep tion Settings Limitation To use this function all pages of the received document must be of the same size...

Страница 732: ...e paper this machine rotates images as shown in the diagram Multi copy Reception If you switch this function on multi ple copies of each incoming fax mes sage will be printed You can also select to ha...

Страница 733: ...y side on a sheet of A3L Two 81 2 51 2 K messages are printed side by side on a sheet of 81 2 11 L Two 81 2 11 K messages are printed side by side on a sheet of 11 17 L Limitation This function does n...

Страница 734: ...et Note Your service representative can customize this function with the following settings Reduction Print split mark Overprinting Overprinting length Guideline for split You can adjust the overprint...

Страница 735: ...iden tify them However if you turn this function on the sender s Own Name or Own Fax Number is printed in stead so you can find out where the message came from When you re ceive an Internet Fax docume...

Страница 736: ...e The priority tray may be used only when the document received is the same size as the priority tray Reference p 99 Image Rotation p 100 Page Separation and Length Reduction p 101 Page Reduction Tray...

Страница 737: ...Bypass Tray You can print messages sent from Specified Senders on paper from the bypass tray Set as follows Program a special sender and se lect the Bypass Tray for the paper tray type See p 178 Progr...

Страница 738: ...shortened or split across sheets Paper longer than 600mm may be creased not sent or jam Print area depends on optional ex pansion memory resolution and vertical length of originals If you use this fu...

Страница 739: ...also set the machine to output Internet Faxes and ordinary faxes onto differ ent trays Note To use this function specify the port and destination using Specify Tray for Lines See p 147 Reception Setti...

Страница 740: ...Reception Features 106 5...

Страница 741: ...ion then select LAN Fax as the printer and then specify a destination In addition to sending faxes LAN Fax Driver allows this machine to be used for printing out documents prepared on a computer for p...

Страница 742: ...000 XP Windows Server 2003 and Windows NT 4 0 the installers for various drivers and utilities launch automatically as Auto Run programs when you insert the CD ROM If your operating system is Windows...

Страница 743: ...elect the interface language of the software and then click OK D D D D Click LAN Fax Driver The software license agreement window appears E E E E Read all of the terms and if you agree select I accept...

Страница 744: ...rating Systems Microsoft Windows 95 98 Me Microsoft Windows 2000 XP Microsoft Windows Server 2003 Microsoft Windows NT 4 0 Setting LAN Fax Driver Properties Note If your operating system is Win dows N...

Страница 745: ...on When using Windows 95 98 Me A Click the Accessories tab When using Windows 2000 XP Windows Server 2003 or Windows NT 4 0 A Click the Accessories tab When using a network A If the settings do not ma...

Страница 746: ...the following proce dures to specify a destination For details see LAN Fax Driver s Help Note When user authentication is used with this machine click User Settings You can specify up to 500 desti na...

Страница 747: ...x from the Type dropdown menu Note Select the fax type as follows Send by standard fax Fax Send by Internet Fax E mail Send by IP Fax IP Fax If you selected Group from the Format dropdown menu you can...

Страница 748: ...e the Protocol dropdown menu is displayed when you selected IP Fax in Step B If you se lected E mail in Step B pro ceed to Step E E Click Set as Destination The entered destination is add ed and displ...

Страница 749: ...ation A Select the Preview check box B Click Print or Send The Preview window appears C Click Next or Previous to check the image Note To close the Preview win dow click Cancel To print the preview im...

Страница 750: ...transfer completed mes sage appears on the computer s display so you can easily ascertain the communication progress However if the volume of commu nication data from the LAN Fax to this machine incre...

Страница 751: ...he LAN Fax Result Re port A A A A Click the E mail Settings tab B B B B Select the Notify check box under E mail TX results C C C C Enter the destination When entering the e mail address directly A Cl...

Страница 752: ...You can also save documents in TIF format Open the application document you want to print or create a new docu ment and then perform the following procedure For details see Help Note You can select t...

Страница 753: ...an not be omitted For Line under Fax number select the appropriate line type G3 G3 2 G3 3 G3 Dir Auto G3 PABX Auto or PA BX For Protocol under IP Fax address select H 323 or SIP B Click Add The destin...

Страница 754: ...x number Mail address Depending on the machine type you may not be able to use the ma chine when it is updating the Ad dress Book using CSV files retrieved using SmartDeviceMon itor for Admin that con...

Страница 755: ...box of LAN Fax Cover Sheet Editor appears B B B B Edit the cover sheet Note For details about operations see Help C C C C Click Save as on the File menu D D D D Select a folder and then enter a file...

Страница 756: ...Solutions Cannot access the print er Click retry to send the data again Check the network connection Check that the power is turned on The number of entries in Destinations exceed the limits Up to 500...

Страница 757: ...rt a Web browser B B B B Enter the machine s IP address in the Address field C C C C Click Fax Received File in the left pane With a user code stored reception file programmed A If you have programmed...

Страница 758: ...Print Note To cancel printing press Can cel before clicking Start Print You can change the printing or der of selected multiple messag es You can also have messages printed on both sides of paper For...

Страница 759: ...then enter the Administrator s name and pass word D D D D Click Address Book in the left pane The Address Book is displayed E E E E Set the Internet Fax data format To edit machine properties already...

Страница 760: ...hange the mode to Simple you cannot set ma chine properties E Click OK in the upper right of the screen The Address Book is displayed Note To cancel the setting click Cancel in the upper right of the...

Страница 761: ...ges with no Confidential ID ID Override Confidential Transmission SUB Code Own Name or Own Fax Number are saved in the delivery server in box You can also set so that the received messages are stored...

Страница 762: ...Fax via Computer 128 6...

Страница 763: ...pread original delivery lim it specified transmission polling transmission polling reception re lay request transmission two sid ed original transmission text input reception confirmation set tings BC...

Страница 764: ...er and return to step E F F F F Enter the program name and then press OK The standby display appears Note If you make a mistake press Backspace or Delete All and then try again You should register the...

Страница 765: ...press OK Note Press Cancel to cancel the change and proceed to step F F F F F Press Exit The standby display appears Deleting a Program A A A A Make sure that the machine is in facsimile mode and the...

Страница 766: ...e is in facsimile mode and the standby display is shown Note If the standby display is not shown press the Facsimile key B B B B Place the original C C C C Press the Program key D D D D Confirm that R...

Страница 767: ...f failure oc curs The manufacturer shall not be responsible for any damage that might result from the loss of data Note Stored documents are not deleted even when there is a power failure or the main...

Страница 768: ...Note You can change file names and user names See p 136 Changing Information of Stored Docu ments A A A A Make sure that the machine is in facsimile mode and the standby display is shown If the stand...

Страница 769: ...de A Press User Name B Press the user name to be pro grammed and then press OK Note Press the title key to switch between titles To set an non programmed user name press Non pro grammed Name and then...

Страница 770: ...te If you have selected Store only proceed to step H H H H H Press the Start key Changing Information of Stored Documents You can change the file name user name and password of stored docu ments To ch...

Страница 771: ...r the new user name and then press OK Note Press the title keys to switch between titles To set a non programmed user name press Non programmed Name and then enter the name User names entered by press...

Страница 772: ...the Quick Operation keys with operations for this function Using the key allows you to omit steps A See p 144 General Settings Adjustment A A A A Press Sub TX Mode B B B B Press Select Stored File C...

Страница 773: ...e DeskTop Binder s manual and Help Limitation If you use a link in Auto Document Link the versions earlier than DeskTopBinder Lite or Profession al version 4 0 0 0 set the SNTP Server Address as 0 0 0...

Страница 774: ...Simplifying the Operation 140 7...

Страница 775: ...and scan set tings When the power is turned on settings specified here are selected p 144 General Settings Adjustment Memory Immed Transmission Switch Text Size Priority Original Type Priority Auto Im...

Страница 776: ...ile Print Qty 2 Sided Print p 97 Two Sided Printing RX Reverse Printing p 100 Reverse Order Printing Paper Tray p 177 Paper Tray Specify Tray for Lines p 105 Specifying Tray for Lines Checkered Mark p...

Страница 777: ...el the new settings The previous display appears Description Reference Program Change Delete Standard Message Store Change Delete Auto Document Program Change Delete Scan Size Print Journal Transmissi...

Страница 778: ...tem Settings General Settings Guide A A A A Press the User Tools Counter key The main menu display for default settings appears B B B B Press Facsimile Features The menu display for facsimile de fault...

Страница 779: ...s function to select whether contents registered in program No 1 are to be used as the initial settings after the power is turned on or the Clear Modes key is pressed Standard Program No 1 Note You ca...

Страница 780: ...keys are shown on the menu immedi ately after the power is turned on The Quick Operation keys can be programmed with the following functions Journal TX Status Display Transmis sion File Status Print C...

Страница 781: ...0 set s 2 Sided Print Specify whether or not received fax messages are to be printed on both sides of paper On Off RX Reverse Printing Reception Re verse Printing Specify whether or not received fax m...

Страница 782: ...be printed at the bottom of received fax messag es On Off E mail Settings Internet Fax Settings You can select to display or not When you want to send an In ternet Fax set ON to display the icon On O...

Страница 783: ...d e mail ad dress is set e mail received from addresses that do not match the authorized address is discarded and an error message is returned to the SMTP server The authorized e mail address is compa...

Страница 784: ...haracters correctly Alphanumerical lower and up per cases The 21 symbols in the table be low Enter the correct IP addresses for the gatekeeper SIP server and gateway which you have been in formed by t...

Страница 785: ...call re quests and responses A redirect server processes request destination inquiries A registrar server registers location information of user agents which correspond to telephones or facsimiles on...

Страница 786: ...rst several digits of IP Fax number and the gateway specific ID number are identical doc uments can be transmitted using the registered digits of the gateway For exam ple if both 03 and 04 have been r...

Страница 787: ...Deleting a gateway A Press Program Change Delete Gateway B Press Delete and then select a gateway to delete C Press Delete on the confir mation message Note If you do not want to de lete the gateway y...

Страница 788: ...Facsimile Features 154 8...

Страница 789: ...You can program change or cancel frequently used scan sizes p 160 Programming Chang ing and Deleting a Scan Size Print Journal Prints a Journal p 162 Printing Journal Transmission Page Count Checks t...

Страница 790: ...Lock reception p 192 Programming a Memo ry Lock ID Select Dial Push Phone Selects a line type when you connect the machine to a G3 analog line Note This function is not availa ble in some areas p 193...

Страница 791: ...r Copy to corres messages Use the same procedure to pro gram and change your messages A A A A Press the User Tools Counter key B B B B Press Facsimile Features C C C C Press Administrator Tools D D D...

Страница 792: ...ram a new Auto Document or over write an existing one You can store the following items in an Auto Document Originals 6 documents maximum only one page per file Scan settings resolution original type...

Страница 793: ...r a file name and then press OK Reference Entering Text General Set tings Guide Proceed to step H F F F F Place the original and then select any scan settings you require Note You can also specify a s...

Страница 794: ...e original two cus tom sizes are available Program Size 1 and Program Size 2 Use these func tions to program a custom size in ad vance To change an existing scan size just use the same procedure Impor...

Страница 795: ...ical size differs depending on the selected unit When mm is selected Auto De tect 210 mm A4 257 mm B4 JIS 297 mm A3 216 mm 8 1 2 and 279 mm 11 are shown When inch is selected Auto Detect 8 3 inch A4 1...

Страница 796: ...chine and sent to a specified End Receiver This is useful if for example you are visiting another office and would like a copy of your messages to be sent to that office You can also specify a folder...

Страница 797: ...n If there is no destination of the specified type you can set to have a certain destination quoted with priority See p 166 User Parameters switch 32 bit 0 You can program one of the Quick Operation k...

Страница 798: ...s switch 21 bit 3 If you make a mistake press Clear or the Clear Stop key be fore pressing OK and then try again G G G G Press OK H H H H Press the User Tools Counter key The standby display appears Q...

Страница 799: ...ilable with Internet Fax Note To store incoming documents from Special Senders only in Memory Lock program each sender with Special Senders to Treat Differ ently See p 171 Special Senders to Treat Dif...

Страница 800: ...to that of step D F F F F Press the User Tools Counter key The standby display appears User Parameters User Parameters allow you to customize various settings to suit your needs To change function se...

Страница 801: ...ve Re port Off On 4 Automatic printing of the Polling Reception Result Re port Off On 5 Automatic printing of the Im mediate Immediate TX Result Report Off On 6 Automatic printing of the Polling Trans...

Страница 802: ...06 6 First page scanned for book originals From the left page From the right page 07 2 Parallel Memory Transmis sion Off On 08 2 Authorized Reception Type Receiving from only specified senders Receivi...

Страница 803: ...2 Reprinting time of stored documents in memory that could not be print ed using LAN Fax Driver 0000 0 minute 0001 1 minute 0010 2 minutes 0011 3 minutes 0100 4 minutes 0101 5 minutes 0110 6 minutes 0...

Страница 804: ...ministrator Tools D D D D Press Parameter Setting E E E E Select the switch number you want to change F F F F Select the bit number you want to change When the bit number is pressed the current value...

Страница 805: ...step D F F F F Press the User Tools Counter key The standby display appears Special Senders to Treat Differently By programming particular receivers in advance you can set the following function for...

Страница 806: ...list See p 27 Printing the Journal See p 180 Printing the Special Sender List To use Forwarding Print 2 Sided or Paper Tray with Internet Fax re ception program the sender s e mail address If you sele...

Страница 807: ...If you do not program any Special Senders the machine transfers all incoming documents to the other end specified in Specify End Re ceiver You can set the fax destination In ternet fax destination IP...

Страница 808: ...Special Senders and the documents from other senders on different types of paper For example if blue paper is in Tray 1 and white paper is in Tray 2 the ma chine prints the documents from Spe cial Sen...

Страница 809: ...you want to pro gram Note You must select only the item you want to program To cancel these settings press Cancel The display returns to that of step E Authorized RX Authorized Reception A Select Auth...

Страница 810: ...et a file format for for warding See p 166 User Pa rameters switch 21 bit 3 Deleting a destination speci fied as a forward destination from the destination table causes the settings of the for ward de...

Страница 811: ...Program Memory Lock ID under Administrator Tools See p 165 Memory Lock RX Reverse Printing Reception Reverse Printing A Select RX Reverse Printing B Select On or Off and then press OK Note Selecting...

Страница 812: ...e Authorized RX has the same settings as Recep tion Settings See p 147 Re ception Settings Programming Authorized RX and Special RX Function A Select Authorized RX or Special RX Function B Select On o...

Страница 813: ...You can specify a vertical size from 210mm 8 3 inch to 305mm 12 0 inch You can not enter a size smaller than 210mm or larger than 305mm Each time you press mm or inch the units switch be tween mm and...

Страница 814: ...r Tools Counter key B B B B Press Facsimile Features C C C C Press Administrator Tools D D D D Press Print List next to Program Special Sender Note To cancel printing press Can cel The display returns...

Страница 815: ...Personal Box Specify a delivery destination pro grammed in Quick Dial Note You can specify a fax number In ternet Fax destination and IP Fax destination as the transmission destination The contents o...

Страница 816: ...To change a Box name press Box Name and then repeat the procedure from step H J J J J Specify the settings you require If you do not want to program a password or receiver proceed to step K Programmin...

Страница 817: ...to delete Personal Boxes Limitation If messages have been programmed in the box you cannot delete the box A A A A Press the User Tools Counter key B B B B Press Facsimile Features C C C C Press Admini...

Страница 818: ...fter being regis tered delivery is not performed and the settings of the delivery destination are also deleted Also when a delivery destination is changed a message is sent to the changed destination...

Страница 819: ...g OK and then try again L L L L Re enter the password and then press OK Note If you make a mistake press Clear or the Clear Stop key be fore pressing OK and then try again To change the password after...

Страница 820: ...ocuments sent with a SUB Code that matches the SUB Code programmed as a Transfer Box are received and then relayed to a programmed receiver Since documents can be sent to multi ple destinations in a s...

Страница 821: ...want to turn this function off please contact your service representa tive When the programmed receiver is a Multi step Transfer Group Dial Multi step Transfer takes place For more information contac...

Страница 822: ...Quick Dials and then press OK Note You can change the display to the fax destination Inter net fax destination and IP Fax destination using the button on the right side of the display A reception sta...

Страница 823: ...tandby display appears Deleting Transfer Boxes A A A A Press the User Tools Counter key B B B B Press Facsimile Features C C C C Press Administrator Tools D D D D Press Box Setting E E E E Press Delet...

Страница 824: ...key The standby display appears Transfer Report For the Requesting Party to be able to receive Transfer Result Reports from the Transfer Station the Requesting Party must program the number of the tel...

Страница 825: ...inting a Confidential Message Note If you do not program a Confiden tial ID you cannot receive a Con fidential Transmission A A A A Press the User Tools Counter key B B B B Press Facsimile Features C...

Страница 826: ...using the number keys and A to F and then press OK Note Register a four digit number us ing 0 through 9 and A through F expect for 0000 and FFFF If you make a mistake press Clear or the Clear Stop ke...

Страница 827: ...elect Dial Push Phone E E E E Press Push Button Phone or Dial Phone 10PPS to select the line and then press OK Reference p 202 Selecting the Line Type F F F F Press the User Tools Counter key The stan...

Страница 828: ...est one You can store received documents up to a total of approximately 320 pages or 2 240 when the optional expansion memory is installed of A4 size Standard ITU T 4Chart You cannot send received doc...

Страница 829: ...programmed user code has been deleted using the Address Book Management function under System Settings you cannot view received and saved documents us ing a Web Image Monitor Select Off in step E or...

Страница 830: ...eted from Ad dress Book is displayed Re en ter the user H H H H Press OK I I I I Press the User Tools Counter key The standby display appears Menu Protection Settings You can set up user access rights...

Страница 831: ...original If an error occurs during reception ask the sender to resend the message Note If an error happens frequently contact your service representa tive The Page column gives the total number of pag...

Страница 832: ...t ask the sender to resend it Important Do not turn off the main power switch while the power indicator is lit or blinking If you do the hard disk and memory may be dam aged and failure could result T...

Страница 833: ...7 If Error Mail Notification cannot be sent the Error Report E Mail is printed by the machine If an error occurs when an e mail is received via SMTP the SMTP server sends an error e mail to the origin...

Страница 834: ...Solving Operation Problems 200 10...

Страница 835: ...one Line To connect the machine to a telephone line use a snap in modular type connec tor Important Make sure the connector is the correct type before you start Where to connect the machine 1 G3 inter...

Страница 836: ...ype Select the line type to which the machine is connected There are two types tone and pulse dial Note This function is not available in some areas Select the line type using Administrator Settings S...

Страница 837: ...esolution Super Fine This also allows you to receive fax messages at high resolution Fine or Super Fine If you require this option consult your service representative See p 211 Maximum Values Extra G3...

Страница 838: ...Data compression method MH MR MMR JBIG Maximum original size Standard size A3 11 17 Maximum scanning size Standard size 297 432mm 11 17 Irregular size 297 1 200mm 11 47 Print process Printing on stand...

Страница 839: ...A3 1 B4 1 A4 Communication Protocols Transmission SMTP TCP IP Reception POP3 SMTP IMAP4 TCP IP E mail format Single Multi part MIME Conversion Attached file forms TIFF F MH MR 1 MMR 1 compression Aut...

Страница 840: ...Transmission protocol Recommended T 38 Annex TCP UDP IP communication Compatible machines IP Fax compatible machines IP Fax transmission function Specify IP address and send fax to an IP Fax compatib...

Страница 841: ...er size and scanned area Exposure Glass ADF Where original is set Acceptable original size Maximum number of sheets Paper thickness Exposure glass Up to A3 297 420mm 11 17 279 432mm 1 ADF one sided do...

Страница 842: ...scanned as A3 11 17 size An original narrower than about 230mm 9 1 will be sent as 81 2 11 or 81 2 14 size and an original narrower than about 264mm 10 4 is scanned as B4 JIS Originals up to 1 200mm...

Страница 843: ...chine has difficulty detecting the size of the following kinds of originals When this happens the receiving machine may not select print paper of the cor rect size documents placed on the exposure gla...

Страница 844: ...tect Unable to auto detect Inch Version b Auto detect Unable to auto detect Paper size where orig inal is placed A3L 8 1 2 13 F4 B4 JIS L A4KL B5 JISKL A5KL Exposure glass b b b b b ADF b b b b b b Pa...

Страница 845: ...l files 1 000 3 000 The number of destinations you can spec ify for one file 500 500 The number of destinations you can spec ify for all files 500 500 The number of Quick Dials you can program 2 000 2...

Страница 846: ...D 191 Confidential Message 36 Confidential Transmission 9 Counters 155 162 D Default ID Free Polling Reception 14 Default ID Transmission 11 12 74 Deleting Information Box Messages 45 programmed desti...

Страница 847: ...Multi copy 83 Multi copy Reception 98 Multi port 59 Multistep Transfer 88 O On Hook Dial 56 Optional Equipment 203 Originals 207 Output Tray 105 P Page Reduction 101 Page Separation and Length Reduct...

Страница 848: ...ater 3 SEP Code 50 Server Generated Error E mail 199 SID Code 50 Simultaneous Broadcast 78 SMTP 93 SMTP reception 92 Special Senders 171 Special Senders to Treat Differently 171 Specifications 204 Sta...

Страница 849: ...215 MEMO...

Страница 850: ...216 AE AE B712 8521 MEMO...

Страница 851: ......

Страница 852: ...ess 80 m Pages in book 224 Print scale 81 Gap when printed at 81 scale Pages in book Paper thickness 2 8 960000 mm FAX Option Type 3245 Operating Instructions Facsimile Reference Adva FAX Option Type...

Страница 853: ...orrect use be sure to read the Safety Information in the General Settings Guide before using the machine Getting Started Sending Scan Files by E mail Sending Scan Files by Scan to Folder Storing Files...

Страница 854: ...l the company be li able for direct indirect special incidental or consequential damages as a result of handling or oper ating the machine Do not copy or print any item for which reproduction is prohi...

Страница 855: ...ta from being tampered or prevent the machine from unauthorized use Also refer to this manual for the procedures for registering administrators as well as setting user and admin istrator authenticatio...

Страница 856: ...guide can be displayed from the Setup dialog box when DeskTopBinder Lite is installed DeskTopBinder Lite Introduction Guide PDF file CD ROM2 Describes operations with DeskTopBinder Lite and provides a...

Страница 857: ...e Control Panel 13 Log Off Using the Control Panel 14 Programming E mail Addresses and Folders 15 2 Sending Scan Files by E mail Preparation for Sending by E mail 17 E mail Screen 18 Sending Scan File...

Страница 858: ...tings Specifying Scan Settings 73 Making the Settings Related to the Orientation of the Original and Scanned Sides 76 For E mail Scan to Folder and a Network Delivery Scanner 76 For a Network TWAIN Sc...

Страница 859: ...olution and File Size 109 When Using for E mail Scan to Folder or Store or as a Network Delivery Scanner 109 When Using as a Network TWAIN Scanner 111 Relationship between File Type Specified for Scan...

Страница 860: ...vi...

Страница 861: ...be used together or conditions in which a particular function cannot be used Reference This symbol indicates a reference Keys that appear on the machine s display panel Keys and buttons that appear o...

Страница 862: ...2...

Страница 863: ...rrently selected 5 Program key Use to register settings used frequently as a program or to recall the registered pro gram 6 Clear Modes key Press to clear the current settings 7 Energy Saver key Press...

Страница 864: ...the corresponding func tion is interrupted Press the respec tive key and then follow the instructions that appear on the screen 12 Function keys Press the Copy Document Server Fax Printer or Scanner...

Страница 865: ...mbination with the file storage function scan files from multiple originals that have been temporarily stored can be sent all at once 2 Mail server A mail server is an SMTP server used for an e mail s...

Страница 866: ...orage function scan files from multiple originals that have been temporarily stored can be sent all at once 2 FTP server The FTP server is a server that provides file transfer services among computers...

Страница 867: ...viewing a file by setting a password for the file Reference p 45 Storing Files 1 This machine A scan file from the originals scanned by the machine is stored 2 Client computer A stored file can be vie...

Страница 868: ...sent to the delivery server In combination with the file storage func tion scan files from multiple originals that have been temporarily stored can be delivered all at once See p 65 Simulta neous Stor...

Страница 869: ...als for This Machine Network TWAIN Scanner The scanner function of this machine can be used from a client computer via a network using Ethernet optional IEEE 1394 IP over 1394 or optional IEEE 802 11b...

Страница 870: ...scanner it is not necessary to press the Scanner key on the control panel When the TWAIN Driver be comes active on a client computer the display automatically switches to the following screen Press E...

Страница 871: ...e and keep it pressed until the computer finish es reading from the CD ROM If Cancel is selected during instal lation the installation will be stopped and all the remaining soft ware will not be insta...

Страница 872: ...tion Before installation check the sys tem requirements for DeskTop Binder See p 117 Software Supplied on CD ROM Reference For information about the subse quent installation procedure see Setup Guide...

Страница 873: ...ser code authentication enter a number registered in the address book as User Code User Code Authentication Using the Control Panel When user authentication is set the following screen appears Enter a...

Страница 874: ...Control Panel Follow the procedure below to log off when Basic Authentication Windows Authentication or LDAP Authentica tion is set A A A A Press User Tools Counter B B B B Press Logout C C C C Press...

Страница 875: ...tor or SmartDeviceMonitor for Admin For details about installing SmartDevice Monitor for Admin see Monitoring and Configuring the Printer Network Guide For details about registering addresses see each...

Страница 876: ...Getting Started 16 1...

Страница 877: ...il server to be used and the software to be installed Connect the machine to the network with an Ethernet cable or IEEE 1394 cable or use wireless LAN To connect using an IEEE 1394 cable the IEEE 1394...

Страница 878: ...l icon Indicates that the e mail screen is dis played 4 Registration No Press to specify a destination using a five digit registration number 5 Manual Input When specifying a destination that is not l...

Страница 879: ...des scanned and oth er settings if necessary Reference p 76 Making the Settings Relat ed to the Orientation of the Original and Scanned Sides E E E E Make the scan settings Reference There are two way...

Страница 880: ...e one of the following steps Display the destination by selecting its initial letter from the title Display the destination by pressing U U U U or T T T T B To select more destinations re peat steps A...

Страница 881: ...address entered press Change locat ed on the left side of the des tination field The soft keyboard appears Make any changes and then press OK To check the selected desti nations press the Check Modes...

Страница 882: ...er you want to search is selected and highlighted If a server is not selected the search is not performed and an error message appears E Press OK F Press Advanced Search G Enter a character string rel...

Страница 883: ...ed For example to search for ABC enter C Exact Match The names which correspond to an entered character or char acters are targeted For example to search for ABC enter ABC Include One of Words The nam...

Страница 884: ...es tination party is sent to the sender selected here However if the mailing software used by the destination party does not support MDN Message Dispo sition Notification the e mail may not be sent I...

Страница 885: ...OK If the protec tion code you entered is cor rect the sender name is displayed C Press OK Using a registration number to specify a sender name A Press Attach Sender s Name B Enter the five digit reg...

Страница 886: ...der Note When a protection code has been set a screen for entering the protection code appears after selecting the sender En ter the protection code and then press OK If the protec tion code you enter...

Страница 887: ...dure to specify the sub ject Urgent New product appear ance is explained as an example here A Press Subject Message B Press Attach Subject C Select the subject Urgent D Press Manual Input The soft key...

Страница 888: ...ding by E mail You can use the e mail function and the storage function together The scan file is sent by e mail and at the same time is stored Note This section explains mainly the procedure for simu...

Страница 889: ...tting for scanning For details see p 73 Specifying Scan Set tings Recall registered settings For details see p 82 Programs D D D D Specify the destination E E E E Specify the sender and a subject F F...

Страница 890: ...lected destination is displayed Sender File Name The file name is displayed only when a file is stored at the same time and when a stored file is sent Status One of the following status is displayed D...

Страница 891: ...when settings made with the control panel Web Image Monitor Telnet or other methods do not permit the use of SMB and FTP sending files is still possible Connect the machine to the network with an Ethe...

Страница 892: ...played 4 Registration No Press to specify a destination using a five digit registration number 5 Enter Destination When specifying a destination that is not listed press Enter Destination and then ent...

Страница 893: ...Preparation for Sending by Scan to Folder 33 3 Note When the entire list does not fit on one screen press U U U U or T T T T to scroll through the list Group destinations are denoted by this symbol...

Страница 894: ...ils about placing originals see Placing Originals Copy Reference D D D D Make settings for original orien tation the sides scanned and oth er settings if necessary Reference p 76 Making the Settings R...

Страница 895: ...s displayed in the destination field at the top of the screen Note If the target destination does not appear take one of the following steps Display the destination by selecting its initial letter fro...

Страница 896: ...ee p 120 Scan to Folder The following is an example of a path where the folder name is user and the com puter name is desk01 desk01 user An IP address can also be en tered if you use one of the fol lo...

Страница 897: ...ation field and then press the Clear Stop key To change the path for the folder that has been entered press Change on the left side of the destination field Enter the correct path for the fold er and...

Страница 898: ...hich is set in System Settings press Change on the right side of the port number field Enter a port number using the number keys and then press the key P Press Connection Test A connection test is per...

Страница 899: ...Level to select another workgroup and then search for the client computer The maximum number of cli ent computers and shared folders that can be displayed is 100 D Select the client computer that has...

Страница 900: ...ch by Dest Name and Search by Folder Name D Press OK E Select a destination folder F Press Exit Checking selected destinations A Use the destination field at the top of the screen to check which desti...

Страница 901: ...der func tion and the storage function together The scan file is sent by Scan to Folder and at the same time is stored Note This section explains mainly the procedure for simultaneous stor age and sen...

Страница 902: ...gistered settings For details see p 82 Programs D D D D Select the destination E E E E Specify the sender subject and message when sending e mail is performed at the same time F F F F Press Store File...

Страница 903: ...ons are displayed individually Sender File Name The file name is displayed only when a file is stored at the same time and when a stored file is sent Status One of the following status is displayed Do...

Страница 904: ...Sending Scan Files by Scan to Folder 44 3...

Страница 905: ...f DeskTopBinder For de tails contact your local dealer Note When a delivery server is added to the network stored files can be delivered You can store scan files and simultaneously deliver them with t...

Страница 906: ...oth er settings if necessary Reference p 76 Making the Settings Relat ed to the Orientation of the Original and Scanned Sides E E E E Make the scan settings Reference There are two ways to specify sc...

Страница 907: ...ecify a user name file name and password for a stored scan file According to the settings made you can search for files by user name or file name and you can prevent unau thorized persons from accessi...

Страница 908: ...ing a password When a password is specified only a person who knows the pass word can view the file A Press Password B Enter a four to eight digit number using the number keys C Press the key Note To...

Страница 909: ...following steps Note You can also display the list of stored files from a client computer using DeskTopBinder and Web Image Monitor For details see p 53 Checking Stored Files from a Client Computer A...

Страница 910: ...ction When displaying information of a selected stored file 1 Keys for searching for files Press to switch to the screens for searching for a file by user name or file name or to the screen for displa...

Страница 911: ...e after selecting the file from the file list Searching for Files You can search for files from the stored files using the user name or file name Searching by user name A A A A On the screen with the...

Страница 912: ...when they were stored A A A A Press Select Stored File to display the list of stored files Reference p 49 Displaying the List of Stored Files B B B B Select a file Note When you select a password prot...

Страница 913: ...nce For details about installing DeskTopBinder see p 12 DeskTopBinder For details about the functions of DeskTop Binder such as transferring files to a client computer see the manuals related to DeskT...

Страница 914: ...p 121 Store When you select a password protected file the Password en try screen appears Enter the correct password and then press OK When multiple files are selected the password entry screen appears...

Страница 915: ...file information Changing the user name A Press Change User Name B Select the new user name Note The user names shown here are names that were regis tered on the Administrator Tools tab in System Set...

Страница 916: ...key Note To change the password press Change and then enter a new one D Enter the same number as you entered in step B B B B for confirma tion E Press the key F Press OK Important Do not forget the pa...

Страница 917: ...the delivery results when this function is used Important A delivery server in which the ScanRouter delivery software is installed is necessary to use the network delivery scanner function Information...

Страница 918: ...r Delivery Option under File Trans fer For details about making settings and other settings see Network Guide Make settings for the network delivery scanner function such as Destination List Settings...

Страница 919: ...ing a five digit registration number 4 Manual Input When sending e mail via the delivery server press Manual Input and then enter the destination using the soft keyboard that is displayed For informat...

Страница 920: ...opying For details about placing originals see Placing Originals Copy Reference D D D D Make settings for original orien tation the sides scanned and oth er settings if necessary Reference p 76 Making...

Страница 921: ...Display the destination by pressing U U U U or T T T T The destination titles are pro gramed in the delivery serv er To deselect a destination press the destination once more or press U U U UPrev or...

Страница 922: ...case and low ercase letters E Press OK F Select a destination G Press Exit Manual entry of a destination A Press Manual Input The soft keyboard appears B Enter the destination Note Enter the e mail ad...

Страница 923: ...nder sender of the file if necessary You can specify the sender in the following ways Select it from the list Specify its registration number Search for it Note When a sender has been speci fied this...

Страница 924: ...I Specify Return Receipt if neces sary Note If you have not specified the sender you cannot press the key E mail notification that the file has been opened at the destina tion is sent to the sender sp...

Страница 925: ...i nals one by one place the next original For details see p 79 Scanning Originals in Several Times Simultaneous Storage and Delivery You can use the network delivery scanner function and the storage f...

Страница 926: ...ed settings For details see p 82 Programs D D D D Select the destination E E E E Specify the sender and a subject if necessary F F F F Press Store File G G G G Make sure that Send Store is se lected H...

Страница 927: ...tion is displayed Sender File Name The file name is displayed only when a file is stored at the same time and when a stored file is sent Status One of the following status is displayed Done Send ing W...

Страница 928: ...Delivering Scan Files 68 5...

Страница 929: ...scribed be low is required Connect the machine to the network with an Ethernet cable or IEEE 1394 cable or use wireless LAN To connect using an IEEE 1394 cable the IEEE 1394 interface board is require...

Страница 930: ...as that for plac ing originals for copying For details about placing originals see Placing Originals Copy Reference C C C C Make the scan settings A On the File menu point to Add Document and then cl...

Страница 931: ...urity set tings a dialog box requesting your user name and password may appear when you press Scan E E E E Save the scan file in DeskTopBind er A On the File menu click Exit B Enter the file name and...

Страница 932: ...Using the Network TWAIN Scanner Function 72 6...

Страница 933: ...ted and then the original is scanned Note File Format Converter op tional is required to use this function Depending on scan settings and or content of your original this scan type may not function co...

Страница 934: ...is selected Note File Format Converter optional is required to use this function Resolution Select the resolution from 100 dpi 200 dpi 300 dpi 400 dpi or 600 dpi Image Density Select the image density...

Страница 935: ...fied If you select Same Width you can specify in millimeters a uniform width for deleting all sides top bottom left and right If you select Diff Width you can specify in millimeters a different width...

Страница 936: ...See p 101 Scan Settings One sided original Two sided original selection A When scanning one sided orig inals make sure that 1 Sided Orig is selected B When scanning two sided orig inals press 2 Sided...

Страница 937: ...mode you want to select does not appear change the mode in Switch to Batch of Scanner Features For details see p 102 Switch to Batch To enable Wait Time for Next Original s SADF in Scanner Features s...

Страница 938: ...ion Replace the stamp cartridge when the stamp begins to fade For details see Trou bleshooting General Settings Guide C C C C Press OK Note The current settings are displayed For a Network TWAIN Scann...

Страница 939: ...xt Original s SADF in Scanner Features Reference p 101 Wait Time for Next Orig Exposure Glass or Wait Time for Next Original s SADF A A A A Place the originals Reference The procedure for placing the...

Страница 940: ...e scanning the originals C When there are additional orig inals place them within the specified time The machine starts scanning au tomatically Note If you change settings while the machine is waiting...

Страница 941: ...ch to Batch D D D D Make settings for sending by e mail or Scan to Folder storing or delivering Reference p 19 Procedure for Sending E mail p 34 Procedure for Sending by Scan to Folder p 46 Storage Pr...

Страница 942: ...orig inal Top to Top Top to Bottom Last Page Divide Original Feed Type File Type Batch SADF and Stamp Registering a Program A A A A Make the settings you want to register in the initial display of the...

Страница 943: ...rogram E E E E Press the Program key F F F F Press m m m m Register G G G G Press the number of the program for which you changed settings or the number of a different pro gram in which you want to re...

Страница 944: ...ress the Pro gram key B B B B Press Change Name C C C C Press the number of the program for which you want to change the name D D D D Enter a new program name Note A program name can be entered using...

Страница 945: ...n Place the original in the cor rect orientation See Placing Originals Copy Reference No image results from scanning The original was placed with the front and back reversed When the original is place...

Страница 946: ...he stored file is locked and is not accessible The file which is password protected is locked because the pass word was incorrectly entered ten times Consult the network ad ministrator Problems Causes...

Страница 947: ...t 87 8 The Network Delivery Function Cannot Be Used Problems Causes and solutions The network delivery function cannot be used The delivery software may be an old version or a security setting may be...

Страница 948: ...iles Status Check that the user name and password are correct Note A password of 64 or more characters may not be recog nized Check that the ID and password for the destination folder are cor rect Can...

Страница 949: ...computer Check that components such as the LAN cable are connected properly Check that the server settings are correct and the server is working properly Entered protection code for destina tion is i...

Страница 950: ...he same time Reduce the number of the selected files The number of files exceeded the maximum number possible Reduce the number of files and send them again Exceeded max number of files which can be u...

Страница 951: ...emory is full Do you want to store scanned file Because there is not enough free hard disk space in the machine for storing in the Document Server only some of the pages could be scanned Specify wheth...

Страница 952: ...o so The files can be deleted by the file administrator To delete a file which you are not au thorized to delete contact the file ad ministrator Sender s name is not selected Please specify sender s n...

Страница 953: ...estina tions for sending by email press Se lect for the message displayed on the e mail screen To select destina tion for sending by Scan to Folder press Select for the message dis played on the Scan...

Страница 954: ...ce the original correctly Specify the scan size When placing an original directly on the exposure glass the lifting lower ing action of the ADF triggers the au tomatic original size detection process...

Страница 955: ...hether the client computer can use the TCP IP protocol Fatal error has occurred in the scanner An unrecoverable error has occurred in the machine Call your service represent ative Insufficient memory...

Страница 956: ...s not available Check the scanner connection status Check whether the main power switch of the machine is turned off Check whether the machine is con nected to the network correctly Deselect the perso...

Страница 957: ...ked with if necessary Scan Settings For explanations of settings see p 101 Scan Settings 1 File Format Converter optional is required to use this function Settings Default E mail Scan to Folder Store...

Страница 958: ...l Scan to Folder Store Delivery TWAIN Destination List Display Priority 1 Delivery Server Destination List Display Priority 2 E mail Ad dress Select Title Title 1 Update Delivery Server Destination Li...

Страница 959: ...Scanner Features 99 9 Administrator Tools For explanations of settings see p 107 Administrator Tools Settings Default E mail Scan to Folder Store Delivery TWAIN Menu Protect Level 2...

Страница 960: ...see General Settings Guide A A A A Press the User Tools Counter key B B B B Press Scanner Features C C C C Press Send Settings D D D D Press the item to be set Example TWAIN Standby Time setting E E...

Страница 961: ...ted en ter the wait time in seconds 3 999 for placing additional orig inals with the number keys Scanning will start if additional originals are placed and the Start key is pressed within this time Yo...

Страница 962: ...originals are placed on the exposure glass you must press the Start key to start scanning If a paper misfeed occurs or any of the following operations is performed while the machine is waiting for ad...

Страница 963: ...rned on or modes are cleared or reset Select Program No 10 to use the set tings stored in Program No 10 as the initial mode Background Density of ADS Full Colour With this setting you can process scan...

Страница 964: ...shows the feeding direction The range of possible original sizes and scan sizes is as follows Original Size X1 140 432 mm 5 5 17 0 Y1 140 297 mm 5 5 11 7 Scan Area X3 10 432 mm 0 4 17 0 Y3 10 297 mm 0...

Страница 965: ...updat ed This function allows manual updating at any time Send Settings This section explains how to set the defaults for settings such as the com pression level for the scan file and switching to and...

Страница 966: ...ted journal is deleted Do not Print Delete Oldest Transmission delivery results are deleted one by one as new results are stored Do not Print Disable Send Transmission delivery cannot be performed whe...

Страница 967: ...n French Italian Spanish Dutch Portuguese Polish Czech Swedish Finnish Hungarian Norwegian Danish Japanese Simplified Chinese Tra ditional Chinese Russian and Hangul Note The e mail text which is a te...

Страница 968: ...Initial Scanner Setup 108 9...

Страница 969: ...ntrol panel of the machine Specify the scan size and resolution again Limitation Depending on the image compression level the maximum image size will be limited When Using for E mail Scan to Folder or...

Страница 970: ...Scan Type The originals can be scanned using combinations marked with in the table 1 The scanning size must be manually entered 100 dpi 200 dpi 300 dpi 400 dpi 600 dpi A3 B4 A4 B5 A5 B6 1 A6 1 A7 1 1...

Страница 971: ...en Binary Halftone Gray Scale 8 colours or 8 colours halftone is selected as the Colours Gradations The originals can be scanned using combinations marked with in the table Original orientation S 1 Th...

Страница 972: ...canned using combinations marked with in the table Original orientation S 1 The scanning size must be manually entered 100 dpi 200 dpi 300 dpi 400 dpi 500 dpi 600 dpi 700 dpi 800 dpi 900 dpi 1000 dpi...

Страница 973: ...sed the file format is converted to JPEG when On is selected for Compression Gray Scale Full Colour in Send Settings and TIFF when Off is selected Note Files are stored in single page style When sendi...

Страница 974: ...ecified on the control panel or scanner driver does not change An original to be scanned Decide the placement method Exposure glass ADF Place the original There are two original orienta tions Place th...

Страница 975: ...acing Originals 115 10 1 When using the machine as a network TWAIN scanner this is the standard orienta tion for the TWAIN Driver Normally set the original this way The original displayed on a compute...

Страница 976: ...lder Store Net work Delivery Scanner TWAIN Scanner Mixed Sizes is not specified Scan Size is set to Auto Detect 1 Auto detection is used to de termine the size of each origi nal placed on the exposure...

Страница 977: ...AIN System requirements Hardware PC AT compatible machines that support the operating system properly Limitation Under Windows NT with RISC based processors MIPS R series Alpha AXP or PowerPC this dri...

Страница 978: ...Operating system Microsoft Windows 98SE Me Microsoft Windows 2000 XP Microsoft Windows Server 2003 Display resolution 800 600 pixels 64K colours or higher Software installed with DeskTopBinder Auto Do...

Страница 979: ...ers 0 9 letters a z A Z symbols _ Period They can be used anywhere except the beginning and end of an ad dress or before Periods cannot be used next to each other 3 An e mail address found using a LDA...

Страница 980: ...Can Be Entered for Scan to Folder SMB Destination folder path 256 characters User name 128 characters Password 128 char acters FTP Server name 128 characters Destination folder path 256 characters Us...

Страница 981: ...ed anywhere except the beginning and end of an ad dress or before Periods cannot be used next to each other 3 The maximum number of destinations that can be selected depends on the ScanRout er deliver...

Страница 982: ...mm 11 17 inches Sizes that can be detected auto matically Exposure glass A3S B4S A4RS B5RS 8 13 S ADF A3S B4S A4RS B5RS A5RS B6RS 8 5 13 S 8KS 16KRS Resolution 600 dpi 8 bit grayscale Variable range o...

Страница 983: ...ority 105 FTP server 6 37 Function keys 4 Function status indicators 4 I Indicators 3 Installing software 11 Interrupt key 3 L LDAP server 5 Login Using the Control Panel 13 Log Off Using the Control...

Страница 984: ...Storage and Sending by Scan to Folder 41 SMB 6 36 SMTP server 5 Software supplied on CD ROM 117 sRGB 74 Stamp 78 Start key 4 Store 7 45 121 Store File Priority 107 Storing Files 45 Switch to Batch 102...

Страница 985: ...rks of their respective companies We disclaim any and all rights to those marks The product name of Windows 95 is Microsoft Windows 95 The product name of Windows 98 is Microsoft Windows 98 The produc...

Страница 986: ...Operating Instructions Scanner Reference GB GB B180 7518...

Страница 987: ...tructions Security Reference Getting Started Preventing Information Leaks Preventing Unauthorized Use of Functions and Settings Enhanced Network Security Management Based on Authentication and Access...

Страница 988: ...achine Trademarks Microsoft Windows and Windows NT are registered trademarks of Microsoft Corporation in the United States and or other countries AppleTalk EtherTalk Rendezvous are registered trademar...

Страница 989: ...t data from being tampered or prevent the machine from unauthorized use Also refer to this manual for the procedures for registering administrators as well as setting user and admin istrator authentic...

Страница 990: ...ayed from the Setup display when DeskTopBinder Lite is installed DeskTopBinder Lite Introduction Guide PDF file CD ROM2 Describes operations of DeskTopBinder Lite and provides an overview of its funct...

Страница 991: ...and the Access Permission for the User s Stored Files 16 Specifying Passwords for the Stored Files 18 Unlocking Files 19 Preventing Data Leaks Due to Unauthorized Transmission 20 Restrictions on Dest...

Страница 992: ...iver 70 Login Using the Control Panel 70 Log Off Using the Control Panel 71 Login Using a Printer Driver 71 Login Using Web Image Monitor 71 Log Off Using Web Image Monitor 72 Auto Logout 72 Menu Prot...

Страница 993: ...Features 113 Scanner Features 113 Settings via Web Image Monitor 113 Settings via SmartDeviceMonitor for Admin 115 File Administrator Settings 116 System Settings 116 Facsimile Features 116 Settings v...

Страница 994: ...vi...

Страница 995: ...to read the instructions all of which are described in the Safety Information section The statements above are notes for your safety Important If this instruction is not followed paper might be misfe...

Страница 996: ...2...

Страница 997: ...thentication administrators manage the machine and its users To enable authentication information about both administrators and users must be registered in order to authenticate users via their login...

Страница 998: ...the user who knows the login user name and password Administrator Authentication Administrators are authenticated by means of the login user name and login password supplied by the administrator when...

Страница 999: ...is allowed to use and access scanned files and the files in Document Server You can prevent such activities as the sending and downloading of stored files by unauthorized users Reference For details...

Страница 1000: ...tored files to modify or delete the files Reference For details see p 13 Specifying Access Permission for Stored Files Preventing Modification of Machine Settings The machine settings that can be modi...

Страница 1001: ...transmission Also encrypt the login password for administrator authentication and user authentication Reference For details see p 40 Encrypting Transmitted Passwords Safer Communication Using SSL Whe...

Страница 1002: ...Getting Started 8 1...

Страница 1003: ...sword using the printer driver For details see the printer driver Help You can perform Locked Print even if user authentication is not enabled For details see Printer Reference Choosing a Locked Print...

Страница 1004: ...For details about logging off with user authentication see p 71 Log Off Us ing the Control Panel A A A A Press the Printer key B B B B Press Locked Sample Print Job List C C C C Press Locked Print Jo...

Страница 1005: ...ress Yes Unlocking Locked Print Files If you specify Enhance File Protection the file will be locked and become in accessible if an invalid password is entered ten times This section explains how to u...

Страница 1006: ...the Locked Print file the file password is required If the file creator owner has forgotten the password the file ad ministrator must delete the file A A A A Press the Printer key B B B B Press Locke...

Страница 1007: ...tent of stored files For details see the Web Image Monitor Help The default access permission for the file creator owner is Read only Password for Stored Files Passwords for stored files can be specif...

Страница 1008: ...p 83 Logging on Using Administrator Authentication For details about logging off with administrator authentication see p 84 Logging off Using Administrator Authentication Important If files become in...

Страница 1009: ...elect more than one users By pressing All Users you can select all the users H H H H Press Exit I I I I Select the user who you want to assign an access permission to and then select the permission Se...

Страница 1010: ...For details about logging on with administrator authentication see p 83 Logging on Using Administrator Authentication For details about logging off with administrator authentication see p 84 Logging o...

Страница 1011: ...tings H H H H Press New Program I I I I Select the users or groups to register You can select more than one users By pressing All Users you can select all the users J J J J Press Exit K K K K Select t...

Страница 1012: ...Administrator Authentication For details about logging off with administrator authentication see p 84 Logging off Using Administrator Authentication A A A A Press the Document Server key B B B B Sele...

Страница 1013: ...tails about Enhance File Protection see p 86 Specifying the Extended Security Functions Preparation For details about logging on with administrator authentication see p 83 Logging on Using Administrat...

Страница 1014: ...nistrator Make the setting to disable the direct entry of e mail addresses and phone num bers under the scanner and fax functions By making this setting the destinations can be restricted to addresses...

Страница 1015: ...r can register destinations by entering them directly If you set Permit Adding of Destinations to Off the user cannot register destinations by entering them directly If you set Permit Adding of Destin...

Страница 1016: ...the user administrator You can specify who is allowed to access the data in the address book By making this setting you can prevent the data in the address book being used by unregistered users Prepar...

Страница 1017: ...s Groups H H H H Press New Program I I I I Select the users or groups to register You can select more than one users By pressing All Users you can select all the users J J J J Press Exit K K K K Selec...

Страница 1018: ...te Encrypting the data in the address book may take a long time Up to three minutes The time it takes to encrypt the data in the address book depends on the number of registered users The machine cann...

Страница 1019: ...Address Book F F F F Press Change for Encryption Key G G G G Enter the encryption key and then press OK Enter the encryption key using up to 32 alphanumeric characters H H H H Press Encrypt Decrypt I...

Страница 1020: ...on the hard disk using Erase All Memory Methods of Erasing the Data You can select the method of erasing the data from the following The default is NSA 1 National Security Agency 2 Department of Defen...

Страница 1021: ...he Copier Fax and Printer functions take priority over the Auto Erase Memory function If a copy fax or print job is in progress overwriting will only be done after the job is completed Preparation For...

Страница 1022: ...as Off might not be overwrit ten Note Should the main power switch of the machine be turned off before over writing is completed the temporary data will remain on the hard disk un til the main power s...

Страница 1023: ...n only be overwritten after it has been printed or deleted from the Document Server 5 Data stored in the Address Book can be encrypted for security For details see p 24 Encrypting the Data in the Addr...

Страница 1024: ...ser codes and the counters under each user code user stamps printer fonts downloaded by the user data stored in the Address Book network settings and the SSL Certificate will be overwritten Note Befor...

Страница 1025: ...ry is completed overwriting is canceled Make sure the main power switch is not turned off during overwriting Note If the main power is turned off when Erase All Memory is in progress overwriting will...

Страница 1026: ...Preventing Information Leaks 32 2...

Страница 1027: ...s of administrator can be designat ed User Administrator Network Administrator File Administrator Machine Administrator Reference For details see p 77 The Roles of Administrators For details see p 79...

Страница 1028: ...n key cannot be used Specifying Which Functions are Available This can be specified by the user administrator Specify the functions available to registered users By making this setting you can limit t...

Страница 1029: ...Next to scroll down to other settings E E E E Select the user F F F F Press Auth Info G G G G In Available Functions select the functions you want to specify If the setting to be specified does not ap...

Страница 1030: ...Preventing Unauthorized Use of Functions and Settings 36 3...

Страница 1031: ...g you can specify which protocols are available and so pre vent unauthorized access over the network Preparation For details about logging on with administrator authentication see p 83 Logging on Usin...

Страница 1032: ...s is possible will be from 192 168 15 16 to 192 168 15 20 Limitation Using access control you can limit access involving lpd rcp rsh ftp diprint ipp Web Image Monitor SmartDeviceMonitor for Client or...

Страница 1033: ...Preventing Unauthorized Access 39 4 F F F F Click Apply Access control is set G G G G Log off from the machine Reference For details see the Web Image Monitor Help...

Страница 1034: ...ed to enhance security Note To use PDF direct print the optional PostScript3 unit must be installed Password for IPP Authentication Using Web Image Monitor you can encrypt the password for IPP authent...

Страница 1035: ...n press OK Enter the driver encryption key using up to 32 alphanumeric characters Note The network administrator must give users the driver encryption key specified on the machine so they can register...

Страница 1036: ...r key B B B B Press Printer Features C C C C Press PDF Menu and then press PDF Group Password If the setting to be specified does not appear press V V V V D D D D For Current Password press Change E E...

Страница 1037: ...to prevent them from being analyzed A A A A Open a Web browser B B B B Enter http machine s address in the address bar to access the ma chine C C C C Log onto the machine The network administrator ca...

Страница 1038: ...from interception analysis and tampering you can install a server certificate in the machine negotiate a secure connection and encrypt transmitted data SSL Secure Sockets Layer A To access the machine...

Страница 1039: ...the cer tificate authority Follow the procedure specified by the certificate author ity B Installing the server certificate Install the server certificate using Web Image Monitor C Enabling SSL Enabl...

Страница 1040: ...o delete the server certificate from the machine Creating the Server Certificate Certificate Issued by a Certificate Authority Create the server certificate using Web Image Monitor This section explai...

Страница 1041: ...Certificate Certificate Issued by a Certificate Authority Install the server certificate using Web Image Monitor This section explains the use of a certificate issued by a certificate authority as the...

Страница 1042: ...a cer tificate authority A A A A Open a Web browser B B B B Enter http machine s address in the address bar to access the printer C C C C Log onto the machine The network administrator can log on Ent...

Страница 1043: ...ficate by following the Certificate Import Wizard instruc tions Note For details about how to install the certificate see the Web browser Help If a certificate issued by a certificate authority is ins...

Страница 1044: ...trator Authentication For details about logging off with administrator authentication see p 84 Logging off Using Administrator Authentication A A A A Press the User Tools Counter key B B B B Press Sys...

Страница 1045: ...ou can protect data from being tampered with Preparation For details about logging on with administrator authentication see p 83 Logging on Using Administrator Authentication For details about logging...

Страница 1046: ...tion in SmartDeviceMonitor for Admin in addition to specifying Permit SNMP V3 Communication on the machine If network administrator s Encryption Password setting is not specified the data for transmis...

Страница 1047: ...machine Important If you have enabled Administrator Authentication Management make sure not to forget the administrator login user name and login password If an adminis trator login user name or logi...

Страница 1048: ...k you can use the machine by accessing it using administrator au thentication and disabling user authentication Do this if for instance you need to use the machine urgently For details see the Web Ima...

Страница 1049: ...s book by the user administrator or registered user In addition to registering users with the machine s control panel you can register them using SmartDeviceMonitor for Admin or Web Image Monitor Note...

Страница 1050: ...Authentication Manage ment on the control panel Important If you have enabled Administrator Authentication Management make sure not to forget the administrator login user name and login password If a...

Страница 1051: ...uired settings for the authentication The settings depend on the authentication method Important When using Windows authentication or LDAP authentication keep in mind that if you edit an authenticated...

Страница 1052: ...deliver stored files using DeskTopBind er use basic authentication Windows authentication or LDAP authentica tion Reference For details about specifying the user code for the printer driver see Printe...

Страница 1053: ...user Using basic authentication you can not only manage the ma chine s available functions but also limit access to stored files and to the personal data in the address book Specifying Basic Authenti...

Страница 1054: ...gis tered in the directory server Operational Requirements for Windows Authentication To specify Windows authentication the following requirements must be met A domain controller has been set up in a...

Страница 1055: ...ble functions speci fied in Default Group Users who are registered in multiple groups can use all the functions availa ble to those groups Specifying Windows Authentication Note Under Windows authenti...

Страница 1056: ...reate global groups in the Windows server in advance and reg ister in each group the users to be authenticated You also need to register in the machine the functions available to the global group memb...

Страница 1057: ...rver Certificates Wizards to create and install the server certif icate LDAP Authentication Specify this authentication when using the LDAP server to authenticate users who have their accounts on the...

Страница 1058: ...Properties and then in Active Directory Domains and Trusts Prop erties add the UPN suffix If you want to use LDAP authentication you need to register the user name that is registered in the LDAP serv...

Страница 1059: ...6 Printer Job Authentication Levels and Printer Job Types H H H H Enter the login name attribute in the Login Name Attribute box If the setting to be specified does not appear press T T T TNext to scr...

Страница 1060: ...ecurity Functions Printer Job Auth All The machine authenticates all printer jobs and remote settings and cancels jobs and settings that fail authentication Printer Jobs Job Reset Settings Disabled Si...

Страница 1061: ...en printing check box is not selected In the PCL printer driver dialog box the User Authentication check box is not selected Personal authentication information is added to the printer job and is disa...

Страница 1062: ...ing on using administrator authentication see p 83 Logging on Using Administrator Authentication For details about logging off with administrator authentication see p 84 Logging off Using Administrato...

Страница 1063: ...not appear press T T T TNext to scroll down to other settings Limitation When using Use Auth Info at Login for SMTP Authentication Folder Authentication or LDAP Authentication a user name other than...

Страница 1064: ...code For user code authentication enter a number registered in the address book as User Code User Code Authentication Using the Control Panel When user authentication is set the following screen appea...

Страница 1065: ...Tools Counter Login Using a Printer Driver When Basic Authentication Windows Authentication or LDAP Authentication is set make encryption settings in the printer properties of a printer driver and th...

Страница 1066: ...ime This feature is called Auto Logout Specify how long the machine is to wait before perform ing Auto Logout A A A A Press the User Tools Counter key B B B B Press System Settings C C C C Press Timer...

Страница 1067: ...Level 2 If you set it to Off no menu protect limitation is applied To limit access to the fullest extent select Level 2 Note The functions that can be used and specified depend on which administrators...

Страница 1068: ...File Management and Network Management to On A A A A Press the User Tools Counter key B B B B Press Facsimile Features C C C C Press Administrator Tools D D D D Press Menu Protect If the setting to be...

Страница 1069: ...Printer Features C C C C Press Maintenance D D D D Press Menu Protect E E E E Select the menu protect level and then press OK F F F F Press the User Tools Counter key Scanner Functions Note To specify...

Страница 1070: ...Management Based on Authentication and Access Control 76 5 D D D D Press Menu Protect E E E E Select the menu protect level and then press OK F F F F Press the User Tools Counter key...

Страница 1071: ...es the machine s default settings You can set the machine so that the default for each function can only be spec ified by the machine administrator By making this setting you can prevent unauthorized...

Страница 1072: ...e and delete their own in formation If any of the users forget their password the user administrator can delete it and create a new one allowing the user to access the machine again Supervisor The sup...

Страница 1073: ...ord and encryption password for each administrator The encryption password is a password for performing encryption when speci fying settings using Web Image Monitor or SmartDeviceMonitor for Admin The...

Страница 1074: ...ntication For details about logging off with administrator authentication see p 84 Logging off Using Administrator Authentication The Administrator 1 defaults are admin for the login name and blank fo...

Страница 1075: ...specify management Specifying Network Management Authentication A Press Network Management and then press On B Press the item for which you want to specify management Specifying File Management Authen...

Страница 1076: ...ation If administrator authentication has already been specified log on using a reg istered administrator name and password For details about logging on using administrator authentication see p 83 Log...

Страница 1077: ...Counter key Logging on Using Administrator Authentication If administrator authentication has been specified log on using an administra tor s user name and password This section describes how to log o...

Страница 1078: ...ssigning the administrator for the first time proceed to step G without pressing Enter F F F F Enter the login password and then press OK G G G G Enter Login Authenticating Please wait appears followe...

Страница 1079: ...er administrator Preparation For details about logging on with administrator authentication see p 83 Logging on Using Administrator Authentication For details about logging off with administrator auth...

Страница 1080: ...function see the corresponding chapters Changing the Extended Security Functions To change the extended security functions display the extended security screen as follows Preparation For details abou...

Страница 1081: ...t Address Book This can be specified by the user administrator Encrypt the data in the ma chine s address book Even if one of the machine s internal parts is removed the data in the address book is pr...

Страница 1082: ...personal information can be displayed as so users cannot be identified Because no information identifying registered users can be viewed unauthorized users can be pre vented from obtaining information...

Страница 1083: ...not possible with the printer driver or LAN fax driver so simple encryption is used If you select Off printing with simple encryption is not allowed and you cannot connect using the printer driver or...

Страница 1084: ...ff for this setting stored files cannot be transferred by Forward ing and Transfer Request Use this setting to prevent the stored files being transferred by mistake On Off Note Default On If you selec...

Страница 1085: ...ion leaks Reference For details see User Parameters Facsimile Reference Advanced Features Stored RX File User Setting You can specify which users can manage fax files stored on the hard disk by settin...

Страница 1086: ...fied by the machine administrator Service mode is used by a customer engineer for inspection or repair If you set the service mode lock to On service mode cannot be used unless the machine administrat...

Страница 1087: ...hine and cancel the service mode lock Preparation For details about logging on with administrator authentication see p 83 Logging on Using Administrator Authentication For details about logging off wi...

Страница 1088: ...Specifying the Administrator Security Functions 94 6...

Страница 1089: ...ding to the information contained in the message Messages Causes Solutions You do not have the privileges to use this function The authority to use the func tion is not specified If this appears when...

Страница 1090: ...ser ad dresses Cannot access the authentica tion server when using Win dows authentication or LDAP authentication A network or server error may have occurred Contact to the network administrator Selec...

Страница 1091: ...ryp tion key Specify the driver encryption key registered in the machine See p 40 Driver Encryption Key If Permit Simple Encryption is set to Off data sent by the driver uses simple encryption Under W...

Страница 1092: ...annot log off when using the copying or scanner functions The original has not been scanned completely When the original has been scanned completely press remove the original and then log off Cannot a...

Страница 1093: ...to interrupt copying or scanning after log ging off an authentication screen appears Only the user who executed a copying or scanning job can interrupt it Wait until the job has completed or consult...

Страница 1094: ...Troubleshooting 100 7...

Страница 1095: ...to 32 alphanumeric characters and symbols Keep in mind that user names and passwords are case sensitive Be sure not to forget the supervisor login user name and login password If you do forget them a...

Страница 1096: ...to step G without pressing Enter G G G G Press Login Logging off as the Supervisor If administrator authentication has been specified be sure to log off after com pleting settings This section explain...

Страница 1097: ...ss OK J J J J If a password reentry screen appears enter the login password and then press OK K K K K Press OK L L L L Press OK M M M M Press the User Tools Counter key Resetting an Administrator s Pa...

Страница 1098: ...to reset H H H H Press Change for the login password I I I I Enter the login password and then press OK J J J J If a password reentry screen appears enter the login password and then press OK K K K K...

Страница 1099: ...ings can be specified Interface Settings Parallel Interface File Transfer The following settings can be specified Delivery Option Capture Server IP Address Fax RX File Transmission Line 1 3 E mail Add...

Страница 1100: ...e user name and the full control user s authority Key Counter Management External Charge Unit Management Enhanced External Charge Unit Management Extended Security Transfer to Fax Receiver Permit Remo...

Страница 1101: ...atio All the settings can be specified Edit All the settings can be specified Stamp All the settings can be specified Input Output All the settings can be specified Adjust Color Image All the settings...

Страница 1102: ...ansfer Report Program Confidential ID Program Polling ID Program Memory Lock ID Select Dial Push Phone Program Direct Phone No Program ISDN G3 Line Program ISDN G4 Line Memory File Transfer Reception...

Страница 1103: ...Destination List Settings All the settings can be specified Send Settings The following settings can be specified TWAIN Standby Time File Type Priority Compression Black White Compression Gray Scale F...

Страница 1104: ...cify the following administrator settings as the machine administrator Login User Name Login Password Change Encryption Password Administrator Authentication Management Machine Administrator Authentic...

Страница 1105: ...the settings can be specified Interface Settings Parallel Interface Network SNMPv3 Access Type Machine Administrator Settings via SmartDeviceMonitor for Admin The following settings can be specified...

Страница 1106: ...e specified 1 The IEEE 1394 interface board option must be installed 2 The IEEE 802 11b interface unit option must be installed File Transfer SMTP Server SMTP Server Name Port No E mail Communication...

Страница 1107: ...end E mail Settings via Web Image Monitor The following settings can be specified Device Settings System Comment Location Spool Printing E mail Reception SMTP E mail Reception Port Program Change Admi...

Страница 1108: ...2 IP over 1394 SCSI print SBP 2 Bidirectional SCSI print Bluetooth 3 Operation Mode 1 The IEEE 802 11b interface unit option must be installed 2 The IEEE 1394 interface board option must be installed...

Страница 1109: ...Type User Access Type Network Administrator Rendezvous All the settings can be specified Webpage All the settings can be specified Security Access Control All the settings can be specified IPP Authent...

Страница 1110: ...settings can be specified Administrator Tools Stored RX File User Setting Settings via Web Image Monitor The following settings can be specified Top Page Reset Printer Job Document Server All the set...

Страница 1111: ...File Administrator Settings 117 8 Administrator Authentication Management File Administrator Authentication Available Settings for File Administrator...

Страница 1112: ...tination List Address Book Management Address Book Program Change Delete Group Address Book Program Change Delete Transfer Request Address Book Change Order Address Book Edit Title Address Book Select...

Страница 1113: ...8 Settings via SmartDeviceMonitor for Admin The following settings can be specified Address Management Tool All the settings can be specified User Management Tool Restrict Access To Device Add New Us...

Страница 1114: ...ete authority Full Control This is a user granted full control Owner This is a user who can store files in the machine and authorize other users to view edit or delete those files File Administrator T...

Страница 1115: ...ssigned Read only authority Edit This is a user assigned Edit authority Edit Delete This is a user assigned Edit Delete authority Full Control This is a user granted full control Registered User This...

Страница 1116: ...U Index U Select Title U Auth Info User Code Login User Name Login Password 1 1 SMTP Authenti cation 1 1 Folder Authenti cation U LDAP Authenti cation 1 1 Available Functions U Protection Use Name as...

Страница 1117: ...Transmis sion For mat U U Fax Number U Interna tional TX Mode U Fax Header U Label In sertion U E mail Address E mail Address U Folder Destina tion SMB FTP U SMB Path U FTP Server Name U FTP Path U J...

Страница 1118: ...te Settings that are not in the list can only be viewed regardless of the menu pro tect level setting Copier Features The default for Menu Protect is Level 2 Tab Names Settings Menu Protect Off Level...

Страница 1119: ...iminary 1 U Stamp Position For internal use 1 U Stamp Position CONFIDENTIAL 1 U Stamp Position DRAFT 1 U Stamp Language U User Stamp Program Delete Stamp U Stamp Position 1 U Stamp Format 1 U Stamp Po...

Страница 1120: ...5 1 U Stamp Position 1 2 1 U Stamp Position 1 2 1 U Stamp Position P 1 P 2 1 U Stamp Position 1 2 1 U Stamp Position 1 1 1 2 1 U Superimpose U Page Numbering Initial Letter U Input Output Switch to Ba...

Страница 1121: ...Maintenance 4 Color Graphic Mode U U System Print Error Report U U Auto Continue U U Memory Overflow U U Job Separation U U Memory Usage U U Duplex U U Copies U U Blank Page Print U U B W Page Detect...

Страница 1122: ...Format U U Resolution U U Color Setting U U Color Profile U U PDF Menu 1 Change PDF Password U U PDF Group Password U U Resolution U U Color Setting U U Color Profile U U Tab Names Settings Menu Prote...

Страница 1123: ...ize Priority U Original Type Priority U Auto Image Density U Adjust Scan Density U Select Title U Change Initial Mode U Adjust Sound Volume U Program Fax Information U Scan End Reset U TX Stamp Priori...

Страница 1124: ...Scan Size U Print Journal U Transmission Page Count U Forwarding U Memory Lock RX U ECM U Reception Mode Timer Switch U Parameter Setting U Program Special Sender Box Setting Transfer Report U Progra...

Страница 1125: ...rator au thentication has been specified Availa ble Set tings has been speci fied Availa ble Set tings has not been speci fied General Features Panel Tone U Warm Up Notice U Copy Count Display U Funct...

Страница 1126: ...Facsimile Auto Reset Timer U Scanner Auto Reset Timer U Printer Auto Reset Timer U Auto Logout Timer U Set Date U Set Time U Auto Logout Timer U Tab Names Settings Admin istrator authen tication has n...

Страница 1127: ...U LAN Type U Ping Command U Permit SNMP V3 Communication U Permit SSL TLS Communication U Host Name U Parallel Inter face 8 Parallel Timing U Parallel Communication Speed U Selection Signal Status U I...

Страница 1128: ...EEE 802 11b 6 Communication Mode U Transmission Speed U SSID Setting U Channel U WEP Encryp tion Setting WEP Encryption Setting 2 U Transmission Speed U Return to Defaults U Print List U Tab Names Set...

Страница 1129: ...ception E mail Size U E mail Storage in Server U Default User Name Password Send 4 U Program Change Delete E mail Message U U U Program Change Delete Subject U U U Scanner Recall Interval Time U Numbe...

Страница 1130: ...er Request U U U Address Book Change Order U Address Book Edit Title U Address Book Select Title U Auto Delete File U Delete All Files U Capture Priority 7 U Capture Delete All Unsent Files 7 U Captur...

Страница 1131: ...ce Settings The settings available to the user depend on whether or not administrator au thentication has been specified If administrator authentication has been specified the settings available to th...

Страница 1132: ...e Auto Reset Timer U Scanner Auto Reset Timer U Printer Auto Reset Timer U Set Date U Set Time U SNTP Server Address U SNTP Polling Interval U Time Zone U Category Settings Ad minis trator au thenti c...

Страница 1133: ...ut setting after POP Auth U POP3 IMAP4 Server Name U POP3 IMAP4 Encryption U POP3 Reception Port No U IMAP4 Reception Port No U SMTP Reception Port No U Fax E mail Address U Fax E mail User Name U Fax...

Страница 1134: ...ation Domain Name U Windows Authentication Group Settings for Windows Authentication U LDAP Authentication Printer Job Authentication U LDAP Authentication LDAP Authentication U LDAP Authentication Lo...

Страница 1135: ...Print U U B W Page Detect U U Printer Language U U Sub Paper Size U U Page Size U Letterhead Setting U U Bypass Tray Setting Priority U U Default Printer Language U U Collate Type U U Staple Type U U...

Страница 1136: ...ank Page Print U U Data Format U U Resolution U U Color Setting U U Color Profile U U PDF Settings 1 Duplex U U Blank Page Print U U Resolution PDF Temporary Password PDF Fixed Password PDF Group Pass...

Страница 1137: ...in istrator Net work Admin istrator File Admin istrator General Fax Information Reception Settings Transmission Settings Administrator Tools Program Confidential ID Program Polling ID Program Direct P...

Страница 1138: ...Server SIP Server IP Address Proxy Server Addr Main Proxy Server Address Sub Redirect Svr Addr Main Redirect Svr Addr Sub Registrar Address Main Registrar Address Sub SIP User Name Gateway Settings P...

Страница 1139: ...Memory Storage Report Polling TX Clear Report Polling RX Result Report Polling RX Reserve Report Confidential File Report PC Fax Result Report Inclusion of part of image Prohibit Error E mail Notific...

Страница 1140: ...lled 4 The IEEE 1284 interface board option must be installed Category Settings Ad minis trator au thenti cation hasnot been speci fied Administrator au thentication has been specified Avail able Set...

Страница 1141: ...ttings available to the user depend on whether or not Available Settings has been specified Category Settings Ad minis trator au thenti cation hasnot been speci fied Administrator au thentication has...

Страница 1142: ...Server U Scope ID U Default Gateway Address U DNS Server U LPR U RSH RCP U DIPRINT U FTP U IPP U IPP Timeout U Rendezvous U Category Settings Ad minis trator au thenti cation hasnot been speci fied A...

Страница 1143: ...ter Name U Zone Name U SMB SMB U Protocol U Workgroup Name U Computer Name U Comment U Notify Print Completion U Rendezvous Rendezvous U Computer Name U Location U PRIORITY DIPRINT U PRIORITY LPR U PR...

Страница 1144: ...8 Functions That Require Options The following functions require certain options and additional functions Hard Disk overwrite erases function DataOverwriteSecurity unit PDF Direct Print function Post...

Страница 1145: ...ettings 107 111 113 Encrypt Address Book 87 Encrypted Communication Mode 49 Encryption Technology 3 Enhance File Protection 88 Erase All Memory 26 F Fax 111 114 143 File Administrator 33 77 120 File C...

Страница 1146: ...istered User 4 121 Rendezvous 115 Reproduction Ratio 107 Reset Device 109 Reset Printer Job 109 Restrict Use of Destinations 87 S Scan Settings 109 Security 115 Send Settings 109 113 Service Mode Lock...

Страница 1147: ...153 MEMO...

Страница 1148: ...154 EN USA AE AE B180 7911 MEMO...

Страница 1149: ......

Страница 1150: ...o G100 55kg Paper Thickness 80 m Pages in book 160 Print scale 81 Gap when printed at 81 scale Pages in book Paper thickness 2 6 400000 mm Operating Instructions Security Reference Operating Instructi...

Отзывы: