3xLogic VSX-2MP-FE Скачать руководство пользователя страница 59

User  Manual|  

VISIX   Network   Camera


10225  Westmoor  Drive,  Suite  300,  Westminster,  CO  80021  |  www.3xlogic.com  |  (877)  3XLOGIC


59   

If   you   enable   the   face   detection,   once   a   face   appears   in   the   surveillance   area,   it   will   be   detected   and   certain   
actions   may   be   triggered   by   the   detection.      
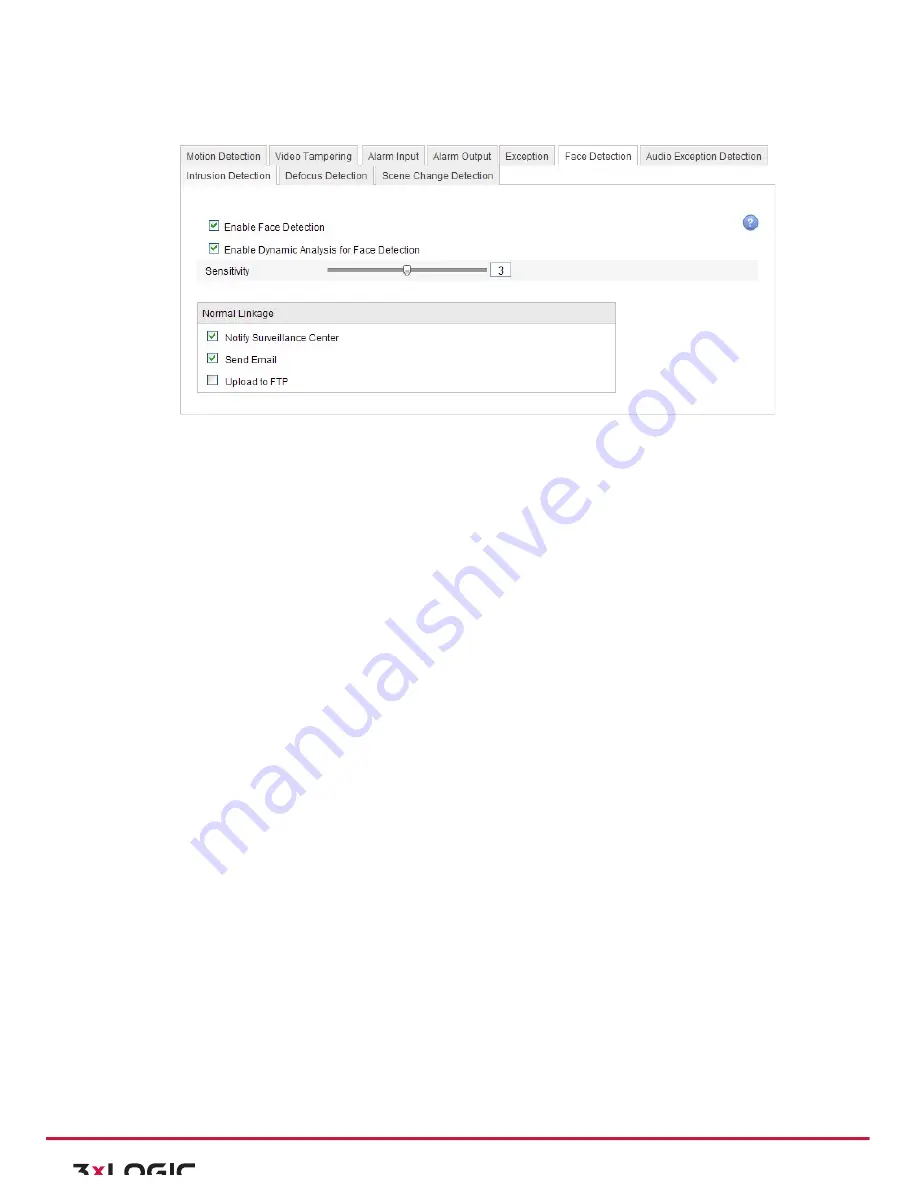


Figure  6-­‐44


Face   Detection   Interface   

Steps:   


1)


Enter   the   face   detection   settings   interface:      

Configuration   >   Advanced   Configuration   >   Events   >   Face   Detection   


2)


Check   the   Enable   Face   Detection   to   checkbox   to   enable   the   function.      

3)


(Optional)You   can   check   the   Enable   Dynamic   Analysis   for   Face   Detection   checkbox   if   you   want   the   

face   detected   get   marked   with   rectangle   in   the   live   view.         

Note:


Select   disable   the   rules   from   

Configuration-­‐Local   Configuration-­‐Live   View   Parameters-­‐Rules   

if   you   don’t   want   the   detected   face   marked   with   the   green   frame.      

4)


Configure   the   sensitivity   [1~5]   of   the   face   detection.      

5)


(Optional)You   can   also   configure   the   linkage   action   for   face   detection.      

Note

:


The   face   detection   is   only   supported   by   a   certain   series   of   camera   modes.   And   it   doesn’t   

support   any   linkage   method.      

CONFIGURING   AUDIO   EXCEPTION   DETECTION      

Purpose:   


Audio   exception   detection   detects   the   abnormal   sounds,   such   as   the   silence   detection,   environment   noise   
detection,   and   current   noise   detection.      

   
Enabling   the   

Sudden   Change   of   Sound   Intensity

   can   detects   the   change   of   the   sound   volume   and   source   in   the   

environment.         

!


Sensitivity:

   Range   [1-­‐100],   the   smaller   the   value   the   more   severe   the   change   should   be   to   trigger   

the   detection.         

!


Sound   Intensity   Threshold

:   Range   [1-­‐100],   it   can   filter   the   sound   in   the   environment,   the   louder   the   

environment   sound,   the   higher   the   value   should   be.   You   can   adjust   it   according   to   the   real   

environment.         

Arming   Schedule   is   configured   to   set   the   time   you   want   the   function   to   be   enabled.   


1)


Click   

Edit

   to   set   the   arming   schedule.         

2)


Choose   to   trigger   alarm   actions   as

   Notify   Surveillance   Center   

and

   Send   Email

,

   Upload   to   FTP   

and


Trigger   Channel   

or   trigger   the

   Alarm   Output

.         

3)


Click   

Save

   to   save   the   settings.         

Содержание VSX-2MP-FE

Страница 1: ...User Manual VISIX Network Camera 10225 Westmoor Drive Suite 300 Westminster CO 80021 www 3xlogic com 877 3XLOGIC 1 V5 1 VISIX Network Camera User Manual...

Страница 2: ...atures being added in firmware versions released after the discontinuation of the VSX line Please contact your 3xLOGIC support representative for more info Thank you for purchasing our product If ther...

Страница 3: ...2 This device must accept any interference received including interference that may cause undesired operation EU Conformity Statement This product and if applicable the supplied accessories too are ma...

Страница 4: ...ding on models according to the IEC60950 1 and Limited Power Source standard If the product does not work properly please contact your dealer or the nearest service center Never attempt to disassemble...

Страница 5: ...nt and do not expose it to high electromagnetic radiation To avoid heat accumulation good ventilation is required for a proper operating environment Keep the camera away from water and any liquid Whil...

Страница 6: ...rity Mode Description 19 4 2 EASY WI FI CONNECTION WITH WPS FUNCTION 21 4 3 IP PROPERTY SETTINGS FOR WIRELESS NETWORK CONNECTION 23 5 CHAPTER 5 LIVE VIEW 25 5 1 LIVE VIEW PAGE 25 5 2 STARTING LIVE VIE...

Страница 7: ...HANDLING ALARMS 51 Configuring Motion Detection 51 Configuring Video Tampering Alarm 55 Configuring Alarm Input 56 Configuring Alarm Output 57 Handling Exception 58 Configuring Face Detection 58 Conf...

Страница 8: ...stmoor Drive Suite 300 Westminster CO 80021 www 3xlogic com 877 3XLOGIC 8 Rebooting the Camera 76 Restoring Default Settings 77 Exporting Importing Configuration File 77 Upgrading the System 77 10 7 R...

Страница 9: ...g System Microsoft Windows XP SP1 and above version Vista Win7 Server 2003 Server 2008 32bits CPU Intel Pentium IV 3 0 GHz or higher RAM 1G or higher Display 1024 768 resolution or higher Web Browser...

Страница 10: ...t with your computer and install the 3xLOGIC VISIX detection software This will allow you to search and change the IP address of the detected network cameras Note For the detailed introduction of the...

Страница 11: ...port number device serial number device version etc shown in Figure 2 3 2 Change the IP address and subnet mask to the same subnet as that of your computer 3 Enter the IP address of network camera in...

Страница 12: ...User Manual VISIX Network Camera 10225 Westmoor Drive Suite 300 Westminster CO 80021 www 3xlogic com 877 3XLOGIC 12...

Страница 13: ...gateway Refer to Section 2 1 2 Detecting and Changing the IP Address for detailed IP address configuration of the camera 3 Save the static IP in the router 4 Set port mapping e g 80 8000 and 554 ports...

Страница 14: ...ing NOTE Refer to Appendix 2 for detailed information about port mapping 5 Apply a domain name from a domain name provider 6 Configure the DDNS settings in the setting interface of the router 7 Visit...

Страница 15: ...e network camera Refer to Section 5 3 4 Configuring DDNS Settings for detailed configuration 3 Visit the camera via the applied domain name Private Domain Name Resolution Figure 2 8 Private Domain Nam...

Страница 16: ...he user name and password and click Login Figure 3 1 Login Interface Notes The default user name is admin and the default password is 12345 Multi language is supported English Simplified Chinese Tradi...

Страница 17: ...e 300 Westminster CO 80021 www 3xlogic com 877 3XLOGIC 17 Figure 3 3 Install Plug in 1 Figure 3 4 Install Plug in 2 Note You may have to close the web browser to install the plug in Please reopen the...

Страница 18: ...on Network Wi Fi Figure 4 1 Wireless Network List 2 Click Search to search the online wireless connections 3 Click to choose a wireless connection on the list Figure 4 2 Wi Fi Setting Manage Mode 4 Ch...

Страница 19: ...connection Figure 4 4 Security Mode Ad hoc Mode 4 Enable the wireless connection function for your PC 5 On the PC side search the network and you can see the SSID of the camera listed Figure 4 5 Ad ho...

Страница 20: ...r 128 bit The encryption key length can sometimes be shown as 40 64 and 104 128 Key type The key types available depend on the access point being used The following options are available HEX Allows yo...

Страница 21: ...Select version 1 or 2 depending on the version used at the access point CA Certificates Upload a CA certificate to present to the access point for authentication 4 2 Easy Wi Fi Connection with WPS fu...

Страница 22: ...button If yes push the button and you can see the indicator near the button start flashing which means the WPS function of the router is enabled For detailed operation please see the user guide of the...

Страница 23: ...an generate the PIN code on the camera side And the expired time for the PIN code is 120 seconds 1 Click Generate 4 Enter the code to the router in the example enter 48167581 to the router 4 3 IP Prop...

Страница 24: ...logic com 877 3XLOGIC 24 Figure 4 12 TCP IP Settings 2 Select the NIC as wlan 3 Customize the IPv4 address the IPv4 Subnet Mask and the Default Gateway The setting procedure is the same with that of L...

Страница 25: ...ectively Display Control Click each tab to adjust the layout and the stream type of the live view And you can click the drop down to select the plug in For IE internet explorer user webcomponents and...

Страница 26: ...microphone Turn on off 3D zooming function 5 3 Recording and Capturing Pictures Manually In the live view interface click on the toolbar to capture the live pictures or click to record the live view...

Страница 27: ...rrows in the live view window when you click and drag the mouse in the relative positions 2 For the cameras which support lens movements only the direction buttons are invalid Table 5 2 Descriptions o...

Страница 28: ...preset Note You can configure up to 128 presets Calling a Preset This feature enables the camera to point to a specified preset scene manually or when an event takes place For the defined preset you c...

Страница 29: ...the real time transmission will be affected UDP Provides real time audio and video streams HTTP Allows the same quality as of TCP without setting specific ports for streaming under some network envir...

Страница 30: ...captured pictures in live view mode Save snapshots when playback to Set the saving path of the captured pictures in playback mode Save clips to Set the saving path of the clipped video files in playb...

Страница 31: ...function and then click to set the system time from the pop up calendar Note You can also check the Sync with computer time checkbox to synchronize the time of the camera with that of your computer Fi...

Страница 32: ...to the multicast group address and allows multiple clients to acquire the stream at the same time by requesting a copy from the multicast group address Before utilizing this function you have to enabl...

Страница 33: ...or the settings to take effect CONFIGURING PPPOE SETTINGS Steps 1 Enter the PPPoE Settings interface Configuration Advanced Configuration Network PPPoE Figure 6 8 PPPoE Settings 2 Check the Enable PPP...

Страница 34: ...Select DDNS Type Three DDNS types are selectable HiDDNS IPServer and DynDNS DynDNS Steps 1 Enter Server Address of DynDNS e g members dyndns org 2 In the Domain text field enter the domain name obtain...

Страница 35: ...tic IP address of the computer that runs the IP Server software Figure 6 11 IPServer Settings Note For the US and Canada area you can enter 173 200 91 74 as the server address NO IP Steps 1 Choose the...

Страница 36: ...rmation and manage the camera remotely when it is connected to the network Before you start Before setting the SNMP please download the SNMP software and manage to receive the camera information via S...

Страница 37: ...Save to save and finish the settings Note A reboot is required for the settings to take effect CONFIGURING 802 1X SETTINGS Purpose The IEEE 802 1X standard is supported by the network cameras and when...

Страница 38: ...uring the priority of data sending Steps 1 Enter the QoS Settings interface Configuration Advanced Configuration Network QoS Figure 6 16 QoS Settings 2 Configure the QoS settings including video audio...

Страница 39: ...system can be configured to send an Email notification to all designated receivers if an alarm event is detected e g motion detection event video loss video tampering etc Before you start Please conf...

Страница 40: ...ou want to send emails with attached alarm images Interval The interval refers to the time between two actions of sending attached pictures Authentication optional If your email server requires authen...

Страница 41: ...TP Settings interface Configuration Advanced Configuration Network FTP Figure 6 20 FTP Settings 2 Configure the FTP settings and the user name and password are required for login the FTP server Direct...

Страница 42: ...fer to the Section 6 6 7 6 4 Configuring Video and Audio Settings CONFIGURING VIDEO SETTINGS Steps 1 Enter the Video Settings interface Configuration Basic Configuration Video Audio Video Or Configura...

Страница 43: ...t to main stream H 264 and MJPEG are selectable and if the stream type is set to sub stream H 264 MJPEG and MPEJ4 are selectable Note The supported video encoding may differ according to the different...

Страница 44: ...iguration Video Audio ROI Figure 6 24 Region of Interest Settings 2 Draw the region of interest on the image There are four regions can be drawn 3 Choose the stream type to set the ROI encoding 4 Choo...

Страница 45: ...ifferent illumination it provides two sets of parameters for user to configure Day Night Auto switch Figure 6 25 Display Settings of Day night Auto switch Image Adjustment 3 Brightness describes brigh...

Страница 46: ...ch You can set it from 5s to 120s Schedule Set the start time and the end time to define the duration for day night mode Triggered by alarm input The switch is triggered by alarm input and you can set...

Страница 47: ...make a complete use of the 16 9 aspect ratio you can enable the rotate function when you use the camera in a narrow view scene When installing turn the camera to the 90 degrees or rotate the 3 axis l...

Страница 48: ...tion of each parameter please refers to day night auto switch session 3 Click Day tab to configure the parameters applicable for day mode 4 Click Night tab to configure the parameters applicable for n...

Страница 49: ...e the mouse to click and drag the text frame in the live view window to adjust the OSD position Figure 6 29 Adjust OSD Location 5 Click Save to activate above settings CONFIGURING TEXT OVERLAY SETTING...

Страница 50: ...Check the checkbox of Enable Privacy Mask to enable this function 3 Click Draw Area Figure 6 31 Privacy Mask Settings 4 Click and drag the mouse in the live video window to draw the mask area Note You...

Страница 51: ...e checkbox of Notify Surveillance Center if you want to the alarm information pushed to your mobile phone as soon as the alarm is triggered 2 Click for help when you configure the intelligent function...

Страница 52: ...arameters rules Figure 6 33 Enable Motion Detection 4 Click Draw Area Click and drag the mouse on the live video to draw a motion detection area 5 Click Stop Drawing to finish drawing one area 6 Optio...

Страница 53: ...d email upload to FTP trigger channel and trigger alarm output are selectable 2 You can also specify the linkage method when an event occurs Figure 6 36 Linkage Method Audible Warning Trigger the audi...

Страница 54: ...eters Expert Configuration Expert mode is mainly used to configure the sensitivity and proportion of object on area of each area for different day night switch Figure 6 37 Expert Mode of Motion Detect...

Страница 55: ...detection area as in the normal configuration mode Up to 8 areas are supported 2 Select Scheduled Switch for Switch Day and Night Settings Figure 6 39 Day Night Scheduled Switch 3 Select the start tim...

Страница 56: ...s the same as the setting of the arming schedule for motion detection Refer to Task 2 Set the Arming Schedule for Motion Detection in Section 6 6 1 5 Check the checkbox to select the linkage method ta...

Страница 57: ...ing 6 You can copy your settings to other alarm inputs 7 Click Save to save the settings CONFIGURING ALARM OUTPUT Steps 1 Enter the Alarm Output Settings interface Configuration Advanced Configuration...

Страница 58: ...o the cameras Steps 1 Enter the Exception Settings interface Configuration Advanced Configuration Events Exception 2 Check the checkbox to set the actions taken for the Exception alarm Refer to Task 3...

Страница 59: ...configure the linkage action for face detection Note The face detection is only supported by a certain series of camera modes And it doesn t support any linkage method CONFIGURING AUDIO EXCEPTION DET...

Страница 60: ...on checkbox 2 Click Draw Area and then draw a rectangle on the image as a defense region Note when you draw the rectangle all lines should connect end to end to each other Up to four areas are support...

Страница 61: ...ttings CONFIGURING DEFOCUS DETECTION Purpose The image blur caused by defocus of the lens can be detected and a series of alarm action can be triggered Steps 1 Check the Enable Defocus Detection check...

Страница 62: ...User Manual VISIX Network Camera 10225 Westmoor Drive Suite 300 Westminster CO 80021 www 3xlogic com 877 3XLOGIC 62 Figure 6 48 Scene Change Detection...

Страница 63: ...network disk a Enter the NAS Network Attached Storage Settings interface Configuration Advanced Configuration Storage NAS Figure 7 1 Add Network Disk b Enter the IP address of the network disk and ent...

Страница 64: ...record b Click Save and refresh the browser page to activate the settings Figure 7 4 Quota Settings Notes Up to 8 NAS disks can be connected to the camera To initialize and use the SD card after inse...

Страница 65: ...duled time or the event For example if an alarm triggers recording at 10 00 and the pre record time is set as 5 seconds the camera starts to record at 9 59 55 The Pre record time can be configured as...

Страница 66: ...t Normal the video will be recorded automatically according to the time of the schedule 7 Record Triggered by Motion Detection If you select Motion Detection the video will be recorded when the motion...

Страница 67: ...s interfaces Please refer to Section 6 6 1 and Section 6 6 4 for detailed information Figure 7 8 Edit Record Schedule Check the checkbox of Select All and click Copy to copy settings of this day to th...

Страница 68: ...P Settings interface Please refer to Section 6 3 10 Configuring FTP Settings for more details to configure FTP parameters b Check the Enable Timing Snapshot checkbox Upload event triggered snapshots t...

Страница 69: ...recorded video files stored in the network disks or SD cards Steps 1 Click Playback on the menu bar to enter playback interface Figure 8 1 Playback Interface 2 Select the date and click Search Figure...

Страница 70: ...le Disable digital zoom Note You can choose the file paths locally for downloaded playback video files and pictures in Local Configuration interface Please refer to Section 6 1 for details Drag the pr...

Страница 71: ...ase configure network storage for the camera or insert a SD card in the camera Steps 1 Click Log on the menu bar to enter log searching interface Figure 9 1 Log Searching Interface 2 Set the log searc...

Страница 72: ...to create modify or delete other accounts Up to 15 user accounts can be created Figure 10 1 User Information ADD A USER Steps d Click Add to add a user e Input the new User Name select Level and input...

Страница 73: ...elect the user you want to delete and click Delete 2 Click OK on the pop up dialogue box to delete the user 10 2 Configuring RTSP Authentication Purpose You can specifically secure the stream data of...

Страница 74: ...terface Configuration Advanced Configuration Security Anonymous Visit Figure 10 5 Anonymous Visit 2 Set the Anonymous Visit permission Enable or Disable in the drop down list to enable or disable the...

Страница 75: ...ddress Filter Figure 10 7 IP Address Filter Interface 2 Check the checkbox of Enable IP Address Filter 3 Select the type of IP Address Filter in the drop down list Forbidden and Allowed are selectable...

Страница 76: ...nfiguration Advanced Configuration System Device Information In the Device Information interface you can edit the Device Name Other information your network camera such as Model Serial No Firmware Ver...

Страница 77: ...ile is used for the batch configuration of the camera which can simplify the configuration steps when there are a lot of cameras needing configuring Steps Enter the Maintenance interface Configuration...

Страница 78: ...wo ways 1 Parameters Configuration Connect a computer to the camera through the serial port Device parameters can be configured by using software such as HyperTerminal The serial port parameters must...

Страница 79: ...one before you control the PTZ unit Steps 1 Enter RS 485 Port Setting interface Configuration Advanced Configuration System RS485 Figure 10 15 RS 485 Settings 2 Set the RS 485 parameters and click Sav...

Отзывы: