


Maintenance
194
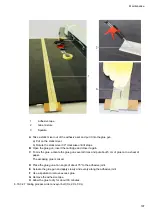
3
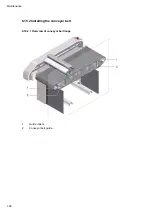
Conveyor belt
4
Spatula
A
Align both ends of the belt to one another:
a) Align the edges with the same alignment to one another (on both the left and right sides).
B
Mark the conveyor belt in the middle if the table size > L.
C
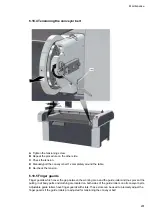
Switch on the vacuum.
D
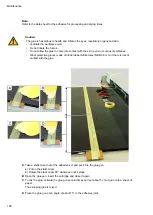
Press the conveyor belt together until the adhesive joint is 1 mm wide.
E
Insert the spatulas into the adhesive joint every 8 cm.
F
Press the conveyor belt against the spatulas.
Results
The conveyor belt is parallel to the table.
There is a 1 mm wide adhesive joint.
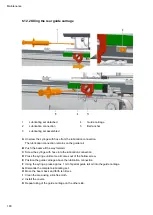
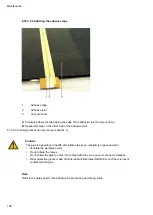
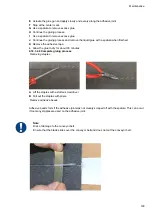
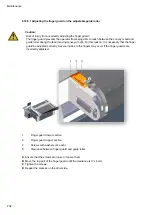
6.18.3.2.3 Fixing the first end of the conveyor belt
1
Stop
4
Stapler
2
Staples
X
Gap between staples and adhesive joint
3
Adhesive joint
Note:
Distance X: new conveyor belt = 15 mm, used conveyor belt = 5 mm.
A
Use the staple gun to place two staples on the long end to prevent slipping.
B
Press the short end of the conveyor belt onto the spatula and insert two staples with the staple gun.
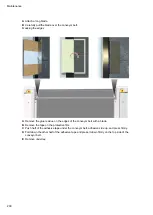
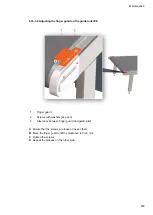
C
Align the stop.
D
Use the staple gun to place staples along the stop at 10 mm intervals.
E
Repeat until the long end is completely fixed.
Summary of Contents for S3 M-1200
Page 1: ...Operating Manual S3 Digital Cutter ...
Page 5: ...Contents 5 8 Modules 209 9 Material handling 211 10 Additional specifications 213 ...
Page 6: ...Contents 6 ...
Page 10: ...Introduction 10 ...
Page 14: ...Product description 14 2 5 Cutter overview ...
Page 38: ...Product description 38 ...
Page 64: ...Safety 64 ...
Page 90: ...Controls and operation 90 4 13 3 Inserting replacing the module ...
Page 103: ...Controls and operation 103 Plastic perforated plate Adjustable vacuum range Leather no ...
Page 134: ...Controls and operation 134 ...
Page 155: ...Tips for cutting 155 5 6 2 Calculation of maximum speed for EOT POT Z16 Z42 ...
Page 207: ...Tools 207 7 Tools ...
Page 208: ...Tools 208 ...
Page 209: ...Modules 209 8 Modules ...
Page 210: ...Modules 210 ...
Page 211: ...Material handling 211 9 Material handling ...
Page 212: ...Material handling 212 ...
Page 213: ...Additional specifications 213 10 Additional specifications ...
Page 214: ...Additional specifications 214 ...


