5-41
CLUTCH
CHECKING THE CLUTCH SPRINGS
The following procedure applies to all of the
clutch springs.
1. Check:
• Clutch spring
Damage
→
Replace the clutch springs as a
set.
2. Measure:
• Clutch spring free length “a”
Out of specification
→
Replace the clutch
springs as a set.
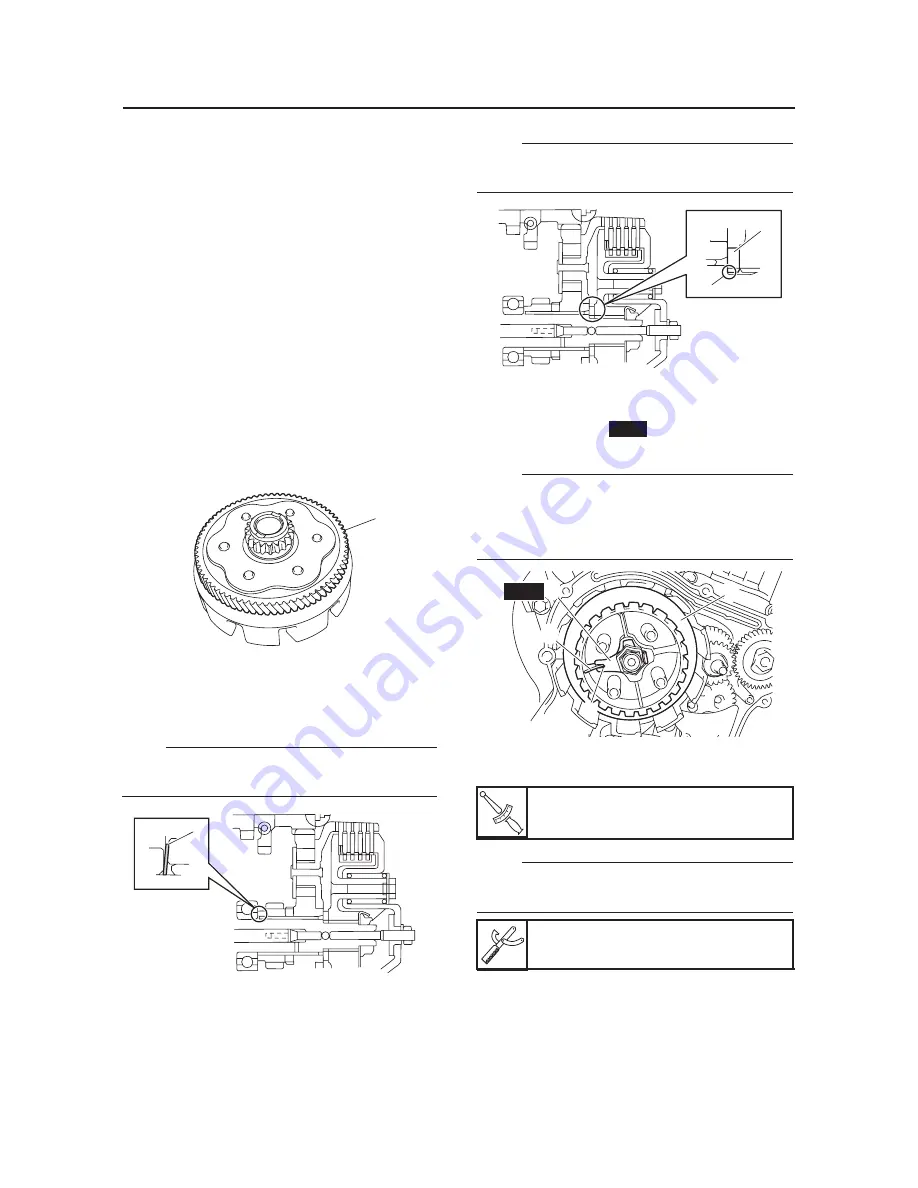
CHECKING THE CLUTCH HOUSING
1. Check:
• Clutch housing dogs “1”
Damage/pitting/wear
→
Deburr the clutch
housing dogs or replace the clutch housing.
Pitting on the clutch housing dogs will cause er-
ratic clutch operation.
2. Check:
• Bearing
Damage/wear
→
Replace the bearing and
clutch housing.
CHECKING THE CLUTCH BOSS
1. Check:
• Clutch boss splines
Damage/pitting/wear
→
Replace the clutch
boss.
Pitting on the clutch boss splines will cause er-
ratic clutch operation.
CHECKING THE PRESSURE PLATE
1. Check:
• Pressure plate
Cracks/damage
→
Replace.
CHECKING THE CLUTCH PUSH LEVER AND
SHORT CLUTCH PUSH ROD
1. Check:
• Clutch push lever
• Short clutch push rod
Damage/wear
→
Replace the defective
part(s).
CHECKING THE PRIMARY DRIVE GEAR
1. Remove:
• Primary drive gear
Refer to “BALANCER GEAR” on page 5-51.
Clutch plate thickness
1.45–1.75 mm
Warpage limit
0.20 mm
5-42
CLUTCH
2. Check:
• Primary drive gear
Damage/wear
→
Replace the primary drive
gear and clutch housing as a set.
Excessive noise during operation
→
Replace
the primary drive gear and clutch housing as
a set.
3. Install:
• Primary drive gear
Refer to “BALANCER GEAR” on page 5-51.
CHECKING THE PRIMARY DRIVEN GEAR
1. Check:
• Primary driven gear “1”
Damage/wear
→
Replace the primary drive
gear and clutch housing as a set.
Excessive noise during operation
→
Replace
the primary drive gear and clutch housing as
a set.
INSTALLING THE CLUTCH
1. Install:
• Conical spring washer “1”
NOTE:
Install the conical spring washer as shown in the
illustration.
2. Install:
• Clutch housing
• Thrust washer “1”
NOTE:
Be sure the thrust washer sharp-edged conner
“a” is positioned opposite side to the clutch boss.
3. Install:
• Clutch boss “1”
• Lock washer “2”
• Clutch boss nut
NOTE:
• Lubricate the clutch boss nut threads and lock
washer mating surfaces with engine oil.
• Align the notch “a” in the lock washer with a low
rib “b” on the clutch boss.
4. Tighten:
• Clutch boss nut “1”
NOTE:
While holding the clutch boss “2” with the clutch
hub holder “3”, tighten the clutch boss nut.
1
1
T
R
.
.
Clutch boss nut
70 Nm (7.0 m·kg, 50 ft·lb)
Clutch hub holder
YSST-733
1
a
New
a
b
1
2
New
Summary of Contents for YZF-R15
Page 1: ...2008 SERVICE MANUAL YZF R15 20P F8197 E0 ...
Page 33: ...2 14 ELECTRICAL SPECIFICATIONS Coil resistance 54 0 66 0 Fuse 20 0A Ω Fuse ...
Page 46: ...2 27 LUBRICATION POINTS AND LUBRICANT TYPES LUBRICATION DIAGRAMS A 1 2 3 4 5 6 7 ...
Page 48: ...2 29 LUBRICATION POINTS AND LUBRICANT TYPES 1 2 3 4 ...
Page 49: ...2 30 LUBRICATION POINTS AND LUBRICANT TYPES 1 Camshaft 2 Crankshaft 3 Main axle 4 Drive axle ...
Page 50: ...2 31 COOLING SYSTEM DIAGRAMS COOLING SYSTEM DIAGRAMS 1 2 3 4 1 5 7 6 4 ...
Page 52: ...2 33 CABLE ROUTING CABLE ROUTING 1 5 2 3 6 4 8 7 ...
Page 54: ...2 35 CABLE ROUTING A A B B C C A A C C B B A B C 1 2 3 4 5 4 5 6 6 7 8 9 10 11 10 11 12 12 ...
Page 56: ...2 37 CABLE ROUTING 1 2 5 4 3 ...
Page 60: ...2 41 CABLE ROUTING A A B C D E 1 2 3 4 5 6 7 8 9 10 A ...
Page 121: ...4 24 FRONT BRAKE Refer to BLEEDING THE HYDRAULIC BRAKE SYSTEM on page 3 18 ...
Page 249: ...7 8 THROTTLE BODY ...
Page 250: ...7 9 AIR INDUCTION SYSTEM AIR INDUCTION SYSTEM 1 2 5 4 5 6 3 2 1 6 4 3 ...
Page 257: ......
Page 269: ...8 12 CHARGING SYSTEM 1 AC magneto 2 Rectifier regulator 3 Battery 42 Fuse ...
Page 271: ...8 14 CHARGING SYSTEM ...
Page 275: ...8 18 LIGHTING SYSTEM ...
Page 285: ...8 28 COOLING SYSTEM ...
Page 311: ...8 54 FUEL PUMP SYSTEM ...


