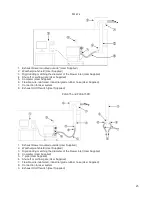
Laser System Leveling
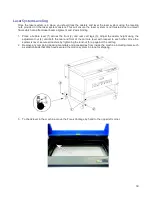
Once the laser system is in place, you should lock the casters and level the laser system using the leveling
nuts provided on the laser system casters. This will ensure the laser system is not twisted due to unlevel
floors which can affect laser beam alignment and Z axis binding.
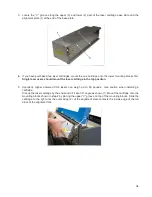
1. Place a bubble level (1) across the front (2) and rear cart legs (3). Adjust the caster height using the
adjustment nut (4) until both the rear and front of the cart are level with respect to each other. Once the
system is level, secure all casters by tightening the locknut (5) up against the cart leg.
2. Remove any remaining packing materials and accessories from inside the machine including items such
as elastic bands that may have secured the motion system in place for shipping.
3. To check level in the machine, move the Focus Carriage by hand to the upper left corner.
39
Summary of Contents for PLS4.75
Page 1: ...PLS User Guide PLS4 75 PLS6 75 PLS6 150D PLS6MW www ulsinc com Revision August 2012...
Page 5: ...Chapter 1 Specifications 5...
Page 8: ...Chapter 2 Safety 8...
Page 14: ...Tamper Proof Labels Safety Labels...
Page 15: ...ULS Fiber Laser Cartridge Labels 15...
Page 16: ......
Page 17: ...PLS4 Back View 17...
Page 18: ...PLS6 Front View 18...
Page 19: ......
Page 22: ...Chapter 3 Installation 22...
Page 40: ......
Page 48: ...Chapter 4 Operation 48...
Page 83: ...Chapter 5 Accessories 83...
Page 99: ...Example Connection for PNP mode Example Connection for NPN mode 99...
Page 111: ...Chapter 6 Maintenance 111...
Page 119: ...www ulsinc com...

