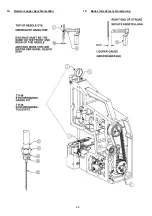
20. Synchronize with TT148 Synchronization Gauge Kit
(see page 42).
Remove the looper and insert the test pin, 1/4" (6.35
mm) diameter x 1 3/4" (4.5 mm) long, (I) in the looper
holder and lock the rod when there is 1/4" protruding
above the throat plate.
Position the needle at the bottom of its stroke.
Install the dial indicator (J) on the top of the machine.
Set the indicator dial to zero when the looper is at the
farthest right position.
Turn the handweel in the clockwise direction until the
test pin (I) touches the throat plate. Record the number
of revolutions and final indicator reading.
Turn the handwheel counterclockwise until the dial indi-
cator reads "0" when the looper is again at right end of
stroke.
Continue to turn the handwheel counterclockwise until
the test pin (I) touches the throat plate again. Record
the number of revolutions and final indicator reading.
The indicator must travel the same amount of revolu-
tions in each direction. The final indicator reading must
be within .003" (.07 mm) of the first reading.
If the indicator does not return to zero, adjustment can
be made by slightly turning (lower unit) 10042 Belt
Sprocket and lightly locking one of the (lower unit)
screws (F). If there is a lower number reading of the in-
dicator on looper front travel, turn slotted sprocket coun-
terclockwise. If there is a lower number reading of the
indicator at looper rear travel, turn slotted sprocket
clockwise.
Tighten the three screws (F) to 100 in. lbs. (11.5 Nm)
after adjustment is made.
21. Synchronize without TT148 Synchronization Gauge Kit
(see Page 42).
If no indicator is available, set the synchronization
measuring with a slide caliper or steel rule.
Set the looper gauge to 13/54" (5mm).
Check the synchronization by moving the looper rear-
ward behind the needle scarf. Continue moving the
looper to the left so that the top of the needle eye (L) is
flush with the bottom of the looper blade (K). Measure
the distance from the looper tip to the left side of the
needle (M).
Move the looper in the opposite direction to where the
looper is in front of the needle. Set the top of the needle
eye (L) flush with the looper blade (K), the same as
above. Measure the looper point to the left side of the
needle. Both measurements should be the same within
1/64" (0.4mm) (M).
If the measurement with the looper in front of the needle
is less than the rear, turn the slotted sprocket counter-
clockwise. If the measurement is less with the looper
behind the scarf of the needle, turn the slotted sprocket
clockwise.
Tighten the three screws (F) to 100 in. lbs. (11.5 Nm).
22. Assemble 10082J Belt Cover with 10042G Dust Ring
attached.
Slide 10084A Felt Washer and the hub of
10021F Adjustable Belt Pulley on the main shaft to
touch the dust ring lightly. Lock the 22894AV first
Screw in operating direction on the flat of the crank-
shaft tight. Then, lock the remaining screw of the pulley
hub of the adjustable belt pulley. Tighten both screws to
87 in. lbs. (10 Nm). Screw on adjusting disc and lock
22894AV Screw temporarily.
20. Synchronisieren mit Synchronsier-Teilesatz TT148 (siehe
Seite 42).
Entfernen Sie den Greifer und setzen Sie den Teststift,
6,35 mm Durchmesser x 44,5 mm lang, (I) in den Grei-
ferhalter und ziehen Sie ihn so fest, daß er 6,35 mm über
die Stichplatte hinausragt.
Stellen Sie die Nadel in Nadeltiefstellung.
Montieren Sie die Meßuhr (J) auf das Maschinenoberteil.
Stellen Sie Anzeige auf "0" wenn der Greifer in seiner
rechten Endstellung ist.
Drehen Sie das Handrad im Uhrzeigersinn bis der Test-
stift (I) die Stichplatte berührt. Notieren Sie die Anzahl
der Umdrehungen und die Messuhranzeige.
Drehen Sie das Handrad gegen den Uhrzeigersinn bis
die Meßuhr "0" anzeigt und der Greifer wieder in seiner
rechten Endstellung ist.
Drehen Sie das Handrad weiter gegen den Uhrzeiger-
sinn, bis der Teststift (I) wieder die Stichplatte berührt.
Notieren Sie die Anzahl der Umdrehungen und die Mess-
uhranzeige.
Die Messuhr muss die gleiche Anzahl von Umdrehungen
in beiden Richtungen anzeigen. Die letzte Anzeige darf
nicht mehr als 0,07 mm von der ersten Anzeige abwei-
chen.
Wenn die Anzeigenabweichung nicht gegen "0" geht,
können Sie eine Feineinstellung durchführen, indem Sie
das Zahnriemenrad am Unterteil leicht verdrehen und mit
einer der Schrauben (F) sichern. Falls die Anzeige am
vorderen Greiferlängsweg niedriger ist, drehen Sie das
geschlitzte Zahnriemenrad gegen den Uhrzeigersinn;
falls die Anzeige am hinteren Greiferlängsweg niedriger
ist, drehen Sie das geschlitzte Zahnriemenrad im Uhr-
zeigersinn.
Ziehen Sie die drei Schrauben (F) nach der
Feineinstellung mit 11,5 Nm an.
21. Sychronisieren ohne Sychronisier-Teilesatz TT148 (siehe
Seite 42). Falls keine Messuhr verfügbar ist, führen Sie
die Synchronisiermessung mit einer Schublehre oder
einem Stahllineal durch.
Stellen Sie den Greiferabstand auf 5 mm ein.
Prüfen Sie die Synchronisation durch Verschieben des
Greifers hinter die Hohlkehle der Nadel. Bewegen Sie
den Greifer weiter nach links bis die Oberkante des
Nadelöhrs (L) mit der Unterkante der Greiferklinge (K)
auf gleicher Höhe ist. Messen Sie den Abstand von der
Greiferspitze bis zur linken Seite der Nadel (M).
Bewegen Sie den Greifer in entgegengesetzter Richtung
vor die Nadel. Stellen Sie die Oberkante des Nadelöhrs
(L) mit der Unterkante der Greiferklinge (K) wie oben auf
gleiche Höhe. Messen den Abstand der Greiferspitze zur
linken Seite der Nadel. Beide Messungen sollen
innerhalb 0,4 mm (M) liegen. Falls die Maß mit dem
Greifer vor der Nadel kleiner ist als hinten, drehen Sie
das geschlitzte Zahnriemenrad gegen den Uhrzeigersinn.
Falls das Maß mit dem Greifer hinter der Nadel kleiner
ist, drehen Sie das geschlitzte Zahnriemenrad im
Uhrzeigersinn.
Ziehen Sie die drei Schrauben (F) mit 11,5 Nm an.
22.
Montieren Sie die Abdeckung 10082J mit dem
angebauten Staubring 10042G. Schieben Sie die
Filzscheibe 10084A und die Nabe der einstellbaren
Riemenscheibe 10021F so auf die Hauptwelle, daß der
Staubring leicht berührt wird. Setzen Sie den ersten
Gewindestift 22894AV in Drehrichtung auf die Fläche der
Kurbelwelle. Befestigen Sie dann den weiteren
Gewindestift der Nabe der einstellbaren Riemenscheibe,
beide mit 10 Nm. Schrauben Sie die Einstellschraube auf
die Nabe und befestigen Sie diese vorläufig mit dem
Gewindestift 22894AV.
43
Summary of Contents for BC100
Page 15: ...13...
Page 25: ...23...
Page 44: ...42 19 Needle Looper Synchronisation 19 Nadel Greifersynchronisierung...
Page 49: ...47 NOTES NOTIZEN...
Page 50: ......


