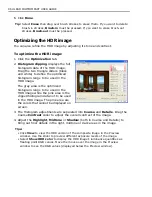
CHAPTER 2: PHOTO EDITING 97
Editing the HDR image
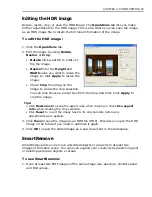
Rotate, resize, crop, or save the HDR image. The
Operations
tab lets you make
further adjustments to the HDR image. This is also where you can save the image
as an HDR image file to retain the full tonal information of the image.
To edit the HDR image:
1. Click the
Operations
tab.
2. Edit the image by using
Rotate
,
Resize
, or
Crop
.
•
Rotate
Click a button to rotate or
flip the image.
•
Resize
Enter the
Height
and
Width
value you want to resize the
image to. Click
Apply
to resize the
image.
• Check
Crop
then drag on the
image to create the crop selection.
You can also choose a preset size from the drop-down list. Click
Apply
to
crop the image.
Tips:
• Click
Resize lock
to keep the aspect ratio when resizing or check
Use aspect
ratio
when creating the crop selection.
• Click
Reset
to revert the image back to its original state before any
adjustments were applied.
3. Click
Save
to save the image as an HDR file (HDR). This lets you open the HDR
image in the future if you need to optimize it again.
4. Click
OK
to open the edited image as a new document in the workspace.
SmartRemove
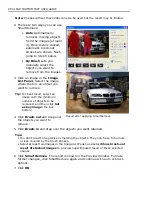
SmartRemove lets you remove unwanted objects or areas from at least two
images of the same scene. You can even expand your creativity by preserving and/
or deleting particular objects or areas.
To use SmartRemove:
1. Open at least two EXIF images of the same image size, aperture, shutter speed,
and ISO values.
Summary of Contents for PHOTOIMPACT 11
Page 1: ...User Guide Ulead Systems Inc August 2005 ...
Page 295: ...9 Appendix COMMANDS ...

