


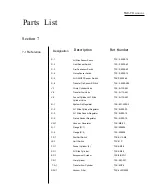

TAC-7X
MANUAL
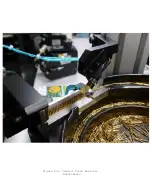
Perform the following steps to replace indenters:
Step 1.
Open the sleeve valve.
Step 2.
Disconnect the air supply from the sleeve valve.
Step 3.
Remove the four button head socket cap screws
securing the crimp cylinder arbor cover plate.
Step 4.
Remove the crimp cylinder arbor cover plate.
Step 5.
Remove the two screws securing the funnel
cover plate.
Step 6.
Remove the funnel cover plate.
Step 7.
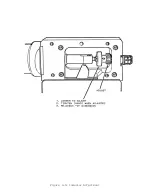
Refer to Figure 6-4 and Figure 6-5.
Step 8.
Remove the four screws securing the indenter
plate.
Step 9.
Carefully lift the indenter plate up from the
housing such that the cam arm disengages
smoothly from the arbor shaft. It may be
necessary to manually move the arbor shaft to
the left.
Step 10. Carefully turn the indenter plate over, exposing the
indenter cam.
CAUTION
DO NOT PINCH THE AIR LINE.
Step 11. Refer to Figure 6-5.
Step 12. Carefully remove the indenter cam arm.
Step 13. Observe indenter orientation and remove indenter
ring from the cam arm.
Summary of Contents for TAC-7AE
Page 6: ...Figure 1 1 TAC 7X Front View ...
Page 8: ... Figure 1 2 Wire Insertion Through Funnel ...
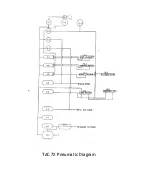
Page 12: ...Figure2 1 Pneumatic Hook Up ...
Page 14: ... Fiqure 2 4 Track Drop Tube Escapement ESCAPEMENT SYSTEM _ _ _ BR ASSEMBL I TRA ...
Page 18: ... ARBOR COVER PLA TE REMOVED Figure 3 1 Crimp Cylinder Arbor Open ...
Page 20: ... ARBOR COVER PLAT E REMOVED Figure 3 2 Crimp Cylinder Arbor Closed ...
Page 23: ... Crimp Inspection Points Improper Crimps ...
Page 33: ...Figure 6 1 TAC 7X Components ...
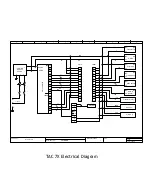
Page 34: ...Figure 6 2 Control Box Components Figure 6 2 TAC 7X Components Right View ...
Page 37: ...Figure 6 3 Contact Track Feed Air Adjustments ...
Page 42: ... Figure 6 4 Indenter Plate Removal ...
Page 43: ...HOSE CLAMP CAREFULL Y REMOVE Figure 6 5 Indenter Replacement ...
Page 47: ...Figure 6 6 Indenter Adjustment ...
Page 52: ...TAC 7X Pneumatic Diagram ...


