background image

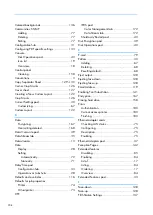
lliinnkk ((LLK

K)) C

CM

MRR

A CMR that converts input color space in the presentation data to the output color space of the
presentation device. Contrast with

device link CMR

.

lliinnkk ccoolloorr ccoonnvveerrssiioonn C

CM

MRR

A CMR that converts input color space in the presentation data to the output color space of the
presentation device.

LLK

K C

CM

MRR

See

link CMR.

LLPPRR

See

Line Printer Remote

.

M

M

m

mooiirréé

A repetitive noise pattern in a halftoned image caused by superimposing the CMYK images.

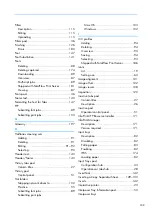
N

N

nna

am

meed

d ccoollo

orr

A color that is specified with a descriptive name. An example of a named color is green.

nna

am

meed

d p

prrooffiillee

An ICC profile for converting one or more named colors to or from the PCS. Named color profiles
are associated with specific devices. They can be embedded in images.

PP

p

pa

ag

gee d

deessccrriip

pttiioonn lla

anng

guua

ag

gee ((PPD

DLL))

A markup language that describes the appearance of a printed page. PostScript is an example of a
PDL.

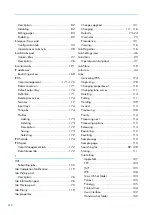
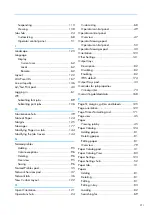
PPC

CSS

See

profile connection space

.

PPD

DFF

See

Portable Document Format

.

PPD

DLL

See

page description language

.

p

pood

d

In the console, a subdivision of a hub.

PPoorrtta

ab

bllee D

Dooccuum

meenntt FFo

orrm

ma

att ((PPD

DFF))

A standard file format developed by Adobe Systems Inc. PDF files are cross-platform and contain all
of the image and font data. Design attributes are retained in a compressed single package.

p

prreesseett

202

Summary of Contents for Print Server R-60

Page 1: ...ntroduction 1 Trying Out TotalFlow Print Server Using Sample Files 2 Working with the Console 3 Configuring TotalFlow Print Server 4 Working with Jobs 5 Maintaining TotalFlow Print Server 6 Security 7 IPDS 8 Troubleshooting 9 Reference 10 For information not in this manual refer to the Help System in your product ...

Page 2: ......

Page 3: ...ual are the same for these models However when necessary some descriptions and illustrations are different Help There are two ways of displaying help the Information Center help and the balloon help The Information Center help explains the functions and basic operations of TotalFlow Print Server The balloon help explains each of the settings their values and how to configure them Reading the PDF M...

Page 4: ...onsole has its own icon Click the icon to display a short description of the pod In this guide this type of help is called balloon help Click F Fiin nd d m mo or re e within the balloon help to display the related topic in the Information Center 2 ...

Page 5: ... elle ec ctt and s se elle ec cttiin ng g refer to the act of touching the touch sensitive screen using the mouse or using the keyboard as though you were pressing a switch choosing an option or entering data Disclaimer To the maximum extent permitted by applicable laws in no event will the manufacturer be liable for any damages whatsoever arising out of failures of this machine losses of the regi...

Page 6: ...Machine Types Check the type of your print server before reading the manuals Type 1 TotalFlow Print Server R 60 Type 2 TotalFlow Print Server R 60A 4 ...

Page 7: ...r Support 16 Extended Features 17 Console 18 Icons Used in the Console 19 Printer Control Bar 20 Interactive Printer 23 Operations and Jobs Hubs 24 Configuration Hub 31 Maintenance Hub 39 J Jo ob b P Pr ro op pe er rttiie es s E Ed diitto or r Dialog 41 Operator Control Panel 47 Printer Control Bar 47 Operations Hub 49 Jobs Hub 51 Paper Setting Hub 52 UserTools Adjustment Hub 52 Patrol Light 53 2 ...

Page 8: ...g the Current Settings Pod 67 Adding Current Settings Editors 67 Removing Current Settings Editors 68 Resetting Current Settings Defaults 68 Customizing the Operations and Jobs Hubs 68 Changing the View of a Pod 69 Searching for Objects in a Pod 69 4 Configuring TotalFlow Print Server Viewing and Updating TotalFlow Print Server Settings 71 Setting the Date and Time 71 Manually Setting the Date and...

Page 9: ...Paper from the Paper Catalog 81 Working with Input Interposer and Output Trays 82 Enabling Trays 82 Disabling Trays 82 Loading Paper in an Input Tray 82 Editing the Paper in an Input Tray or Interposer Tray 83 Working with Extended Features 84 Listing Available Features 84 Enabling Features 84 Disabling Features 85 Working with Saved Configurations Presets 85 Viewing and Updating Presets 86 Config...

Page 10: ...RINERGY 105 Submitting a Print Job Using JMF 105 Submitting a Print Job Using LPR 106 Submitting a Print Job Using AppleTalk 107 Managing Print Jobs 108 Searching Pods 108 Previewing a Print Job 108 Viewing a Print Job 108 Holding a Print Job 109 Printing a Sample Copy of a Job 110 Printing a Sample Page of a Job 110 Causes of Invalid Print Jobs 110 Editing the Properties of a Print Job 111 Changi...

Page 11: ...ttings 139 Changing the Header Footer Settings 140 Changing Other Settings 141 Using the Exception Pages Tools 142 Using the Insert Tool 142 Using the Substitute Tool 143 Using the Subset Tool 145 Using the Tab Tool 146 6 Maintaining TotalFlow Print Server Checking Printer Status 149 Checking Toner Levels 149 Checking Paper Levels 149 Checking Other Printer Information 150 Uploading and Downloadin...

Page 12: ...167 Restricting IP Addresses 168 Overwriting Deleted Data 168 Setting up Secure Mode Printing 168 8 IPDS AFP IPDS Support 171 Color Management Tab IPDS Pod 172 Data Stream Tab IPDS Pod 172 Working with IPDS Profiles 172 Selecting an IPDS Profile 172 Adding IPDS Profiles 173 Deleting IPDS Profiles 173 Saving IPDS Profiles 173 Renumbering IPDS Input Trays 174 Setting the Default Output Tray for IPDS...

Page 13: ...es 178 E mailing Traces 179 Managing Archived Traces 179 Known Problems 180 10 Reference Fonts Shipped with TotalFlow Print Server 181 ICC Profiles Shipped with TotalFlow Print Server 186 Papers Supported 188 Clear Toner Patterns 191 Glossary Trademarks INDEX 11 ...

Page 14: ......

Page 15: ... is at the printer It lets you do common tasks like monitoring the printer status and managing print jobs P Pr ro od du uc ct t O Ov ve er rv viie ew w TotalFlow Print Server is a digital front end for full process color printers It works with print workflows such as Heidelberg Prinect and Kodak PRINERGY Input Data Streams TotalFlow Print Server supports these input data streams PDF Version 1 7 PD...

Page 16: ...nect p 105 Submitting a Print Job from PRINERGY p 105 or Submitting a Print Job Using JMF p 105 Line Printer Remote LPR protocol For more information see Submitting a Print Job Using LPR p 106 AppleTalk protocol For more information see Submitting a Print Job Using AppleTalk p 107 Job Processing This flowchart shows the basic path that jobs take through TotalFlow Print Server Not all options are s...

Page 17: ... defaults and overrides Processing option Process Print Process Hold Processing option Hold Process Hold Job is RIPped Property changes needed Operator changes job properties Is job valid Operator releases job Operator changes job or printer properties k3fc002 Job Processing ...

Page 18: ...Server supports the following color functions ICC profiles CMYK profiles SWOP GRACoL FOGRA Japan Color RGB profiles sRGB AppleRGB AdobeRGB RICOH RGB Gray profiles AdobeGray Device link profiles Rendering intent selection Profile switching by object type PDF X output intent Spot color support Pantone DIC TOYO HKS Color substitution Pure black Rich black Black overprint Auto trapping Color gradation...

Page 19: ...r Description IPDS Enables the IPDS data stream capability Many elements of the console appear only when this feature is installed IPDS Off Page Error Suppression 8B4289 6 Lets a user specify the number of pixels pels that can be outside of the printable area of a page without generating an error to the host system If this feature is installed a menu item S Su up pp pr re es ss s o offff p pa ag g...

Page 20: ...cal console Setting the language of the keyboard attached to TotalFlow Print Server Setting the text and button size of the local console Backing up jobs Setting the language of the Web browser used by the remote console Setting the text and button size of the remote console Specifying whether to display inline help The console contains these hubs that let you do different tasks Operations Jobs Co...

Page 21: ...ithout opening it Select one of the items and then click the appropriate icon for the action you want to do If a pod has buttons on it click the buttons and do the appropriate action Icons Used in the Console This table lists the icons used throughout the console with a brief description of their function For icons used in the interactive printer and printer pod see Printer graphic icons p 29 For ...

Page 22: ...m list Move up in the list Move down in the list Move to the beginning of the document Move one page back Move one page forward Move to the end of the document Printer Control Bar The printer control bar is at the top of the console and is always present regardless of which hub is displayed You can use it to access some operator actions instead of using the Operations hub 1 Introduction ...

Page 23: ... shows the tabs that are available It also shows which user is currently logged in a button for submitting jobs and a button that opens the help system The printer status section of the printer control bar displays the current state of the printer Possible states are Icon State and Description Ready The printer is idling but not currently printing a job Before the printer can begin printing it mus...

Page 24: ...for example staples you can temporarily bypass this message and continue processing other supplies for example black toner require you to replace them immediately The printer needs basic service that involves paper handling or checking mechanical conditions You must handle all messages of this type immediately The printer or TotalFlow Print Server has a hardware problem such as a paper jam or a co...

Page 25: ... make the printer ready to print and to start printing if a job is available S Stto op p Click this to stop printing Open Printer Click this to open the interactive printer Close Printer Click this to close the interactive printer Interactive Printer Use the interactive printer to monitor and change basic printer settings F Fiig gu ur re e 4 4 I In nt te er ra ac ct tiiv ve e P Pr riin nt te er r ...

Page 26: ...pen Printer Click this to close the interactive printer Close Printer Operations and Jobs Hubs Depending on how you configure them the Operations and Jobs hubs can contain the same or different information Either one can display information about operating TotalFlow Print Server or managing the jobs in TotalFlow Print Server The Operations and Jobs hubs can contain these pods Pod Operations Hub Jo...

Page 27: ...ings Available Available F Fiig gu ur re e 5 5 O Op pe er ra at tiio on ns s H Hu ub b C Co on ns so olle e F Fiig gu ur re e 6 6 J Jo ob bs s H Hu ub b C Co on ns so olle e Job Preview The Job Preview pod displays a preview of a selected job and includes a navigation bar Job Preview ...

Page 28: ...od displays information about jobs in the Invalid Held state This pod appears by default in both the Operations hub and the Jobs hub Job History The Job History pod displays information about processed and deleted jobs in the Completed state and deleted jobs in the Discontinued state The Job History pod includes the Print complete heading which lists the date and time when a job was completed or d...

Page 29: ...g RIP is complete T Ta ab blle e 4 4 J Jo ob b S St ta at tu us s I Ic co on ns s Icon Description Receiving Preprocessing Processing Preparing to print Preparing to print processed Printing Printing processed Printing and processing at same time Held before processing Held before print Held before print processed Waiting to print Waiting to print processed Completed Stored Stored processed Suspen...

Page 30: ...r Trays pod If you want to add only one you can close the other Interposer Trays The Interposer Trays pod displays information about the paper in the printer s interposer trays This pod always appears in the interactive printer It appears in the Operations hub by default To add it to the Jobs hub click the white arrow on the hub then A Ad dd d P Po od ds s then the pod name T Tr ra ay ys s I In nt...

Page 31: ...ational messages about the printer are available See the Operator Messages pod for more information The printer is not available See the Operator Messages pod for more information A printer error has occurred See the Operator Messages pod for more information The cover or door is open The input tray or interposer tray is disabled The input tray or interposer tray is full The input tray or interpos...

Page 32: ...on When you click a message in the list the recovery information for the message displays Warning messages which might require intervention at some point such as reloading toner or paper Informational messages which provide information about the status and configuration of the printer This pod always appears in the interactive printer It does not appear in the Operations hub or the Jobs hub by def...

Page 33: ...ig gu ur ra at tiio on n H Hu ub b The elements of the console that you see and the tasks that you can do depend on your role If you cannot perform any tasks in a tab or pod you do not see that tab or pod If you are a P Pr riin ntt s su ub bm miitttte er r you cannot see the Configuration hub at all For more information see Working with Users and Roles p 161 Paper Tab The Paper tab on the Configur...

Page 34: ...atalog pod Printer Tab The Printer tab on the Configuration hub contains the configuration parameters that control the physical printer The Printer tab on the Configuration hub contains these pods Basic Input Trays Interposer Trays Output Trays Preset Date Time and Extended Features F Fiig gu ur re e 9 9 P Pr riin nt te er r T Ta ab b 1 Introduction ...

Page 35: ... on the Printer tab allows you to save load delete configure or edit a collection of configurations You can then reload the collection to avoid having to specify the configurations individually A Preset collection contains General settings Paper settings Calibration settings Color Registration settings Printer settings Color Management Basic settings Tone curve settings Profile settings Date Time ...

Page 36: ... feature is installed the Color Management tab also contains the IPDS pod F Fiig gu ur re e 1 10 0 C Co ollo or r M Ma an na ag ge em me en nt t T Ta ab b Basic The Basic pod on the Color Management tab is used to optimize how colors are processed and printed This pod is not used for IPDS print jobs When you click the Basic pod you can change the color settings or return to factory defaults Tone C...

Page 37: ...by name TotalFlow Print Server resolves the name to an actual color using the dictionary in a named profile Named profiles are unique because they can be installed downloaded and deleted but you cannot select them for use When they are loaded they are used Data Stream Tab The Data Stream tab on the Configuration hub contains the parameters that control the processing options for the print jobs The...

Page 38: ...a ac ce e Fonts The Fonts pod on the Data Stream tab lists all the available fonts in TotalFlow Print Server You can manage the fonts from this pod Network Tab The Network tab on the Configuration hub lets you define virtual printers that can be used to receive jobs configure network connections for TotalFlow Print Server configure and enable TCP IP Ethernet network interface cards and set up remo...

Page 39: ...ter set Because virtual printer names are limited to the least common denominator that can be used for all job submission protocols virtual printer names are also case insensitive and restricted to the 7 bit ASCII character set H Ho ott F Fo olld de er rs s allow files to be copied into directories from which they are submitted for printing They also allow font downloading R Ra aw w P Po or rtt al...

Page 40: ...ig gu ur re e 1 13 3 S Se ec cu ur riit ty y T Ta ab b Authentication The Authentication pod on the Security tab is used to configure the basic access settings for TotalFlow Print Server The settings include Whether authentication is required to submit jobs whether users must log in The default role for authenticated users Whether authentication is required to use the local console If authenticati...

Page 41: ...ets you specify whether to overwrite the area occupied by a deleted file Overwriting makes it impossible to recover the file s contents Users and Roles Use the Users and Roles pods on the Security tab to create user IDs and associate the level of access or Roles for the user IDs An administrator or service user can add edit and delete users and roles Maintenance Hub The Maintenance hub contains po...

Page 42: ...tion backups and to erase all data from the hard drive If you have service access you can also update microcode from this pod Tools and Logs TheTools and Logs pod on the Maintenance hub provides access to the hardware maintenance procedures These maintenance procedures are included C Clle ea an n S Sc cr re ee en n desensitizes the operator control panel without activating any controls A black dis...

Page 43: ... or r dialog provides all the information you need to configure the job you need to print All your changes are shown in real time so that you can see how the final output will look To open the J Jo ob b P Pr ro op pe er rttiie es s E Ed diitto or r dialog select a job and click the properties icon The main sections are M Ma aiin n p pa ag ge e S Sh ho ow w jjo ob b v viie ew w Shows the job displa...

Page 44: ...n n page are 1 Title bar 2 Content area 3 Footer area 4 Action bar Scroll controls The scroll controls let you flip through the physical pages of the book job view flip through screens of pages page view or change the current page In addition you can also flip through the exception pages if they exist The scroll controls are displayed in the footer area of the M Ma aiin n page 1 Introduction ...

Page 45: ...es by rotating them to a degree angle of 90 180 or 270 degrees To rotate the pages click the R Ro otta atte e v viie ew w icon The current page is displayed in the box in the middle of the scroll controls To see a specific page type the page number To see the first or last page click the F Fiir rs stt p pa ag ge e icon or the L La as stt p pa ag ge e icon If exception pages are inserted click the ...

Page 46: ...g S Sh ho ow w jjo ob b view Shows the job displayed as a book S Sh ho ow w p pa ag ge es s iin n jjo ob b view Shows the job displayed as pages in the order that you read them S Sh ho ow w jjo ob b s se ettttiin ng gs s view Summarizes all the job settings These settings can be exported as HTML files S Sh ho ow w jjo ob b view 1 Introduction ...

Page 47: ...ht so you can move to or return to a previous page If the top edge of the top sheet and the bottom edge of the bottom sheet are enabled you can flip the pages from bottom to top Another way to flip through the book is to press the arrows on the keyboard S Sh ho ow w p pa ag ge es s iin n jjo ob b view The S Sh ho ow w p pa ag ge es s iin n jjo ob b view shows multiple pages in the order that you r...

Page 48: ...in ng gs s view and you can toggle between the individual groups If you need to change the settings already made click a setting which acts as a link to open the corresponding place in the user interface If one of the values turns red this means that your printer does not support the current selection and you must change it to a valid one The J Jo ob b S Se ettttiin ng gs s view displays the detai...

Page 49: ...el and is always present regardless of which hub is displayed The printer control bar includes three areas 1 Printer status area Shows message or warning icons 2 Job status area Shows what job is printing and the percent complete 3 Navigation bar The navigation bar shows the tabs that are available F Fiig gu ur re e 1 15 5 P Pr riin nt te er r C Co on nt tr ro oll B Ba ar r O Op pe er ra at to or ...

Page 50: ...ntrol Bar causes the printer to enter the Not Ready state When normal operation is interrupted the printer goes into a Not Ready state When the printer detects an intervention condition it places itself in the Not Ready state and displays a pop up warning or error message T Th he e ffo ollllo ow wiin ng g tty yp pe es s o off iin ntte er rv ve en nttiio on ns s c ca au us se e a a N No ott R Re ea...

Page 51: ...b status window on the printer control bar displays the job name and shows the progress of the job on the printer F Fiig gu ur re e 1 16 6 J Jo ob b S St ta at tu us s W Wiin nd do ow w The printer control bar also includes these buttons Button Description S Sa am mp plle e Click this to print a copy of the page that is printing and output it to the sample tray S Stta ar rtt Click this to make the...

Page 52: ...clude Error messages which usually require an operator action When you click a message in the list the recovery information for the message displays Warning messages which might require intervention at some point such as reloading toner or paper Informational messages which provide information about the status and configuration of the printer Tray Information The Tray Information pod displays info...

Page 53: ...ains these pods Active 0 Inactive 0 and History 0 Active 0 The Active 0 pod displays information about print jobs in the Active state Inactive 0 The Inactive 0 pod displays information about jobs in the Held state History 0 The History 0 pod displays information about processed and deleted jobs in the Completed state and deleted jobs in the Discontinued state IPDS jobs do not appear in the History...

Page 54: ...at is currently defined for the printer F Fiig gu ur re e 1 19 9 P Pa ap pe er r S Se et tt tiin ng g H Hu ub b UserTools Adjustment Hub The UserTools Adjustment hub contains pods that are used to perform maintenance tasks such as shutting down restarting backing up and restoring TotalFlow Print Server 1 Introduction ...

Page 55: ...o od de e P Pr riin ntt S Sa am mp plle es s S Sa av ve e T Tr ra ac ce es s C Co on nffiig gu ur re e T Tr ra ac ce es s T Tr ra ac ce e A Ar rc ch hiiv ve e L Lo oa ad d P Pr re es se ett E Etth he er rn ne ett C Co on nffiig gu ur ra attiio on n I In ns stta allll V Viir rttu ua all M Ma ac ch hiin ne e and R Re em mo ov ve e V Viir rttu ua all M Ma ac ch hiin ne e Patrol Light The patrol light...

Page 56: ......

Page 57: ...g from a remote system to a hot folder Creating papers Loading papers in input trays Submitting a job through a hot folder Changing the view of the Job Properties Editor Setting the printing sides for a job Changing the page size to fit the paper Specifying finishing options Specifying page substitutions Inserting tabs Releasing a held job to print P Pr re er re eq qu uiis siitte es s Default size...

Page 58: ...h to 2 2 iin nc ch h Letter or 5 55 5 m mm m A4 6 Set T Ta ab b p pr riin nttiin ng g m me etth ho od d to T Te ex xtt o on n tta ab b 6 Load the new papers in input trays See Loading Paper in an Input Tray p 82 for instructions 7 Copy root SAMPLE SETUPGUIDE pdf to the hot folder of the virtual printer that you configured in Step 2 The hot folder is in the Printer folder and has the same name as t...

Page 59: ...uses the following pages to be renumbered in the Job Properties Editor The page numbers in the page images do not change 23 Click O OK K to close the Job Properties Editor 24 Verify that the job is still selected in the Inactive Jobs pod Click the print icon C Cr re ea at tiin ng g a an nd d P Pr riin nt tiin ng g a a S St ta ap plle ed d M Ma ag ga az ziin ne e In this task you will create a stap...

Page 60: ...Set N Nu um mb be er r o off p pa ag ge es s to 2 2 4 Set I Im mp po os siittiio on n to M Ma ag ga az ziin ne e The page images will show a question mark This is normal because job preview is not supported for booklet magazine or speed imposition jobs 5 Under J Jo ob b P Pr ro op pe er rttiie es s click F Fiin niis sh hiin ng g and set S Stta ap plle e B Biin nd d to 2 2 s stta ap plle e a att c ...

Page 61: ...nstructions 3 Copy root SAMPLE TICKETS pdf to the hot folder The hot folder is in the Printer folder and has the same name as the virtual printer for example Printer Hold 4 On the Operations hub or the Jobs hub find the Inactive Jobs pod Select the job and click the edit icon The Job Properties Editor opens 5 Under J Jo ob b P Pr ro op pe er rttiie es s click E Ed diitt 1 Set O Or riie en ntta att...

Page 62: ...2 60 ...

Page 63: ...e when TotalFlow Print Server starts or when another user logs out By default this user is A Ad dm miin niis sttr ra atto or r To log in 1 Do one of these To use the local console attach a keyboard and monitor to TotalFlow Print Server To use the remote console open a Web browser and go to http hostname hostname is the host name or IP address of TotalFlow Print Server See the Setup Guide for suppo...

Page 64: ...f the Web browser if it is available TotalFlow Print Server is available in English Japanese Dutch French German Italian and Spanish If the browser is set to any of these languages the remote console uses that language If the browser is set to a regional version of any of these languages the remote console uses the basic version of the language For example if the browser language is French Canada ...

Page 65: ...al console B Bu utttto on n s siiz ze e This setting affects only the local console On the remote console R Re em mo otte e c co on ns so olle e b bu utttto on n s siiz ze e This setting affects only the remote console 3 Click O OK K H Hiid diin ng g o or r S Sh ho ow wiin ng g I In nlliin ne e H He ellp p f fo or r t th he e C Cu ur rr re en nt t U Us se er r Each user can specify whether to show...

Page 66: ...3 64 F Fiig gu ur re e 2 21 1 B Ba as siic c P Po od d w wiit th h I In nlliin ne e H He ellp p 3 Working with the Console ...

Page 67: ...a as siic c P Po od d w wiit th ho ou ut t I In nlliin ne e H He ellp p This task can be done only at the remote console It sets user preferences for both the local and remote consoles Hiding or Showing Inline Help for the Current User ...

Page 68: ...ons pod To add buttons for shortcuts 1 From either the Operations or Jobs hub find the Shortcut Buttons pod 2 Click the V Viie ew w menu on the title bar 3 Click C Ch ho oo os se e B Bu utttto on ns s to open the dialog to add shortcut buttons 4 Scroll the list of available buttons and select the buttons you want to include in the Shortcut Buttons pod 5 Click the right arrow icon to add the button...

Page 69: ...O OK K Resetting Shortcut Buttons Defaults You can reset the defaults for the Shortcut Buttons pod To reset the Shortcut Buttons defaults 1 From either the Operations or Jobs hub find the Shortcut Buttons pod 2 Click the V Viie ew w menu on the title bar 3 Click R Re es se ett D De effa au ulltts s and then click O OK K C Cu us st to om miiz ziin ng g t th he e C Cu ur rr re en nt t S Se et tt tii...

Page 70: ... editors from the S Se elle ec ctte ed d E Ed diitto or rs s list 6 You can also click the the up arrow icon or the down arrow icon to move the remaining buttons up or down in the list 7 Click O OK K Resetting Current Settings Defaults You can reset the defaults for the Current Settings pod To reset the defaults for the Current Settings editors 1 From either the Operations or the Jobs hub find the...

Page 71: ...e bar You can search these pods for objects such as jobs or papers with specific properties To search for objects in a pod 1 Click the search icon A search area opens 2 Specify the search conditions To search for a single text string included in the value of either one property or any property 1 Select the property that you want to search for in the drop down list For example to search for all job...

Page 72: ...To add another search condition click the plus sign 6 To remove a search condition click the minus sign 7 Select one of these values To find all objects that match any search condition select A An ny y For example if your search conditions are Job type is PDF and User name is JoeSmith you find all PDF jobs owned by any user and all jobs of any type owned by Joe Smith To find all objects that match...

Page 73: ...inter status is Ready To view or change settings 1 On the Configuration hub click the appropriate tab Most settings are on the Printer tab Some are on the Color Management tab or the Security tab 2 Find and click on the appropriate pod For example click the Basic pod to change whether to reprint unfinished pages You see a dialog that lets you change the settings in the pod 3 Select new values for ...

Page 74: ...to virtual printers to start processing You can change existing virtual printers add new virtual printers or delete virtual printers Every virtual printer has a hot folder associated with it Hot folders are the most common method of submitting jobs Copying a Virtual Printer To create a virtual printer you must use an existing virtual printer as a template You can create up to 250 virtual printers ...

Page 75: ...on hub click the Network tab and find the Virtual Printers pod 2 Click the name of the virtual printer that you want to delete then click the delete icon 3 Click Y Ye es s to confirm the action Setting Virtual Printer Defaults and Overrides for Job Properties You can associate default and override values for job properties with a virtual printer When the virtual printer receives a job the job uses...

Page 76: ...Wo or rk kiin ng g w wiit th h N Ne et tw wo or rk k S Se er rv viic ce es s P Pr riin nt te er r P Pr ro ot to oc co olls s A protocol is a set of rules controlling the communication and transfer of data between the host system and a printer in a network When a protocol is enabled jobs can be sent to the printer using that protocol Enabling Protocols Use the Network Services pod to enable a netwo...

Page 77: ...net card for editing 4 Select the correct values for the Ethernet card For information see the balloon help 5 Click O OK K Checking the LAN Status of an Ethernet Card You can check whether and how fast an Ethernet card is sending and receiving information over the LAN To check the LAN status of an Ethernet card 1 On the Configuration hub click the Network tab and find the Ethernet Adapters pod 2 S...

Page 78: ...ion For information see the balloon help 4 Click S Sh ho ow w L Lo og g to view status for SNMP 5 Click O OK K Adding an SNMP Trap Host Use the Remote Access pod to add an SNMP trap host To add an SNMP trap host 1 On the Configuration hub click the Network tab and find the Remote Access pod 2 Select S SN NM MP P and click the edit icon 3 Find the Trap hosts section 4 If you want to copy an existin...

Page 79: ...b click the Network tab and find the Remote Access pod 2 Select S SN NM MP P and click the edit icon 3 Find the Communities section 4 If you want to copy an existing community select that community 5 Click the add icon and enter the N Na am me e for a new community 6 Select the appropriate A Ac cc ce es ss s 7 Click O OK K Editing an SNMP Community Use the Remote Access pod to edit an SNMP communi...

Page 80: ...t to copy an existing user select that user 5 Click the add icon and enter the N Na am me e for a new user 6 Select the appropriate A Ac cc ce es ss s 7 Click O OK K Editing an SNMP User Use the Remote Access pod to edit an SNMP user To edit an SNMP user 1 On the Configuration hub click the Network tab and find the Remote Access pod 2 Select S SN NM MP P and click the edit icon 3 Find the Users se...

Page 81: ...rs You can get these addresses from your network administrator To set up outgoing e mail 1 On the Configuration hub click the Network tab and find the Remote Access pod 2 Select E E m ma aiill and click the edit icon 3 Select e mail options For information see the balloon help You can click T Te es stt to make sure that the e mail addresses work and that the SMTP server is correct 4 If you want to...

Page 82: ...tta allo og g to display different views 1 Open J Jo ob b P Pr ro op pe er rttiie es s E Ed diitto or r 2 Click P Pa ap pe er r on the left side of the screen 3 Click P Pa ap pe er r c ca atta allo og g 4 Click C Ch ha an ng ge e to open the P Pa ap pe er r c ca atta allo og g 5 Go to V Viie ew w and select G Gr ra ap ph hiic c to display the paper properties as icons 6 To see detailed information...

Page 83: ...Properties specify a name for the new paper and select the paper properties you need See the balloon help for information 5 Click O OK K Viewing or Editing Papers Use the Paper Catalog pod to view or edit information about papers To view or edit information about papers 1 On the Configuration hub click the Paper tab and find the Paper Catalog pod 2 Select the paper that you want to edit and click ...

Page 84: ...b blle ed d check box and click O OK K Disabling Trays Disable an input interposer or output tray when you do not want the printer to use it The printer must be stopped before you can disable a tray To disable a tray 1 On the Configuration hub click the Printer tab and find the Input Trays Interposer Trays or Output Trays pod 2 Select the tray that you want to disable and click the edit icon 3 Cle...

Page 85: ...s that are defined in the Paper Catalog and loaded or available for loading in an input tray To edit a paper 1 Do any of these On the Operations or Jobs hub 1 Find the Input Trays or Interposer Trays pod 2 Select the tray where you want to edit paper and click the edit icon On the Configuration hub 1 Click the Printer tab and find the Input Trays pod or Interposer Trays pod 2 Select the tray where...

Page 86: ... the Extended Features pod on the Printer tab in the Configuration hub When features are installed a user with service or administrator access can use the Extended Features pod to work with the available features These icons are available for Extended Features Icon Function Access List features available for installation Service or Administrator Delete Uninstall Service Enable Service or Administr...

Page 87: ...Click the disable icon 4 Click O OK K You see a confirmation dialog that tells you what to do next Depending on the feature you might have to restart the computer or enter a password 5 If you see a message with a system fingerprint for the Entitlement Management System EMS 1 Copy the fingerprint and click O OK K 2 Paste the fingerprint into the license key file W Wo or rk kiin ng g w wiit th h S S...

Page 88: ...figure icon 4 In Configure Preset select the correct options for each configurable setting Not all parameters can be configured 1 Select L Lo oa ad d to indicate that the value is copied to the corresponding system setting when the preset is loaded Clear L Lo oa ad d to ignore the value By default L Lo oa ad d 2 Select or clear S Siig gn niiffiic ca an ntt to indicate how to handle a difference in...

Page 89: ... created you can load it When you load a preset the TotalFlow Print Server settings are updated to match the values in the preset To load a preset 1 On the Configuration hub click the Printer tab and find the Preset pod 2 Select the preset you want to load 3 Click the select icon A temporary message displays as the configuration settings in the selected preset are applied 4 Click C Cllo os se e W ...

Page 90: ...icon 3 Click O OK K Deleting Fonts If you no longer need specific fonts that have been uploaded you can delete them from TotalFlow Print Server You cannot delete any fonts that came with TotalFlow Print Server These fonts are also called system fonts To delete a font 1 Click the stop button to stop the printer 2 On the Configuration hub click Data Stream and find the Fonts pod 3 Click the font you...

Page 91: ... not require authentication to submit a job press E En ntte er r to log in as the default user Otherwise enter your user name and password 3 Set the FTP connection to binary mode using the binary or bin command 4 Change the directory on the TotalFlow Print Server system to the fonts directory by entering cd fonts 5 Send the font job to TotalFlow Print Server For example the command put myfonts ps ...

Page 92: ...tings 1 On the Configuration hub click the Color Management tab and find the Basic pod 2 Select the group or object you want to configure 3 Change the settings as required 4 Click O OK K Working with Halftone Screening Sets A halftone screen is the pattern of dots used to print an object A halftone screening set is the set of screens used for the different printable object types images text line a...

Page 93: ...alftone screening set 1 On the Configuration hub click the Color Management tab and find the Basic pod 2 Click the Basic pod 3 Click the edit icon next to the H Ha allfftto on ne e s sc cr re ee en niin ng g s se ett field 4 In the dialog that opens select the halftone screening set that you want to edit and click the edit icon 5 Select a screen pattern for each object type 6 Click O OK K Deleting...

Page 94: ...ut and output colors 7 Click O OK K Editing a Color Substitution You can edit color substitutions to change the input color output color tolerance and enablement status To delete a halftone screening set 1 On the Configuration hub click the Color Management tab and find the Basic pod 2 Click the Basic pod 3 Click S Su ub bs sttiittu uttiio on ns s 4 In the dialog that opens select the color substi...

Page 95: ...lor substitutions 1 On the Configuration hub click the Color Management tab and find the Basic pod 2 Click the Basic pod 3 Click S Su ub bs sttiittu uttiio on ns s 4 In the dialog that opens do either of these To delete individual color substitutions select the color substitution that you want to delete and click the delete icon To delete all color substitutions click D De elle ette e A Allll S Su...

Page 96: ...MY YK K and click the edit icon next to that object 4 In the dialog that opens click the add icon 5 In Add Profile select the type of profile you want to add 6 In Confirm Upload File click O OK K 7 In the dialog that opens select the file you want to upload 8 Click S Sa av ve e Deleting ICC Profiles Delete the ICC profiles you no longer need to accurately manage the color of basic print jobs To de...

Page 97: ... ott c co ollo or r m ma attc ch hiin ng g is set to O On n L a b values are converted to CMYK values for printing These spot color dictionaries are embedded in named profiles that are shipped with TotalFlow Print Server DIC Color Guide HKS K Coated HKS N Uncoated Pantone Formula Guides Solid Coated Pantone Formula Guides Solid Uncoated Toyo Color Finder Notes Do not use the spot color dictionarie...

Page 98: ...or Exception You can create exceptions to fine tune any color in a named profile 1 On the Configuration hub click the Color Management tab and find the Named Profiles pod 2 Select a named color profile and click the edit icon 3 Select the color that you want to create an exception for and click the edit icon You see a dialog that shows the named color as it is defined in these color spaces CMYK Th...

Page 99: ... icon 4 Select the exception that you want to edit and click the edit icon 5 Edit the CMYK values for the exception and click O OK K Deleting Color Exceptions When you no longer need color substitutions you can delete them To delete color substitutions 1 On the Configuration hub click the Color Management tab and find theNamed Profiles pod 2 Click the Basic pod 3 Select a named color profile and c...

Page 100: ...r rv ve es s then select an edit mode S Sm mo oo otth h m mo od de e displays a graphic view of a curve for each color Drag the adjustment points to change the curve N Nu um me er riic c m mo od de e displays a graphic view and 10 numeric fields for each color curve These fields contain values at X axis values at intervals of 10 starting at 10 and ending at 100 Type values in these fields or use t...

Page 101: ...values in these fields or use the up and down arrows to change the numbers N Nu um me er riic c 0 0 1 10 00 0 displays the same numeric fields as N Nu um me er riic c m mo od de e in larger format and without the graphic view Type values in these fields or use the up and down arrows to change the numbers 5 To view the result of applying the changed tone curve to a sample image click N Na av viig g...

Page 102: ...4 100 ...

Page 103: ...ion language No changes 4 Values set by the job submission protocol No changes 5 Default values set by the virtual printer New jobs Setting Virtual Printer Defaults and Overrides for Job Properties p 73 6 Media values All jobs Viewing or Editing Papers p 81 7 Printer default values All jobs Setting Printer Defaults for Job Properties p 74 Some values are applied when the job is received Changing t...

Page 104: ...jobs 6 Click O OK K 7 Select the jobs that you want to print and click F Fiille e U Up pllo oa ad d The jobs can be on a USB storage device a CD or DVD or a mapped network drive 8 If you selected O Op pe en n J Jo ob b P Pr ro op pe er rttiie es s set properties for the job and click O OK K Submitting a Job from a Windows Hot Folder In order to submit jobs from a remote Windows system to a virtual...

Page 105: ...ions 2 Edit the virtual printer and make sure that the values of J Jo ob b s su ub bm miis ss siio on n m me etth ho od d include H Ho ott ffo olld de er rs s See Changing a Virtual Printer p 73 for instructions 3 In the Mac OS Finder click G Go o then C Co on nn ne ec ctt tto o S Se er rv ve er r 4 Type the IP address of TotalFlow Print Server with the smb prefix then click C Co on nn ne ec ctt 5...

Page 106: ...r 8 Enter the bye command to end the FTP connection Submitting a Print Job Using the Printer Driver You can use the printer driver to submit jobs to TotalFlow Print Server from a remote Windows or Mac OS system To install the printer driver see the TotalFlow Print Server Setup Guide You cannot use the printer driver to print from these Mac OS applications because they do garbage collection Xcode 4...

Page 107: ... Protocols p 74 for instructions 2 To submit the job use the host name or IP address of TotalFlow Print Server and the dedicated virtual printer for Prinect which is called P Pr riin ne ec ctt This virtual printer does not appear in the console because you cannot edit it Submitting a Print Job from PRINERGY PRINERGY requires you to identify TotalFlow Print Server using a URL 1 In TotalFlow Print S...

Page 108: ...ice1 vpname h ho os st tn na am me e The host name or IP address of the print server v vp pn na am me e The name of the virtual printer Submitting a Print Job Using LPR You can use the lpr command to submit a job from any system where an LPR client is installed to TotalFlow Print Server Before you use the lpr command you must install the LPR client Windows operating systems earlier than Windows Vi...

Page 109: ...ude A Ap pp plle eT Ta allk k See Changing a Virtual Printer p 73 for instructions A Ap pp plle eT Ta allk k can be enabled for only one virtual printer at a time 3 On your Mac OS system make sure that AppleTalk is enabled in Network preferences 4 Do one of these For Mac OS X v10 2 8 or earlier click the P Pr riin ntte er r menu in the print dialog then E Ed diitt P Pr riin ntte er r L Liis stt Fo...

Page 110: ...k the search icon 2 In the expanded area below the title bar select the correct options 3 To use the advanced search features click A Ad dv va an nc ce ed d 4 Click C Cllo os se e to end the search Previewing a Print Job Preview a print job for a low resolution image that also lets you view and change the job properties To preview a print job 1 On the Operations or Jobs hub find the pod that conta...

Page 111: ...Go to the previous page Go to the next page Go to the last page of the job 7 Click N Na av viig ga atto or r to show a thumbnail of the page with the area that you are viewing highlighted 8 Click C Co ollo or r P Plla an ne es s to select the color planes that you want to view The selected color planes are superimposed To see one color plane at a time select only that color 9 Click C Ca an nc ce e...

Page 112: ...e of the current job is printed Causes of Invalid Print Jobs Print jobs that cannot be processed are given a status of Invalid These print jobs are listed in the Invalid Jobs pod An invalid job is not the same thing as a job with errors in the data stream The job can be free of errors but TotalFlow Print Server is not configured to process it Changing the job property values or the TotalFlow Print...

Page 113: ...ck the edit icon The print job opens in the Job Properties Editor After you make changes verify them in the pod that contains the job Changing the Tone Curve for a Job You can select a different tone curve for a job To change the tone curve of a print job 1 On the Operations or Jobs hub find the pod that contains the print job you want to edit 2 Select the print job you want to edit 3 Click the ac...

Page 114: ... and time when the job will be deleted You can set this value only for individual jobs that are already in Stored state Select S Stto or re e ffo or r and specify the number of days and hours to store the job You cannot set this value for individual jobs that are already in Stored state 6 Click O OK K Notes You can use the Job Properties Editor to store every non IPDS print job submitted to TotalF...

Page 115: ...ctive Jobs pod 2 Select the print job you want to suspend 3 Click the actions icon 4 Select S Su us sp pe en nd d J Jo ob b The print job s status changes from Printing to Suspended The job moves to the Inactive Jobs pod Resetting a Print Job A suspended print job can be reset A reset print job starts printing again from the beginning To reset a print job 1 On the Operations or Jobs hub find the I...

Page 116: ...rough the process you selected Processing a Job Next You can select an active job to be processed immediately after the current job To process a job next 1 On the Operations or Jobs hub find the pod that contains the print job you want to process next 2 Select the job you want to process next The job must be in the Pending process or Waiting to print state 3 Click the actions icon 4 Select P Pr ro...

Page 117: ...perties 4 Click the the up arrow icon or the down arrow icon to move the properties up or down in the list 5 Click O OK K W Wo or rk kiin ng g w wiit th h J Jo ob b F Fiillt te er rs s Job filters are programs that modify print jobs For example if a product name has recently changed you might create a filter to change the old name to the new name whenever it occurs in all print jobs The Filters po...

Page 118: ...e default values are only used when no value is set in the incoming job The incoming job means a job s print file or in the job s ticket If any exception pages are set as defaults they are used only if the incoming job does not have any exceptions set Once a job is in the system you can edit any property even those set based on an override value A virtual printer attribute must first contain a val...

Page 119: ...r F Fo oo otte er r settings O Otth he er r settings Each setting shows an icon that indicates the current values Open each setting to see and configure the settings You can open one setting at a time The settings are only available when a module is installed The module is available only on these printers Pro C7100SX Pro C7110SX Pro C7100X Pro C7110X Changing Job Options This section lets you see ...

Page 120: ...ages separated by commas or a range of pages in the P Pa ag ge e r ra an ng ge e field 5 To print a single sample copy of the job before manually releasing all the copies for the final print select O On n from the S Sa am mp plle e p pr riin ntt drop down list 6 To place a banner page before the job go to B Ba an nn ne er r p pa ag ge e and select B Be effo or re e jjo ob b To place the banner pag...

Page 121: ...d d S Se ettttiin ng gs s 3 To turn off the S Stto or re e option for the current job select O Offff from the drop down list 4 To store the job select S Stto or re e iin nd de effiin niitte elly y If S Sp pa ac ce e a av va aiilla ab blle e is checked this job is removed when an incoming job requires the space 5 To store the job for a specific amount of time after it is printed select S Stto or re...

Page 122: ...e You can specify which sides of the sheet to print on 1 Click E Ed diitt on the left side of the screen 2 Go to P Pr riin nttiin ng g s siid de e 3 To print only on one side select F Fr ro on ntt s siid de e 1 1 s siid de ed d 4 If you want to print on both sides of the paper select B Bo otth h s siid de es s 2 2 s siid de ed d 5 To print only on the back side of the paper select B Ba ac ck k s s...

Page 123: ...ttto om m When you select it the B Biin nd diin ng g e ed dg ge e is automatically set to B Bo otttto om m Rotating a Page To specify the amount to rotate the data on each page in the job in a counter clockwise direction 1 Click E Ed diitt on the left side of the screen 2 Go to R Ro otta attiio on n d de eg gr re ee es s 3 Click on one of the buttons to select the number of degrees to rotate the i...

Page 124: ...rop down list select how many pages to place on each printed side 4 Select the method for the imposition by selecting a value from the I Im mp po os siittiio on n drop down list 5 To set the direction for the pages go to P Pa ag ge e o or rd de er r and select a specific value 6 To set how to individually rotate one of the two pages on the sheet use the P Pa ag ge e R Ro otta attiio on n option De...

Page 125: ... the location select a value from the R Re ed du uc ce e E En nlla ar rg ge e drop down list 9 To specify the amount to offset the images placed in this location select the I Im ma ag ge e o offffs se ett check box and enter a value in the X and Y fields Any changes made under the R Ro otta attiio on n d de eg gr re ee es s R Re ed du uc ce e E En nlla ar rg ge e or I Im ma ag ge e o offffs se ett...

Page 126: ... if no catalog paper is defined You can only edit the settings for the M Ma an nu ua all paper Selecting the Manual Paper options 1 Open the J Jo ob b P Pr ro op pe er rttiie es s E Ed diitto or r 2 Click P Pa ap pe er r on the left side of the screen 3 Click M Ma an nu ua all 4 Select a manual paper from the N Na am me e drop down list and then choose a tray from the I In np pu utt ttr ra ay y dr...

Page 127: ... edges of the sheet enter the values into the corresponding fields 5 Specify the width for the gutter in the H Ho or riiz zo on ntta all g gu utttte er r and V Ve er rttiic ca all g gu utttte er r fields 6 Set the amount to bleed past edges of the finished size into the margins and gutters by entering the size in the H Ho or riiz zo on ntta all b blle ee ed d and V Ve er rttiic ca all b blle ee ed...

Page 128: ...he center crop marks 3 Enter a value in the O Offffs se ett field to specify the amount to shift the center of the crop mark from the edge of the finished size 4 To specify the units for the offset use the U Un niitts s drop down list 3 To print the crop marks on the corner 1 From the C Co or rn ne er r c cr ro op p m ma ar rk k p pr riin ntt s siid de e drop down list select the side where to pri...

Page 129: ...1 Go to the C Co ov ve er r s sh he ee ett control 2 Select O On n to include a cover sheet for the job 3 Select either M Ma an nu ua all or P Pa ap pe er r c ca atta allo og g to specify the paper for the cover sheet 4 When P Pe er rffe ec ctt b biin nd diin ng g is selected 1 Go to the C Co ov ve er r s sh he ee ett control 2 Select either M Ma an nu ua all or P Pa ap pe er r c ca atta allo og g...

Page 130: ...cted 1 Click F Fiin niis sh hiin ng g on the left side of the screen 2 Select F Fa ac ce e d do ow wn n from the drop down list to print the first page facing down at the bottom of the stack 3 Select F Fa ac ce e d do ow wn n r re ev ve er rs se e o or rd de er r from the drop down list to print the first page facing down on top of the stack 4 Select F Fa ac ce e u up p from the drop down list to ...

Page 131: ...m e ed dg ge e Changing the Output Options This section lets you see and edit the output settings for the job To access the output options 1 Open J Jo ob b P Pr ro op pe er rttiie es s E Ed diitto or r 2 Click on the left side of the screen 3 Use the options displayed to customize the output settings Inserting a Job Separator Sheet Specifies whether to include a job separator sheet to separate thi...

Page 132: ... he ee ett 3 Select O On n from the drop down list 4 Set the paper properties by selecting the M Ma an nu ua all or the P Pa ap pe er r c ca atta allo og g mode 5 Enter the number of copies you want between the separator sheets in the I In ntte er rv va all field 6 Select O Offff from the drop down list to not include any separator sheet between the job copies Inserting a Slip Sheet To include a s...

Page 133: ... Print Specifies which color planes should print You can select to print all the color planes or only some of them 1 Click C Co ollo or r on the left side of the screen 2 Go to P Plla an ne e s se ep pa ar ra attiio on n p pr riin ntt 3 To print all the color planes select all the check boxes 4 To print only one or a combination of the color planes select the appropriate check boxes 5 To use the p...

Page 134: ...tt and select the profile for each of the I Im ma ag ge es s T Te ex xtt L Liin ne e a ar rtt and S Sm mo oo otth h s sh ha ad de es s objects 3 To set the printer profile on the back go to P Pr riin ntte er r p pr ro of fiille e b ba ac ck k and select the profile for each of the I Im ma ag ge es s T Te ex xtt L Liin ne e a ar rtt and S Sm mo oo otth h s sh ha ad de es s objects 4 To set separate...

Page 135: ...PDF X output intent select O On n from the U Us se e P PD DF F X X o ou uttp pu utt iin ntte en ntt drop down list 2 To specify whether to use the color trapping to compensate for poor color registration or not select a value from the T Tr ra ap pp piin ng g drop down list 3 Use the B Blla ac ck kp po oiin ntt c co om mp pe en ns sa attiio on n option to preserve the shadow details for PDF jobs Yo...

Page 136: ...a particular halftone screen to the input 1 Click P Pr riin ntt Q Qu ua alliitty y on the left side of the screen 2 Go to H Ha allfftto on ne e s sc cr re ee en niin ng g and use the drop down list to display the values 3 Select one of the methods to convert the input 2 20 00 0 d do ott Text 200 dot Line art 200 dot Smooth shade 200 dot Image 200 dot Performs a halftone screening appropriate for o...

Page 137: ...en nc ce e r re ed du uc cttiio on n Text Interference reduction Line art Interference reduction Smooth shade Interference reduction Image Interference reduction Performs a halftone screening appropriate for hatching patterns and thin lines This setting reduces moire and breaking of specific angled thin lines 1 17 75 5 d do ott Text 175 dot Line art 175 dot Smooth shade 175 dot Image 175 dot Perfo...

Page 138: ...ese printers Pro C9100 Pro C9110 To enhance the quality for the edge or the thin lines 1 Click P Pr riin ntt Q Qu ua alliitty y on the left side of the screen 2 Go to E Ed dg ge e e en nh ha an nc ce em me en ntt and select O On n from the drop down list This enhances edges for text and line art by removing jagged lines 3 Go to T Th hiin nn niin ng g O Ou uttlliin ne e e en nh ha an nc ce em me en...

Page 139: ... Use the options displayed to customize the settings The settings are only available when a module is installed The module is available only on these printers Pro C7100SX Pro C7110SX Pro C7100X Pro C7110X Setting Clear Toner Properties When C Clle ea ar r is the S Sp pe ec ciia all e effffe ec ctt tto on ne er r installed 1 Click on the left side of the screen 2 Go to the P Pr ro oc ce es ss siin ...

Page 140: ...e r ra an ng ge e and enter the range of pages to print with special effect toner Setting White Toner Properties When W Wh hiitte e is the S Sp pe ec ciia all e effffe ec ctt tto on ne er r installed 1 Click on the left side of the screen 2 Go to the P Pr ro oc ce es ss siin ng g tta ar rg ge ett control and select one of these options F Fiifftth h s stta attiio on n p plla an ne e W Wh ho olle e ...

Page 141: ... enter the content in the text area or select a previously specified text from the drop down list 3 Go to the F Fo on ntt section and select the name color and size for the font displayed 4 To rotate the text 90 degrees enter the value 90 in the A An ng glle e field 5 To make the watermark opaque leave the transparency percentage to 0 in the T Tr ra an ns sp pa ar re en nc cy y field 6 To customiz...

Page 142: ... center or right at the top or bottom of the page enter the content in the corresponding fields If you want only the text in the header to be displayed leave the footer text fields empty 3 Go to the F Fo on ntt section and select the name color and size for the font displayed 4 To print the date on the page enter d as part of the text and go to D Da atte e ffo or rm ma att and select one of the op...

Page 143: ...font if it is not found 1 Click O Otth he er r on the left side of the screen 2 From the F Fo on ntt s su ub bs sttiittu uttiio on n drop down list select O On n Selecting Presets Specifies the preset used to print the job To select a set of printer configuration parameters 1 Click O Otth he er r on the left side of the screen 2 Go to P Pr re es se ett 3 Select one of the preset configuration from...

Page 144: ... or change all these values click that specific tool You can open one tool at a time You can click and drag to drop the tool on a particular page in the job This creates an exception The current tool values are associated with that page To select one of the exception pages 1 Open J Jo ob b P Pr ro op pe er rttiie es s E Ed diitto or r 2 Click on one tool you want to use 3 To close an open tool cli...

Page 145: ...de es sttiin na attiio on n p pa ag ge e and then enter the page number Adding Blank Covers to a Job You can add blank front and back covers to the job To add a blank front or a back cover 1 Click I In ns se er rtt 2 To insert a front cover click B Be effo or re e ffiir rs stt p pa ag ge e ffr ro on ntt c co ov ve er r 3 To insert a back cover click A Afftte er r lla as stt p pa ag ge e b ba ac ck...

Page 146: ...ash 4 To specify a value enter a single page such as 1 or a range of pages separated by a dash such as 1 10 When you enter a range of pages a single substitution is created for all the pages in the range To modify page 5 in a job enter 5 in the text field under P Pa ag ge es s If you want to modify the pages from 5 to 10 enter 5 10 in the text field Modifying 1 Sided and 2 Sided Job Covers The sub...

Page 147: ...ct S Stta ar rtt n ne ew w c ch ha ap ptte er r and then modify the color and the alignment properties Using the Subset Tool To access the S Su ub bs se ett tool 1 Open J Jo ob b P Pr ro op pe er rttiie es s E Ed diitto or r 2 Click S Su ub bs se ett on the right side of the screen Adding a Subset to the Job 1 Click S Su ub bs se ett on the right side of the screen 2 In the P Pa ag ge es s field e...

Page 148: ...click on one of the placement options available 4 Enter a tab number in the field below the P Po os siittiio on n icons You can enter multiple tabs either separated by commas or as a range of tabs 5 To specify the text you want to be displayed on the tabs go to T Te ex xtt s sttr riin ng g 6 Enter the text you need to display in the L Liin ne e 1 1 field 7 If you need additional information or you...

Page 149: ...de of the screen 2 Go to the A Ad dv va an nc ce ed d section and click the down arrow to expand it 3 Set the font name and select the color and size for it 4 Select where to start the text by setting the T Te ex xtt d diir re ec cttiio on n 5 Go to T Te ex xtt a alliig gn nm me en ntt to set the horizontal and vertical position of the text 6 Enter a value in the I In nd de en ntt field if you wan...

Page 150: ...5 148 ...

Page 151: ...it to the Jobs hub On the Operations hub or Jobs hub find thePrinter pod This pod does not appear by default on the Operations hub or the Jobs hub You can add it to either hub The gauges are below the M My y P Pr riin ntte er r button Checking Paper Levels There are several ways to check the level of paper in each input tray or interposer tray In the printer control bar click the open interactive ...

Page 152: ...les to or download files from TotalFlow Print Server You can upload and download files from any of these devices A USB storage device attached to TotalFlow Print Server A network drive mounted to TotalFlow Print Server Any storage device that you can access from the remote console You can also upload files from a DVD drive attached to TotalFlow Print Server You can also download files to e mail if...

Page 153: ... is running including the computer s hard drive USB storage devices DVDs and mapped network drives 1 Click F Fiille e U Up pllo oa ad d This button is available only at the remote console 2 Use the standard browser dialog to select and upload the file This dialog is different for each browser Downloading Files The Select File dialog opens when you need to download a file To download a file To down...

Page 154: ...ces DVDs and mapped network drives 1 Click D Do ow wn nllo oa ad d F Fiille e This button is available only at the remote console 2 Use the standard browser dialog to save the file This dialog is different for each browser To e mail the file 1 Select the e mail icon This icon is not available if TotalFlow Print Server does not have an e mail adapter or if remote e mail access is not enabled 2 Type...

Page 155: ...ypes and halftones with the current engine and toners Each paper is associated with a calibration Different papers can use the same calibration for example different size papers that are otherwise alike The same paper can use different calibrations under different conditions for example on days with high or low humidity or with different halftone screenings TotalFlow Print Server includes several ...

Page 156: ...ter 1 Press U Us se er r T To oo olls s 2 Press A Ad djju us sttm me en ntt S Se ettttiin ng gs s ffo or r O Op pe er ra atto or rs s 3 Press 0 02 2 M Ma ac ch hiin ne e I Im ma ag ge e Q Qu ua alliitty y 4 Press 0 02 20 07 7 A Ad djju us stt I Im ma ag ge e D De en ns siitty y B Be effo or re e A Au utto o C Co ollo or r C Ca alliib br ra attiio on n 5 Press 0 00 01 1 I Im ma ag ge e D De en ns s...

Page 157: ...tiio on n D Da atta a 2 Select the imported data file and click O OK K 13 Do either of these To see how the new calibration looks before you apply it 1 Click P Pr riin ntt V Ve er riiffiic ca attiio on n The verification page is printed with the same options that you selected for the configuration page 2 In the Paper Calibration dialog click A Ac cc ce ep ptt N Ne ew w C Ca alliib br ra attiio on ...

Page 158: ...he Input Trays pod the new calibration applies to the paper loaded in the selected input tray 3 Do one of these To create a new calibration click the add icon To copy an existing calibration select that calibration and click the copy icon 4 In the Print calibration master dialog click P Pr riin ntt C Ch ha ar ra ac ctte er riiz za attiio on n S Sa am mp plle e P Pa ag ge es s 5 Type a name for the...

Page 159: ...device To back up TotalFlow Print Server 1 If you are using the local console attach a USB storage device to TotalFlow Print Server 2 Log in as an administrator or service user 3 On the Maintenance hub find the Disk Operations pod 4 Click B Ba ac ck ku up p 5 Select the type of backup to perform N No or rm ma all includes configuration data and user created ICC profiles E Ex xtte en nd de ed d b b...

Page 160: ...lll deletes all existing objects then restores all objects from the backup file 6 Click O OK K 7 Select the backup file E Er ra as siin ng g t th he e H Ha ar rd d D Dr riiv ve e A Ad dm miin niis sttr ra atto or r and S Se er rv viic ce e users can erase all data from the hard drive by repeatedly overwriting it T Th hiis s o op pe er ra attiio on n m ma ak ke es s T To otta allF Fllo ow w P Pr ri...

Page 161: ...the Tools and Logs pod 2 Click C Clle ea an n S Sc cr re ee en n The screen turns black and shows a countdown timer for 30 seconds 3 Wipe the screen with a soft cloth 4 If you finish cleaning the screen before the timer expires press any key or mouse button to sensitize the screen again Cleaning the Control Panel ...

Page 162: ...6 160 ...

Page 163: ...u are resetting To log in after a password is reset you must leave the password field blank After you are logged in you can change your password To reset a password 1 On the Configuration hub click the Security tab and find the Users pod 2 Double click the user ID that needs to have its password reset 3 In Edit User click R Re es se ett P Pa as ss sw wo or rd d 4 After you click O OK K the system ...

Page 164: ...tiio on ns s A Au ut th ho or riiz ze ed d f fo or r P Pr re ed de ef fiin ne ed d R Ro olle es s Hub Tab Pod Task P Pr riin nt t s su ub bm miit tt te er r O Op pe er ra at to or r A Ad dm miin niis s t tr ra at to or r S Se er rv viic ce e Opera tions or Jobs Jobs pods Release jobs Yes Yes Yes Delete jobs Yes Yes Yes Hold jobs Yes Yes Yes Suspend jobs Yes Yes Yes Submit jobs Yes Yes Yes Yes Conf...

Page 165: ...ninstall extended features Yes Yes Enable extended features Yes Yes Disable extended features Yes Yes Color Manage ment Basic Any Yes Yes Tone Curves Manage tone curves Yes Yes Profiles Any Yes Yes Named Profiles Manage named profiles Yes Yes Edit named profiles Yes Yes Data Stream Basic Set processing options Yes Yes Yes Manage banner pages Yes Yes Filters Any Yes Yes Fonts Any Yes Yes Network Et...

Page 166: ... Yes Remote Authenti cation Any Yes Yes Restricted IP Addresses Any Yes Yes Roles Any Yes Yes Users Any Yes Yes Mainte nance Tools and Logs Manage logs Yes Yes View DFE hardware status Yes Yes List Test Print View available test masters Yes Yes Yes Print test masters Yes Yes Yes Shut down Restart Restart software Yes Yes Yes Restart computer Yes Yes Yes Shut down computer Yes Yes Yes Calibra tion ...

Page 167: ...r rv viic ce e user can create and delete additional roles The A Ad dm miin niis sttr ra atto or r cannot create roles based on the S Se er rv viic ce e role Adding a User When necessary new users can be added To add a user 1 On the Configuration hub click the Security tab and find the Users pod 2 If you want to copy an existing user select that user 3 Click the add icon 4 Enter a name for the use...

Page 168: ...ration hub click the Security tab and find the Roles pod 2 If you want to copy an existing role select that role 3 Click the add icon 4 Enter a name for the role and select the basic access level The basic access level should have at least the same access as the new role because when you edit the new role you cannot authorize tasks that the basic access level cannot do by default 5 Click O OK K 6 ...

Page 169: ...from http support microsoft com kb 2616471 to Windows 7 client systems This hotfix corrects an access problem Without it Windows 7 asks you for authentication but does not pass your credentials to the printer S Se et tt tiin ng g R Re em mo ot te e A Au ut th he en nt tiic ca at tiio on n The remote authentication settings let users log in to TotalFlow Print Server with LDAP or WINS user IDs To al...

Page 170: ...nter one or more ranges of IP addresses that you want to permit access to TotalFlow Print Server 5 Click O OK K O Ov ve er rw wr riit tiin ng g D De elle et te ed d D Da at ta a You can configure TotalFlow Print Server so that when a file is deleted the area is overwritten To enable or disable data overwrite 1 On the Configuration hub click the Security tab and find the Data Overwrite pod 2 Click ...

Page 171: ...7 169 2 Submit jobs to that virtual printer in the same way as to other virtual printers Setting up Secure Mode Printing ...

Page 172: ...7 170 ...

Page 173: ... a feature of InfoPrint Manager that lets you create form definitions and page definitions for use with your AFP print jobs You can use PPFA to associate CMRs with form definitions and page definitions for your color print jobs The form definitions and page definitions that you create using PPFA can be used in print jobs that are sent to InfoPrint Manager and RICOH ProcessDirector R RI IC CO OH H ...

Page 174: ...IP PD DS S P Pr ro of fiille es s When the IPDS extended feature is installed and enabled IPDS profiles manage the color settings of IPDS print jobs IPDS color management is more automated than International Color Consortium ICC color management This increased automation means IPDS profiles have fewer settings You can select add delete and save profiles for groups such as RGB or CMYK However you c...

Page 175: ...S profiles that you no longer need to accurately manage the color of IPDS print jobs To delete an IPDS profile 1 On the Configuration hub click the Color Management tab and find the IPDS pod 2 Click the IPDS pod to open the IPDS dialog 3 Select a type of color profile and click the edit icon next to it 4 Click the edit icon 5 In the dialog that opens click the delete icon 6 In Confirm Delete File ...

Page 176: ...g C Ca ap pt tu ur re ed d I IP PD DS S R Re es so ou ur rc ce es s When resources are downloaded with IPDS print jobs TotalFlow Print Server can save them for future use This is called capturing the resources You can delete captured resources if you do not need to use them again 1 On the Configuration hub click the Data Stream tab and find the IPDS pod 2 Click D De elle ette e C Ca ap pttu ur re ...

Page 177: ... 175 To cancel an IPDS print job 1 From the Operations or Jobs hub find the job in one of the Jobs pods 2 Select the job to be canceled 3 Click the delete icon 4 Click O OK K Canceling an IPDS Print Job ...

Page 178: ...8 176 ...

Page 179: ...nter to the Ready state follow any recovery directions that appear in the message window Some intervention messages have additional troubleshooting information that displays in a detailed message window The suggested actions are arranged based on the most likely condition that could cause the error and you should follow the suggestions in the order listed Use the mouse to select the colored text t...

Page 180: ... all the data needed to diagnose software problems when it encounters a program check or fatal error You can also save a trace whenever you notice anything unusual To save a trace 1 On the Maintenance hub find the Traces pod 2 Click S Sa av ve e T Tr ra ac ce es s 3 Type a description of the trace and then click O OK K 4 Do either of these Click the USB icon and insert a USB drive Click the networ...

Page 181: ...tion window select E E m ma aiill and click O OK K 4 Verify the information in the E mail window 5 Click O OK K to send the e mail Managing Archived Traces The last 660 MB of trace information is saved to an archive file system for use by your service representative In some cases your service representative might need you to access this archive To access the trace archive 1 On the Maintenance hub ...

Page 182: ...ishing options cannot be processed together with subset finishing If you have selected subset finishing for certain pages in the job any job finishing selections are removed The option of Z Z ffo olld d is not supported when B Biin nd diin ng g e ed dg ge e is set to B Bo otttto om m The S Stta ap plle e B Biin nd d option is not supported when B Biin nd diin ng g e ed dg ge e is set to B Bo otttt...

Page 183: ...ipped with TotalFlow Print Server Roman Fonts Albertus MT Albertus MT Italic Albertus MT Light Antique Olive Bold Antique Olive Compact Antique Olive Italic Antique Olive Roman Apple Chancery Arial Arial Bold Arial Bold Italic Arial Italic Bodoni Bold Bodoni Bold Italic Bodoni Italic Bodoni Poster Bodoni Poster Compressed Bodoni Roman Carta Chicago Clarendon Bold Clarendon Light Clarendon Roman Co...

Page 184: ...Italic Helvetica Helvetica Bold Helvetica Bold Oblique Helvetica Condensed Bold Helvetica Condensed Bold Oblique Helvetica Condensed Medium Helvetica Condensed Oblique Helvetica Narrow Helvetica Narrow Bold Helvetica Narrow Bold Oblique Helvetica Narrow Oblique Helvetica Oblique Hoefler Text Hoefler Text Black Hoefler Text Black Italic Hoefler Text Italic Hoefler Text Ornaments ITC Avant Garde Got...

Page 185: ...tter Gothic Bold Slanted Letter Gothic Slanted Marigold Monaco New Century Schoolbook Bold New Century Schoolbook Bold Italic New Century Schoolbook Italic New Century Schoolbook Roman New York Optima Bold Optima Bold Italic Optima Italic Optima Roman Oxford Palatino Bold Palatino Bold Italic Palatino Italic Palatino Roman Stempel Garamond Bold Stempel Garamond Bold Italic Stempel Garamond Italic ...

Page 186: ...ar Chinese Japanese and Korean Fonts M Mo or riis sa aw wa a ffo on ntts s O Op pttiio on na all Futo Go B101 Futo Min A101 Gothic Medium BBB Jun 101 Ryumin Light KL C Co om mp pa attiib blle e ffo on ntts s O Op pttiio on na all These Type 1 fonts can be used in PostScript and PDF jobs when Morisawa fonts are installed They are mapped to Morisawa fonts Compatible Morisawa Chu Gothic BBB Medium Mo...

Page 187: ...ith TotalFlow Print Server nor embedded in a PDF file T Ty yp pe e 1 1 Futo Go B101 Bold Proportional Roman Futo Min A101 Bold Proportional Roman Jun OneZeroOne Light Proportional Roman Midashi Gothic MB31 Proportional Roman Midashi Mincho MA31 Proportional Roman Mincho PC Hiragana Mincho PC Katakana C CI ID D B Ba as se ed d Adobe Heiti Standard OpenType Regular Adobe Ming Standard OpenType Light...

Page 188: ...12647 2 2004 Coated FOGRA39 ISO 12647 2 2004 Coated GRACoL 2006 ISO 12647 2 2004 Japan Color 2001 Coated Japan Color 2001 Uncoated Japan Color 2002 Newspaper Japan Color 2003 Web Coated Japan Color 2011 Coated Japan Web Coated Ad PSO Coated v2 300 Glossy laminate ECI PSO Coated v2 300 Matte laminate ECI PSO LWC Improved ECI PSO Uncoated ISO12647 ECI U S Web Coated SWOP v2 U S Web Uncoated v2 Uncoa...

Page 189: ...n Media Test Profile Plain Media Japan Test Profile Named Profiles DIC Color Guide HKS K Coated Paper v2 2 HKS N Uncoated Paper v2 2 Pantone Solid Coated 2013 Pantone Solid Uncoated 2013 TOYO COLOR FINDER Ver 2 0 These spot color dictionaries are embedded in named color profile formats DIC Color Guide HKS K Coated HKS N Uncoated Pantone Formula Guides Solid Coated Pantone Formula Guides Solid Unco...

Page 190: ...h Legal SEF 8 5 14 inch Foolscap SEF 8 5 13 inch Letter SEF 8 5 11 inch Letter LEF 11 8 5 inch Government LG SEF 8 25 14 inch Folio SEF 8 25 13 inch F GL SEF 8 13 inch Eng Quatro SEF 8 10 inch Executive SEF 7 25 10 5 inch Executive LEF 10 5 10 25 inch Half Letter SEF 5 5 8 5 inch Half Letter LEF 8 5 5 5 inch 8K SEF 267 390 mm 16K SEF 195 267 mm 16K LEF 267 195 mm 12x18 SEF 12 18 inch 11x15 SEF 11 ...

Page 191: ...mm Post card Standard SEF 4 2 5 5 inch Custom standard min 100 0 139 7 mm Custom standard max 330 2 487 7 mm Custom standard min 3 94 5 50 inch Custom standard max 13 00 19 20 inch Custom long min 210 0 139 7 mm Custom long max 330 2 700 0 mm Custom long min 8 27 5 50 inch Custom long max 13 00 49 60 inch Pro C7100 series Pro C7110 series Custom long max 13 00 27 55 inch Pro C9100 Pro C9110 Papers...

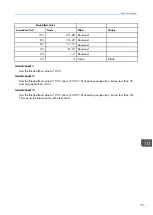
Page 192: ...re ed d 1 8 1 9 L Le etttte er rh he ea ad d 1 8 1 9 P Pr re ep pr riin ntte ed d 1 8 1 9 P Pr re ep pu un nc ch he ed d 1 8 1 9 T Tr ra an ns sp pa ar re en nc cy y Not set Not set T Ta ab b s stto oc ck k 1 8 1 9 T Tr ra an ns sllu uc ce en ntt Not set Not set L La ab be ells s 1 8 1 9 C Co oa atte ed d 2 8 1 9 E En nv ve ello op pe e 5 7 5 7 T Te ex xttu ur re ed d 1 8 1 9 M Ma ag gn ne ettiic ...

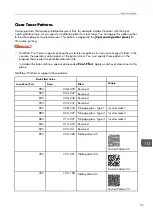
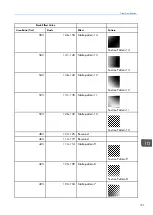
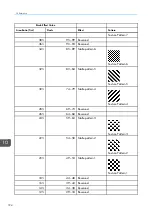
Page 193: ... the printer driver You must specify these patterns in the program that creates the printable document file In Adobe Illustrator define a special plane called R Riic co oh h E Effffe ec ctt Apply swatches of clear toner to this plane TotalFlow Print Server supports these patterns Ricoh Effect Value Area Ratio Tint Pixels Effect Pattern 98 248 255 Reserved 96 243 247 Reserved 94 238 242 Reserved 92...

Page 194: ...te pattern 21 Texture Pattern 21 70 177 181 Matte pattern 20 Texture Pattern 20 68 171 176 Matte pattern 19 Texture Pattern 19 66 166 170 Matte pattern 18 Texture Pattern 18 64 161 165 Matte pattern 17 Texture Pattern 17 62 156 160 Matte pattern 16 Texture Pattern 16 60 151 155 Matte pattern 15 Texture Pattern 15 10 Reference ...

Page 195: ...3 Texture Pattern 13 54 136 140 Matte pattern 12 Texture Pattern 12 52 131 135 Matte pattern 11 Texture Pattern 11 50 126 130 Matte pattern 10 Texture Pattern 10 48 120 125 Reserved 46 115 119 Reserved 44 110 114 Matte pattern 9 Texture Pattern 9 42 105 109 Matte pattern 8 Texture Pattern 8 40 100 104 Matte pattern 7 Clear Toner Patterns ...

Page 196: ...ure Pattern 6 32 80 84 Matte pattern 5 Texture Pattern 5 30 74 79 Matte pattern 4 Texture Pattern 4 28 69 73 Reserved 26 64 68 Reserved 24 59 63 Matte pattern 3 Texture Pattern 3 22 54 58 Matte pattern 2 Texture Pattern 2 20 49 53 Matte pattern 1 Texture Pattern 1 18 44 48 Reserved 16 39 43 Reserved 14 34 38 Reserved 12 29 33 Reserved 10 Reference ...

Page 197: ...k k 1 1 Sets the Ricoh effect value to 100 I In nv ve er rtte er r m ma as sk k 2 2 Sets the Ricoh effect value to 150 minus C M Y K at each pixel position but no less than 0 and no greater than 100 I In nv ve er rtte er r m ma as sk k 3 3 Sets the Ricoh effect value to 100 minus C M Y K at each pixel position but no less than 0 This covers the area evenly with clear toner Clear Toner Patterns ...

Page 198: ...10 196 ...

Page 199: ...o or r s sp pa ac ce e An RGB color space with a wider range of colors than sRGB It includes most of the colors that can be printed with CMYK inks or toners A Ad dv va an nc ce ed d F Fu un nc cttiio on n P Pr re es se en ntta attiio on n A AF FP P The presentation environment that includes the IPDS data stream architecture and various data object architectures A AF FP P See Advanced Function Pres...

Page 200: ...d from an ICC profile that ties a color space to or from the PCS c co ollo or r m ma an na ag ge em me en ntt The technology to calibrate the color of input devices such as scanners or digital cameras and presentation devices such as printers or offset presses Parts of this technology are implemented in the operating system the API or directly in the application c co ollo or r m ma an na ag ge em ...

Page 201: ...d d I IC CC C p pr ro of fiille e An ICC profiles that is embedded within a graphic document or image It lets users transparently move color data between different computers networks and even operating systems without having to worry if the necessary profiles are present on the destination systems e er rr ro or r d diifff fu us siio on n h ha allfftto on ne e A specific dithering method in which q...

Page 202: ... color spaces In most ICC profiles one color space is the PCS The other color space can be device independent or it can describe the color reproduction capabilities of a device such as a scanner a digital camera a monitor or a printer The intent of this format is to provide a cross platform device profile format Such device profiles can be used to translate color data created on one device into an...

Page 203: ...D DF F An XML based language used to create and store electronic job tickets J Jo ob b M Me es ss sa ag giin ng g F Fo or rm ma att J JM MF F The JDF component that is used to communicate between the JDF management information system and device controller L L L L In the CIELAB color space a value on the black white axis between 0 black and 100 white lliin ne e a ar rtt Graphics that consist of lin...

Page 204: ... is green n na am me ed d p pr ro offiille e An ICC profile for converting one or more named colors to or from the PCS Named color profiles are associated with specific devices They can be embedded in images P P p pa ag ge e d de es sc cr riip pttiio on n lla an ng gu ua ag ge e P PD DL L A markup language that describes the appearance of a printed page PostScript is an example of a PDL P PC CS S ...

Page 205: ...s that the printer cannot reproduce r re es so ou ur rc ce e An object that is referenced by a data stream or by another object to provide data or information Resource objects can be stored in libraries Examples of resources are fonts data objects and CMRs r re es so ou ur rc ce e a ac cc ce es ss s tta ab blle e R RA AT T The table in a library that maps resource names to file names and contains ...

Page 206: ...d to subtract a portion of the white light that is illuminating an object Subtractive colors are reflective on paper and printed media When used together with various degrees of coverage and variation they have the ability to create billions of other colors Contrast with additive primary colors T T tto on ne e c cu ur rv ve e A mathematical representation of the relationship between the input and ...

Page 207: ... are registered trademarks of Heidelberger Druckmaschinen AG in Germany the United States and or other countries HKS is a registered trademark of HKS Hostmann Steinberg K E Schmincke Warenzeichenverband e V Kodak and PRINERGY are registered trademarks of Eastman Kodak Company Linux is a registered trademark of Linus Torvalds in the United States other countries or both Microsoft Windows Windows NT...

Page 208: ...206 ...

Page 209: ...ing 154 Calibration pod 40 Center Crop Marks 126 Changing Color Settings 130 Changing Fifth Station Settings 137 Changing Finishing Options 126 Changing Header Footer 140 Changing Job Options 117 Changing Other Settings 141 Changing Paper Settings 123 Changing the Print Quality Settings 134 Changing the Trim Size Settings 124 Changing the Watermark Settings 139 Cleaning control panel 158 Clear ton...

Page 210: ...bs hub 28 Defaults and overrides 116 Defaults for job properties Printer 74 Virtual printer 73 DFE IPDS pod Color Management tab 172 Data Stream tab 172 Shutdown Restart pod 40 Disk Encryption pod 39 Disk Operations pod 40 E E E mail 79 Editors 30 Adding 67 Deleting 68 Resetting default 68 Eject output 128 Ejecting face down 128 Ejecting face up 128 Email Address 119 Enabling Font Substitution 141...

Page 211: ...drives to 102 Practice 55 Submitting font jobs 89 Submitting print jobs Mac OS 103 Windows 102 I I ICC profiles Adding 94 Deleting 94 Overview 93 Saving 94 Selecting 93 Shipped with TotalFlow Print Server 186 Icons List 19 Setting size 63 Image alignment 121 Image offset 122 Image viewer 108 Imposition 122 Inactive Jobs pod Column titles 27 Description 26 Inactive pod Operator control panel 51 Inf...

Page 212: ...19 Job History pod Description 26 Job Information pod 26 Job Preview pod 25 Job Priority 119 Job properties Changes applied 101 Changing 111 116 Defaults 73 74 Overrides 73 Precedence 101 Viewing 116 Job Properties 116 Job Settings view 46 Job status 20 Operator control panel 47 Job Store 119 Job view 44 Jobs Canceling IPDS 174 Capturing 178 Changing properties of 116 Changing tone curves 111 Dele...

Page 213: ...n Orientation 121 Operations hub 24 Customizing 68 Operator control panel 49 Operator control panel Overview 47 Operator Message pod Operator control panel 50 Operator Messages pod 30 Orientation 120 Other Settings 141 Output trays Description 82 Disabling 82 Enabling 82 IPDS default 174 Output Trays pod 33 Overrides for job properties Virtual printer 73 Overwriting deleted data 168 P P Page fit m...

Page 214: ...r 105 PRINERGY Product overview 13 Submitting jobs 105 Print quality Calibration Description 153 New calibration 155 Recalibrating 154 Optimizing 152 Test charts 153 Print Quality 134 Print Quality Settings 134 Printer control bar 20 Operator control panel 47 Printer driver Submitting jobs 104 Printer pod 29 Printer status 20 Operator control panel 47 Printer tab 32 Printers Defaults for job prope...

Page 215: ...ing the White Toner Properties 138 Setting the Color Profiles 132 Setting the Job Basic Options 118 Setting the Job Priority 119 Setting the Manual Paper options 124 Setting the Margins 125 Settings Changing 71 Viewing 71 Shortcut buttons Adding 66 Changing display 67 Deleting 66 Resetting defaults 67 Shortcut Buttons pod 30 Shutdown Restart pod 40 SNMP Adding communities 77 Adding trap hosts 76 A...

Page 216: ...rks 205 Trap hosts Adding 76 Deleting 77 Editing 76 Tray Information pod 50 Trim 128 Trim Size 124 Trim Size Settings 124 Typefaces 3 U U User interface Display language Current user 62 Local 62 Remote 62 Enabling remote 79 Icon size 63 Inline help 63 Logging in 61 Properties for Job dialog 41 Scroll controls 42 Shortcut buttons 66 Submitting jobs from 102 Text size 63 View controls 44 User Tools ...

Page 217: ...Editing 73 Overrides for job properties 73 Prinect 105 Virtual Printers pod 37 W W Watermark 139 Watermark Settings 139 White lines around characters 136 White Toner Properties 138 WINS user IDs 167 215 ...

Page 218: ...Copyright 2015 2015 Ricoh Company Ltd All rights reserved ...

Page 219: ......

Page 220: ...US EN GB AU EN EN 3 2015 M273 7502 TotalFlow Print Server Operating Instructions RICOH COMPANY LTD 8 13 1 Ginza Chuo ku Tokyo 104 8222 Japan http www ricoh com ...

Reviews: