background image

Specifications

- 177 -

Appendix

9

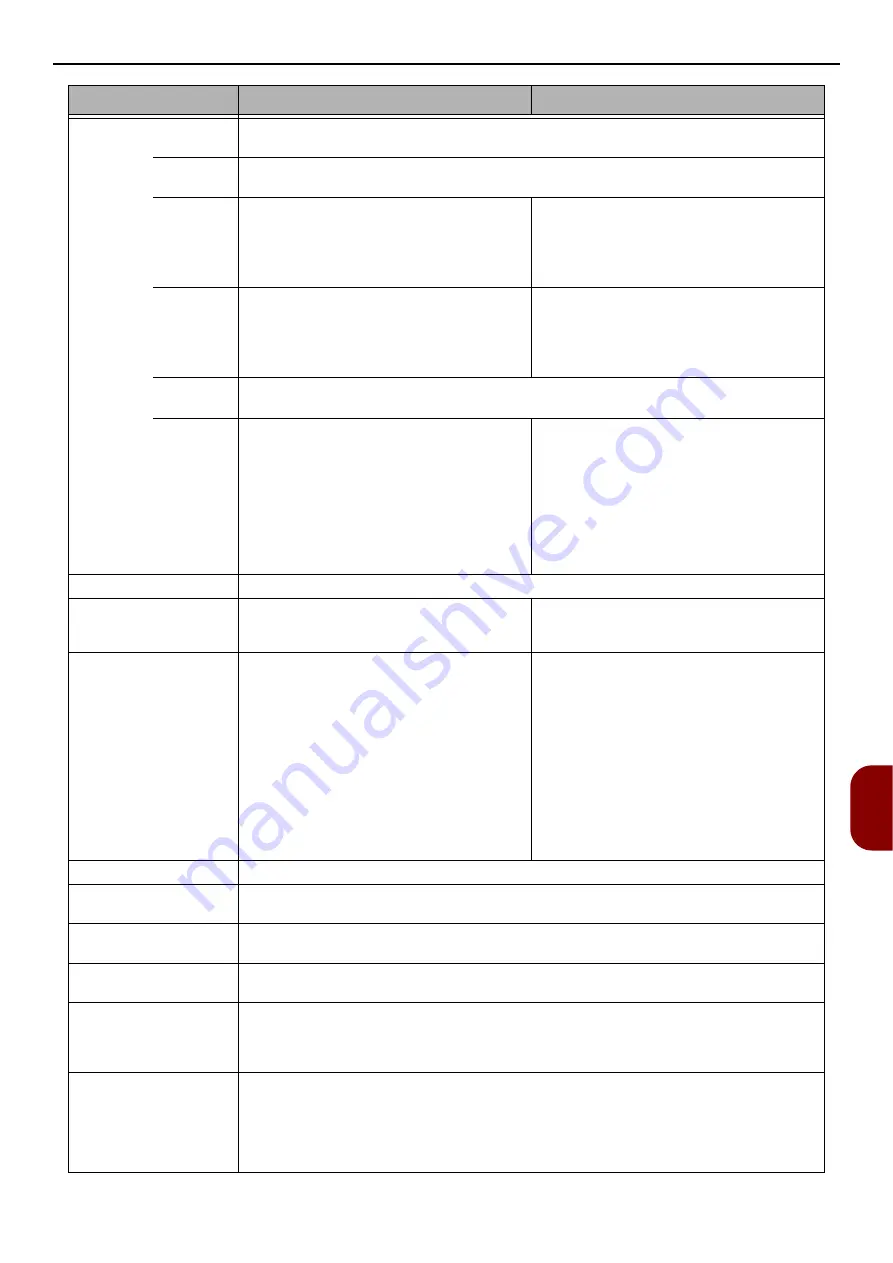
Paper size

Tray1

Legal 13/13.5/14, letter, executive, Statement, A4, A5, B5, A6, 16K (197 x 273 mm, 
195 x 270 mm, 184 x 260 mm), custom size

Tray2 
(Optional)

Legal 13/13.5/14, letter, executive, A4, A5, B5, 16K (197 x 273 mm, 195 x 270 mm, 
184 x 260 mm), custom size

MP Tray

-

Legal 13/13.5/14, letter, executive, 
Statement, A4, A5, B5, A6, C5, C6, DL, 
Com-9, Com-10, Monarch, 16K (197 x 
273 mm, 195 x 270 mm, 184 x 260 mm),  
custom size

Manual 
Feeder

Legal 13/13.5/14, letter, executive, 
Statement, A4, A5, B5, A6, C5, C6, DL, 
Com-9, Com-10, Monarch, 16K (197 x 
273 mm, 195 x 270mm, 184 x 260 mm), 
custom size

-

Duplex 
Printing

Legal 13/13.5/14, letter, executive, A4, B5, 16 K (197 x 273 mm, 195 x 270 mm, 
184 x 260 mm), custom size

Custom 
size

z

Tray 1

100 x 148-216 x 355.6 mm (3.94 x 5.83-
8.5 x 14 inches)

z

Tray 2 (optional)

148 x 210-216 x 355.6 mm (5.83 x 8.27-
8.5 x 14 inches)

z

Manual Feeder

86 x 140-216 x 1320.8 mm (3.4 x 5.5-
8.5 x 52 inches)

z

Tray 1

100 x 148-216 x 355.6 mm (3.94 x 5.83-8.5 
x 14 inches)

z

Tray 2 (optional)

148 x 210-216 x 355.6 mm (5.83 x 8.27-8.5 
x 14 inches)

z

MP tray

86 x 140-216 x 1320.8 mm (3.4 x 5.5-8.5 
x 52 inches)

Media type

Standard paper (60 g/m

2

 - 163 g/m

2

), envelopes, label.

Feeding method

Automatic feeding from the tray 1 and 

tray 2 (optional), Manual feeding from 

Manual Feeder

Automatic feeding from the tray 1, MP 

tray and tray 2 (optional), Automatic 

feeding from MP tray

Paper loading capacity

z

Tray 1

250 sheets of Standard paper /80 g/m

2

total 

thickness 25 mm or lower.

z

Manual Feeder 

1 sheet.

z

Tray 2 (optional)

530 sheets of Standard paper /80 g/m

2

total 

thickness 53 mm or lower.

z

Tray 1

250 sheets of Standard paper /80 g/m

2

total 

thickness 25mm or lower.

z

MP tray

100 sheets of Standard paper /80 g/m

2


and total thickness 10mm or lower, 10 

envelopes/ weight of 

85 g/m

2

z

Tray 2 (optional)

530 sheets of Standard paper /80 g/m

2

total 

thickness 53 mm or lower

Output method

Face down

Paper output capacity

z

Face down

150 sheets (less than 80 g/m

2

Print guaranteed area 

6.35 mm or more from the paper edge (not applicable to special media such as enve-

lopes)

Print precision

Print beginning

:

±

 2 mm, paper skew:

±

 1 mm/100 mm, 

image expansion:

±

 1 mm/100 mm (80 g/m

2

)

Warm-up time 

z

From power on

Less than 60 seconds

z

From power save mode

Less than 25 seconds

Usage Environment 
Conditions

z

When in operation

10~32°C / Relative Humidity of 20~80% (maximum wet bulb temperature of 25°C, 

maximum dry bulb temperature of 2°C) 

z

When not in operation

0~43°C / Relative Humidity of 10~90% (maximum wet bulb temperature of 26.8°C, 

maximum dry bulb temperature of 2°C) 

e-STUDIO332S

e-STUDIO403S

Summary of Contents for e-Studio332s

Page 1: ...MULTIFUNCTIONAL DIGITAL SYSTEMS User s Manual Basic ...

Page 2: ... 2012 TOSHIBA TEC CORPORATION All rights reserved Under the copyright laws this manual cannot be reproduced in any form without prior written permission of TTEC ...

Page 3: ...mes and brand names are registered trademarks or trademarks of their proprietors This product complies with the requirements of the Council Directives 2004 108 EC EMC and 2006 95 EC LVD and 1999 5 EC R TTE as amended where applicable on the approximation of the laws of the member states relating to electromagnetic compatibility low voltage and radio telecommunications terminal equipment The follow...

Page 4: ...ON ENERGY STAR PROGRAM Toshiba Tec Corporation as a member of the ENERGY STAR Program attaches the ENERGY STAR logo to all products which meet the ENERGY STAR Program requirements The ENERGY STAR Program aims at the promotion of the development and wider usage of office equipment including energy efficient computers in order to address environmental issues such as global warming Manufacturers that...

Page 5: ...le a program of the Rechargeable Battery Recycling Corporation For more information and for drop off locations visit www rbrc org or call 1 800 822 8837 Notice regarding CR coin cell batteries applicable to California U S A only Perchlorate Material special handling may apply See http www dtsc ca gov hazardouswaste perchlorate ...

Page 6: ... that this product may not be disposed as unsorted municipal waste and has to be collected separately By ensuring this product is disposed of correctly you will help prevent potential negative consequences for the environment and human health which could otherwise be caused by inappropriate waste handling of this product For more detailed information about the take back and recycling of this produ...

Page 7: ...rected in User s Manual Doing so may cause electric shock and or fire leading to personal injury Unplug the power cord and contact with a customer service center if the machine is dropped or the cover is damaged Failure to do so may cause electric shock and or fire leading to personal injury Unplug the power cord periodically to clean plug blades and root section between the blades If the power pl...

Page 8: ...ARE IS PROVIDED BY THE INSTITUTE AND CONTRIBUTORS AS IS AND ANY EXPRESS OR IMPLIED WARRANTIES INCLUDING BUT NOT LIMITED TO THE IMPLIED WARRANTIES OF MERCHANTABILITY AND FITNESS FOR A PARTICULAR PURPOSE ARE DISCLAIMED IN NO EVENT SHALL THE INSTITUTE OR CONTRIBUTORS BE LIABLE FOR ANY DIRECT INDIRECT INCIDENTAL SPECIAL EXEMPLARY OR CONSEQUENTIAL DAMAGES INCLUDING BUT NOT LIMITED TO PROCUREMENT OF SUB...

Page 9: ...s or accidents beyond the reasonable control of TOSHIBA TEC CORPORATION including without limitation acts of God war riot civil commotion malicious or deliberate damage fire flood or storm natural calamity earthquakes abnormal voltage or other disasters c additions modifications disassembly transportation or repairs by any person other than service technicians authorized by TOSHIBA TEC CORPORATION...

Page 10: ...onents 19 Installing Your Machine 21 Unpacking Your Machine 21 Turning On and Off Your Machine 23 Installing Options 26 Installing a Second Tray Unit 26 Operator Panel 29 Default Screen 30 Entering Text Using the Operator Panel 30 Loading Paper and Documents 33 Paper 33 Supported Paper Types 33 Paper Recommendations 35 Storing Paper 35 Loading Paper 36 Paper Output 41 Documents 41 Document Require...

Page 11: ...e 76 2 Copying 77 Basic Operation 77 Starting a Copy Job 77 Canceling a Copy Job in Progress 77 Configuring Copy Settings 78 Changing the Scan Size Scan Size 78 Changing the Paper Tray Paper Feed 78 Changing Image Orientation of Document Direction 79 Making Enlarged or Reduced Copies Zoom 79 Enabling Continuous Scan Mode Continuous Scan 80 Making Duplex Copies Duplex Copy 80 Adjusting Copy Density...

Page 12: ...roup Number 92 Registering and Editing 92 Deleting 92 One Touch Key Pad 93 Register all telephone numbers 93 Registering the Machine 93 Basic Procedure for Scan To Fax Server 94 Transmitting Data to Fax Server 94 Specifying the destination 94 Deleting the specified destination 95 Stopping the fax transmission 95 Basic Procedure for Internet Faxing 96 Sending an Internet Fax 96 Specifying a Destina...

Page 13: ...a Printer 116 Printing from a Computer 116 Printing 116 Canceling a Print Job 118 Printing From USB Memory 119 Starting a Print Job 119 Configuring Print Settings 120 Canceling a Print Job 121 6 User Authentication and Access Control 122 About User Authentication and Access Control 122 Authentication by PIN 123 Registering a PIN 123 Enabling Access Control 123 Operation When PIN Authentication Is ...

Page 14: ...ues 155 Scanning Issues 156 Image Quality Issues 157 Feeding Issues 159 Machine Issues 161 When the Power Goes Out 163 8 Maintenance 164 Replacing Consumable Items 164 Replacing Toner Cartridges 165 Replacing the Image Drum 166 Cleaning Your Machine 168 Cleaning the Surface of the Machine 168 Cleaning the Document Glass 168 Cleaning Document Feeding Rollers in the ADF 168 Cleaning Paper Feed Rolle...

Page 15: ...se ensure you read these Memo z Indicates important information on operations Please ensure you read these Reference z Indicates where to look when you want to know more detailed or related information Symbols in this document The following symbols are used in this manual WARNING z Indicates additional information which if ignored or not followed may result in personal injury or death CAUTION z In...

Page 16: ...ft Windows 7 operating system Windows 7 z Microsoft Windows Vista operating system Windows Vista z Microsoft Windows Server 2008 operating system Windows Server 2008 z Microsoft Windows XP operating system Windows XP z Microsoft Windows Server 2003 operating system Windows Server 2003 z Generic name for Windows 7 Windows Vista Windows Server 2008 Windows XP and Windows Server 2003 Windows z Web Se...

Page 17: ...arter toner cartridges are installed in the image drum which is installed in the machine before shipment z Software DVD ROM z AC cord z Telephone connector cover The Telephone Connector Cover is installed on the Telephone Connector of the main unit z Telephone cable In some countries the cables are not supplied Note z An Ethernet cable and USB cable are not supplied with your machine Procure them ...

Page 18: ...tc z Do not install near inflammable solutions such as alcohol and thinner z Do not install in places easily accessible to small child z Do not install in an unstable place the shaky stand leaning place etc z Do not install in a place exposed to high humidity dust or direct sunlight z Do not install in an environment exposed to briny air or corrosive gas z Do not install in a place with much vibra...

Page 19: ...de view z Side view tray 2 installed Names of Components 20cm 193cm 20cm 50cm 100cm 83cm 50cm 96cm 50cm 110cm No Name 1 Auto document feeder ADF cover 2 Document tray 3 Scanner unit 4 Document glass cover 5 Operator panel 6 USB port 7 Air vents 8 Tray 1 9 Manual Feeder for e STUDIO332S only Multipurpose MP tray for e STUDIO403S only 10 Top cover open button 11 Top cover No Name 12 Document glass 1...

Page 20: ...16 LED head 17 Power Switch No Name 18 Faceup stacker 19 AC power socket 20 Air vents 21 LINE connection for e STUDIO403S only 22 TEL connection for e STUDIO403S only 16 13 15 17 14 LINE TEL 22 21 18 19 20 No Name 23 USB interface connection 24 SD memory card slot for e STUDIO403S only 25 Network interface connection 25 23 24 ...

Page 21: ...d at the time of shipping the machine Please keep it as you will need it should you wish to transport the machine at some point in the future 1 Remove your machine from the box and remove cushioning materials and the plastic bag from your machine The accessories are packed within the cushioning material 1 2 Lift your machine and place it where it is to be installed Note z Do not open the scanner u...

Page 22: ...r close the scanner 10 Open the scanner unit 11 Remove the protection tapes and remove desiccants and films 12 Press the top cover open button 8 and open the top cover 13 Lift the image drum from printer Note z Do not expose image drum to light for more than 5 minutes z Do not touch shiny green surface at bottom of image drum 14 Remove the silica gel pack before installation 6 8 ...

Page 23: ...onnect with the ground of a water pipe a gas pipe and a telephone wire or lightning rod without fail z Make sure to connect with the ground terminal before connecting the power cord to the power supply plug z Be sure to perform extraction and insertion of the power cord with a power supply plug z Insert the power supply plug into the wall socket securely z Do not touch the power cord or machine if...

Page 24: ...ss Please wait The machine turns off automatically appears in the operator panel and power switch indicator blinks every 1 second Then the machine turns off automatically and power switch indicator goes out Note z Turn the power off and when turning the power back on again push the power switch after waiting for a few seconds When the machine is not used for long time When the machine is not used ...

Page 25: ...automatically returns to the standby mode Auto Power Off When your machine is not used for a certain period of time the power turns off automatically Once the machine turns off you need to turn on to use it The machine has three settings to select the machine s behavior on Auto Power Off Enable Auto Config Disable Enable When your machine is not used for a certain period of time it turns off the p...

Page 26: ...all an optional second tray unit tray 2 when you want to increase the paper capacity of your machine After installation you need to configure the printer driver settings Reference z For the specification of the second tray unit Tray2 refer to Loading Paper P 36 Installation 1 Hold down the power switch for about a second to turn off the power and then unplug the AC cable and the Ethernet or USB ca...

Page 27: ...the TOSHIBA e STUDIO403S icon and select Printer properties If you have installed multiple printer drivers select Printer properties TOSHIBA e STUDIO403S PCL or TOSHIBA e STUDIO403S PCL XPS 3 Select the Device Options tab 4 For the network connection select Get Printer Settings For the USB connection check Lower Cassette 5 Click OK For Windows PS Driver 1 Click Start Devices and Printers 2 Right c...

Page 28: ...wing procedure uses Mac OS X 10 4 11 as an example Depending on an OS the description may be different 1 From Go select Utilities and then double click Printer Setup Utility 2 Select the name of your machine and then click Show Info 3 Select Installable Options 4 If the optional tray is already mounted click Second Tray and then click Apply Changes 5 Close Printer Info ...

Page 29: ...ed 7 SETTING key Displays the equipment setting menu screen 8 REDIAL HELP key for e STUDIO403S HELP key for e STUDIO332S Displays the help screen When closing press the REDIAL HELP key Return key or RESET LOG OUT key On certain screens dial the phone number which is dialed the last time 9 RESET LOG OUT key z In the top screen of each function logs out z In the start screen of each function returns...

Page 30: ... to the next screen z Shifts the highlighted selection to the right while an item is selected or characters are entered 15 OK key z Confirms the highlighted item z Selects an item to be checked 16 BACK key Returns to the previous screen 17 CLEAR key Executes the following action z Minimizes a setting value z Enters zero for a setting value z Clears what is entered z Cancels a selected item 18 POWE...

Page 31: ...the numbers labeled on each key as well as the other characters by pressing the keys repeatedly 1 Press a key on the ten key pad until the character you want appears in the text file 2 Repeat step 1 until all the characters required are entered If you continuously press the same key you can press the button to move the cursor 3 Check that Enter is selected and press to complete the entry process M...

Page 32: ...screen keyboard is displayed z CTRL mode Pressing the CTRL key enables you to enter symbols The following screen keyboard is displayed Note z When the QWERTY keyboard cover is open the numerical keypad can only be used for entering numbers Deleting the Entered Text You can delete text in the text field in the following ways Pressing the CLEAR key Press the CLEAR key to delete the last character en...

Page 33: ... 100 to 216 mm 3 94 to 8 5 inches wide and 148 to 355 6 mm 5 83 to 14 inches long 2 Tray 2 can contain paper 148 to 216 mm 5 83 to 8 5 inches wide and 210 to 355 6 mm 8 27 to 14 inches long 3 The MP Tray e STUDIO403S or Manual Feeder e STUDIO332S can contain paper 86 to 216 mm 3 4 to 8 5 inches wide and 140 to 1320 8 mm 5 5 to 52 inches long Paper Type Paper Size mm inch Paper Weight Standard pape...

Page 34: ...opes should be folded Com 9 98 4 x 225 4 3 875 x 8 875 Com 10 104 8 x 241 3 4 125 x 9 5 DL 110 x 220 4 33 x 8 66 C5 162 x 229 6 4 x 9 Index card Index card 76 2 x 127 0 3 x 5 Label A4 210 x 297 0 1 0 2 mm Letter 215 9 x 279 4 8 5 x 11 Partly printing paper Subject to the standard paper 64 to 163 g m2 18 to 43lb Color paper Subject to the standard paper 64 to 163 g m2 18 to 43lb ...

Page 35: ...cted to hot roll pressure fusing used in this type of printer Window envelopes are not suitable Labels Labels should also be of the type recommended for use in copiers and laser printers in which the base carrier page is entirely covered by labels Other types of label stock may damage the printer due to the labels peeling off during the printing process Storing Paper Store paper under the followin...

Page 36: ...184 x 260 mm z 16K 195 x 270 mm z 16K 197 x 273 mm z Custom 250 sheets when paper weight is 80 g m2 z Light 60 to 63 g m2 16 to 17 lb z Medium Light 64 to 74 g m2 18 to 19 lb z Medium 75 to 87 g m2 20 to 23 lb z Medium Heavy 88 to 104 g m2 24 to 27 lb z Heavy 105 to 122 g m2 28 to 32 lb Tray2 optional z A4 z A5 z B5 z Letter z Legal 13 z Legal 13 5 z Legal 14 z Executive z 16K 184 x 260 mm z 16K 1...

Page 37: ... Letter z Legal 13 z Legal 13 5 z Legal 14 z Executive z Statement z 16K 184 x 260 mm z 16K 195 x 270 mm z 16K 197 x 273 mm z Custom z Com 9 Envelope z Com 10 Envelope z Monarch Envelope z DL Envelope z C5 Envelope z C6 Envelope z Envelope 4 A4 z 100 sheets when paper weight is 80 g m2 z 10 envelopes z Light 60 to 63 g m2 16 to 17 lb z Medium Light 64 to 74 g m2 18 to 19 lb z Medium 75 to 87 g m2 ...

Page 38: ...bove the fill line 3 6 Push the paper tray until it stops Register the loaded paper on your machine Proceed to Configuring the Tray Settings P 40 Loading Paper on the MP Tray e STUDIO403S The following procedure explains how to load paper in the MP tray 1 Open the MP tray 2 Pull out the paper support 3 Pull out the sub support 4 Adjust the manual feeding paper guide to the width of paper to be loa...

Page 39: ...nvelopes in the MP tray load them face up with the orientation as stated below Your envelopes Monarch Com 9 Com 10 DL and C5 are loaded with the flap folded and the flap should come to the right side to the feeding direction Loading Paper in the Manual Feeder e STUDIO332S The following procedure explains how to load paper in the Manual Feeder 1 Open the Manual Feeder 2 Adjust the manual feeding pa...

Page 40: ...istering Custom Sizes To load custom size paper you need to register the width and length of the paper before printing The range of the sizes you can set differs according to the paper tray Note z For tray 1 and tray 2 you can configure the Custom setting only when Paper Size is set to Custom z The available size range for duplex printing is the same as that for tray 2 1 Press the SETTING key on t...

Page 41: ...r side of the machine and open it toward you 2 Unfold the faceup stacker Documents You can use the auto document feeder ADF or the document glass to load documents for copying scanning or faxing Document Requirements You cannot load the following documents on the ADF Use the document glass instead z Torn or perforated paper z Curled or rolled paper z Wet paper z Static paper z Carbon backed paper ...

Page 42: ...the ADF If your documents are portrait load them with the top edge of the documents in first If your documents are landscape load them with the left edge of the documents in first 2 Adjust the document guides to the width of your documents Loading Documents on the Docu ment Glass 1 Lift and open the document glass cover 2 Place a document face down on the document glass If your document is portrai...

Page 43: ...the document glass cover gently Reference z Set Document Direction according to the direction of your document to get the output you want The factory default is Portrait Refer to Changing Image Orientation of Document Direction P 79 Note z When you take a copy with the document glass do not apply an excessive load to the document glass ...

Page 44: ...e to select Fax Setup and then press 6 Press the to select Fax Setting and then press 7 Press the to select Country Code and then press 8 Press the or to select your country name and then press If your country name is not displayed select the following value If your country is Czech Republic or Slovakia select Czech Slovakia If your country is Canada select U S A If the region of your country is L...

Page 45: ...ne end of the Telephone cable into the LINE connection of your machine and the other end into a Public Line Analog Note z Connect telephone cable to LINE connection without fail Never connect it to TEL connection Connecting to the Public Line Connecting for Fax and Telephone 1 Plug one end of the Telephone cable into the LINE connection of your machine and the other end into a Public Line Analog 2...

Page 46: ...lephone Plug the Telephone cable connected to the IP telephone into the LINE connection of your machine Remove the telephone connector cover Plug the external telephone s cable into the TEL connection of your machine Memo z Check the dial tone detection if it is unable to dial and refer to Admin Setup User install P 103 Advanced z If you cannot send or receive faxes well set Super G3 to off Refer ...

Page 47: ...ected to a control device including PBX etc into the LINE connection of your machine Memo z Set PBX Line to ON Refer to PBX Connecting P 49 Settings for each dialing type The factory default MF Tone DP Pulse is set to Tone z For push button phones if you hear a Beep boop beep sound leave MF Tone DP Pulse as Tone z For push button type phones if you do not hear a Beep boop beep sound or if you are ...

Page 48: ... the 9 Press the or to select the current time and then press To move to the next box press the 10 When the setup menu screen is displayed press to complete the setup Specifying Sender Information Specify the fax number and sender name for your machine 1 Press the SETTING key on the operator panel 2 Press the to select Easy Setup and press 3 Enter the administrator password The factory default pas...

Page 49: ...ode The optimal reception mode differs depending on the environment for your machine Refer to the following description z Fax Ready Mode This mode is recommended when you use the machine as a fax machine z Tel Fax Ready Mode This mode is recommended when you connect an external phone to the machine z Ans Fax Ready Mode This mode is recommended when you connect an external answering machine to the ...

Page 50: ...n Types of Drivers The types of the drivers that can be installed are as follows z For Windows z For Mac OS X Note z Depending on a version of a printer driver Windows or Mac OS X the description may be different Type Description PCL The PCL printer driver is suitable for printing of business documents PS The PS printer driver is suitable for printing of documents including PostScript fonts and EP...

Page 51: ...service provider specifies a unique IP address for the computer and your machine Set the IP addresses manually Note z You need to complete the network setting of the computer before this procedure z To complete this procedure you must be logged in as an administrator z When setting an IP address manually ask the network administrator or your Internet service provider which IP address to use If the...

Page 52: ... If it is not necessary to connect the DNS server or WINS server to the network press until the pop up message showing the setting completion is displayed 12 When the setup menu screen is displayed press to complete the setup Next install the printer and fax driver into the computer Note z To complete this procedure you must be logged in as an administrator 1 Ensure that your machine and the compu...

Page 53: ... is not detected the Review your installation settings screen is displayed Proceed to step 10 10 click Restart search to restart the device search After the machine is displayed select the machine and click Next Memo z If the machine is not displayed by clicking Restart search select Printer name IP Address and enter the IP address assigned to your machine and then click Next 11 If the Windows Sec...

Page 54: ...mputer are turned on and connected Reference z Connecting an Ethernet Cable P 51 2 Press the SETTING key on the operator panel 3 Press the to select Admin Setup and press 4 Enter the administrator password The factory default password is aaaaaa 5 Select Complete and press 6 Press the to select Network Menu and press 7 Press the to select Network Setup and press 8 Press the to select EtherTalk and ...

Page 55: ...ne Then install the driver in the computer Memo z The following procedure uses Mac OS X 10 4 11 as an example Depending on an OS the description may be different First enable EtherTalk in the machine 1 Ensure that your machine and the computer are turned on and connected Reference z Connecting an Ethernet Cable P 51 2 Press the SETTING key on the operator panel 3 Press the to select Admin Setup an...

Page 56: ... installation 10 From the Go menu select Utilities and then double click Printer Setup Utility Note z If Printer Setup Utility is already running close it and open it again 11 Click Add If the You have no printers available dialog box appears click Add 12 Select the name of your machine whose Connection is AppleTalk and then check that TOSHIBA e STUDIO403S PS is displayed in Print Using 13 Click A...

Page 57: ...llow the instructions displayed on the screen to complete the installation 6 From the Apple menu select System Preferences 7 Click Print Scan For Mac OS X 10 5 and 10 6 Print Fax 8 Click 9 Click Default 10 Select the name of your machine whose Kind is Bonjour and then check that TOSHIBA e STUDIO403S PS or TOSHIBA e STUDIO403S PCL is displayed in Print Using The name of your machine is displayed wi...

Page 58: ...k that Built in Ethernet is selected 5 Close Network 6 Insert Software DVD ROM into the computer 7 Double click the TOSHIBA icon on the desktop 8 Double click Driver folder PS or PCL folder Installer for Mac OSX 9 Enter the administrator password and then click OK Follow the instructions displayed on the screen to complete the installation 10 From the Go menu select Utilities and then double click...

Page 59: ...er via USB Connecting a USB Cable 1 Prepare a USB cable A USB cable is not supplied with your machine Prepare an USB 2 0 cable separately Memo z Use a USB 2 0 Hi Speed cable for a USB 2 0 Hi Speed connection 2 Hold down the power switch for about a second to turn on the power and the computer Reference z Turning Off Your Machine P 24 3 Plug one end of the USB cable into the USB interface connector...

Page 60: ...he checkbox of the printer driver fax driver or both you want to install and click the Install bunch button Memo z By factory default PCL driver Scanner driver and ActKey are selected z All of drivers and software packages are installed by the collective installation if their boxes are checked If you wish to install drivers and software separately click the Install button at the right to them and ...

Page 61: ...nd connected Reference z Connecting a USB Cable P 59 2 Insert Software DVD ROM into the computer 3 Double click the TOSHIBA icon on the desktop 4 Double click Driver folder PS or PCL folder Installer for MacOSX 5 Enter the administrator password and then click OK Follow the instructions displayed on the screen to complete the installation 6 From the Apple menu select System Preferences 7 Click Pri...

Page 62: ...Driver folder PS or PCL folder Installer for Mac OS X 5 Enter the administrator password and then click OK Follow the instructions displayed on the screen to complete the installation 6 From the Go menu select Utilities and then double click Printer Setup Utility Note z If Printer Setup Utility is already running close it and open it again 7 Click Add If the You have no printers available dialog b...

Page 63: ... characters B 2 SMTP server address The address of the server used when sending e mails smtp test com B 3 POP3 server address The address of the server used when receiving e mails pop3 test com B 4 Authentication method Sending mail server authentication SMTP B 5 SMTP user ID Sending mail server account name TOSHIBAESTUDIO403S B 6 SMTP password Sending mail server password toshibaestudio403s B 7 P...

Page 64: ...page into A 3 Note z It is necessary that the gateway address be configured beforehand Also if using an Internet service provider it is necessary that the DNS server be configured If it has not been configured 0 0 0 0 follow the procedure on 54 page to configure it Setting Up Scan To E mail and Internet Fax The Scan To E mail Scan To Fax Server and Internet Fax functions enable you to send scanned...

Page 65: ...ess of the machine and enter an e mail address to be used by your machine in B 1 of the Setup Information Form z If the e mail address for your machine is specified by the network administrator enter the e mail address in B 1 z If you are using an Internet service provider obtain an e mail address for your machine from the provider and then enter the e mail address in B 1 z If the e mail address f...

Page 66: ...d then press 22 Press the and then enter the information in B 8 23 Select Enter and then press 24 When the setup menu screen is displayed press The setup for Scan To E mail Scan To Fax Server and Internet Fax is complete Reference z For details on how to use Scan To E mail refer to Scan to E mail P 105 z For details on how to use Scan To Fax Server refer to Basic Procedure for Scan To Fax Server P...

Page 67: ...S in Detailed Settings 4 Close Sharing Determining the Names of the Items Required for Scan To Network PC Determine the names of the following items and fill in C 2 to C 6 on the Setup Information Form z User name to log into the destination computer C 2 Note z If the username is managed on the domain enter Username Domainname in C 2 To check the domain name click on Change within the Computer Nam...

Page 68: ...ed to create a folder in the local drive C drive or D drive not on the desktop My Documents or network drive 11 Right click the folder created in step 10 and select Properties 12 Select the Sharing tab and then click Share 13 Select the user account created in step 5 from the drop down box and then click Add 14 Check that the user added in step 13 is displayed and then click Share After the Networ...

Page 69: ... 4 Enter the value of C 2 in the text box and click Next 5 Select Limited and click Create Account 6 Click the icon of the user account created in step 5 7 Select Create a password 8 Enter the value of C 3 in Type a new password and Type the new password again to confirm and then click Create Password 9 Close the operator panel 10 Create a new folder on the computer with the name entered in C 5 Me...

Page 70: ...3 Select Just enable file sharing in Windows Firewall and then click OK 14 Select the Share this folder on the network and Allow network users to change my files check box and then click OK Proceed to Creating a Profile for Scan To Network PC P 74 15 Click Add 16 Enter the value in C 2 in the entry field and click OK 17 Select the Allow check box for Full Control and then click OK Proceed to Creat...

Page 71: ...t change password and Password never expires 5 Click Close 6 Double click User and check that the user created in step 4 is displayed 7 Close the window 8 Create a new folder on the computer with the name entered in C 5 Memo z It is recommended to create a folder in the local drive C drive or D drive not on the desktop My Documents or network drive 9 Right click the folder created in step 8 and th...

Page 72: ...value in C 3 in both Password and Verify 8 Click Create User for Mac OS X 10 5 and 10 6 Create Account Memo z After the dialog box for auto login appears disable the auto login 9 Check that an account is added to Other Users for Mac OS X 10 5 and 10 6 Other Accounts with the name of C 2 and close Users Groups for Mac OS X 10 5 and 10 6 Accounts 10 Create a new folder on the computer with the name ...

Page 73: ... Password and click OK 23 Click Done 24 Close Sharing Proceed to Creating a Profile for Scan To Network PC P 74 For Mac OS X 10 4 0 to 10 4 11 Memo z The following procedure uses Mac OS X 10 4 11 as an example Depending on an OS the description may be different 1 From the Apple menu select System Preferences 2 Click Accounts 3 Click Click the lock to make changes at the bottom left of the screen a...

Page 74: ...u perform Scan To Network PC with the computer 1 Press the the SETTING key on the operator panel 2 Press the to select Profile and then press 3 Press the to select the profile number you want to register and then press 4 Press the to select Register and then press 5 Press to select Profile Name and then press the 6 Enter the information in C 4 7 Select Enter and then press 8 Press the to select Ta...

Page 75: ...ings The setup for Scan To Network PC is complete Reference z For details how to use Scan To Network PC refer to Scan to Network PC P 107 Managing Profiles To perform the Scan To Network PC Auto Deliver or Transmission Data Save function for e STUDIO403S Only a profile for each destination must be created You can register up to 50 profiles Reference z Refer to Creating a Profile for Scan To Networ...

Page 76: ... as the settings and status of your machine Printing Procedure 1 Press the SETTING key on the operator panel 2 Press the to select Reports and press 3 Press the to select Configuration and press 4 On the confirmation message press the or to select Yes and press Reference z You can also print reports and lists for each function Refer to the User s Manual Advanced OK OK OK ...

Page 77: ... the ten key pad You can enter up 1 to 99 sets If you have entered an incorrect value press the CLEAR key and then enter the correct value 5 Press to start copying Reference z For details on how to configure each copy setting refer to Configuring Copy Settings P 78 z For details on how to load your documents in the ADF or on the document glass refer to Loading Documents P 42 Canceling a Copy Job i...

Page 78: ...tings menu 2 Press the to select Paper Feed and then press 3 Press the to select a tray and then press 4 Press the until the start screen is displayed Memo z Tray 2 is displayed only when the optional second tray unit is installed z When set to Auto the MP tray is not selected in the default setting To use the MP tray press the SETTING key and select Paper Setup Select Tray Copy MP tray and then s...

Page 79: ...ling factor initially set Paper Tray and then set Enlarge Reduce Selecting a Preset Zoom Ratio 1 Press the to enter the Change Settings menu 2 Press the to select Zoom and then press 3 Press the to select the desired value and then press Memo z By selecting Fit to page 98 if the sizes of the document and the paper are the same the document is reduced to fit onto the paper 4 Press the until the sta...

Page 80: ...ess to start scanning the first document 5 When the Please set next document screen is displayed place the next document in the ADF or on the document glass Note z When changing the place to load the next document be sure to remove the document from the place you used first 6 Press the to select Start Scan and then press 7 When all sets of the documents are scanned press the to select Scan Complat...

Page 81: ...e most suitable quality for your needs 1 Press the to enter the Change Settings menu 2 Press the to select Image Settings and then press 3 Press the to select Document Type and then press 4 Press the to select a document type and then press Memo z Text Set when copying a text document z Text Photo Set when copying a document having texts and photos Images are reproduced with a balance between text...

Page 82: ...the desired value and then press Memo z High Speed provides quick copy By selecting Normal or High Quality the reproduction and gray level of fine lines or texts can be improved Note z If you select the scan size of less than or equal to 177 8mm 7 inches wide and make copies from ADF Scan Resolution is changed to High Quality automatically 5 Press the until the start screen is displayed Resetting ...

Page 83: ...cted and press to open the fax start screen 4 Check that Add Destination is selected on the start screen and then press 5 Specify a destination You can specify a destination from the ten key pad the speed dial list the group list the transmission histories the reception histories or the one touch key pad Reference z For details on each procedure refer to Specifying a Destination P 84 6 Configure t...

Page 84: ...ntering z Flash Orders your PBX Private Branch Exchange to connect you with PSTN Public Switched Telephone Network When inputting enter F Enter Pause and by pressing on the ten key pad When you press you toggle between P and z Pause Pauses a few seconds when dialing You can use multiple pauses P is inserted when entering z Hash symbol When the tone dial is set sends through a circuit When inputtin...

Page 85: ...he SHIFT key to select the speed dials no 9 to 16 assigned to the one touch key pad Memo z You can use the one touch key pad also on the screen that is displayed after pressing the FAX HOOK key In this case the fax standby screen appears after pressing a one touch key so that you can configure other advanced settings for fax functions Deleting Specified Destinations 1 Select the specified destinat...

Page 86: ...n appears Adjusting Density Density You can adjust the scan density from 7 levels 1 Press to select Fax Functions on the fax standby screen and then press 2 Press the to select Density and then press 3 Press the or to select a density and then press Memo z 0 is the standard value To darken the document image select 1 2 or 3 most dense Conversely to lighten the document image select 1 2 or 3 least ...

Page 87: ...he to select Delete Reserved Tx and then press 7 Press the or select Yes and then press Note z When you select a broadcast job the job itself is cancelled Memo z The job that is being transmitted is displayed at the top of the list Checking Transmission and Reception History You can check transmission and reception history and results Memo z If a fax is being transmitted you can check the transmis...

Page 88: ...can talk to the sender after receiving faxes Memo z If you often receive calls it is recommended that you activate Tel Priority Mode For more detailed information on Tel Priority Mode please refer to User s Manual Advanced z If connecting to a telephone unit that is far away you can receive faxes by dialing the remote switchover number Please dial the remote switchover number within three seconds ...

Page 89: ... password is aaaaaa 4 Select Enter and then press 5 Press the to select User Install and then press 6 Press the to select DRD Type and then press 7 Press the to select DRD Type and then press 8 Press the until the top screen appears DRD Type The length of ring ON time and ring OFF time Type1 2 sec ON 4 sec OFF repeat Type2 0 8 sec ON 0 4 sec OFF 0 8 sec ON 4 sec OFF repeat Type3 0 4 sec ON 0 2 sec...

Page 90: ... Check that Fax is selected and then press 5 Press the to select a paper tray and then press 6 Press the to select a value and then press When you select ON Prior for a paper tray the tray is used in priority to other trays containing the same size paper The MP tray is set to OFF by factory default 7 Press the until the top screen is displayed When Unable to Print Received Faxes When the machine c...

Page 91: ...er a name up to 24 characters c Select Enter and then press 7 Press the to select Fax Number and then press 8 Enter a phone number Enter a phone number up to 40 digits 9 Select Enter and then press 10 If necessary specify a group number a Press the to select Group No and then press the b Press the to select a group number 1 to 20 The check box is selected You can select multiple entries c When you...

Page 92: ...lect Phone Book and then press 3 Press the to select Group No and then press 4 Press the to select a group number and then press 5 Check that Register is selected and then press When editing registered group numbers select Edit 6 Check that Name is selected and then press 7 Enter a name Enter a name up to 16 characters 8 Select Enter and then press 9 Press the to select Speed Dial and then press t...

Page 93: ...troducing a new machine register the machine in the Configuration Tool 1 Select Start All Programs Toshiba Configuration Tool Configuration Tool 2 Select Register Device from the Tools menu Search results are displayed 3 Select the machine and click on Register 4 On the confirmation screen click on Yes Importing Addresses from a File 1 Select from which device to import from Registered Device Tabl...

Page 94: ...To E mail and Internet Fax P 64 Transmitting Data to Fax Server 1 Press the FAX HOOK key on the operator panel 2 The original can be set by an automatic document feeder or the document glass 3 Select FAX and then press 4 Set the scan options as required Reference z User s Manual Advanced 5 Check that Add Destination is selected and then press 6 Specify the destination fax number You can specify th...

Page 95: ...on history 1 Press the to select Transmission History and then press 2 Press the to select an entry and then press The box is checked You can select multiple entries 3 When you have selected all the destinations press the 4 Check that Complete is selected and then press Using the one touch keys This is the same as the fax function Enter the text in the similar way Deleting the specified destinatio...

Page 96: ... E mail and Internet Fax P 64 Sending an Internet Fax 1 Press the FAX HOOK key on the operator panel 2 Place your document with text face up in the ADF or face down on the document glass 3 Press the to select Internet Fax and then press 4 Configure the Internet fax settings if necessary Reference z For details on the Internet fax settings refer to the User s Manual Advanced 5 Check that Add Destin...

Page 97: ... have selected all the destinations press the 4 Check that Complete is selected and then press 5 Press the to return to the Internet fax start screen Using the Transmission History You can select a destination from transmission histories Note z The sending history only shows those recipients which had their addresses directly entered 1 Press the to select Tx History and then press 2 Press the to s...

Page 98: ...ave selected all the destinations press the 7 Check that Complete is selected and then press 8 Press the to return to the Internet fax start screen For Advanced Search 1 Press the to select LDAP and then press 2 Press the to select Advanced Search and then press 3 Check that Search Method is selected and press 4 Select either OR or AND and press 5 Press select User name and then press 6 Enter the ...

Page 99: ...t the destination you want to change and then press The check box is selected You can select multiple addresses 4 When you have selected all the destinations to be changed press the 5 Check that Edit Destination Type is selected and then press 6 Press the to select the destination type you want from To Cc or Bcc and then press Canceling Transmission While the Scanning screen is displayed you can c...

Page 100: ...k connection in Windows if the equipment IP address is changed please change the settings in Network Configuration For Mac OS X please change settings in network scanner setting tools For details refer to User s Manual Advanced Installation Procedure Memo z When using the network scan function in Windows please install the Network Configuration For Mac OS X the network scanner setting tools will b...

Page 101: ...ow procedure 10 10 If Search MFP is selected select the machine and click Next 11 Set the scanner driver name and click Next 12 Enter the host name IP address and port number and then click Configure 13 Click Next 14 Click Next 15 Click Finish For Mac OS X 1 Make sure that the machine is connected to the PC and the power switch of the machine is turned ON Then load the Software DVD ROM on the driv...

Page 102: ... Continue 6 Check the display and click Continue if OK 7 Read the license agreement and click Continue 8 Click Agree if you agree 9 Click Install To change the installation location of the driver click Change Install Location 10 Enter the administrator name and password and click OK 11 Click Continue Installation 12 Click Restart ...

Page 103: ...key does not work z When ActKey is installed Network Configuration is also installed simultaneously Reference z For details on how to start a scan job refer to the User s Manual Advanced Installing the Software 1 Insert the Software DVD ROM into your computer A window opens 2 Select ActKey from Software 3 Install the software as instructed 4 Click Finish Starting the Software 1 Click Start to sele...

Page 104: ...mo z When you follow the procedure below the WIA is installed automatically as the scanner driver Note z Before starting the installation select Network and Sharing Center from the Control Panel and make sure that Network Search is enabled 1 From the Start menu select Network The devices connected to the network are displayed 2 Right click the TOSHIBA e STUDIO403S icon under Multifunction Devices ...

Page 105: ...on by direct input or from the address book groups e mail histories LDAP or one touch key 7 Press or Specifying a Destination You can specify a destination in the following six ways z Using the address book z Using a group list z Using the e mail history z Direct input z Using LDAP search z Using the one touch key pad Perform any of the following operations at step 6 of Scan to E mail stated above...

Page 106: ... s Manual Advanced For Simple Search 1 Press the to select LDAP and then press 2 Check that Simple Search is selected and press 3 Enter a keyword to search for a user name on the LDAP server 4 Select Enter and then press to start searching 5 When the search results appear press the to select the destination you want and then press The check box is selected You can select multiple entries 6 When yo...

Page 107: ... then press 5 Press the to select a profile and then press 6 Press or Scan to USB Memory You can save the scanned document in a USB memory Reference z For the specifications of USB memory that you can use please refer to Print From USB Memory Specifications P 178 1 Press the SCAN key on the operator panel 2 Place your document with text face up in the ADF or face down on the document glass 3 Inser...

Page 108: ...erence z For details on how to enable the network TWAIN setting refer to the User s Manual Advanced z For details on how to install the ActKey utility refer to the User s Manual Advanced z For the procedure to enable WSD Scan see the User s Manual Applications z For the procedure to install the MFP on the PC see Setup to use the WSD Scan P 104 Connecting via USB 1 Press the SCAN key on the operato...

Page 109: ...s simple scan mode secure scan mode and WSD scan In simple mode the scanning can only be started from all computers via USB and Network In secure scan mode the scanning can only be started from the already registered computers in the machine via USB and Network In WSD Scan the scanning can be started from only the already registered computers in the machine via Network Only a computer can be conne...

Page 110: ...IOxxxS USB or TOSHIBA e STUDIOxxxS Network If you select TOSHIBA e STUDIOxxxS USB proceed to step 10 If you select TOSHIBA e STUDIOxxxS Network and the network scan is the second or more scanning proceed to step 10 7 For the first network scan the dialog box indicating that the tool of connection destination selection is started is displayed and then click OK 8 Select a connection destination in t...

Page 111: ...ect Import from File of Adobe Photoshop CS3 to select TOSHIBA e STUDIOxxxS Network The window appears 14 Click a scan button Scanning starts 15 Select Quit Photoshop from Photoshop Secure Scan Mode For USB Connection For Windows 1 Press the SCAN key on the operator panel 2 Place your document with text face up in the ADF or face down on the document glass 3 Press the to select Remote PC and the pr...

Page 112: ...k a scan button The document scan starts Memo z According to the format scanning by the Document Feeder may fail after the second page For example for Windows FAX and Scan scanning by the Document Feeder with the following combination may fail after the second page Color format Color Grayscale File type BMP PNG Color format Black and white File type BMP PNG JPG Canceling the Current Scan Job Scann...

Page 113: ... press 7 Press the to select E mail Address and then press 8 Enter an e mail address up to 80 characters and then press 9 Press Registering From Transmission History You can add e mail addresses to the address book from e mail transmission histories Note z The sending history only displays recipient addresses to which an e mail was sent by directly entering the recipient s address 1 Press the SCAN...

Page 114: ...he to select E mail Group and then press 4 Press the to select a group number and then press 5 Press the to select Delete and then press 6 Press the or to select Yes on the confirmation screen and then press Register all E mail addresses All contents of the E mail Address Book can be registered by using Configuration Tool For setting up of Configuration Tool see User s Manual Advanced 7 Useful Sof...

Page 115: ...ess or domain name and then press 4 Check that Register is selected and then press If editing registered numbers select Edit 5 Check that Destination is selected and then press 6 Enter a destination A destination up to 16 characters 7 Select Enter and then press 8 Press the to select Destination Address and then press 9 Enter an IP address or a Host PC name An IP address or a name up to 64 charact...

Page 116: ...m an application 2 Configure the print settings on the printer driver screen and start printing The following explains how to configure the paper size the paper source and the media weight on each printer driver you are using For how to set by each printer driver refer to the following instructions For Windows PCL PCL XPS Printer Driver 1 From the File menu of an application select Print 2 Select ...

Page 117: ...enu select Page Setup 2 Select the printer you want to use from Format For 3 Select a paper size from Paper Size and then click OK 4 From the File menu select Print 5 Select Paper Feed from the panel menu Memo z If the print dialog contains only two menus and does not contain the options you expect to see on the Mac OS X 10 5 to 10 7 click the disclosure triangle beside the Printer menu 6 Select a...

Page 118: ... for a paper source the tray with the designated paper type is automatically selected For details on the automatic selection of trays refer to the User s Manual Advanced z If you select the MP tray for a paper source the paper must be loaded in the MP tray For details on how to load paper in the MP tray refer to Loading Paper on the MP Tray e STUDIO403S on P 38 Canceling a Print Job You can cancel...

Page 119: ...characters may not be read correctly z You can select and print one file in your USB memory at a time Starting a Print Job 1 Insert the USB memory into the USB port on the machine Note z Insert the USB memory straight into the USB port If the USB memory is inserted at an angle it may damage the USB port 2 Press the PRINT key on the operator panel to open the print menu 3 Press the to select the Pr...

Page 120: ...implex or 2 sided duplex printouts Note z When printing a PRN file setting of double sided printing follows the driver settings at the time of file creation 1 Press the to select Print Setup and then press 2 Press the to select Duplex and then press 3 Press the to select ON for duplex printing or OFF for simplex printing and then press 4 Press the to return to the start screen Setting the Binding ...

Page 121: ...nd then press 4 Press the to return to the start screen Canceling a Print Job You can cancel a print job from the USB memory by pressing the STOP key on the operator panel Printing will stop while a message is displayed saying that printing is finished 1 Press the STOP key on the operator panel Note z Pages that are ready to be printed on the machine are printed without change OK OK ...

Page 122: ...ame and password to each user in advance You can register up to 100 PINs and 100 sets of user name and password If the access control is enabled according to the setting the user must enter the PIN or the user name and password to log into the machine or to print from a computer Access control can be applied to the following functions z Copying z Faxing z Scanning to e mail z Scanning to USB memor...

Page 123: ...ord is aaaaaa 4 Select Enter and then press 5 Press the to select Management and then press 6 Press to select System Setup and then press 7 Check that Access Control is selected and then press 8 Press the to select PIN and then press 9 Press the until the message of Access Control has been enabled is displayed Operation When PIN Authentication Is Enabled Logging Into the Machine For General Users ...

Page 124: ... Tab check box and then click Change 4 Click OK 5 From the File menu select Close 6 Click Start and select Devices and Printers 7 Right click the TOSHIBA e STUDIO403S icon and select Printer properties TOSHIBA e STUDIO403S Select the type of driver you want 8 Select the Job Accounting tab 9 Enter the user name in User Name and the PIN in Job Account ID 10 Click OK 11 Open the file you want to prin...

Page 125: ... The items here may differ depending on the application you are using 1 Click Start All Programs Toshiba Print Job Accounting Client Change Job Accounting Mode On the User Account Control window click Yes 2 Select the printer driver you want in Driver 3 Select the Tab check box and then click Change 4 Click OK 5 From the File menu select Close 6 Click Start and select Devices and Printers 7 Right ...

Page 126: ... then press 6 Press the to select System Setup and then press 7 Check that Access Control is selected and then press 8 Press the to select User Password and then press 9 Press the to select User Authentication Method and then press 10 Check that Local is selected and then press Reference z When you select LDAP or Secure Protocol the server settings are necessary For details refer to the User s Man...

Page 127: ...rint 2 From the File menu select Print 3 Select the printer driver you want in Select Printer and click Preferences 4 Select the Job Options tab 5 Click User Auth 6 Select the Use User Authentication check box 7 Enter the user name in Username and the password in Password Clicking Use Windows Login automatically enters your login name on Windows 8 Click OK 9 Click OK and then click Print Printing ...

Page 128: ...lect Print 3 Select your machine s fax driver in Select Printer and click Preferences 4 On the Setup tab click User Authentication 5 Select the Use User Authentication check box 6 Enter the user name in Username and the password in Password Clicking Use Windows Login automatically enters your login name on Windows 7 Click OK 8 Click OK and then click Print Reference z For details on how to send a ...

Page 129: ...ote z The image drum the green tube is very delicate Handle it carefully z Do not expose the image drum to direct sunlight or very bright interior light approximately more than 1500 lux Even under the normal interior light do not leave it for more than 5 minutes Error Code 370 371 372 Duplex paper jam 1 Remove any documents from the document tray 2 Open the scanner unit 3 Press the top cover open ...

Page 130: ...inter insert both projections A of the front end of transcription unit into holders of the printer 8 Insert rear projections located close to both handles of the transcription unit into both mounting holes of the printer 9 Secure the transcription unit to the printer by rotating both handles of the transcription unit in the direction of the arrow of Note z Do not touch the sponge roller of the tra...

Page 131: ...ull out the paper If neither the top or bottom end of paper is visible move the jammed paper in the arrow direction as shown Hold the top end of paper with your hands and carefully pull out the paper If the bottom end of paper is visible hold the paper by your hands and carefully pull out the paper Paper discharge unit Paper jammed zIf the bottom end of paper is visible in the printer hold and pul...

Page 132: ...n release the alarm display only after you have opened the top cover first and then closed it again 6 Re install the image drum complete with toner cartridge ensuring that the pegs 1 2 correctly locate into the slots on each side of the printer 3 7 Close the top cover 8 Close the scanner unit Error Code 390 Paper feed jam Multipurpose tray 1 Remove any documents from the document tray 2 Open the s...

Page 133: ...e ensuring that the pegs 1 2 correctly locate into the slots on each side of the printer 3 7 Close the top cover 8 Close the scanner unit Error Code 391 392 Paper feed jam Error Code 391 indicates an error in Tray1 and Error Code 392 indicates a paper jam in Tray2 Memo z The following procedure uses tray 1 as an example 1 Pull out and remove the paper cassette of the indicated tray 2 Remove jammed...

Page 134: ...cuments from the document tray 2 Open the ADF cover 3 Hold the jammed document by the top edge and gently pull it out If the edge of the document can been seen under the paper guide 1 lift the paper guide and then pull out the document If the edge of the document cannot be seen in the ADF lift the document tray 2 and then pull out the document Pull down the document tray 4 Close the ADF cover 1 2 ...

Page 135: ...edy Inspection is required PU Flash Error Blinks Firmware error has occurred Contact your dealer Inspection is required PU Communication Error Blinks Firmware error has occurred Contact your dealer COLOR Toner Low Please see Help for details Lights up The toner cartridge of the indicated color is low Prepare a new toner cartridge If the SETTING key Admin Setup Device Man agement System setup Near ...

Page 136: ...ils to Close Blinks The memory has overflowed If you are performing other tasks simultaneously finish them and try again If this does not work reduce the print resolution 420 Memory Overflow 420 Please see Help for details to Close Blinks The memory has overflowed Reduce the print resolution If this does not work reduce the size of the print data Access Limitation Error Deleted unauthorized user d...

Page 137: ...left 547 K 372 380 381 382 389 390 Paper Jam ERRCODE Please open the scanner unit and the top cover Please see Help for details Blinks Paper jam has occurred Remove the jammed paper Error 372 Misfeed from Duplex Error 380 Paper Feed Error 381 Transport Error 382 Exit Error 389 Printing Page Lost Error 390 MP Tray Error 390 MANUAL 391 392 Paper Jam ERRCODE Please pull out the paper cassette of the ...

Page 138: ...t resolved contact your dealer Please call service Scanner unit failed to detect printer unit Blinks An error has occurred between the scanner and printer units Turn the machine off and then on again If the error is not resolved contact your dealer SIP Firmware Missing Blinks A board failure has been detected Turn the machine off and then on again If the error is not resolved contact your dealer W...

Page 139: ...netFAX E mailPrint FaxToPrint with communication data saving an error has occurred in the TIFF or JPEG data analysis 409 Please open the top cover 409 Faceup Stacker Error Blinks Because the Face Up stacker was operated during printing the printing was stopped and an error was output Error code Message Status key Cause Remedy Offline Mode Lights up The machine is off line and cannot start a copy j...

Page 140: ...error If the error is not resolved reduce the data to be transmitted as PC Fax Offline Mode Lights up The machine is off line and cannot print received fax data Press the PRINT key on the operator panel and then select Online Offline on the print menu screen Memory Overflow has occurred during Fax Tx reservation to Close Blinks A memory overflow occurred during fax memory transmission Error code M...

Page 141: ...r has occurred Check the network configuration cable connection and status and the server status Please check SMTP settings Please see Help for details to close Blinks An error has occurred while connecting to an SMTP server z Check the network configuration cable connection and status and the server status z Check the SMTP settings Please check POP3 settings Please see Help for details to close B...

Page 142: ...work configuration cable connection and status and the server status z Check the server settings z If the username is managed from the domain input Username Domainname on Username settings Server Login failed Please see Help for details to close Blinks Login to file server has failed Check the ID and password for the server Entering directory failed Please see Help for details to close Blinks The ...

Page 143: ...tablish a CIFS connection z Change the name of the shared folder Please remove the connected USB device Unsupported USB device is connected Blinks Indicates that an unsupported USB device has been connected This message will be displayed until the unsupported USB device disconnected Please remove the USB Hub USB Hub is connected Blinks A USB hub has been connected This machine does not support the...

Page 144: ...ob File erasing Lights up Erasing a secret file Erased Data Full Please see Help for details Blinks Secret files to be erased are full Expired Secure Job Please see Help for details to close Lights up The machine deleted an expired secure job Received invalid data Please see Help for details to close Lights up The machine deleted an expired secure Job 500 Please install paper on MP Tray 490 Please...

Page 145: ... Close Lights up Notifies users that jobs have been cancelled because they are not permitted for printing Related to JobAccount Notifies users that jobs have been cancelled because they are not permitted for PC Fax Related to JobAccount USB Memory disconnected Please see Help for details to Close Blinks Indicates that the USB memory has been extracted When a USB memory is extracted all over ScanTo...

Page 146: ...ey on the operator panel to open the status menu 2 Be sure that System Status is selected and then press 3 Press the to select the item you want to check and then press Checking the Device and Job Status You can check the device status such as the residual life of the consumable items and job lists from the STATUS key 1 Press the STATUS key on the operator panel to open the status menu 2 Press the...

Page 147: ... the display screen of the operator panel Error Messages Displayed on the Screen on P 135 or press the HELP key on the operator panel P 135 The interface setting is disabled Check the setting of the interface being used from the operator panel Advanced Something is wrong with the print function Check if you can perform configuration print P 76 The LED indicator in the power switch is blinking at h...

Page 148: ...ngs tab 4 For the network connection select Get installed options automatically under Installable Options and then click Setup For the USB connection select Installed for SD Memory Card under Installable Options 5 Click OK Advanced Cause Remedy Reference Using a crossover cable Use a straight cable The machine is turned on before a cable was connected Connect cables before turning on the machine P...

Page 149: ...rst printer driver is installed even if multiple printer drivers are selected to install Follow the procedure below to install a second and subsequent printer drivers 1 Insert the Software DVD ROM into the computer 2 Click Run setup exe and follow the on screen instructions 3 Select Custom Installation Printer from Driver Installation 4 Click Next 5 Select Local Printer and then click Next 6 On th...

Page 150: ...log may appear Click Yes or Continue to run the installer or utility as an administrator If you click No the installer or utility does not start The Program Capability Assistant dialog appears If the Program Capability Assistant dialog appears after an installation including if you stop an installation before it is completed make sure to click This program installed correctly PS Gamma Adjuster The...

Page 151: ... find a machine If the Don t allow exceptions check box is selected on the General tab of the Windows firewall you cannot search for a machine in a segment that is connected to another router Only machines within the same segment as the machine are the search target When you cannot find a machine specify the IP address of the machine in the Add Printer or Confirm Connections screen Item Symptom Ca...

Page 152: ...r is con nected to the network display the user inter face of the TWAIN driver before using To display the user interface of the TWAIN driver after starting the image capture select Browse Devices from the Devices menu of the image capture Select a driver in TWAIN devices and then check the check box of Use TWAIN software shown in the lower right screen ...

Page 153: ...use is loaded and then select ON or ON Prior Is the loaded paper compatible with duplex printing Duplex copying cannot be done without the proper paper size document type or document weight Load the right paper for duplex printing and configure the paper size document type and document weight correctly P 36 Is the media type of the paper tray set to Plain or Recycled When setting Paper feed to Aut...

Page 154: ... Is Mixed Size set to ON Set Mixed Size to OFF Advanced The size of the copied output is different from the size of the original document Is the proper size paper for the document loaded on the paper tray Load the proper size paper for the document P 36 Is the zoom ratio properly set Set the proper zoom ratio P 79 Is Repeat set to ON Set Repeat to OFF Advanced A part of the document image is missi...

Page 155: ...ate dial line type for your region P 47 Did you load the document correctly Load the document correctly P 42 Did you dial the correct number Dial the correct number Is the recipient s line busy Wait until the line is open and try again Unable to transmit a fax manually Did you put down the handset before pressing Press first and then put down the handset Advanced The machine does not start scannin...

Page 156: ...s the cable connected to the machine Check the cable connections and connect them properly P 50 Is there any damage to the cable Change the cable P 50 Is the network setting proper Correct the network setting P 63 Is an error occurring Follow the instructions displayed on the display screen of the machine P 135 Transmission and reception of e mail not possible Did you connect the Ethernet cable af...

Page 157: ... The paper is moist Use paper stored under proper temperature and humidity conditions P 35 The paper is unsuitable Use supported paper The paper is unsuitable The settings of media type and width are incorrect Press the SETTING key and select Paper Setup the paper tray you are using and then select the proper values for Media Type and Media Weight Or select the thicker values for Media Weight P 40...

Page 158: ...he machine Coated paper is not recommended Toner comes off when it is rubbed The settings of media type and width are incorrect Press the SETTING key and select Paper Setup the paper tray you are using and then select the proper values for Media Type and Media Weight Or select the thicker values for Media Weight P 40 The paper is recycled Press the SETTING key and select Paper Setup the paper tray...

Page 159: ...ng pad P 168 The paper size is bigger than the size of the document when the zoom ratio is set to 100 Use paper of the same size as the document The orientation of the document and paper are different Set the proper orientation of the document The zoom ratio is set improperly Set the zoom ratio properly according to the paper size The printed image is skewed The document is loaded improperly Load ...

Page 160: ...d on the tray 1 and tray 2 Load the paper envelopes or labels whose weight is between 123 and 163 g m2 33 and 43 lb in the MP tray e STUDIO403S or Manual Feeder e STUDIO332S P 38 P 41 Paper does not feed into the machine The setting of Paper Feeding Source on the printer driver is not correctly specified Check the paper tray and select the correct tray in Paper Feeding Source on the printer driver...

Page 161: ...e error code and follow the on screen instructions P 135 The Ethernet or USB cable is unplugged Plug in the Ethernet or USB cable firmly P 51 P 59 Something is wrong with the Ethernet or USB cable Use another Ethernet or USB cable The machine does not support your Ethernet or USB cable z Use a USB 2 0 compatible cable z Use an Ethernet 10BASE T 100BASE TX compatible cable Something may be wrong wi...

Page 162: ...a long time the temperature in the machine inside has become too high The machine is cooling off Wait for a while When the machine gets cooler printing restarts automatically The specified settings such as the time setting have been erased The machine was turned off for a long time or every day The life of the battery may have ended Contact your dealer Memory is insufficient You have launched Mult...

Page 163: ...ommunication z Time communication started z Received number of pages Memo z The communication type is printed for manual reception F code polling F code secure reception or F code bulletin board reception Machine s Status Behavior During a call You can continue talking During transmitting a fax The communication stops When the electricity supply is restored z The machine automatically starts trans...

Page 164: ...touch the periphery of the label Caution High Temperature which may cause burns Keep the toner cartridge out of reach of young children If young children swallow toner powder seek immediate medical attention If toner powder is inhaled gargle with large amounts of water and move the person to the open area for fresh air Seek medical attention if necessary If your skin is exposed to toner wash thoro...

Page 165: ...ts left side with the protrusion on the left side of the image drum Firmly press the grooves on the right side of the toner cartridge against the protrusion of the cartridge guide on the right side of the image drum While holding down the toner cartridge top with your hand to prevent it from rising rotate the blue release lever on the right side in the direction of the arrow of on the toner cartri...

Page 166: ...y may deteriorate after the toner cartridge has been unpacked for a year Replace it with a new one Procedure for Replacement Note z The image drum the green tube is very delicate Handle it carefully z Do not expose the image drum to direct sunlight or very bright interior light approximately more than 1500lux Even under the normal interior light do not leave it for more than 5 minutes z To ensure ...

Page 167: ... of the toner cover Take care as it may stain other parts when removed z The image drum the green cylinder is very delicate Handle it with extreme care z Do not expose the image drum to direct sunlight or bright interior light approximately 1 500 lux or more When leaving it under normal interior light for 5 minutes or more cover it with black paper z Do not leave the image drum for more than 1 hou...

Page 168: ...ce with a soft cloth lightly moistened with water 3 Close the document glass cover Memo z If the document glasses surface and the document holding pad get too dirty wipe them with a soft cloth lightly moistened with neutral detergent and then wipe it again with a soft cloth lightly moistened with water Cleaning Document Feeding Rollers in the ADF If the document feeding rollers in the ADF are cont...

Page 169: ... Wipe the paper feed rollers 1 inside the machine with a soft cloth lightly moistened with water 3 Wipe the paper feed roller 2 on the Tray 4 Push the Tray back into the machine For MP Tray e STUDIO403S only 1 Open the MP tray 2 While pressing the tab 1 of the paper feed roller cover to the right open the cover 3 Wipe the paper feed roller 2 with a soft cloth lightly moistened with water 4 Close t...

Page 170: ...age drum to direct sunlight or very bright interior light approximately more than 1500 lux Even under the normal interior light do not leave it for more than 5 minutes 1 Hold down the power switch for about a second to turn on the power Reference z Turning Off Your Machine P 24 2 Open the scanner unit 3 Press the top cover open button 1 and open the top cover 4 Lightly wipe the lenses 2 of the LED...

Page 171: ...direct sunlight or very bright interior light approximately more than 1500 lux Even under the normal interior light do not leave it for more than 5 minutes 1 Hold down the power switch for about a second to turn on the power Reference z Turning Off Your Machine P 24 2 Unplug all the cables z AC cable and ground wire z Ethernet or USB cable z Telephone cable s 3 Remove any paper from the paper tray...

Page 172: ... with packing materials 10 Lift your machine and put it in a box Note z Use the packing materials attached to your machine when purchased z Remove the vinyl tape to secure the image drum and toner cartridges after transporting or when reinstalling ...

Page 173: ...rage Device SD memory card Resident 4 GB Weight 20 kg including consumables Dimensions 427 W x 425 D x 455 H Power supply 120V model 120VAC 10 50 60Hz 2 230V model 230VAC 10 50 60Hz 2 Power consumption z Typical operation 540 W z Idle 80 W z Peak 950 W z Sleep mode Less than 3 W z Power save mode Less than 14 W z Off mode Less than 0 5 W z Typical operation 610 W z Idle 80 W z Peak 950 W z Sleep m...

Page 174: ...atibility ITU T G3 Super G3 Compression method MH MR MMR JBIG Modem speed Up to 33 6 Kbps Lines PSTN PBX Line Line interface RJ11 x 2 Line TEL Document size ADF A4 letter legal 13 13 5 14 Document glass A4 letter Transmission speed Approx 3 seconds page ITU T no 1 JBIG Normal Stored document memory size 4 MB Storage document capacity Up to 200 pages ITU T no 1 MMR Nor mal Resolution z Normal 8 dot...

Page 175: ... 300 dpi ADF simplex e STUDIO332S e STUDIO403S Communication protocol SMTP POP3 MIME File format PDF supported Encryption M TIFF RAW G3 G4 compressed JPEG JFIF color grayscale only XPS Mail server authentication SMTP AUTH POP3 Supported mail server application Lotus Domino Mail Server 5 0 Microsoft Exchange 2000 Server Microsoft Exchange 2003 Server Microsoft Exchange 2007 Server Red Hat 7 0 Sendm...

Page 176: ...ormat PDF TIFF JPEG BMP PCX GIF TGA PNG WMF EMF e STUDIO332S e STUDIO403S Printing method Dry electrophotographic recording method with LED Light emitting diode Emulation T PCL6 PCLXL PCL5e PCL6 PCLXL PCL5e PostScript 3 Resident fonts PCL 91 European fonts PCL 91 european fonts PS 136 european fonts Resolution 600 x 600 dpi 600 x 1200 dpi 600 x 2400dpi 600 x 600 dpi 1200 x 1200 dpi Color black Pri...

Page 177: ... Automatic feeding from the tray 1 and tray 2 optional Manual feeding from Manual Feeder Automatic feeding from the tray 1 MP tray and tray 2 optional Automatic feeding from MP tray Paper loading capacity z Tray 1 250 sheets of Standard paper 80 g m2 total thickness 25 mm or lower z Manual Feeder 1 sheet z Tray 2 optional 530 sheets of Standard paper 80 g m2 total thickness 53 mm or lower z Tray 1...

Page 178: ...B memory products are guaranteed to work Supported file system FAT12 FAT FAT16 FAT32 File format TIFF TIFF 6 0 Baseline PRN PCL PDF v1 7 Does not support encrypted PDF JPEG TIFF TIFF 6 0 Baseline PRN PS PCL e STUDIO332S e STUDIO403S Interface Ethernet 10BASE T 100BASE TX Protocol TCP IPv4 TCP IPv6 NetBEUI NetBIOS over TCP EtherTalk NetWare LPR Port9100 IPP FTP HTTP TELNET SMTP POP3 SNMPv1 v3 DHCP ...

Page 179: ...ing the drivers you want to set check Displays the Property screen For Windows Vista Windows Server 2008 1 Click Start and select Control Panel Printer 2 Right click on the TOSHIBA e STUDIO403S icon and select Properties For Windows XP Windows Server 2003 1 Click Start and select Printers and Faxes 2 Right click on the TOSHIBA e STUDIO403S icon and select Properties Displays the printer setting sc...

Page 180: ...Dial Functions 84 Dial Type 47 Digital Television 46 Direction 79 Document Glass 42 Document Jam 134 Document Type 81 DRD 49 89 Duplex Copies 80 Duplex Printing 36 40 120 Duplex Scanning 42 E E mail History 105 Entering Text 31 Envelope 34 Error Code 129 135 Error Messages 135 F Face Down Skater 41 Face Up Skater 41 Fax Ready Mode 49 FAX HOOK Key 29 83 96 Fit 120 Flash 84 Function Keys 30 G Group ...

Page 181: ... Key 29 82 123 126 Resolution Fax 86 S SCAN Key 29 105 107 108 110 Scan Resolution 82 Scan Size 42 78 86 Scan to E mail 105 Scan to Fax Server 94 Scan to Local PC 108 Scan to Network PC 107 Scan to Remote PC 109 Scan to USB Memory 107 Scannable Size 42 Scanning 105 Second Tray Unit Tray2 26 171 Secure Scan Mode 110 Sender Name 48 86 Server Set Up 63 SETTING Key 29 Setting Paper Size 40 Simple Scan...

Page 182: ...DP 3321S 4030S OME12009800 ...

Page 183: ...2 17 2 HIGASHIGOTANDA SHINAGAWA KU TOKYO 141 8664 JAPAN R120120L1500 TTEC 2012 03 MULTIFUNCTIONAL DIGITAL SYSTEMS User s Manual Basic 2012 TOSHIBA TEC CORPORATION All rights reserved ...

Reviews: